L61470WDBI USER MANUAL EN User Manual Washer Dryer
www.aeg.com CONTENTS 1. SAFETY INFORMATION............................................................................................. 3 2. SAFETY INSTRUCTIONS.............................................................................................5 3. PRODUCT DESCRIPTION...........................................................................................7 4. CONTROL PANEL....................................................................................................... 8 5. PROGRAMMES ..
ENGLISH 1. 3 SAFETY INFORMATION Before the installation and use of the appliance, carefully read the supplied instructions. The manufacturer is not responsible if an incorrect installation and use causes injuries and damages. Always keep the instructions with the appliance for future reference. 1.1 Children and vulnerable people safety WARNING! Risk of suffocation, injury or permanent disability.
www.aeg.com • • • • • • • • • • • • • side, where the appliance door can not be fully opened. Connect the mains plug to the mains socket only at the end of the installation. Make sure that there is access to the mains plug after the installation. The ventilation openings in the base (if applicable) must not be obstructed by a carpet. Ensure you have good ventilation in the installation room to avoid the back flow of gases into the room from appliances burning other fuels, including open fires.
ENGLISH • • • • • • • 5 or pillows fitted with foam rubber pads should not be dried in the wash dryer. Fabric softeners, or similar products, should be used as specified by the fabric softener instructions. Remove all objects from pockets such as lighters and matches. Never stop the wash dryer before the end of the drying cycle unless all items are quickly removed and spread out so that the heat is dissipated.
www.aeg.com • Do not touch the mains cable or the mains plug with wet hands. • Only for UK and Ireland: The appliance has a 13 amp mains plug. If it is necessary to change the fuse in the mains plug, use a 13 amp ASTA (BS 1362) fuse. • This appliance complies with the E.E.C. Directives. 2.3 Water Connection • Make sure not to cause damage to the water hoses. • Before you connect the appliance to new pipes or pipes not used for a long time, let the water flow until it is clean.
ENGLISH 7 3. PRODUCT DESCRIPTION 3.1 Appliance overview 1 2 7 8 9 3 4 5 6 1 2 3 4 5 6 10 Detergent dispenser Control panel Door handle Rating plate Drain pump filter Feet for the appliance level 7 8 9 10 Water drain hose Mains cable Water inlet hose Feet for the appliance level 3.2 Accessories 1 4 2 3 3.3 How to activate the child safety device This device prevents children or pets to be closed in the drum. Turn the device clockwise, until the groove is horizontal.
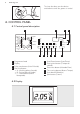
www.aeg.com To close the door, turn the device anticlockwise until the groove is vertical. 4. CONTROL PANEL 4.1 Control panel description 1 Algodón Eco Refrescar Secado Algodón Sintéticos Centrifugado Descarga Aclarado delicados Lana/ Frio Seda 30 Delicados Off 40 30 95 + Prelavado 60 40 60 Sintéticos 50 40 40 30 1400 1200 800 400 4 Lavado Secado Puerta bloqueada Centrif.
ENGLISH 9 The display shows the following information: Duration of the set programme When you set a programme, the display shows the duration in hours and minutes (for example 2.05). The duration is calculated automatically on the maximum load for each type of fabric. After the programme has started, the time remaining is updated every minute. Set drying time When you set a drying programme, the display shows the drying time in minutes and/or hours (see paragraph «Programmes for timed drying »).
www.aeg.com 4.3 Phase indicators After you have pressed the button Start/ Pausa, the Lavado indicator comes on. The appliance is operating. When you set a drying programme, the Secado indicator illuminates and stays on during the drying phase. The Puerta bloqueada indicator indicates when the door can be opened: • light on: the door cannot be opened. • light blinking: the door is opening in some minutes. • light off: the door can be opened. A B C 5. PROGRAMMES 5.
ENGLISH 11 Programme Temperature range Maximum load Programme description Maximum spin (Type of load and soil level) speed Centrifugado 7 kg 1400 rpm To spin the laundry and to drain the water in the drum. All fabrics. Secado sintéticos 2 kg Drying programme for synthetic items. Secado algodón 4 kg Drying programme for cotton items. Refrescar 3 kg 1200 rpm A very short cycle for cottons and synthetics items with light soil level or worn only once.
www.aeg.com Programme Algodón Eco Man- Centrif. ■ Ahorra chas 1) Tiempo 2) ■ ■ ■3) Aclarado Extra Inicio Diferido ■ ■ 1) The Stain option is not available with a temperature lower then 40°C. 2) If you set a shorter duration, we recommend that you decrease the quantity of the load. It is possible to load fully the appliance, however the washing results are reduced. 3) With these programmes you can set only the shorter duration. 5.
ENGLISH Programmes Load (kg) Cottons 60 °C 7 1.35 67 150 Algodón Eco Cotton Energy Saving Pro- 7 1.05 49 180 Cottons 40 °C 7 0.85 67 140 Synthetics 40 °C 3 0.55 42 90 Delicates 40 °C 3 0.55 63 65 Wool/Handwash 30 °C 2 0.
www.aeg.com 7.5 Inicio Diferido With this option you can delay the start of a programme from 30 minutes to 20 hours. The display shows the related indicator and delay time. 8. SETTINGS 8.1 Acoustic signals 8.2 Child Lock The acoustic signals operate when: With this option you can prevent that the children play with the control panel. • You activate the appliance. • You deactivate the appliance. • You press the buttons. • The programme is completed. • The appliance has a malfunction.
ENGLISH CAUTION! Make sure that no laundry stays between the seal and the door. There is a risk of water leakage or damage to the laundry. 10.2 Filling the detergent and additives 15 If you turn the programme dial to another programme when the appliance is working, the yellow indicator of button Start/Pausa blinks 3 times. The display shows the message Err to indicate a wrong selection. The appliance does not perform the new set programme. 10.
www.aeg.com The door will be locked throughout the delay time. If you wish to add laundry in the appliance during the delay time, press the button Start/Pausa to set the appliance to pause. When the indicator Puerta bloqueada goes off , the door can be opened. Add the laundry, close the door and press button Start/Pausa again. Setting the delayed start. • Set the programme and the required options. • Set the delay start. • Press button Start/Pausa: the appliance starts its hourly countdown.
ENGLISH go off. A blinking display. will appear on the If you have set a programme or an option that ends with water in the tub, the indicator Puerta bloqueada remains on. The door is locked. The water must be emptied out before opening the door. During this time the drum continues to turn at regular intervals until water drain. Follow the below instructions to empty out the water: • Turn the programme selector dial to Off. • Set the DRAIN or SPIN programme. • Reduce the spin speed, if needed.
www.aeg.com 11.3 End of the drying programme When the door locked indicator goes off, you can open the door. The appliance stops automatically. 1. Turn the programme knob to Off position to deactivate the appliance. After some minutes from the end of the programme, the energy saving function automatically deactivates the appliance. 2. Remove the laundry from the appliance. Make sure that the drum is empty. 3. Keep the door ajar, to prevent mildew and odours. 4. Close the water tap.
ENGLISH 12.4 Fluff in the fabrics During the washing and/or drying phase, some types of fabric, (sponge, sweatshirt) could release fluff. The released fluff could stick to the fabrics during the next cycle. This inconvenient increases with technical fabrics. 19 • To do not wash dark fabrics after you washed and dried light coloured fabrics (new sponge, sweatshirt ) and the contrary. • To dry this type of fabrics at open air when they are washed the first time. • To clean the drain filter.
www.aeg.com 13.4 Ecological hints • Set a programme without the prewash phase to wash laundry with normal soil. • Always start a washing programme with the maximum load of laundry. • If necessary, use a stain remover when you set a programme with a low temperature. • To use the correct quantity of the detergent, check the water hardness of your domestic system 13.5 Water hardness If the water hardness in your area is high or moderate, we recommend that you use a water softener for washing machines.
ENGLISH 21 14. CARE AND CLEANING 14.3 Maintenance wash WARNING! Refer to Safety chapters. With the low temperature programmes it is possible that some detergent stays in the drum. Make regularly a maintenance wash. To do this: 14.1 External cleaning Clean the appliance only with soap and warm water. Fully dry all the surfaces. • Remove the laundry from the drum. • Set the cotton programme with the highest temperature with a small quantity of detergent.
www.aeg.com 3. 4. MAX 14.6 Cleaning the drain filter The pump should be inspected regularly and particularly if: • The appliance does not empty and/or spin. • The appliance makes an unusual noise during draining due to objects such as safety pins, coins etc. blocking the pump. • A problem with water draining is detected (see chapter “Troubleshooting” for more details). WARNING! Before unscrewing the pump cover, switch the appliance off and remove the mains plug from the socket.
ENGLISH 23 4. Release the emergency emptying hose, place it in the container and remove its cap cover. 5. When no more water comes out, unscrew the filter cover by turning it anti-clockwise and remove the filter. Use pliers, if necessary. Always keep a rag nearby to dry up any water spillages when removing the cover. Clean the filter under a tap, to remove any traces of fluff. 1 2 6. Remove foreign bodies and fluff from the filter seat and from the filter impeller. 7.
www.aeg.com 14.7 Cleaning the inlet hose and the valve filter 1. 2. 1 2 3 3. 4. 45° 20° 14.8 Frost precautions If the appliance is installed in an area where the temperature can be less than 0° C, remove the remaining water from the inlet hose and the drain pump. 1. Disconnect the mains plug from the mains socket. 2. Close the water tap. 3. Place the end of the emergency emptying hose and that of the inlet hose in a bowl placed on the floor and let water flow out of the hoses. 4.
ENGLISH First try to find a solution to the problem (refer to the table). If not, contact the Authorised Service Centre. With some problems, the acoustic signals operate and the display shows an alarm code: • - The appliance does not fill with water properly. • - The appliance does not drain the water. • - The appliance door is open or not closed correctly. Please check the door! 25 • - The mains supply is unstable. Wait until the mains supply is stable.
www.aeg.com Problem Possible solution The spin phase does not operate or the washing cycle lasts longer than usually. • Set the spin programme. • Make sure that the drain filter is not clogged. Clean the filter, if necessary. Refer to 'Care and cleaning'. • Adjust manually the items in the tub and start the spin phase again. This problem may be caused by balance problems. There is water on the floor. • Make sure that the couplings of the water hoses are tight and there is not water leakages.
ENGLISH 27 Problem Possible solution The laundry is full of different coloured fluff: The fabrics washed in the previous cycle released fluff of a different colour. • Clean the clothes with a fluff remover • The drying phase helps to eliminate some fluff. In case of an excessive amount of fluff in the drum, refer to section «FLUFF IN THE FABRICS». • Thoroughly clean the empty drum, the gasket and the door with a wet rag. • Perform a rinse cycle. • Put a wool or piled fabric rag inside the drum.
www.aeg.com Remove the cardboard top. Remove the polystyrene packaging materials. Remove the internal film. Open the door. Remove the polystyrene piece from the door seal and all the items from the drum. Put one of the polystyrene packaging elements on the floor behind the appliance. Carefully put down the appliance with the rear side on it. Make sure not to damage the hoses.
ENGLISH 29 Remove the polystyrene protection from the bottom. Pull up the appliance in vertical position. 1 2 Remove the polystyrene block fitted on the door seal (if present). Pull out all items from the drum. Remove the power supply cable and the drain hose from the hose holders. Remove the three bolts. Use the key supplied with the appliance. Pull out the plastic spacers.
www.aeg.com Put the plastic caps in the holes. You can find these caps in the user manual bag. We recommend that you keep the packaging and the transit bolts for any movements of the appliance. 16.2 Positioning and levelling • Install the appliance on a flat hard floor. • Make sure that air circulation around the appliance is not impeded by carpets, rugs etc. • Level the appliance by raising or lowering the feet.
ENGLISH 31 16.3 The inlet hose • Connect the hose to the back appliance. Turn the inlet hose only left or right. • Loose the ring nut to set it in the correct position. 45 20 O O • Connect the water inlet hose to the cold water tap with 3/4 thread. CAUTION! Make sure that there are no leaks from the couplings. Do not use an extension hose if the inlet hose is too short. Contact the service centre for the replacement of the inlet hose.
www.aeg.com On the edge of a sink • Make sure that the plastic guide cannot move when the appliance drains. Attach the guide to the water tap or the wall. To a stand pipe with vent-hole • Directly into a drain pipe at a height of not less than 60 cm (23.6”) and not more than 100 cm (39.3”). Refer to the illustration. • The end of the drain hose must always be ventilated , i.e. the inner diameter of the drain pipe (min. 38 mm - min. 1.5”) must be larger than the external diameter of the drain hose.
ENGLISH 33 To a wall-pipe • Directly to a built-in drain pipe in the room wall and tighten it with a clip. You can extend the drain hose to maximum 400 cm. Contact the service centre for the other drain hose and the extension. 16.4 Water-stop device The inlet hose has a water stop device. This device prevents water leaks in the hose because of its natural ageing. The red sector in the window «A» shows this fault. If this occur, close the water tap and contact the service centre to replace the hose.
www.aeg.com 16.6 Preparation and assembly of the door The appliance is originally pre-arranged for the assembly of a door opening from right to left. 16-22 mm X Ø 35 mm 416 mm Door The dimensions of the door should be: • width 595 - 598 mm • thickness 16-22 mm • the height X depends on the height of the adjacent furniture's base. 22±1,5 mm 14 mm 595-598 mm 1 2 Hinges To mount the hinges it is necessary to drill two holes (dia. 35 mm, depth12.
ENGLISH 35 Counter-magnet A WARNING! Do not remove the screw B. B The appliance is prearranged for a magnetic closure of the door. To enable a correct operation of this device, it is necessary to screw the counter-magnet A (steel disk + rubber ring) in-to the inner side of the door. Its position must correspond to the magnet B on the appliance. C WARNING! Do not remove the screw B.
www.aeg.com 18. ENVIRONMENTAL CONCERNS Recycle the materials with the symbol . Put the packaging in applicable containers to recycle it. Help protect the environment and human health and to recycle waste of electrical and electronic appliances. Do not dispose appliances * marked with the symbol with the household waste. Return the product to your local recycling facility or contact your municipal office.
ENGLISH 37
www.aeg.
ENGLISH 39
132907022-A-512016 www.aeg.