L61470WDBI USER MANUAL EN User Manual Washer Dryer
www.aeg.com CONTENTS 1. SAFETY INFORMATION............................................................................................. 3 2. SAFETY INSTRUCTIONS.............................................................................................5 3. PRODUCT DESCRIPTION...........................................................................................7 4. CONTROL PANEL....................................................................................................... 8 5. PROGRAMMES ..
ENGLISH 1. 3 SAFETY INFORMATION Before the installation and use of the appliance, carefully read the supplied instructions. The manufacturer is not responsible for any injuries or damages that are the result of incorrect installation or usage. Always keep the instructions in a safe and accessible location for future reference. 1.1 Children and vulnerable people safety WARNING! Risk of suffocation, injury or permanent disability.
www.aeg.com • • • • • • • • • • • • Do not install the appliance behind a lockable door, a sliding door or a door with a hinge on the opposite side, that would prevent the appliance door from being fully opened. Connect the mains plug to the mains socket only at the end of the installation process. Make sure that the mains plug is accessible after installation. The ventilation opening in the base (if applicable) must not be covered by a carpet, mat, or any floor covering.
ENGLISH • • • • • • • • • • 5 Do not use the appliance if items have been soiled with industrial chemicals. Do not dry unwashed items in the wash dryer. Items such as foam rubber (latex foam), shower caps, waterproof textiles, and rubber backed articles and clothes, or pillows fitted with foam rubber pads should not be dried in the washer dryer. Fabric softeners, or similar products, should only be used as specified by the product manufacturer’s instructions.
www.aeg.com • Do not install or use a damaged appliance. • Do not install the appliance where the appliance door cannot be fully opened. • Adjust the feet to have the necessary space between the appliance and the flooring. • When the appliance is in its permanent position, check that it is fully level with the aid of a spirit level. If it is not, adjust the feet accordingly. 2.2 Electrical Connection WARNING! Risk of fire and electrical shock. • The appliance must be earthed.
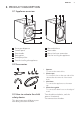
ENGLISH 7 3. PRODUCT DESCRIPTION 3.1 Appliance overview 1 2 7 8 9 3 4 5 6 1 2 3 4 5 6 10 Detergent dispenser Control panel Door handle Rating plate Drain pump filter Feet for levelling the appliance 7 8 9 10 Water drain hose Mains cable Water inlet hose connection Feet for levelling the appliance 3.2 Accessories 1 4 2 3 3.3 How to activate the child safety device This device prevents children or pets from being closed in the drum. 1 Spanner To remove the transit bolts.
www.aeg.com To limit vibration we recommend placing a waterproof wooden panel, at least 15 mm thick, under the appliance. It should be screwed to at least 2 floor beams and should extend beyond the front feet. If possible, install the appliance where the floor is more stable. To close the door, turn the device anticlockwise until the groove is vertical. 3.4 Installation on suspended flooring Suspended wooden floors are particularly susceptible to vibration. 4. CONTROL PANEL 4.
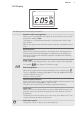
ENGLISH 9 4.2 Display The display shows the following information: Duration of the set programme When you set a programme, the display shows the duration in hours and minutes (for example 2.05). The duration is calculated automatically on the maximum load for each type of fabric. After the programme has started, the time remaining is updated every minute.
www.aeg.com Child safety lock This symbol comes on when you activate the child lock function. 4.3 Phase indicators A B C After you have pressed the button Start/Pause, the Washing (A) indicator comes on. The appliance is operating. When you set a drying programme, the Drying (B) indicator illuminates and stays on during the drying phase. The Door (C) indicator indicates when the door can be opened: • light on: the door cannot be opened. • light blinking: the door is opening in some minutes.
ENGLISH Programme Temperature range Wool/Silk 30°C - Cold Delicate Rinse Cold Maximum load Maximum spin speed Programme description (Type of load and soil level) 2 kg 1200 rpm Machine washable wool, hand washable wool and delicate fabrics with «hand washing» care symbol.2) 3 kg 1200 rpm To rinse and spin the laundry. All fabrics, except woollens and very delicate fabrics. Reduce the spin speed accordingly to the type of laundry. 7 kg To drain the water in the drum. All fabrics.
www.aeg.com Programme Stains 1) Spin Delicates ■ ■ Wool/Silk ■ ■ Delicate Rinse ■ ■ ■ Time Save 2) Extra rinse Delay Start ■ ■ ■ ■ ■ ■ Drain Spin ■ ■ Refresh ■ ■ Economy ■ ■ ■ ■3) ■ ■ 1) The Stain option is not available with a temperature lower than 40 °C. 2) If you set the shortest duration, we recommend that you decrease the load size. It is possible to fully load the appliance, however the washing results can be less satisfactory.
ENGLISH 13 6. CONSUMPTION VALUES The data in this table are approximate. Different variables can affect the data: the quantity and type of laundry, the water and ambient temperature. Programmes Load (kg) Energy Water conApproximate proconsump- sumption (li- gramme duration tion (kWh) tre) (minutes) Cottons 60°C 7 1.35 67 150 Economy Cotton Energy Saving Pro- 7 1.05 57 219 Cottons 40°C 7 0.85 67 140 Synthetics 40°C 3 0.55 42 90 Delicates 40°C 3 0.
www.aeg.com • Press this button two times to set 'Extra Quick' for slightly soiled items only. Some programmes accept only one of the two options. 7.4 Extra rinse With this option you can add some rinses to some washing programmes, refer to "Programme chart". The related indicator comes on. 7.5 Delay Start With this option you can delay the start of a programme from 30 minutes to 20 hours. The display shows the related indicator and delay time.
ENGLISH 15 The programme dial determines the type of washing cycle (e.g. water level, drum movement, number of rinses) and the washing temperature according to the type of laundry. The indicator of Start/Pause button starts flashing. The programme dial can be turned either clockwise or anticlockwise. Off = Reset programme/switching OFF of the appliance CAUTION! Make sure that no laundry becomes trapped between the seal and the door. There is a risk of water leakage or damage to the laundry. 10.
www.aeg.com from 30 min. - 60 min. - 90 min., 2 hours and then by 1 hour up to a maximum of 20 hours. The set delay time value appears on the display for about 3 seconds, then the duration of the programme appears again. You can modify or cancel the delay time at any moment, before you press button Start/Pause. The door will be locked throughout the delay time. If you wish to add laundry in the appliance during the delay time, press the button Start/Pause to set the appliance to pause.
ENGLISH again. Press button Start/Pause to start the programme again. 10.10 At the end of the programme The appliance stops automatically. The indicator of button Start/Pause, the indicators Washing and Door go off. A blinking will appear on the display. If you have set a programme or an option that ends with water in the tub, the indicator Door remains on. The door is locked. The water must be emptied out before opening the door.
www.aeg.com 11.3 End of the drying programme When the door locked indicator goes off, you can open the door. The appliance stops automatically. 1. Turn the programme knob to Off position to deactivate the appliance. After some minutes from the end of the programme, the energy saving function automatically deactivates the appliance. 2. Remove the laundry from the appliance. Make sure that the drum is empty. 3. Keep the door ajar, to prevent mildew and odours. 4. Close the water tap.
ENGLISH 12.4 Fluff in the fabrics During the washing and/or drying phase, some types of fabric, (sponge, sweatshirt) could release fluff. The released fluff could stick to the fabrics during the next cycle. This inconvenient increases with technical fabrics. 19 • To do not wash dark fabrics after you washed and dried light coloured fabrics (new sponge, sweatshirt ) and the contrary. • To dry this type of fabrics at open air when they are washed the first time. • To clean the drain filter.
www.aeg.com 13.4 Ecological hints • Set a programme without the prewash phase to wash laundry with normal soil. • Always start a washing programme with the maximum load of laundry allowed. • If necessary, use a stain remover when you set a programme with a low temperature. • To use the correct quantity of detergent, check the water hardness of your domestic system. Refer to "Water hardness". 13.
ENGLISH 21 14. CARE AND CLEANING 14.3 Maintenance wash WARNING! Refer to Safety chapters. With the low temperature programmes it is possible that some detergent stays in the drum. Perform a maintenance wash regularly. To do this: 14.1 External cleaning Clean the appliance with soap and warm water only. Fully dry all the surfaces. • Remove all laundry from the drum. • Select the cotton programme with the highest temperature with a small quantity of detergent.
www.aeg.com 3. 4. MAX 14.6 Cleaning the drain filter The pump should be inspected regularly and particularly if: • The appliance does not empty and/or spin. • The appliance makes an unusual noise during draining due to objects such as safety pins, coins etc. blocking the pump. • A problem with water draining is detected (see chapter “Troubleshooting” for more details). WARNING! Before unscrewing the pump cover, switch the appliance off and remove the mains plug from the socket.
ENGLISH 23 4. Release the emergency emptying hose, place it in the container and remove its cap cover. 5. When no more water comes out, unscrew the filter cover by turning it anti-clockwise and remove the filter. Use pliers, if necessary. Always keep a rag nearby to dry up any water spillages when removing the cover. Clean the filter under a tap, to remove any traces of fluff. 1 2 6. Remove foreign bodies and fluff from the filter seat and from the filter impeller. 7.
www.aeg.com 14.7 Cleaning the inlet hose and the valve filter 1. 2. 1 2 3 3. 4. 45° 20° 14.8 Frost precautions If the appliance is installed in an area where the temperature can be less than 0° C, remove the remaining water from the inlet hose and the drain pump. 1. Disconnect the mains plug from the mains socket. 2. Close the water tap. 3. Place the end of the emergency emptying hose and that of the inlet hose in a bowl placed on the floor and let water flow out of the hoses. 4.
ENGLISH First try to find a solution to the problem (refer to the table). If the problem persists, contact the Authorised Service Centre. With some problems, the acoustic signals operate and the display shows an alarm code: • - The appliance does not fill with water properly. • - The appliance does not drain the water. • - The appliance door is open or not closed correctly. Please check the door! 25 • - The mains supply is unstable. Wait until the mains supply is stable.
www.aeg.com Problem Possible solution There is water on the floor. • Make sure that the couplings of the water hoses are tight and there is not water leakages. • Make sure that the drain hose have no damages. • Make sure you use the correct detergent and the correct quantity of it. • Make sure you have replaced the emergency emptying cap into the filter • Make sure you have properly screwed the filter in after cleaning. You cannot open the appliance door.
ENGLISH After the check, activate the appliance. The programme continues from the point of interruption. If the problem occurs again, contact the Authorised Service Centre. 27 If the display shows other alarm codes. Deactivate and activate the appliance. If the problem continues, contact the Service. 16. INSTALLATION 16.1 Unpacking WARNING! Remove all the packaging and the transit bolts before installing the appliance. Use the gloves. Remove the external film. If necessary, use a cutter.
www.aeg.com Open the door. Remove the polystyrene piece from the door seal and all the items from the drum. Put one of the polystyrene packaging elements on the floor behind the appliance. Carefully put down the appliance with the rear side on it. Make sure not to damage the hoses. Remove the polystyrene protection from the bottom. Pull up the appliance in vertical position. 1 2 Remove the polystyrene block fitted on the door seal (if present). Pull out all items from the drum.
ENGLISH 29 Remove the power supply cable and the drain hose from the hose holders. Remove the three bolts. Use the key supplied with the appliance. Pull out the plastic spacers. Put the plastic caps in the holes. You can find these caps in the user manual bag. We recommend that you keep the packaging and the transit bolts for any movements of the appliance. 16.2 Positioning and levelling • Install the appliance on a flat hard floor.
www.aeg.com • The feet may be tight to adjust as they incorporate a self locking nut, but the appliance MUST be level and stable. If necessary, check the setting with a spirit level. Any necessary adjustment can be made with a spanner. Accurate levelling prevents vibration, noise and displacement of the appliance during operation. • After having levelled the appliance, tighten the lock nuts.
ENGLISH 31 Do not use an extension hose if the inlet hose is too short. Contact the service centre for the replacement of the inlet hose. Water drainage There are different procedures to connect the drain hose: With the plastic hose guide. • Make a U shape with the drain hose. On the edge of a sink • Make sure that the plastic guide cannot move when the appliance drains. Attach the guide to the water tap or the wall.
www.aeg.com Without the plastic hose guide. To a sink spigot • Refer to the illustration. Put the drain hose in the spigot and tighten it with a clip. • Make sure that the drain hose makes a loop to prevent particles going into the appliance from the sink. To a wall-pipe • Directly to a built-in drain pipe in the room wall and tighten it with a clip. You can extend the drain hose to maximum 400 cm. Contact the service centre for the other drain hose and the extension. 16.
ENGLISH 33 Remove the screws of the top cover on the rear of the appliance and install the antitilting device as shown in the drawing. Adjust the anti-tilting device so that the distance from the counter is 10mm. Loosen the nut counterclockwise with a 3mm wrench. Adjust the height and turn the nut clockwise to fix it. ~10mm 16.5 Preparation and assembly of the door The appliance is originally pre set for the assembly of a door opening from right to left.
www.aeg.com 1 Hinges To mount the hinges it is necessary to drill two holes (dia. 35 mm, depth12.5-14 mm depending on the depth of door furniture) on the inner side of the door. The distance between the hole fixing centres must be 416 mm. The distance from upper edge of the door to the centre of the hole depends on the adjacent furniture's dimensions. The hinges will be fixed to the door by means of screws for wood 1 and 2 supplied with the appliance.
ENGLISH 35 17.
132937901-B-372017 www.aeg.