LAVAMAT 61470 WDBI (1 8VHU PDQXDO
www.aeg.com CONTENTS 1. 2. 3. 4. 5. 6. 7. 8. 9. 10. 11. 13. 14. 15. 16. SAFETY INFORMATION . . . . . . . . . . . . . . . . . . . . . . . . . . . . . . . . . . . . . . . . . . . . . . . . . . . . . . 3 SAFETY INSTRUCTIONS . . . . . . . . . . . . . . . . . . . . . . . . . . . . . . . . . . . . . . . . . . . . . . . . . . . . . . 4 TECHNICAL INFORMATION . . . . . . . . . . . . . . . . . . . . . . . . . . . . . . . . . . . . . . . . . . . . . . . . . . 6 PRODUCT DESCRIPTION . . . . . . . . . . . . . . . .
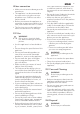
(1*/,6+ 3 1. SAFETY INFORMATION Before the installation and use of the appliance, carefully read the supplied instructions. The manufacturer is not responsible if an incorrect installation and use causes injuries and damages. Always keep the instructions with the appliance for future reference. 1.1 Children and vulnerable people safety WARNING! Risk of suffocation, injury or permanent disability.
www.aeg.com • If the supply cord is damaged, it must be replaced by the manufacturer, its service agent or similarly qualified persons in order to avoid a hazard. • The operating water pressure (minimum and maximum) must be between 0,5 bar (0,05 MPa) and 8 bar (0,8 MPa) • The ventilation openings in the base (if applicable) must not be obstructed by a carpet. • The appliance is to be connected to the water mains using the new supplied hose-sets. Old hose sets must not be reused. 2.
(1*/,6+ Water connection • Make sure not to cause damage to the water hoses. • The appliance is to be connected to the water mains using the new supplied hose-sets. Old hose sets must not be reused. • Before you connect the appliance to new pipes or pipes not used for a long time, let the water flow until it is clean. • The first time you use the appliance, make sure that there is no leakage. 2.2 Use WARNING! Risk of injury, electrical shock, fire, burns or damage to the appliance.
www.aeg.com • Disconnect the appliance from the mains supply. • Cut off the mains cable and discard it. • Remove the door catch to prevent children and pets to get closed in the appliance. 3.
(1*/,6+ 7 4. PRODUCT DESCRIPTION 1 2 7 8 9 3 4 5 6 1 Detergent dispenser 10 children or pets to be closed in the drum. To activate the device, turn it clockwise, until the groove is horizontal. To deactivate the device, turn it counterclockwise, until the groove is vertical. 2 Control panel 3 Door handle 4 Rating plate 5 Drain pump 6 Feet for the appliance level 7 Water drain hose 8 Mains cable 9 Water inlet hose 10 Feet for the appliance level 4.
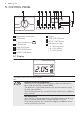
www.aeg.com 5. CONTROL PANEL 1 2 3 4 5 6 7 8 9 10 A B C 1 Programme selector dial 7 Display 2 SPIN button 8 START/PAUSE button • Rinse hold position 3 STAIN button 4 TIME SAVE button 5 EXTRA RINSE button 6 DRYING TIME button 9 DELAY START button 10 Indicator pilot lights: • A – Washing phase • B – Drying phase • C – Door locked 5.
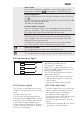
(1*/,6+ 9 Alarm codes In the event of operating problems, some alarm codes can be (see chapter «Troubleshooting»). displayed, for example End of programme When the programme has finished, the display shows a blinking zero . The DOOR light C, the WASHING light A (or the DRYING light B) and the light of button 8 go out. The door can be opened. Incorrect option selection If you set an option which is not compatible with the wash programme, the display shows the message Err for some seconds.
www.aeg.com • after pressing button 8: it will be impossible to change any other programme or option. To enable or disable this option press simultaneously for about 6 seconds but- comes tons 4 and 5 until the symbol on or disappears from the display. 6. WASHING PROGRAMMES Programme Maximum and Minimum Temperature Type of Laundry Maximum Load Cycle Description Cottons 95° - 30° Max. load 7 kg - Reduced load 3 kg White and coloured cotton Normally soiled items.
(1*/,6+ Programme Maximum and Minimum Temperature Type of Laundry Maximum Load Delicates 40° - 30° Max. load kg 3 - Reduced load kg 2 Delicate fabrics: acrylics, viscose, polyester. Wool/Silk 30° - Cold Max. load 2 kg Machine washable wool as well as for hand washable woollens and delicate fabrics. Note: A single or bulky item may cause imbalance. If the appliance doesn’t perform the final spin phase, add more items, redistribute the load manually and then select the spinning programme.
www.aeg.com Programme Maximum and Minimum Temperature Type of Laundry Maximum Load Cotton Economy 60° Max. load 7 kg White and fast coloured cotton. Slightly or normally soiled cotton items. The appliance decreases the temperature and extends the washing time to obtain a good washing efficiency so saving energy. Cycle Description Main wash Rinses Long spin Spin at the maximum speed Options SPIN REDUCTION RINSE HOLD STAIN EXTRA RINSE For cancelling the running programme or to switch the machine off .
(1*/,6+ 13 6.1 Drying programmes Timed programmes Degree of Drying Type of Fabric EXTRA DRY Cotton and linen Ideal for towelling mate- (bathrobes, bath rials towels, etc) Cotton and linen (bathrobes, bath towels, etc) CUPBOARD DRY1) Suitable for items to put away without ironing Suitable for items to put away without ironing IRON DRY Suitable for ironing Drying Load Spin Speed Suggested drying time Minutes 4 kg 1400 160 180 3 kg 1400 110 120 1.
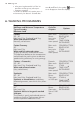
www.aeg.com 7. CONSUMPTION VALUES Programme Energy consumption (KWh) Water consumption (litres) Cottons 60° 1.35 67 Cotton Energy Saving Programme 60° 1) 1.05 49 Cottons 40° 0.85 67 Synthetics 40° 0.55 42 Delicates 40° 0.55 63 Wool/ Handwash 30° 0.25 55 Programme duration (minutes) For the duration of the programmes, please refer to the display on the control panel.
(1*/,6+ 15 Make sure that no laundry stays between the seal and the door. There is a risk of water leakage or damage to the laundry. 9.2 Filling the detergent and additives MAX The detergent compartment for the prewash phase, the soak programme and for the stain function. Add the detergent for prewash, soak and stain remover before the start of the programme. The detergent compartment for the washing phase. If you use a liquid detergent, put it immediately before you start the programme.
www.aeg.com If you turn the programme dial to another programme when the appliance is working, the yellow pilot light of button 8 blinks 3 times. The display shows the message Err to indicate a wrong selection. The machine will not perform the new set programme. 9.4 Setting the SPIN speed (button 2) When you set the programme, the appliance automatically proposes the maximum spin speed allowed by that programme. Press this button repeatedly to change the spin speed. The relevant light will light up.
(1*/,6+ 9.9 Setting the DELAY START (button 9) Press this button again an again to set the required delay. The display shows the set delay time value (up to 20 hours) for some seconds, then it shows the duration of the programme again. Set the delay before you press the button 8. You can delay the wash programme can be delayed from 30 min - 60 min - 90 min, 2 hours and then by 1 hour up to a maximum of 20 hours.
www.aeg.com The water must be emptied out before opening the door. During this time the drum continues to turn at regular intervals until water drain. Follow the below instructions to empty out the water: • Turn the programme selector dial to • • • • Set the DRAIN or SPIN programme Reduce the spin speed, if needed Press the button 8 When the programme has finished the display shows a blinking . The pilot light C goes off. The door can be opened.
(1*/,6+ 7. Turn the selector dial to the O position to switch the machine off. 8. Remove the laundry. Note! The different type of cottons (towelling, sheets, shirts, and so on) or any laundry items rolling up during the spinning phase may result in partial dryness. In the exceptional case that at the end of the cycle the laundry remains slightly wet, we suggest that you unfold the rolled up items, redistribute them evenly in the drum and select an additional drying cycle of 20-30 minutes. 10.
www.aeg.com 11. HELPFUL HINTS AND TIPS 11.1 The laundry load 11.3 Detergents and additives • Divide the laundry in: white, coloured, synthetics, delicates and wool. • Obey the washing instructions that are on the laundry care labels. • Do not wash together white and coloured items. • Some coloured items can discolour with the first wash. We recommend that you wash them separately for the first times. • Button up pillowcases, close zippers, hooks and poppers. Tie up belts.
(1*/,6+ 21 Water hardness table Level Type Water hardness °dH °T.H. mmol/l Clarke 1 soft 0-7 0-15 0-1.5 0-9 2 medium 8-14 16-25 1.6-2.5 10-16 3 hard 15-21 26-37 2.6-3.7 17-25 4 very hard > 21 > 37 >3.7 >25 12.1 Drying hints • = The drying cycle is at reduced temperature Prepare the drying cycle • = The item can not be tumble dried. • Open the water tap. • Do a check if the connection of the drain hose is correct. Refer to installation chapter for more information.
www.aeg.com 13. CARE AND CLEANING WARNING! Disconnect the appliance from the mains supply before you clean it. find on the packaging of the manufacturer. Do this separately from the laundry wash. 13.2 External cleaning 13.1 Descaling The water we use contains limescale. If it becomes necessary, use a water softener to remove limescales. Use a special product made for washing machines. Obey the instructions that you Clean the appliance only with soap and warm water. Fully dry all the surfaces.
(1*/,6+ 3. 4. 23 Remove the top part of the liquid additive compartment. Clean all the parts with water. MAX 5. 6. WARNING! Before unscrewing the pump cover, switch the appliance off and remove the mains plug from the socket. 13.6 Drain pump The pump should be inspected regularly and particularly if: • the appliance does not empty and/or spin; • the appliance makes an unusual noise during draining due to objects such as safety pins, coins etc.
www.aeg.com 5. When no more water comes out, unscrew the pump cover (A) by turning it anti-clockwise and remove the filter. Use pliers, if necessary. Always keep a rag nearby to dry up any water spillages when removing the cover. Clean the filter under a tap, to remove any traces of fluff. 6. Remove foreign bodies and fluff from the filter seat and from the pump impeller. 7. Check carefully whether the pump impeller rotates (it rotates jerkily).
(1*/,6+ 25 To clean the water inlet filters: Close the water tap. Remove the water inlet hose from the water tap. 3. Clean the filter in the inlet hose with a stiff brush. 1. 2. 4. 5. 6. 7. 20° Remove the inlet hose behind the appliance. Clean the filter in the valve with a stiff brush or a towel. Install again the inlet hose. Make sure that the couplings are tight to prevent leakages. Open the water tap. 45° 13.
www.aeg.com By doing this, any water remaining in the machine is removed, avoiding ice forming and consequently damage to the appliance. When you use the machine again, make sure that the ambient temperature is above 0°C. 14. TROUBLESHOOTING Certain problems are due to lack of simple maintenance or oversights, which can be solved easily without calling out an engineer. Before contacting your local Service Centre, please carry out the checks listed below.
(1*/,6+ 27 Problem Possible cause/Solution The machine does not fill: The water tap is closed. • Open the water tap. The inlet hose is squashed or kinked. • Check the inlet hose connection. The filter in the inlet hose or the inlet valve filter are blocked. • Clean the water inlet filters. (See "Cleaning the water inlet filters" for more details) The door is not properly closed. • Close the door firmly. The machine fills then empties immediately: The end of the drain hose is too low.
www.aeg.com Problem Possible cause/Solution Too little detergent or unsuitable detergent has been used. • Increase the detergent quantity or use another one. Stubborn stains have not been treated prior to washing. Unsatisfactory washing • Use commercial products to treat the stubborn results: stains. The correct temperature was not selected. • Check if you have selected the correct temperature. Excessive laundry load. • Reduce the laundry load. The door will not open: The programme is still running.
(1*/,6+ 29 Problem Possible cause/Solution The machine does not dry or does not dry properly: The drying time has not been selected. • Select the drying time. The water tap is not turned on. • Open the water tap. The drain filter is clogged. • Clean the drain filter. The machine is overloaded. • Reduce the laundry load. The selected drying time or dryness degree was not suitable for the laundry. • Select the suitable drying time or the dryness degree for the laundry.
www.aeg.com 15. INSTALLATION 15.1 Unpacking 1. Use the gloves. Remove the external film. If necessary, use a cutter. 2. 3. Remove the cardboard top. Remove the polystyrene packaging materials. 4. Remove the internal film. 5. Open the door. Remove the polystyrene piece from the door seal and all the items from the drum.
(1*/,6+ 31 6. Put one of the polystyrene packaging elements on the floor behind the appliance. Carefully put down the appliance with the rear side on it. Make sure not to damage the hoses. 7. Remove the polystyrene protection from the bottom. Pull up the appliance in vertical position. 8. 1 2 9. Remove the power supply cable and the drain hose from the hose holders. 10. Remove the three bolts. Use the key supplied with the appliance. 11. Pull out the plastic spacers.
www.aeg.com 12. Put the plastic caps in the holes. You can find these caps in the user manual bag. WARNING! Remove all the packaging and the transit bolts before you install the appliance. We recommend that you keep the packaging and the transit bolts for when you move the appliance. 15.2 Positioning and levelling • Install the machine on a flat hard floor. • Make sure that air circulation around the machine is not impeded by carpets, rugs etc.
(1*/,6+ 33 15.3 The inlet hose • Connect the hose to the appliance. Turn the inlet hose only left or right. Loose the ring nut to set it in the correct position. 20 O 45 O • Connect the water inlet hose to the cold water tap with 3/4 thread. CAUTION! Make sure that there are no leaks from the couplings. Do not use an extension hose if the inlet hose is too short. Contact the service centre for the replacement of the inlet hose. Water-stop device The inlet hose has a water stop device.
www.aeg.com With the plastic hose guide. • On the edge of a sink. • Make sure that the plastic guide cannot move when the appliance drains. Attach the guide to the water tap or the wall. • To a stand pipe with vent-hole. Refer to the illustration. Directly into a drain pipe at a height of not less than 60 cm (23.6”) and not more than 100 cm (39.3”). The end of the drain hose must always be ventilated , i.e. the inner diameter of the drainpipe (min. 38 mm — min. 1.
(1*/,6+ 35 Without the plastic hose guide. • To a sink spigot. Refer to the illustration. Put the drain hose in the spigot and tighten it with a clip. Make sure that the drain hose makes a loop to prevent that remaining particles go in the appliance from the sink. • Directly to a built-in drain pipe in the room wall and tighten it with a clip. You can extend the drain hose to maximum 400 cm. Contact the service centre for the other drain hose and the extension. 15.
www.aeg.com 16. BUILDING IN 16.1 Building in • This appliance has been designed to be built into the kitchen furniture. The recess should have the dimensions shown in Fig 1. 600 mm min. 596 mm 560 mm 555 mm min. 820 mm 818 mm 75 mm 60 mm 100 mm 170 mm Fig.1 Preparation and assembly of the door • The machine is originally pre-arranged for the assembly of a door opening from right to left (Fig. 2). Fig. 2 16-22 mm X Ø 35 mm 416 mm 22±1,5 mm 14 mm 595-598 mm Fig.
(1*/,6+ 1 2 37 • Hinges To mount the hinges it is necessary to drill two holes (dia. 35 mm, depth 12.5-14 mm depending on the depth of door furniture) on the inner side of the door. The distance between the holes hobs fixing centres must be 416 mm. The distance from upper edge of the door to the centre of the hole depends on the adjacent furniture's dimensions. The hinges will be fixed to the door by means of screws for wood 1 and 2 (Fig. 4) supplied with the appliance. Fig.
www.aeg.com D A If the door has to be opened from left to right, invert the position of the plates E , the magnet D and the plate C. Mount the counter-magnet D and the hinges A as previously described (Fig. 7 ) CAUTION! Do not remove the screw B. C E B Fig. 7 17. ENVIRONMENT CONCERNS Recycle the materials with the symbol . Put the packaging in applicable containers to recycle it. Help protect the environment and human health and to recycle waste of electrical and electronic appliances.
(1*/,6+ 39
132905840-A-192014 www.aeg.