LAVAMAT68480FL USER MANUAL EN User Manual Washing Machine
www.aeg.com CONTENTS 1. SAFETY INFORMATION............................................................................................. 2 2. SAFETY INSTRUCTIONS.............................................................................................4 3. PRODUCT DESCRIPTION...........................................................................................6 4. CONTROL PANEL....................................................................................................... 7 5.
ENGLISH 3 manufacturer is not responsible for any injuries or damages that are the result of incorrect installation or usage. Always keep the instructions in a safe and accessible location for future reference. 1.
www.aeg.com • • • • If the mains power supply cable is damaged, it must be replaced by the manufacturer, its Authorised Service Centre or similarly qualified persons to avoid an electrical hazard. Before any maintenance operation, deactivate the appliance and disconnect the mains plug from the socket. Do not use high pressure water sprays and/or steam to clean the appliance. Clean the appliance with a moist cloth. Use only neutral detergents.
ENGLISH • This appliance complies with the E.E.C. Directives. 2.3 Water connection • Do not cause damage to the water hoses. • Before connection to new pipes, pipes not used for a long time, where repair work has been carried out or new devices fitted (water meters, etc.), let the water flow until it is clean and clear. • Ensure that there are no visible water leaks during and after the first use of the appliance. • Do not use an extension hose if the inlet hose is too short.
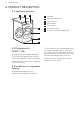
www.aeg.com 3. PRODUCT DESCRIPTION 3.1 Appliance overview 1 2 3 4 1 2 3 4 5 6 7 Worktop Detergent dispenser Control panel Door handle Rating plate Drain pump filter Feet for levelling the appliance 5 6 7 3.2 Fixing plate kit (4055171146) Available from your authorised dealer. If you install the appliance on a plinth, secure the appliance in the fixing plates. Read carefully the instructions supplied with the accessory. 3.
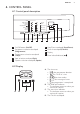
ENGLISH 7 4. CONTROL PANEL 4.1 Control panel description Cotton Cotton Eco Synthetics Delicates Wool/Handwash 30 Min - 3Kg Mix 20° Easy Iron Programmes 1400 Prewash 1200 Quick 800 Super Quick Finish In Rinse Only Drain & Spin Temp. Spin 3 4 Option Start/Pause On/Off 1 2 5 1 On/Off button (On/Off) 2 Programme selection touchpad (Programmes) 3 Temperature selection touchpad (Temp.
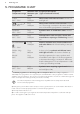
www.aeg.com 5. PROGRAMME CHART Programme Maximum load Programme description Temperature range Maximum spin (Type of load and soil level) speed Cotton 90°C - Cold 8 kg 1400 rpm White cotton and coloured cotton. Normal soil and light soil. Cotton Eco1) 60°C - 40°C 8 kg 1400 rpm White cotton and fast-coloured cotton. Normal soil. The energy consumption decreases and the time of the washing programme is extended. Synthetics 60°C - Cold 3 kg 1200 rpm Synthetic items or mixed fabric items.
ENGLISH 9 ■ ■ ■ Synthetics ■ ■ ■ ■ Delicates ■ ■ ■ ■ Wool/Handwash ■ ■ ■ Easy Iron ■ ■ ■ ■ ■ ■ ■ ■ ■ ■ ■ ■ ■ ■ ■ ■ ■ ■ ■ ■ ■ ■ ■ ■ ■ ■ ■ ■ ■ ■ ■ ■ ■ ■ ■ ■ 30 Min - 3 Kg Mix 20° Finish In ■ Cotton Eco Drain & Spin ■ Rinse Only ■ Super Quick 1) ■ Cotton Quick1) ■ Programme Spin Prewash Programme options compatibility ■ ■ ■ ■ ■ ■ ■ ■ ■ 1) When you set this option, we recommend that you decrease the quantity of the laundry.
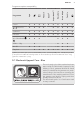
www.aeg.com 6. CONSUMPTION VALUES Stated values are obtained in laboratory conditions with relevant standards. Different causes can change the data: the quantity and type of laundry and ambient temperature. Water pressure, the supply voltage and the temperature of inlet water may also affect the washing programme duration. Technical specifications may be changed without prior notice to improve the quality of product.
ENGLISH Off Mode (W) Left On Mode (W) 0.48 0.48 11 The information given in the chart above is compliant with the EU Commission regulation 1015/2010 implementing directive 2009/125/EC . 7. OPTIONS 7.1 Temp. Use this option for heavy soil. With this option you can change the default temperature. When you set this option the programme duration increases. Indicator = cold water The indicator of the set temperature comes on. 7.2 Spin With this option you can change the default spin speed.
www.aeg.com 7.8 Finish In 7.9 Extra Rinse With this option you can set the number of hours in which you would like your washing programme to be completed. With this option you can add some rinses to a washing programme. You can set from minimum 3 hours to maximum 20 hours. The display shows the number of hours and the indicator above the button Finish In is on. Use this option for persons allergic to detergents and in areas where the water is soft. The related indicator comes on.1) 8. SETTINGS 8.
ENGLISH 13 10. DAILY USE WARNING! Refer to Safety chapters. 10.1 Loading the laundry 1. Open the appliance door 2. Shake the items before you put them in the appliance. 3. Put the laundry in the drum, one item at a time. Make sure not to put too much laundry in the drum. 4. Close the door firmly. 10.2 Using detergent and additives 1. Measure out the detergent and the fabric conditioner. 2. Put the detergent and the fabric conditioner into the compartments. 3. Carefully close the detergent drawer 10.
www.aeg.com 10.4 Liquid or powder detergent When you set a prewash option, put the detergent for prewash phase directly into the drum. 1. 2. A 3. 4. B • Position A for powder detergent (factory setting). • Position B for liquid detergent. When you use the liquid detergent: • Do not use gelatinous or thick liquid detergents. • Do not put more liquid then the maximum level. • Do not set the prewash option. • Do not set the delay start (or Finish in option). 10.
ENGLISH 10.7 Starting a programme without the Finish In option Touch the button Start/Pause . • The indicator of the button Start/ Pause stops to flash and stays on. • The programme starts, the door locks, the indicator is on. • The drain pump can operate for a short time at the beginning of the washing cycle. After approximately 15 minutes from the start of the programme: • The appliance adjusts automatically the programme duration agree with the laundry load. • The display shows the new value. 10.
www.aeg.com 1. Touch the button Start/Pause to pause the appliance. 2. Wait until the indicator goes off. 3. You can open the door. 4. Close the door and touch the button Start/Pause again. The programme (or the Finish In) continues. 10.12 At the end of the programme • The appliance stops automatically. • The acoustic signal operates (if it is activated). • In the display comes on. • The indicator of the button Start/ Pause goes off. • The door lock indicator goes off. • You can open the door.
ENGLISH • Be careful with the curtains. Remove the hooks and put the curtains in a washing bag or pillowcase. • Do not wash laundry without hems or with cuts. Use a washing bag to wash small and/or delicate items (e.g. underwired bras, belts, tights, etc. ). • A very small load can cause balance problems with the spin phase. If this occurs, adjust manually the items in the tub and start the spin phase again. 11.2 Stubborn stains For some stains, water and detergent is not sufficient.
www.aeg.com • Select the cotton programme with the highest temperature with a small quantity of detergent. Regularly examine the drum to prevent limescale and rust particles. To remove rust particles use only special products for washing machines. Do this separately from the laundry wash. 12.4 Door seal Always obey the instructions that you find on the packaging of the product. 12.3 Maintenance wash With the low temperature programmes it is possible that some detergent stays in the drum.
ENGLISH 12.6 Cleaning the drain filter Do not clean the drain filter if the water in the appliance is hot. Regularly check the drain pump filter and make sure that it is clean. Repeat the steps 2 and 3 until the water stops flowing out. 1. 2. 1 2 3. 4. 2 1 2 5. 6.
www.aeg.com 7. 8. 1 2 Always keep a rag nearby to dry up any water spillage. Make sure that the impeller of the pump can rotate. If it does not rotate, contact the Authorised Service Centre. Make sure also that you tighten the filter correctly to prevent leakages. 12.7 Cleaning the inlet hose and the valve filter 1. 2. 1 2 3 3. 4.
ENGLISH 12.8 Emergency drain Because of a malfunction, the appliance cannot drain the water. If this occurs, do steps (1) through (8) of 'Cleaning the drain filter'. If necessary, clean the pump. When you drain the water with the emergency drain procedure, you must activate the drain system again: 1. Put 2 litres of water in the main wash compartment of the detergent dispenser. 2. Start the programme to drain the water. 21 0° C, remove the remaining water from the inlet hose and the drain pump. 1.
www.aeg.com the alarm code appears again, contact the Authorised Service Centre. WARNING! Deactivate the appliance before you do the checks. 13.2 Possible failures Problem Possible solution The programme does not start. • Make sure that the mains plug is connected to the mains socket. • Make sure that the appliance door is closed. • Make sure that there is not a damaged fuse in the fuse box. • Make sure that the Start/Pause has been pressed.
ENGLISH 23 Problem Possible solution There is water on the floor. • Make sure that the couplings of the water hoses are tight and there is not water leakages. • Make sure that the water inlet hose and the drain hose have no damages. • Make sure you use the correct detergent and the correct quantity of it. You cannot open the appliance door. • Make sure that the washing programme is finished. • Set the drain or the spin option if there is water in the drum. • Do the emergency drain procedure.
www.aeg.com Level of protection against ingress of solid particles and moisture ensured by the protective cover, except where the low voltage equipment has no protection against moisture IPX4 Water supply pressure 0,5 bar (0,05 MPa) 8 bar (0,8 MPa) 1) Minimum Maximum Cold water Water supply 2) Maximum Load Cotton 8 kg Energy Efficiency Class Spin Speed A+++ Maximum 1400 rpm 1) The appliance works correctly if the water pressure is not lower than 0.05 MPa (0.5 bar).
ENGLISH 25
www.aeg.
ENGLISH 27
192964042-A-322017 www.aeg.