L6FBI741N USER MANUAL EN User Manual Washing Machine
www.aeg.com CONTENTS 1. SAFETY INFORMATION............................................................................................. 3 2. SAFETY INSTRUCTIONS.............................................................................................4 3. INSTALLATION............................................................................................................6 4. PRODUCT DESCRIPTION.........................................................................................10 5.
ENGLISH 1. 3 SAFETY INFORMATION Before the installation and use of the appliance, carefully read the supplied instructions. The manufacturer is not responsible for any injuries or damages that are the result of incorrect installation or usage. Always keep the instructions in a safe and accessible location for future reference. 1.
www.aeg.com • • • • • • • The appliance must be connected to the water mains using the new supplied hose sets, or other new hose sets supplied by the Authorised Service Centre. Old hose sets must not be reused. If the mains power supply cable is damaged, it must be replaced by the manufacturer, its Authorised Service Centre or similarly qualified persons to avoid an electrical hazard. Before any maintenance operation, deactivate the appliance and disconnect the mains plug from the socket.
ENGLISH • • • • • • • electrical ratings of the mains power supply. Do not use multi-plug adapters and extension cables. Make sure not to cause damage to the mains plug and to the mains cable. Should the mains cable need to be replaced, this must be carried out by our Authorised Service Centre. Connect the mains plug to the mains socket only at the end of the installation. Make sure that there is access to the mains plug after the installation.
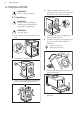
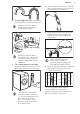
www.aeg.com 3. INSTALLATION WARNING! Refer to Safety chapters. 4. Open the door and remove the polystyrene piece from the door seal and all the items from the drum. 3.1 Unpacking WARNING! Remove all the packaging and the transit bolts before installing the appliance. WARNING! Use the gloves. 1. Use a cutter to cut through external film. 5. Carefully put down the appliance with the rear side on it. 6. Put the front polystyrene packaging element on the floor under the appliance.
ENGLISH 9. Remove the power supply cable and the drain hose from the hose holders. It is possible to see water flowing from the drain hose. This is due to the testing with water of the appliance in factory. 7 We recommend that you keep the packaging and the transit bolts for any movement of the appliance. 3.2 Installation on suspended flooring Suspended wooden floors are particularly susceptible to vibration.
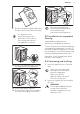
www.aeg.com 45 20 O O x4 The appliance must be level and stable. A correct adjustment of the appliance level prevents the vibration, noise and the movement of the appliance when in operation. Make sure that the inlet hose is not in vertical position. 3. If necessary, loose the ring nut to set it in the correct position. 4. Connect the water inlet hose to the cold water tap with 3/4" thread.
ENGLISH 9 4. If the end of the drain hose looks like this (see the picture), you can push it directly into the stand pipe. 2. On the edge of a sink - Fasten the guide to the water tap or to the wall. Make sure that the plastic guide cannot move when the appliance drains. 5. Without the plastic hose guide: Put the drain hose in the spigot and tighten it with a clip. Refer to the illustration. Make sure that the drain hose end is not immersed in the water.
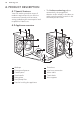
www.aeg.com 4. PRODUCT DESCRIPTION 4.1 Special features Your new washing machine meets all modern requirements for an effective treatment of laundry with low water, energy and detergent consumption and respectful of fabric care. • The ProSense technology adjusts automatically the programme duration to the laundry in the drum to achieve perfect washing results in the minimum possible time. 4.
ENGLISH 11 5. CONTROL PANEL 5.1 Control panel description 3 2 1 Programme Delay Start Cottons Cotton Eco Synthetics Delicates Wool/Silk 20 min. - 3kg Cotton 20° Duvet Easy Iron Drain/Spin 1400 95° Time Save 800 No spin 30° Temp.
www.aeg.com A The digital indicator can show: • Programme duration (e. g. • Delay time (e. g. or ). ). • Cycle end ( ). • Warning code ( ). B Extra rinse indicator. It lights on when this option is selected . C The tions. D Child safety lock indicator. E Door locked indicator. indicator blink during the laundry load detec- 6. DIAL AND BUTTONS 6.1 On/Off 6.3 Temp. Pressing this button for a few seconds allows to activate or deactivate the appliance.
ENGLISH The appliance empties the water out automatically after 18 hours approximately. Activate the No spin option • Set this option to deactivate all spin phases. Only the drain phase is available. • The related indicator comes on. • Set this option for very delicate fabrics. • The rinses phase uses more water for some washing programmes. The spin speed can be reduce. 6.5 Options Press this button repeatedly to activate one of the available options.
www.aeg.com 7. PROGRAMMES 7.1 Programme Chart Washing programmes Programme Programme description Washing programmes Cottons Cotton Eco White cotton and coloured cotton. Normal soil and light soil. White and coloured cotton White cotton and coloured cotton. Normal soil and light soil. Standard programmes for the Energy Label consumption values.
ENGLISH 15 Programme Programme description Drain/Spin To spin the laundry and to drain the water in the drum. All fabrics, except woollens and delicate fabrics. 1) During this cycle the drum rotates slowly to ensure a gentle wash. It can seem that the drum doesn't rotate or doesn't rotate properly, but this is normal for this programme. 2) This programme is for daily use and has the lowest energy and water consumption whilst maintaining a good washing performance.
www.aeg.com Synthetics Delicates Wool/Silk 20 min.
ENGLISH 17 8. SETTINGS 8.1 Child Lock With this option you can prevent children from playing with the control panel. • To activate/deactivate this option, touch the Spin and the Options buttons simultaneously until the To deactivate/activate the acoustic signals, touch the Delay Start and the Time Save buttons simultaneously for about 6 seconds. If you deactivate the acoustic signals, they continue operate when the appliance has a malfunction. indicator comes on/goes off on the display.
www.aeg.com Always follow the instructions that you find on the packaging of the detergent products, but we recommend that you do not exceed the maximum indicated level ( ). This quantity will however guarantee the best washing results. CAUTION! Make sure that no laundry stays between the seal and the door. There is a risk of water leakage or damage to the laundry. 10.3 Filling the detergent and additives After a washing cycle, if necessary, remove any detergent residue from the detergent dispenser.
ENGLISH 4. To use liquid detergent, turn the flap down. With the flap in the position DOWN: • Do not use gelatinous or thick liquid detergents. • Do not put more liquid detergent than the limit shown on the flap. • Do not set the prewash phase. • Do not set the delay start function. 5. Measure out the detergent and the fabric conditioner. 6. Carefully close the detergent dispenser. 19 The indicator of the Start/Pause button flashes. The display shows an indicative programme duration. 2.
www.aeg.com 10.7 Starting a programme Touch the Start/Pause button to start the programme. The related indicator stops flashing and stays on. The programme starts, the door is locked. The display shows the indicator . The drain pump can operate shortly before the appliance fills water. 10.8 The ProSense load detection After touching the Start/Pause button the ProSense technology starts the laundry load detection: 1.
ENGLISH The indicator of the Start/Pause button goes off. The door unlocks and the indicator goes off. 1. Press the On/Off button to deactivate the appliance. After five minutes from the end of the programme, the energy saving function automatically deactivates the appliance. 2. 3. 4. 5. When you activate the appliance again, the display show the end of the last selected programme. Turn the programme dial to set a new cycle. Remove the laundry from the appliance. Make sure that the drum is empty.
www.aeg.com • Button up pillowcases, close zippers, hooks and poppers. Tie up belts. • Empty pockets and unfold. • Turn multilayered fabrics, wool and items with printed illustrations inside out. • Pre-treat tough stains. • Wash heavy soil stains with a special detergent. • Be careful with curtains. Remove the hooks and put the curtains in a washing bag or pillowcase. • Do not wash laundry without hems or with cuts. Use a washing bag to wash small and/or delicate items (e.g.
ENGLISH 23 12. CARE AND CLEANING WARNING! Refer to Safety chapters. 12.4 Door seal 12.1 External cleaning Clean the appliance with mild soap and warm water only. Fully dry all the surfaces. CAUTION! Do not use alcohol, solvents or chemical products. CAUTION! Do not clean the metal surfaces with chlorine-based detergent. 12.2 Descaling If the water hardness in your area is high or moderate, we recommend that you use a water descaling product for washing machines.
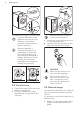
www.aeg.com 1 2 2. Remove the top part of the additive compartment to aid cleaning and flush it out under running warm water, to remove any traces of accumulated detergent. After cleaning, replace the top part in its position. 12.7 Cleaning the drain pump WARNING! Disconnect the mains plug from the mains socket. Regularly check the drain pump filter and make sure that it is clean. Clean the drain pump if: • The appliance does not drain the water. • The drum does not turn.
ENGLISH 2. Place a suitable bowl below the drain pump access to collect the water that flows out. 3. Open the chute downwards. Always keep a rag nearby to dry up any water spillages when removing the filter. 25 1 2 8. If it is necessary, remove fluff and objects from the filter recess. 9. Make sure that the impeller of the pump can rotate. If it does not rotate, contact the Authorised Service Centre. 4. Turn the filter 180 degrees in anticlockwise direction to open it, without removing.
www.aeg.com 2 1 3. Clean the valve filter on the back of the appliance with a toothbrush. 12. Close the pump cover. 2 1 12.8 Cleaning the inlet hose and the valve filter It is recommended to clean both the filters of the inlet hose and valve occasionally to remove any deposit, collected over the time: 4. When you reconnect the hose to the back of the appliance, turn it left or right (not in vertical position) depending on the position of your water tap. 1.
ENGLISH values around 0° C or drop below, remove the remaining water from the inlet hose and the drain pump. 27 5. When the drain pump is empty, install the inlet hose again. WARNING! Make sure that the temperature is higher than 0 °C before you use the appliance again. The manufacturer is not responsible for damages caused by low temperatures. 1. Disconnect the mains plug from the mains socket. 2. Close the water tap. 3.
www.aeg.com 13.2 Possible failures Problem The programme does not start. The appliance does not fill with water properly. Possible solution • Make sure that the mains plug is connected to the mains socket. • Make sure that the appliance door is closed. • Make sure that there is no damaged fuse in the fuse box. • Make sure that the Start/Pause has been touched. • If the delay start is set, cancel the setting or wait for the end of countdown. • Deactivate the Child Lock function if it is on.
ENGLISH 29 Problem Possible solution You cannot open the appliance door. • Make sure that a washing programme that ends with water in tub, has been selected. • Make sure that the washing programme is finished. • Set the drain or the spin programme if there is water in the drum. • Make sure that the appliance receives electrical power. • This problem may be caused by a failure of the appliance. Contact the Authorised Service Centre. The appliance makes an unusual noise and vibrates.
www.aeg.com 14. CONSUMPTION VALUES Stated values are obtained in laboratory conditions with relevant standards. Different causes can change the data: the quantity and type of laundry and ambient temperature. Water pressure, the supply voltage and the temperature of inlet water may also affect the washing programme duration. Technical specifications may be changed without prior notice to improve the quality of product.
ENGLISH 31 15.
www.aeg.com using the correct stacking kit manufactured and approved by AEG. Verify the compatible stacking kit by checking the depth of your appliances. Read carefully the instructions supplied with the appliance and with the accessory. WARNING! Do not put the tumble dryer under the washing machine. The stacking kit can be used only with the appliances specified in the leaflet provided with the accessory. 17. ENVIRONMENTAL CONCERNS Recycle materials with the symbol .
ENGLISH 33
www.aeg.
ENGLISH 35
192945131-A-042017 www.aeg.