L 71476 FL FI Käyttöohje SV Bruksanvisning 2 31
www.aeg.com SISÄLLYS 1. 2. 3. 4. 5. 6. 7. 8. 9. 10. 11. 12. 13. TURVALLISUUSOHJEET . . . . . . . . . . . . . . . . . . . . . . . . . . . . . . . . . . . . . . . . . . . . . . . . . . . . . . 3 TEKNISET TIEDOT . . . . . . . . . . . . . . . . . . . . . . . . . . . . . . . . . . . . . . . . . . . . . . . . . . . . . . . . . . . 4 LAITTEEN KUVAUS . . . . . . . . . . . . . . . . . . . . . . . . . . . . . . . . . . . . . . . . . . . . . . . . . . . . . . . . . . 5 KÄYTTÖPANEELI . . . . . . . . . . . . . . .
SUOMI 1. 3 TURVALLISUUSOHJEET Lue nämä käyttöohjeet huolellisesti ennen laitteen asentamista ja käyttöä: • Turvallisuutesi ja omaisuuden turvallisuuden vuoksi. • Ympäristön suojelemiseksi. • Laitteen virheettömän käytön takaamiseksi. Säilytä nämä ohjeet aina laitteen mukana, myös muuton yhteydessä tai laitteen vaihtaessa omistajaa. Valmistaja ei ota vastuuta vahingoista, jotka aiheutuvat laitteen virheellisestä asennuksesta tai käytöstä.
www.aeg.com • Varmista, etteivät vesiletkut vaurioidu. • Älä liitä laitetta uuteen putkistoon tai putkistoon, jota ei ole käytetty pitkään aikaan. Anna veden juosta muutaman minuutin ajan ennen kuin liität vedenottoletkun. • Laitteen ensimmäisellä käyttökerralla on varmistettava, ettei vesiletkuissa tai liitoksissa ole vuotoja. • Varmista, ettei virtajohto ja kaapeli vaurioidu. • Kytke pistoke pistorasiaan vasta asennuksen jälkeen.
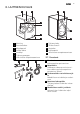
SUOMI 3. LAITTEEN KUVAUS 1 2 3 8 9 10 4 5 11 6 7 12 1 Kansilevy 8 Tyhjennysletku 2 Pesuainelokero 3 Käyttöpaneeli 9 Tulovesiventtiili 10 Virtajohto 4 Luukun kahva 11 Kuljetuspultit 5 Arvokilpi 6 Tyhjennyspumppu 12 Jalat laitteen tasapainottamiseen 7 Jalat laitteen tasapainottamiseen 1 2 3 3.1 Varusteet 1 Ruuviavain Kuljetuspulttien poistamiseen. 2 Muovikorkit 5 4 Ulkokuoren takaosassa olevien reikien tukkimiseen kuljetuspulttien poistamisen jälkeen.
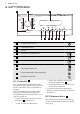
www.aeg.com 4. KÄYTTÖPANEELI 1 2 3 ECO SUPER ECO 20 Min. - 3 kg 10 9 1 Virtapainike (On/Off) 2 Ohjelmanvalitsin 3 Näyttö 4 Käynnistä/Tauko-painike 5 Ajastimen painike 6 Ajansäästö-painike 7 Lisähuuhtelun painike 8 Tahranpoisto-painike 9 Linkousnopeuden alennuspainike 10 Lämpötilan painike 4.1 Virtakytkin 1 Paina virtakytkintä laitteen kytkemiseksi toimintaan ja pois toiminnasta. Laitteesta kuuluu äänimerkki, kun se kytketään toimintaan.
SUOMI 7 4.3 Näyttö 3 A B C D Näytössä näkyy: A • Ohjelman maksimilämpötila. B • Ohjelman oletuslinkousnopeus. • 'Ei linkousta'1) ja 'Rypistymisenesto' -symbolit. C • Näytön symbolit.2) Symbolit Kuvaus Pesuvaihe Huuhteluvaiheet linkousvaiheella Lapsilukko Laitteen luukkua ei voida avata, kun symboli on näkyvissä. Laitteen luukkua ei voi avata, kun symboli vilkkuu. Odota joitakin minuutteja, ennen kuin avaat luukun. Voit avata luukun vain silloin, kun symboli kytkeytyy pois päältä.
www.aeg.com D • Ohjelman kesto Kun ohjelma käynnistyy, aika kuluu 1 minuutin astein. • Ajastin Kun painat ajastimen painiketta, näytössä näkyy ajastimen aika. • Häiriökoodit Jos laitteessa on toimintahäiriö, näytössä näkyvät häiriökoodit. Katso luku "Vianmääritys". • Err Näytössä näkyy tämä viesti joidenkin sekuntien ajan, jos: – asetat ohjelmalle sopimattoman toiminnon – muutat ohjelmaa sen ollessa käynnissä. Käynnistä/Tauko-painikkeen 4 merkkivalo vilkkuu. • Kun ohjelma on päättynyt.
SUOMI Linkousvaihe on pois käytöstä. 'Rypistymisenesto' -toiminto on päällä. 4.10 Lämpötilan painike 10 Voit muuttaa oletuslämpötilaa painamalla 10 . -- = kylmä vesi 4.11 Äänimerkit Voit kuulla äänimerkit, kun: • kytket laitteen toimintaan • kytket laitteen pois toiminnasta • painat painikkeita • ohjelma on päättynyt • laitteessa on toimintahäiriö. Voit kytkeä äänimerkit pois päältä/päälle painamalla painiketta 8 ja painiketta 7 samanaikaisesti 6 sekunnin ajan.
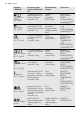
www.aeg.com Ohjelma Lämpötila Pestävä pyykki pyykin maksimipaino Pesuohjelman kuvaus Toiminnot Valkoinen ja kirjava puuvillapyykki, hyvin likaiset vaatteet. enintään 7 kg Esipesu Pesu Huuhtelut Pitkä linkous LINKOUS RYPISTYMISENESTO LISÄHUUHTELU AJANSÄÄSTÖ2) Extra Silent 95° - kylmä Valkoinen ja kirjava puuvillapyykki, normaalilikaiset vaatteet.
SUOMI Ohjelma Lämpötila 11 Pestävä pyykki pyykin maksimipaino Pesuohjelman kuvaus Toiminnot Kaikki tekstiilit. Yksi huuhtelu ylimääräisellä linkousvaiheella LINKOUS RYPISTYMISENESTO LISÄHUUHTELU5) Aseta tämä ohjelma, kun peset verhoja. Se lisää automaattisesti esipesun pölyn poistamiseksi verhoista. Älä lisää pesuainetta esipesulokeroon. enintään 2 kg Esipesu Pesu Huuhtelut Lyhyt linkous LINKOUS RYPISTYMISENESTO LISÄHUUHTELU Kaikki farkkukankaiset vaatteet.
www.aeg.com 4) Linkousnopeuden oletusvaihe on puuvillapyykkiä varten. Aseta linkousnopeus. Varmista, että se sopii pyykkiin. Valitse ainoastaan TYHJENNYS-ohjelma, aseta toiminto EI LINKOUSTA. 5) Paina LISÄHUUHTELU-painiketta huuhtelukertojen lisäämiseksi. Kun linkousnopeus on alhainen, laite suorittaa kevyitä huuhteluita ja lyhyen linkouksen. 6) Aseta tämä ohjelma vähentääksesi aikaa sekä virran- ja vedenkulutusta.
SUOMI 13 7. KÄYTTÖÖNOTTO Aktivoi tyhjennysjärjestelmä kaatamalla pesuainelokeron päälokeroon 2 litraa vettä. 2. Kaada pesuainelokeron päälokeroon pieni määrä pesuainetta. Aseta puu- villalle tarkoitettu pesuohjelma ja valitse korkein lämpötila, älä kuitenkaan aseta pyykkiä koneeseen. Tällöin poistetaan mahdolliset liat rummusta ja pesualtaasta. 1. 8. LAITTEEN KÄYTTÖ 1. 2. 3. Avaa vesihana. Kiinnitä pistoke pistorasiaan. Kytke laite toimintaan painamalla painiketta 1 . 4. Laita pyykit koneeseen. 5.
www.aeg.com Esipesuvaiheen, liotusohjelman ja tahranpoistotoiminnon pesuainelokero. Lisää pesuainetta esipesua, liotusta ja tahranpoistoa varten ennen ohjelman käynnistämistä. Pesuvaiheen pesuainelokero. Jos käytät nestemäistä pesuainetta, lisää se juuri ennen ohjelman käynnistämistä. Nestemäisten lisäaineiden lokero (huuhteluaine, tärkki). Aseta tuote lokeroon ennen ohjelman käynnistämistä. Tämä on nestemäisten lisäaineiden maksimitaso.
SUOMI 4. 15 Kun käytät pesunestettä, käännä läppä alas. Kun läppä on ALHAALLA: – Älä käytä hyytelömäisiä tai paksuja nestemäisiä pesuaineita. – Älä aseta nestemäistä pesuainetta yli läpän maksimirajan. – Älä aseta esipesuvaihetta. – Älä aseta ajastinta. 5. 6. Mittaa pesuaine ja huuhteluaine. Sulje pesuainelokero varoen. Varmista, ettei läppä aiheuta tukosta lokeron sulkemisen yhteydessä. 8.3 Ohjelman asettaminen ja käynnistäminen 1. Käännä ohjelmanvalitsinta. Vastaavan pesuohjelman merkkivalo syttyy.
www.aeg.com 8.8 Ajastuksen peruuttaminen 1. Paina painiketta 4 . Vastaava merkkivalo alkaa vilkkua. 2. Paina painiketta 5 toistuvasti, kunnes näytössä näkyy 0’. 3. Paina painiketta 4 . Ohjelma käynnistyy. 8.9 Avaa luukku Laitteen luukku on lukittu ohjelman tai ajastimen ollessa toiminnassa. Laitteen luukun avaaminen: 1. Paina painiketta 4 . Näytössä palava luukun lukon symboli sammuu. 2. Avaa laitteen luukku. 3. Sulje laitteen luukku ja paina painiketta 4 .
SUOMI • Käännä monikerroksiset tekstiilit, villavaatteet ja painetut tekstiilit väärin päin. • Poista vaikeat tahrat. • Pese vaikeat tahrat erityisellä pesuaineella. • Ole varovainen verhoja käsitellessä. Poista kaikki koukut tai aseta verhot pesupussiin tai tyynyliinaan. • Älä pese laitteella: – saumaamattomia tai huolittelemattomia kankaita tai vaatteita – kaarellisia rintaliivejä. – Pese pienet vaatekappaleet pesupussissa. • Erittäin pieni täyttömäärä voi aiheuttaa epätasapainon linkousvaiheessa.
www.aeg.com 10.1 Kalkinpoisto 10.3 Huoltopesu Vesijohtovesi sisältää yleensä kalkkia. Käytä tarvittaessa vedenpehmennintä kalkkikertymien poistamiseksi. Käytä erityistä pesukoneelle tarkoitettua tuotetta. Noudata tuotepakkauksiin merkittyjä ohjeita. Suorita toimenpide erillään pyykinpesusta. Alhaisen lämpötilan ohjelmissa rumpuun voi jäädä hiukan pesuainetta. Suorita huoltopesu säännöllisesti. Toimi seuraavasti: • Poista pyykki rummusta. • Aseta puuvillan pesuohjelma korkeimmassa lämpötilassa.
SUOMI 19 3. 4. Poista esipesulokeron yläosa. Pese kaikki osat vedellä. 5. 6. Puhdista lokeron syvennys harjalla. Aseta lokero takaisin syvennykseen. VAROITUS! 1. Irrota pistoke pistorasiasta. 2. Älä poista sihtiä laitteen ollessa toiminnassa. Älä puhdista tyhjennyspumppua, jos laitteen vesi on kuumaa. Tyhjennyspumpun puhdistaminen edellyttää, että vesi on kylmää. 10.7 Tyhjennyspumppu Tarkista tyhjennyspumppu säännöllisesti ja varmista, että se on puhdas. Puhdista pumppu, jos: • Koneeseen jää vettä.
www.aeg.com 2. 3. 4. 5. Vedä tyhjennyskanavaa taaksepäin ja käännä suodatinta sen poistamiseksi. 6. Poista nukka ja muut pumpussa olevat epäpuhtaudet. 7. Tarkista, että pumpun siipipyörä pyörii esteettä. Ota muussa tapauksessa yhteys valtuutettuun huoltoliikkeeseen. 8. Puhdista sihti valuvan veden alapuolella ja aseta se takaisin pumppuun erityisten ohjaimien varaan. Varmista, että kiristät sihdin oikein vuotojen estämiseksi.
SUOMI 21 10. Sulje tyhjennyspumpun luukku. 10.8 Vedenottoletkun sihti ja tuloventtiilin sihti • Painikkeen 4 merkkivalo vilkkuu ja näytössä näkyy vastaava hälytys. Lue ohjeet kohdasta "Vianmääritys". Sihtien puhdistus voi olla tarpeen, kun: • Laitteeseen ei tule vettä. • Laitteen vedentäyttövaihe kestää kauan. VAROITUS! Irrota pistoke pistorasiasta. Tulovesisihtien puhdistaminen: 1. 2. 3. Sulje vesihana. Irrota vedenottoletku hanasta. Puhdista vedenottoletkun sihti jäykällä harjalla. 4. 5.
www.aeg.com Kun tyhjennät veden hätätyhjennystoimenpiteellä, tyhjennysjärjestelmä tulee aktivoida uudelleen: 1. Kaada pesuainelokeron päälokeroon 2 litraa vettä. 2. Aloita veden tyhjennys käynnistämällä ohjelma. 3. 4. Irrota vedenottoletku. Aseta vedenottoletkun kaksi päätä astiaan ja anna veden valua letkusta ulos. 5. Tyhjennä tyhjennyspumppu. Katso hätätyhjennyksen ohjeet. 6. Kun tyhjennyspumppu on tyhjä, asenna vedenottoletku uudelleen. 10.
SUOMI Ongelma Mahdollinen syy Mahdollinen ratkaisu Tyhjennysletku on liitetty virheellisesti. Varmista, että liitäntä on virheetön. Olet valinnut pesuohjelman, jossa ei ole tyhjennysvaihetta. Valitse tyhjennysohjelma. Toiminto "Rypistymisenesto" on toiminnassa. Valitse tyhjennysohjelma. Laitteen luukku on auki tai se ei ole kunnolla kiinni. Linkousvaihe ei toimi. Pesuohjelma ei käynnisty. 23 Sulje luukku oikein. Linkousvaihe on pois käytöstä. Aseta linkousohjelma.
www.aeg.com Ongelma Mahdollinen syy Mahdollinen ratkaisu Laite täyttyy vedellä ja tyhjenee välittömästi. Tyhjennysletkun pää on liian matalalla. Varmista, että tyhjennysletku on oikeassa asennossa. Pesutulos ei ole tyydyttävä. Pesuainetta on käytetty Lisää pesuaineen määrää tai liian vähän tai se on vää- käytä toista pesuainetta. ränlaista. Et poistanut vaikeita Käsittele vaikeat tahrat erikoistahroja ennen pyykinpe- tuotteilla. sua. Virheellinen lämpötilaasetus.
SUOMI 25 2. 3. Poista pahvinen yläosa. Poista polystyreeniset pakkausmateriaalit. 4. Poista sisäinen suojakalvo. 5. Avaa luukku ja poista kaikki rummun sisällä olevat varusteet. 6. Aseta yksi pakkauksen polystyreenikappale lattialle laitteen taakse. Aseta laite varoen alas sen takaosa kappaleen päälle. Varmista, etteivät letkut vaurioidu.
www.aeg.com 7. 8. Poista polystyreenisuoja alaosasta. Nosta laite takaisin pystyasentoon. 9. Irrota virtajohto ja tyhjennysletku letkunpidikkeistä. 1 2 10. Irrota kolme pulttia. Käytä koneen mukana toimitettua avainta. 11. Vedä muoviset välikappaleet ulos. 12. Aseta muovikorkit reikiin. Korkit ovat käyttöohjepussissa.
SUOMI 27 – Pakkausmateriaalit ja kuljetustuet kannattaa säilyttää mahdollisia tulevia laitteen siirtoja varten. – Jos hankit laitteen talvella ulkolämpötilan ollessa pakkasen puolella. Anna laitteen olla huoneenlämpötilassa 24 tuntia ennen kuin käytät sitä ensimmäisen kerran. 12.3 Laitteen sijoittaminen ja tasapainottaminen • Asenna laite tasaiselle, kovalle lattialle. • Varmista, että matot eivät estä laitteen alapuolella olevaa ilmankiertoa.
www.aeg.com 12.4 Vedenottoletku • Liitä letku laitteeseen. Käännä vedenottoletkua vain vasempaan tai oikeaan suuntaan. Aseta se oikein löysäämällä rengasmuttaria. 20 O 45 O • Liitä vedenottoletku kylmävesihanaan, jossa on 3/4 tuuman kierteitys. HUOMIO Varmista, etteivät liitännät vuoda. Älä käytä jatkoletkua, jos vedenottoletku on liian lyhyt. Ota yhteyttä huoltopalveluun vedenottoletkun vaihtoa varten. Vesiturvajärjestelmä Vedenottoletkussa on vesiturvajärjestelmä.
SUOMI 29 Muovista letkunpidikettä käyttämällä. • Altaan reunaan. • Varmista, ettei muovinen letkunpidike liiku, kun vesi tyhjenee laitteesta. Kiinnitä pidike vesihanaan tai seinään. • Tuuletusaukolla varustettuun pystyputkeen. Katso kuva. Suoraan tyhjennysputkeen vähintään 60 cm:n ja enintään 100 cm:n korkeudelle. Tyhjennysletkun päässä on oltava aina riittävä tuuletus, ts. tyhjennysputken sisähalkaisijan tulee olla sen ulkoista halkaisijaa suurempi. Ilman muovista letkunpidikettä.
www.aeg.com Voit pidentää tyhjennysletkua enintään 400 cm. Ota yhteyttä valtuutettuun huoltoliikkeeseen tyhjennysletkun vaihtamiseksi ja jatkeen saamiseksi. 13. YMPÄRISTÖNSUOJELU Kierrätä materiaalit, jotka on merkitty merkillä . Kierrätä pakkaus laittamalla se asianmukaiseen kierrätysastiaan. Suojele ympäristöä ja ihmisten terveyttä kierrättämällä sähkö- ja elektroniikkaromut. Älä hävitä merkillä merkittyjä kodinkoneita kotitalousjätteen mukana.
SVENSKA 31 INNEHÅLL 1. 2. 3. 4. 5. 6. 7. 8. 9. 10. 11. 12. 13. SÄKERHETSINFORMATION . . . . . . . . . . . . . . . . . . . . . . . . . . . . . . . . . . . . . . . . . . . . . . . . . . TEKNISK INFORMATION . . . . . . . . . . . . . . . . . . . . . . . . . . . . . . . . . . . . . . . . . . . . . . . . . . . . PRODUKTBESKRIVNING . . . . . . . . . . . . . . . . . . . . . . . . . . . . . . . . . . . . . . . . . . . . . . . . . . . . . KONTROLLPANEL . . . . . . . . . . . . . . . . . . . . . . . . . . . . . . .
www.aeg.com 1. SÄKERHETSINFORMATION Läs den här handboken innan du börjar installera och använda diskmaskinen. • För din egen och dina tillhörigheters säkerhet • För att skydda miljön • För att du ska använda produkten på rätt sätt. Förvara alltid dessa instruktioner tillsammans med produkten, även om du flyttar den eller ger bort den. Tillverkaren kan inte hållas ansvarig för skada som orsakats av felaktig installation eller användning. 1.
SVENSKA Anslutning av vatten • Anslut inte produkten med gamla slangar som redan använts. Använd bara nya slangar. • Kontrollera så att du inte skadar vattenslangarna. • Anslut inte produkten till nya ledningar eller ledningar som inte har använts på länge. Låt vattnet rinna några minuter och anslut därefter tilloppsslangen. • Kontrollera att vattenslangarna och kopplingarna inte läcker när du använder produkten första gången. 33 • Byt inte ut eller ändra strömkabeln. Kontakta servicecentret.
www.aeg.com 3. PRODUKTBESKRIVNING 1 2 3 8 9 10 4 5 11 6 7 12 1 Arbetsyta 8 Tömningsslang 2 Tvättmedelsfack 3 Kontrollpanel 9 Ventil för vattenintag 10 Nätkabel 4 Luckhandtag 11 Transportbultar 5 Typskylt 6 Tömningspump 12 Fötter för nivåutjämning av produk- ten 7 Fötter för nivåutjämning av produk- ten 1 2 3 3.1 Tillbehör 1 Skruvnyckel För att ta bort transportbultarna. 2 Plastlock 5 4 För att stänga igen hålen på baksidan av skåpet när transportbultarna tagits bort.
SVENSKA 35 4. KONTROLLPANEL 1 2 3 ECO SUPER ECO 20 Min. - 3 kg 10 9 8 7 1 Strömbrytare På/Av (On/Off) 2 Programvred 3 Display 4 Start/Paus-knapp 5 Knapp för fördröjd start 6 Knappen Tidspar 7 Knapp för Extra sköljning 8 Fläck-knapp 9 Knapp för reducerat centrifugeringsvarvtal 10 Temperaturknapp 4.1 Strömbrytare På/Av 1 Tryck på knappen för att aktivera och avaktivera produkten. En ljudsignal avges när produkten är slås på.
www.aeg.com 4.3 Display 3 A B C D Displayen visar: A • Programmets max-temperatur. B • Standardcentrifugeringshastigheten för valt program. • Ingen centrifugering1) och symbolerna Sköljstopp. C • Displaysymboler.2) Symboler Beskrivning Tvättfas Sköljfaser Centrifugeringsfas Barnlås Luckan kan inte öppnas när symbolen visas. Luckan kan inte öppnas när symbolen blinkar. Vänta några minuter innan du öppnar luckan. Luckan kan öppnas när symbolen släcks.
SVENSKA D 37 • Programtid När programmet startar minskar tiden i steg om 1 minut. • Fördröjd start När knappen Fördröjd start trycks in visar displayen den fördröjda starttiden. • Larmkoder Om det är fel på produkten visas felkoder på displayen. Se avsnittet "Felsökning". • Err Displayen visar det här meddelandet i några sekunder om: – En funktion som inte finns för programmet har ställts in. – Program byts under pågående cykel. Kontrollampan för knappen Start/Paus 4 blinkar. • När programmet är klart.
www.aeg.com Centrifugeringen är avstängd. Funktionen Sköljstopp är på. 4.10 Temperaturknapp 10 Tryck på 10 för att ändra den inställda temperaturen. -- = kallt vatten 4.11 Ljudsignal Ljudsignaler avges när: • Du aktiverar produkten. • När du avaktiverar produkten. • När du trycker på knapparna. • När programmet är klart. • När ett fel uppstått på produkten. För att avaktivera/aktivera ljudsignalerna ska du trycka på 8 och 7 samtidigt i 6 sekunder.
SVENSKA Program Temperatur Typ av disk max vikt på tvätten Programbeskrivning Funktioner Vit och färgad bomull (hårt smutsad tvätt). max. 7 kg Fördisk Tvätt Sköljningar Lång centrifugering CENTRIFUGERING SKÖLJSTOPP EXTRA SKÖLJNING SNABB 2) Extra Tyst 95° - Kall Vit och färgad bomull (normalt smutsad tvätt). max. 7 kg Tvätt Sköljningar Stopp med vatten i trumman FLÄCKAR1) EXTRA SKÖLJNING SNABB 2) Syntet 60° - Kall Syntet eller blandade material (normalt smutsad tvätt). max. 3.
www.aeg.com Program Temperatur Typ av disk max vikt på tvätten Programbeskrivning Funktioner Tömning av vatten Centrifugering på maximal hastighet. CENTRIFUGERING INGEN CENTRIFUGERING Alla material. En sköljning med tillagd centrifugering CENTRIFUGERING SKÖLJSTOPP EXTRA SKÖLJNING5) Program för tvätt av gardiner. Den lägger automatiskt till förtvätt för att få bort dammet från gardinerna. Tillsätt inget tvättmedel i förtvättfacket. max.
SVENSKA 41 2) om du trycker på knappen 6 två gånger (Extra Quick) rekommenderar vi att du minskar mängden tvätt. Det går att fylla produkten helt men tvättresultatet blir sämre. 3) Tvätt- och centrifugeringsfasen är skonsam för att förhindra att tvätten blir skrynklig. Produkten lägger till ytterligare sköljningar. 4) Standardcentrifugeringshastigheten är inställd för bomull. Ställ in centrifugeringshastigheten. Se till att det går att ställa in den hastigheten med valt program.
www.aeg.com 7. INNAN MASKINEN ANVÄNDS FÖRSTA GÅNGEN Häll 2 liter vatten i tvättmedelsfacket för huvudtvätt för att aktivera tömningssystemet. 2. Häll lite tvättmedel i tvättmedelsfacket för huvudtvätt. Ställ in och starta ett program för bomull vid högsta temperaturen utan tvätt. Detta tar bort all möjlig smuts från trumman och baljan. 1. 8. ANVÄNDA PRODUKTEN 1. 2. 3. Öppna vattenkranen. Sätt i stickkontakten i eluttaget. Tryck på knappen 1 för att slå på produkten. 4. Lägg in tvätten i produkten.
SVENSKA 43 Tvättmedelsfacket för förtvättsfasen, blötläggningsprogrammet och fläckfunktionen. Tillsätt tvättmedlet för förtvätt, blötläggning och fläckborttagning innan programmet startar. Tvättmedelsfacket för tvättfasen. Om du använder flytande tvättmedel lägger du in det precis innan du startar programmet. Fack för flytande tillsatsmedel (sköljmedel, stärkningsmedel). Lägg produkten i facket innan du startar programmet. Detta är den högsta nivån för mängden flytande tillsatsmedel.
www.aeg.com 4. Vänd fliken nedåt om du ska använda flytande tvättmedel. Med fliken i läget NEDÅT: – Använd inte geléaktigt eller flytande tvättmedel. – Lägg inte i mer flytande tvättmedel än gränsen som visas på fliken. – Ställ inte in förtvättsfasen. – Ställ inte in funktionen fördröjd start. 5. 6. Mät upp tvätt- och sköljmedel. Stäng tvättmedelsfacket försiktigt. Se till att fliken inte orsakar en tilltäppning när du stänger facket. 8.3 Ställa in och starta ett program 2. 1. 8.
SVENSKA Innan du trycker på 4 -knappen för att starta produkten kan du avbryta eller ändra inställningen av den fördröjda starten. 8.8 Avbryta den fördröjda starten 1. Tryck på 4 -knappen. Motsvarande kontrollampa blinkar. 2. Tryck på 5 -knappen flera gånger tills displayen visar 0'. 3. Tryck på 4 -knappen. Programmet startar. 8.9 Öppna luckan. Produktens lucka är låst medan ett program eller fördröjd start pågår. Öppna produktens lucka: 1. Tryck på 4 -knappen. Symbolen för lucklåset släcks. 2.
www.aeg.com • Vissa färgade plagg kan missfärgas i första tvätten. Vi rekommenderar att du tvättar dem separat de första gångerna. • Stäng örngott, blixtlås, hakar och tryckknappar. Knyt skärp. • Töm alla fickor och veckla ut plaggen. • Vänd ut och in på flerfärgade plagg, ylle och plagg med tryck. • Ta bort svåra fläckar. • Tvätta svåra smutsfläckar med ett specialtvättmedel. • Var försiktig med gardiner. Ta bort hakarna eller lägg gardinerna i en tvättpåse eller ett örngott.
SVENSKA 47 10. UNDERHÅLL OCH RENGÖRING VARNING Koppla loss produkten från eluttaget innan du rengör den. 10.1 Avkalkning Vattnet vi använder innehåller kalk. Använd vid behov en vattenavhärdare för att ta bort kalk. Använd en specialprodukt avsedd för tvättmaskiner. Följ anvisningarna på tillverkarens förpackning. Gör detta separat från tvätten. 10.3 Underhållstvätt Vid programmen med låg temperatur kan det hända att det blir kvar lite tvättmedel i trumman. Kör en underhållstvätt med jämna mellanrum.
www.aeg.com 10.6 Tvättmedelsfack Rengöring av facket: 1 1. 2. Tryck på spaken. Dra ut facket. 3. Ta bort den övre delen av facket för flytande tillsatser. Rengör alla delar med vatten. 2 4. 5. 6. 10.7 Tömningspump Undersök tömningspumpen regelbundet och se till att den är ren. Rengör pumpen om: • Produkten tömmer inte ut vattnet. • Trumman kan inte snurra. • Produkten avger ett ovanligt ljud p.g.a. att tömningspumpen är blockerad. Rengör tvättmedelsfackets fördjupning med en borste.
SVENSKA 49 Rengöring av tömningspumpen: 1. Öppna luckan till tömningspumpen. 2. Sätt en behållare under tömningspumpens fördjupning, för att samla upp vattnet som rinner ut. Tryck på de två knopparna och dra tömningsledningen framåt så att vattnet kan rinna ut. När behållaren är fylld med vatten, sätt tillbaka tömningsledningen och töm behållaren. Upprepa steg 3 och 4 så många gånger som behövs tills inget vatten rinner ut från tömningspumpen. 3. 4. 1 5.
www.aeg.com 8. 1 2 9. Rengör nålfällan under en vattenkran och sätt tillbaka det i pumpen i de speciella spåren. Var noga med att dra åt nålfällan ordentligt för att förhindra läckage. 10. Stäng pumpluckan. 10.8 Tilloppsslangens filter och ventilfiltret • Kontrollampan på 4 -knappen blinkar och tillhörande larm visas på displayen. Se avsnittet "Felsökning". Det kan vara nödvändigt att rengöra filtren när: • Produkten inte fylls med vatten. • Produkten fylls med vatten länge.
SVENSKA 6. 7. 51 Sätt tillbaka tilloppsslangen. Kontrollera att anslutningarna är helt täta för att undvika läckage. Öppna vattenkranen. 45° 20° 10.9 Nödtömning Produkten kan inte tömma ut vattnet på grund av ett fel. Om detta händer, gå igenom stegen (1) till (6) i "Rengöring av tömningspumpen". Rengör pumpen vid behov. Sätt tillbaka tömningsledningen och stäng luckan till tömningspumpen. När vattnet tappas ut med nödtömningsproceduren måste tömningssystemet aktiveras igen. 1.
www.aeg.com Problem Produkten tömmer inte ut vattnet. Möjlig orsak Möjlig lösning Filtren i tilloppsslangen är igentäppt. Rengör filtren. Se "Underhåll och rengöring". Vattenkranen är blockerad eller belagd med kalk. Rengör vattenkranen. Tilloppsslangen är inte rätt ansluten. Kontrollera att anslutningen är korrekt. Vattentrycket är för lågt. Kontakta berörd myndighet. Tömningsslangen är skadad. Kontrollera att tömningsslangen inte är skadad. Filtret i tömningspumpen är igensatt.
SVENSKA 53 Problem Möjlig orsak Möjlig lösning Det är vatten på golvet. Läckage från kopplingarna i vattenslangarna. Kontrollera att kopplingarna är åtdragna. Läckage från tömningspumpen. Kontrollera att filtret i tömningspumpen är åtdraget. Tömningsslangen är skadad. Kontrollera att tilloppsslangen inte är skadad. Du kan inte öppna Tvättprogrammet påluckan på produk- går. ten. Produkten avger ett konstigt ljud. Låt tvättprogrammet gå klart. Det finns vatten i trumman.
www.aeg.com 12.2 Uppackning 1. Använd handskarna. Avlägsna den utvändiga filmen. Använd en kniv vid behov. 2. 3. Avlägsna kartonglocket. Avlägsna frigolitemballaget. 4. Avlägsna den invändiga filmen. 5. Öppna luckan och ta ut alla plagg ur trumman.
SVENSKA 55 6. Lägg en av frigolitemballagedelarna på golvet bakom produkten. Sätt försiktigt ner produkten med baksidan på den. Kontrollera så att du inte skadar slangarna. 7. Ta bort frigolitskyddet från undersidan. Dra upp produkten till upprätt position. 8. 1 2 9. Ta loss strömkabeln och tömningsslangen ur slanghållarna. 10. Skruva loss de tre bultarna. Använd nyckeln som medföljer produkten. 11. Dra ut distanserna av plast.
www.aeg.com 12. Sätt plastlocken i hålen. Du hittar dessa lock i påsen med bruksanvisningen. – Vi rekommenderar att du behåller förpackningen och transportbultarna till när du ska flytta produkten. – Om produkten levereras på vintern när det är minusgrader, Förvara den i rumstemperatur i 24 timmar innan den används första gången. 12.3 Placering och avvägning • Installera produkten på ett plant och hårt golv. • Se till att mattor inte hindrar luftcirkulationen under produkten.
SVENSKA 57 FÖRSIKTIGHET Justera inte nivån genom att sätta kartong, trä eller motsvarande material under produktens fötter. 12.4 Tilloppsslang • Anslut slangen till produkten. Vänd tilloppsslangen endast vänster eller höger. Lossa ringmuttern och ställ in den i rätt läge. 20 O 45 O • Anslut tilloppsslangen för kallvatten till en kallvattenkran med 3/4-tums gänga. FÖRSIKTIGHET Kontrollera att det inte finns några läckor i kopplingarna. Använd inte en förlängningsslang om tilloppsslangen är för kort.
www.aeg.com 12.5 Tömning av vattnet Det finns olika sätt att ansluta tömningsslangen: Med plastböjen. • På kanten av en diskho. • Se till att plastböjen inte kan flytta på sig när produkten töms. Anslut plastböjen till vattenkranen eller väggen. • Till ett stigrör med ett ventilationshål. Se bilden. Direkt in i ett tömningsrör på en höjd av minst 60 cm och högst 100 cm. Änden på tömningsslangen måste alltid vara ventilerad, dvs.
SVENSKA 59 • Direkt till ett inbyggt avloppsrör i rummets vägg och dra åt den med en klämma. Du kan förlänga tömningsslangen till högst 400 cm. Kontakta kundtjänst för den andra tömningsslangen och förlängningen. 13. MILJÖSKYDD Återvinn material med symbolen . Återvinn förpackningen genom att placera den i lämpligt kärl. Bidra till att skydda vår miljö och vår hälsa genom att återvinna avfall från elektriska och elektroniska produkter. Släng inte produkter märkta med symbolen med hushållsavfallet.
132923630-A-192012 www.aeg.