L 75480 WD NL Gebruiksaanwijzing FR Notice d'utilisation 2 39
www.aeg.com INHOUD 1. 2. 3. 4. 5. 6. 7. 8. 10. 11. 12. 13. VEILIGHEIDSINFORMATIE . . . . . . . . . . . . . . . . . . . . . . . . . . . . . . . . . . . . . . . . . . . . . . . . . . . . 3 VEILIGHEIDSVOORSCHRIFTEN . . . . . . . . . . . . . . . . . . . . . . . . . . . . . . . . . . . . . . . . . . . . . . . . 4 TECHNISCHE INFORMATIE . . . . . . . . . . . . . . . . . . . . . . . . . . . . . . . . . . . . . . . . . . . . . . . . . . . 6 BESCHRIJVING VAN HET PRODUCT . . . . . . . . . . . . . . . . . . . . .
NEDERLANDS 3 1. VEILIGHEIDSINFORMATIE Lees zorgvuldig de meegeleverde instructies voor installatie en gebruik van het apparaat. De fabrikant is niet verantwoordelijk voor letsel en schade veroorzaakt door een foutieve installatie. Bewaar de instructies van het apparaat voor toekomstig gebruik. 1.1 Veiligheid van kinderen en kwetsbare mensen WAARSCHUWING! Gevaar voor verstikking, letsel of permanente invaliditeit.
www.aeg.com • De specificatie van het apparaat mag niet worden veranderd. • Respecteer het maximale laadvermogen van 8 kg (raadpleeg hoofdstuk “Programmaschema”). • Als de voedingskabel beschadigd is, moet de fabrikant of diens technische dienst of een gekwalificeerd persoon deze vervangen teneinde gevaarlijke situaties te voorkomen.
NEDERLANDS • Steek de stekker pas in het stopcontact als de installatie is voltooid. Zorg ervoor dat het netsnoer na installatie bereikbaar is. • Trek niet aan het aansluitnoer om het apparaat los te koppelen. Trek altijd aan de stekker. • Raak de stroomkabel of stekker niet aan met natte handen. • Dit apparaat voldoet aan de EU-richtlijnen. Aansluiting aan de waterleiding • Zorg dat u de waterslangen niet beschadigt. • Het apparaat moet met de nieuwe slangset worden aangesloten op een kraan.
www.aeg.com • Ga niet op de open deur zitten of staan. • Houd u aan de maximale belading. • Droog geen druipnatte kledingstukken in het apparaat. 2.3 Onderhoud en reiniging WAARSCHUWING! Gevaar voor letsel of schade aan het apparaat. • Schakel het apparaat uit en trek de stekker uit het stopcontact voordat u onderhoudshandelingen verricht. • Gebruik geen waterstralen of stoom om het apparaat te reinigen. • Maak het apparaat schoon met een vochtige, zachte doek.
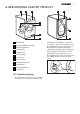
NEDERLANDS 7 4. BESCHRIJVING VAN HET PRODUCT 1 2 3 8 9 10 4 5 11 6 7 1 Bovenblad 2 Afwasmiddeldoseerbakje 3 Bedieningspaneel 4 Handgreep 5 Typeplaatje 6 Afvoerpomp 7 Stelvoetjes 8 Afvoerslang 9 Watertoevoerklep 10 Hoofdkabel 11 Transportbouten 12 Stelvoetjes 4.1 Kinderbeveiliging • Als u deze beveiliging activeert, kunt u de deur niet sluiten. Dit voorkomt dat 12 u kinderen of huisdieren in de trommel opsluit.
www.aeg.com 4.2 Accessoires 1 1 Moersleutel 2 4 Om de transportbouten te verwijderen. 2 Plastic dopjes Voor het afdichten van de gaten aan de achterzijde van het apparaat nadat u de transportbouten hebt verwijderd. 3 Toevoerslang met geïntegreerd beschermingssysteem tegen wateroverlast Om mogelijke wateroverlast te voorkomen. 4 Plastic slanggeleider Om een afvoerslang op de rand van een gootsteen te bevestigen. 3 5.
NEDERLANDS De AUTO Stand-by functie schakelt het apparaat automatisch uit om stroom te besparen als: • Er een programma is geselecteerd, maar na 5 minuten van de instelling nog niet op de toets is gedrukt. 4 . – Alle instellingen worden geannuleerd – Druk op de knop 1 om het apparaat weer in te schakelen. – Stel het wasprogramma en alle mogelijke opties • 5 minuten na afloop van het wasprogramma. Raadpleeg 'Aan het einde van het programma'. 5.
www.aeg.com U kunt de deur van het apparaat niet openen als het symbool brandt. U kunt de deur van het apparaat openen als het symbool uit gaat. Het symbool blijft aan, maar het programma is voltooid: • Er staat water in de trommel. • De functie "Spoelstop" is aan. Uitgestelde start D • De programmatijd (was- en/of droogfase) Als het programma start, vermindert de tijd in stappen van 1 minuut. • Startuitstel Als u op de toets startuitstel drukt, toont de display de uitgestelde starttijd.
NEDERLANDS 5.8 Toets automatische drogen 8 Druk op deze toets om automatisch het droogniveau van uw wasgoed in te stellen. Het symbool van het ingestelde niveau wordt op het display weergegeven. • Extra droog • Kastdroog • Strijkdroog U kunt niet alle niveaus voor alle stofsoorten automatisch instellen. 5.9 Permanente extra spoelfunctie Met deze functie kunt u de extra spoelfunctie permanent aan laten als u een nieuw programma instelt.
www.aeg.com 6. PROGRAMMA’S Programma Temperatuur Type lading max. gewicht van belading CyclusFuncties beschrijving WASPROGRAMMA'S Katoen Blanc/Couleurs Katoen 95° - Koud Wit en bont katoen, Wassen normaal vervuild. Spoelingen max. 8 kg Lang centrifugeren AANPASSEN TOERENTAL SPOELSTOP EXTRA SPOELING TIJD BESPAREN1) Katoen + Voorwas Wit en bont katoen, Blanc/Couleurs + zwaar vervuild. Prélavage max.
NEDERLANDS 13 Programma Temperatuur Type lading max. gewicht van belading CyclusFuncties beschrijving Wol / Zijde In de machine wasbare wol. Met de hand wasbare wol en fijn wasgoed met het symbool 'handwas'. max. 2 kg Wassen Spoelingen Kort centrifugeren AANPASSEN TOERENTAL SPOELSTOP 20 Min. - 3 kg 40° - 30° Snelle was voor sportkleding, of katoenen en synthetische licht vervuilde of slechts eenmaal gedragen kleding, max. lading.
www.aeg.com Programma Temperatuur Type lading max. gewicht van belading CyclusFuncties beschrijving Non-stop 60 min. 30° Compleet programma samengesteld uit wasfase + droogfase voor een kleine lading met gemengde stoffen (katoenen en synthetische artikelen). max. 1 kg Wassen Spoelingen Kort centrifugeren Automatisch drogen Super Eco6) Koud Gemengde stoffen (katoen en synthetische stoffen). max.
NEDERLANDS 15 6.1 Programma’s voor automatisch drogen Droogniveau Soort weefsel Extra droog Artikelen van badstof Katoen en linnen (badjassen, badhanddoeken, etc.) tot 6 kg Katoen en linnen (badjassen, badhanddoeken, etc.) tot 6 kg Synthetische en gemengde stoffen (truien, blouses, ondergoed, huishoudlinnen) tot 3 kg Katoen en linnen (lakens, tafellakens, overhemden, etc.) tot 6 kg KASTDROOG Voor op te bergen kledingstukken Strijkdroog Voor strijken Lading 6.
www.aeg.com 7. VERBRUIKSWAARDEN Programma Energieverbruik (KWh) Waterverbruik (liter) Katoen 60° 1.60 72 Katoen ECO 60° 1) 1.04 59 Katoen 40° 1.00 72 Synthetische stoffen 40° 0.60 50 Fijne was 40° 0.70 60 Wol/Handwas 30° 0.35 57 Programmaduur (minuten) Raadpleeg voor de duur van de programma's,het display op het bedieningspaneel.
NEDERLANDS 17 Zorg ervoor dat er geen wasgoed tussen de deur blijft klemmen. Er kan waterlekkage of beschadigd wasgoed ontstaan. 9.2 Wasmiddel en additieven (wasverzachter, vlekkenmiddel) toevoegen Het doseerbakje voor de voorwasfase, het inweekprogramma en voor de vlekkenfunctie. Voeg inweek-, vlekken- en voorwasmiddelen toe voordat u het programma start. Het vakje voor het wasmiddel van de wasfase.
www.aeg.com De stand van de klep controleren 1. Trek de wasmiddeldoseerlade uit tot deze stopt. 2. Druk de hendel in om de lade uit te trekken. 3. Draai de klep omhoog om poederwasmiddel te gebruiken. 4. Draai de klep omlaag om vloeibaar wasmiddel te gebruiken. Met de klep in de stand OMLAAG: – Gebruik geen gelatineachtige of dikke vloeibare wasmiddelen. – Giet niet meer vloeibaar wasmiddel in het vakje dan de limiet op de klep. – Stel de voorwasfase niet in. – Stel de startuitstelfunctie niet in.
NEDERLANDS gaat aan, of de display toont het bijbehorende symbool. 5. Druk op toets 4 om het programma te starten. Het lampje van toets 4 is aan. display verschijnt. De bijbehorende symbolen gaan branden. 2. De afvoerpomp kan even werken als het apparaat gevuld wordt met water. De wasmachine past de cyclustijd automatisch aan op het wasgoed dat u in de trommel hebt gedaan, voor perfecte wasresultaten binnen een minimaal benodigde tijd.
www.aeg.com Als u het apparaat uit zet, dient u het programma opnieuw in te stellen. 9.10 Aan het einde van het programma • Het apparaat stopt automatisch. • De geluidssignalen klinken. • In de display gaat het symbool aan. • Het indicatielampje van de toets Start/ Pauze 4 gaat uit. • Het deurvergrendelingssymbool gaat uit. • Druk op toets 1 om het apparaat uit te schakelen. Vijf minuten na afloop van het programma schakelt energiebesparingsfuncie het apparaat automatisch uit.
NEDERLANDS Met tijdgestuurd drogen: • Blijf op de toets 7 drukken om de tijdswaarde in te stellen (zie de tabel «Programma voor ingestelde droogtijd»). Op het display verschijnt een minimale tijdswaarde. Tijdswaarde instellen • Telkens als u deze toets indrukt wordt de droogtijd met 5 minuten verlengd. • Na een paar seconden wijzigt de tijdwaarde op het display: het apparaat berekent ook de duur van de antikreuk en de koelfase. Definitieve tijdswaarde • Druk op toets 4 om het programma te starten.
www.aeg.com Het deursymbool voor de vergrendeling gaat branden. Elke minuut wordt de nieuwe tijdswaarde op het display weergegeven. De laatste minuten van de droogcyclus voert het apparaat een anti-kreukfase en de afkoelfasen uit. • Wanneer het programma is voltooid, stopt het apparaat automatisch. • De geluidssignalen klinken. • uit gaat, Wanneer het symbool kunt u de deur openen. • Haal het wasgoed uit het apparaat. Zorg ervoor dat de trommel leeg is. • Draai de waterkraan dicht.
NEDERLANDS • Reinig het afvoerfilter. • Na de droogfase reinigt u de lege trommel, de pakking en de deur grondig met een natte doek. Voor het verwijderen van pluisjes in de trommel, stelt u een speciaal programma in: • Maak de trommel leeg. • Maak de trommel, pakking en deur grondig schoon met een natte doek. 23 • Stel het spoelprogramma in. • Druk om de reinigingsfunctie in te schakelen, tegelijkertijd toets 9 en 7 in totdat CLE op het display verschijnt. • Druk op toets 4 om het programma te starten.
www.aeg.com 10.4 Waterhardheid Als de waterhardheid in uw gebied hoog of gemiddeld is, raden we u het gebruik van waterverzachter voor wasautomaten aan. In gebieden waar de waterhardheid zacht is, is het gebruik van een waterverzachter niet nodig. Neem contact op met de plaatselijke waterautoriteit voor de waterhardheid in uw gebied. Volg altijd de instructies die u vindt op de verpakking van de producten. Gelijkwaardige eenheden meten de waterhardheid: • Duitse graden (°dH).
NEDERLANDS te krijgen. Houd bij hoe lang uw droogprogramma's duren. Statische lading na het drogen voorkomen: • Gebruik wasverzachter tijdens de wasfase. • Gebruik speciale wasverzachter voor droogautomaten. Zorg dat u uw wasgoed aan het einde van het droogprogramma zo snel mogelijk uit het apparaat haalt. 25 10.8 Extra drogen Als het wasgoed aan het einde van het droogprogramma nog steeds vochtig is, stelt u nogmaals een korte droogfase in.
www.aeg.com • Reinig de trommel met een speciaal product voor roestvrij staal. • Start een kort programma voor katoen op de maximale temperatuur met een kleine hoeveelheid wasmiddel. 11.6 Wasmiddeldoseerlade De wasmiddeldoseerlade reinigen: 1 1. 2. Druk op de hendel. Trek de doseerlade naar buiten. 3. Verwijder het bovenste gedeelte van het vakje voor vloeibare nabehandelingsmiddelen. Maak alle onderdelen schoon met water. 2 4. 5. 6. 11.
NEDERLANDS 27 De afvoerpomp reinigen: 1. Open het afvoerpompdeurtje. 2. Trek de klep naar voren om hem te verwijderen. 3. Plaats een bak onder de uitsparing van de afvoerpomp om het uitstromende water op te vangen. Druk de twee hendels in en trek het afvoerkanaal naar voren om het water eruit te laten stromen. 4. 1 5. 6. Als de bak vol met water is, duwt u het afvoerkanaal terug en leegt u de bak. Herhaal stap 4 en 5 tot er geen water meer uit de afvoerpomp stroomt.
www.aeg.com 9. Reinig het filter onder de waterkraan en plaats het terug in de speciale geleiders van de pomp. 10. Zorg ervoor dat het filter stevig vastzit om waterlekkage te voorkomen. 11. Plaats de klep terug en sluit het afvoerpompdeurtje. 2 1 11.8 Het filter van de toevoerslang en het klepfilter Het kan nodig zijn filters te reinigen als: • Het apparaat niet met water wordt gevuld. • De machine langdurig water vult.
NEDERLANDS Plaats het afvoerkanaal terug en sluit de afvoerpompklep. Als u het water afvoert met de noodafvoerprocedure, dient u het afvoersysteem opnieuw te activeren: 1. Giet 2 liter water in het vakje voor het hoofdwasmiddel van de wasmiddeldoseerlade. 2. Start het programma om water af te voeren. 29 1. 2. 3. 4. Trek de stekker uit het stopcontact. Draai de waterkraan dicht. Verwijder de watertoevoerslang. Plaats de twee uiteinden van de toevoerslang in een bak en laat het water uit de slang stromen.
www.aeg.com Probleem Mogelijke oorzaak Mogelijke oplossing De waterdruk is te laag. Neem contact op met het waterleidingbedrijf. Het apparaat De waterafvoerslang is pompt geen water beschadigd. weg. Controleer of de waterafvoerslang niet is beschadigd. Het filter in de afvoerpomp is geblokkeerd. Reinig het filter of maak de afvoerpomp schoon. Zie het hoofdstuk "Onderhoud en reiniging". De aansluiting van de waterafvoerslang is niet correct. Zorg dat de aansluiting altijd correct is.
NEDERLANDS Probleem Mogelijke oorzaak Mogelijke oplossing Het kinderslot is geactiveerd. Het kinderslot uitschakelen. 31 Er ligt water op de Lekkage bij de koppeZorg dat de koppelingen goed vloer. lingen van de waterslan- zijn aangedraaid. gen. U kunt de deur van het apparaat niet openen. Het apparaat maakt een abnormaal geluid. Het apparaat vult zich met water en pompt dit direct weg. Lekkage van de afvoerpomp. Zorg dat het filter van de afvoerpomp goed is bevestigd.
www.aeg.com Probleem Het wasgoed zit vol met pluisjes van verschillende kleuren. Mogelijke oorzaak Mogelijke oplossing U hebt een verkeerd droogniveau of de verkeerde droogtijd ingesteld. Stel een langere droogtijd in. De stoffen die tijdens de vorige wasbeurt zijn gewassen, hebben pluisjes met een andere kleur afgegeven. • De droogfase helpt bij het verwijderen van (een deel van) de pluizen. • Maak het wasgoed schoon met een pluisverwijdermiddel.
NEDERLANDS 33 2. 3. Verwijder de kartonnen deksel. Verwijder de piepschuim verpakkingsmaterialen. 4. De interne folie eraf trekken. 5. Open de deur. Verwijder het piepschuim blok van de deur en alle andere onderdelen uit de trommel. 6. Plaats het piepschuim verpakkingsmateriaal op de vloer achter het apparaat. Plaats het apparaat met de achterzijde voorzichtig op het kartonnen deksel. Zorg dat u de slangen niet beschadigt.
www.aeg.com 7. 8. Verwijder de piepschuim bescherming van de onderkant. Zet het apparaat weer rechtop. 1 2 9. Verwijder het aansluitsnoer en de afvoerslang van de slanghouders. 10. Draai de drie transportbouten los. Gebruik de bij het apparaat geleverde moersleutel. 11. Trek de bouten met de plastic tussenstukken eruit. 12. Doe de plastic dopjes in de gaatjes. U vindt deze doppen in de zak van de gebruikershandleiding.
NEDERLANDS WAARSCHUWING! Verwijder alle transportbouten en verpakking voordat u het apparaat installeert. 35 Wij raden u aan om alle transportbouten en verpakking te bewaren voor als u het apparaat gaat verplaatsen. 13.3 Plaatsing en waterpas zetten • Installeer het apparaat op een vlakke harde vloer. • Zorg ervoor dat de vloerbedekking de luchtcirculatie onder het apparaat niet stopt. • Zorg ervoor dat het apparaat geen muren of andere apparaten raakt.
www.aeg.com 13.4 De toevoerslang • Sluit de slang aan op het apparaat. Draai de toevoerslang alleen naar links of rechts. Maak de ringmoer los om hem in de juiste stand te zetten. 20 O 45 O • Sluit de watertoevoerslang aan op een koudwaterkraan met 3/4-schroefdraad. LET OP! Zorg ervoor dat de koppelingen niet lekken. Gebruik geen verlengslang als de toevoerslang te kort is. Neem contact op met de klantenservice voor vervanging van de toevoerslang.
NEDERLANDS 37 Met de plastic slanggeleider. • Op de rand van een gootsteen. • Zorg dat de plastic geleider niet kan bewegen als het apparaat water afvoert. Bevestig de geleider op de waterkraan of wand. • Op een standpijp met ventilatieopening. Raadpleeg de illustratie. Rechtstreeks in een afvoerpijp op een hoogte van niet minder dan 60 cm en niet meer dan 100 cm. Het einde van de afvoerslang moet altijd geventileerd zijn, d.w.z.
www.aeg.com U kunt de afvoerslang maximaal 400 cm verlengen. Neem contact op met de klantenservice voor de andere afvoerslang en het verlengstuk. 14. MILIEUBESCHERMING Recycle de materialen met het symbool . Gooi de verpakking in een geschikte verzamelcontainer om het te recyclen. Help om het milieu en de volksgezondheid te beschermen en recycle het afval van elektrische en elektronische apparaten. Gooi apparaten gemarkeerd met het symbool niet weg met het huishoudelijk afval.
FRANÇAIS 39 SOMMAIRE 1. 2. 3. 4. 5. 6. 7. 8. 10. 11. 12. 13. CONSIGNES DE SÉCURITÉ . . . . . . . . . . . . . . . . . . . . . . . . . . . . . . . . . . . . . . . . . . . . . . . . . . INSTRUCTIONS DE SÉCURITÉ . . . . . . . . . . . . . . . . . . . . . . . . . . . . . . . . . . . . . . . . . . . . . . . . CARACTERISTIQUES TECHNIQUES . . . . . . . . . . . . . . . . . . . . . . . . . . . . . . . . . . . . . . . . . . . DESCRIPTION DE L'APPAREIL . . . . . . . . . . . . . . . . . . . . . . . . . . . . . . . . .
www.aeg.com 1. CONSIGNES DE SÉCURITÉ Avant d'installer et d'utiliser cet appareil, lisez soigneusement les instructions fournies. Le fabricant ne peut être tenu pour responsable des dommages et blessures liés à une mauvaise installation ou utilisation. Conservez toujours cette notice avec votre appareil pour vous y référer ultérieurement. 1.1 Sécurité des enfants et des personnes vulnérables AVERTISSEMENT Risque d'asphyxie, de blessure ou d'invalidité permanente.
FRANÇAIS 41 • Respectez la charge maximale de 8 kg (reportez-vous au chapitre « Tableau des programmes »). • Si le câble d'alimentation est endommagé, il doit être remplacé par le fabricant, son atelier d'entretien ou un technicien qualifié afin d'éviter tout danger. • La pression de l'eau en service (minimale et maximale) doit être comprise entre 0,5 bar (0,05 MPa) et 8 bar (0,8 MPa) • Les orifices d'aération situés à la base (si présents) ne doivent pas être obstrués par de la moquette.
www.aeg.com tallation. Assurez-vous que la prise de courant est accessible une fois l'appareil installé. • Ne tirez jamais sur le câble d'alimentation électrique pour débrancher l'appareil. Tirez toujours sur la prise. • Ne touchez jamais le câble d'alimentation ou la prise avec des mains mouillées. • Cet appareil est conforme aux directives CEE. Raccordement à l'arrivée d'eau • Veillez à ne pas endommager les tuyaux de circulation d'eau.
FRANÇAIS • Ne montez pas sur le hublot ouvert de votre appareil ; ne vous asseyez pas dessus. • Respectez la charge maximale. • N'introduisez pas de linge non essoré dans l'appareil. produits de lavage neutres. N'utilisez pas de produits abrasifs, de tampons à récurer, de solvants ou d'objets métalliques. 2.4 Mise au rebut AVERTISSEMENT Risque de blessure ou d'asphyxie. 2.3 Entretien et nettoyage AVERTISSEMENT Risque de blessure corporelle ou de dommages matériels.
www.aeg.com 4. DESCRIPTION DE L'APPAREIL 1 2 3 8 9 10 4 5 11 6 7 1 Plan de travail 2 Distributeur de produit de lavage 3 Bandeau de commande 4 Poignée de la porte 5 Plaque signalétique 6 Pompe de vidange 7 Pieds pour que l'appareil soit de ni- veau 8 Tuyau de vidange 9 Tuyau d'arrivée d’eau 10 Câble d'alimentation électrique 11 Dispositifs de protection 12 Pieds pour que l'appareil soit de ni- veau 4.1 Sécurité enfants • Lorsque ce dispositif est activé, vous ne pouvez pas fermer le hublot.
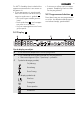
FRANÇAIS 45 4.2 Accessoires 1 1 Clé 2 4 Pour retirer les dispositifs de protection. 2 Caches en plastique Pour boucher les orifices situés à l'arrière de l'appareil après avoir retiré les dispositifs de protection. 3 Tuyau anti-débordement Pour éviter toute fuite éventuelle 4 Guide en plastique Pour relier le tuyau de vidange au bord d'un évier. 3 5. BANDEAU DE COMMANDE 1 2 Katoen Eco Blanc/Couleurs +Voorwas Super Eco +Prélavage Synthetica Non Stop 60 Min.
www.aeg.com – Toutes les sélections sont annulées. – Appuyez sur le bouton 1 pour remettre le lave-linge en marche. – Sélectionnez à nouveau le programme de lavage et toutes les options possibles. • 5 minutes à compter de la fin du programme de lavage. Voir "A la fin du programme". 5.2 Programmateur 2 Tournez cette manette pour sélectionner un programme. Le voyant correspondant au programme s'allume. 5.3 Affichage 3 A B C D L'affichage indique : A • La température maximale du programme.
FRANÇAIS D 47 • La durée du programme (phase de lavage et/ou de séchage) Une fois que le programme a démarré, cette durée diminue par intervalles d'une minute. • Le départ différé Lorsque vous appuyez sur la touche Départ différé, l'heure du départ différé s'affiche. • Codes d'alarme En cas de dysfonctionnement de l'appareil, des codes d'alarme s'affichent. Reportez-vous au chapitre « En cas d'anomalie de fonctionnement ».
www.aeg.com Certains degrés automatiques de séchage ne peuvent pas être sélectionnés selon le type de textile. 5.9 Fonction Rinçage plus permanente Avec cette fonction, vous pouvez conserver la fonction Rinçage plus en permanence quand vous sélectionnez un nouveau programme. • Pour activer la fonction, appuyez sur la touche 6 et sur la touche 5 en même temps jusqu'à ce que le voyant de la touche 7 s'allume.
FRANÇAIS 49 6. PROGRAMMES Programme Température Type de charge Charge max. Description du cycle Fonctions Lavage Rinçages Essorage long RÉDUCTION DE LA VITESSE D'ESSORAGE ARRÊT CUVE PLEINE RINÇAGE SUPPLÉMENTAIRE GAIN DE TEMPS1) Katoen + Voorwas Coton blanc et couBlanc/Couleurs + leurs très sales. Prélavage Max.
www.aeg.com Programme Température Type de charge Charge max. Description du cycle Fonctions Fijne Was Délicats Délicats 40° - Froid Vêtements en textiles délicats tels que l'acrylique, la viscose ou le polyester, normalement sales. Max. 4 kg Lavage Rinçages Essorage court RÉDUCTION DE LA VITESSE D'ESSORAGE ARRÊT CUVE PLEINE RINÇAGE SUPPLÉMENTAIRE GAIN DE TEMPS1) Wol / Zijde Vêtements en laine lavables en machine.
FRANÇAIS Programme Température Synthetica Synthétiques Synthétiques Katoen Blanc/Couleurs Blanc/Couleurs Non Stop 60 Min. 30° Type de charge Charge max. Description du cycle Articles en textiles synthétiques Max. 3 kg Séchage automatique ou chronométrique Articles en coton Max. 6 kg Séchage automatique ou chronométrique Programme complet composé d'une phase de lavage + une phase de séchage pour une petite charge de linge mélangé (articles en coton et en textiles synthétiques). Max.
www.aeg.com 6) Sélectionnez ce programme pour réduire la durée du cycle ainsi que la consommation d'énergie et d'eau. 7) Le programme « Coton Eco » à 60 °C pour une charge de 8 kg est le programme de référence pour les données de l'étiquette énergétique, conformément aux normes CEE 92/75. 6.1 Programmes pour le séchage automatique Degré de séchage Type de textile Très sec Pour les articles en tissu éponge Coton et lin (peignoirs, serviettes de bain, etc.
FRANÇAIS 53 6.2 Programmes pour le séchage chronométrique Vitesse Charge d'essorage (kg) (tr/min) Durées conseillées (min) 6 1400 225 - 245 4 1400 135 - 155 2 1400 95 - 105 6 1400 215 - 235 4 1400 125 - 145 2 1400 85 - 95 3 1200 135 - 145 1 1200 40 - 50 Prêt à repasser Pour les vêtements à repasser 6 Coton et lin (draps, nappes, chemises, 4 etc.
www.aeg.com 7. VALEURS DE CONSOMMATION Programme Consommation énergétique (KWh) Consommation d'eau (litres) Coton 60 ° 1.60 72 Programme Coton économie d'énergie 60 °1) 1.04 59 Coton 40 ° 1.00 72 Synthétiques 40 ° 0.60 50 Textiles délicats 40 ° 0.70 60 Laine/Lavage à la main 30 ° 0.35 57 Durée du programme (minutes) Pour la durée des programmes, reportezvous à la fenêtre d'affichage du bandeau de commande.
FRANÇAIS 55 Assurez-vous de ne pas coincer de linge entre le joint et la porte. Risque de fuite d'eau ou de détérioration du linge. 9.2 Ajout du produit de lavage et des additifs Compartiment à lessive pour la phase de prélavage, le programme de trempage et la fonction Taches. Ajoutez la lessive pour le prélavage, le trempage et le détachage avant le départ du programme. Compartiment à lessive pour la phase de lavage.
www.aeg.com Vérifiez la position du volet. 1. Tirez le distributeur de produit de lavage jusqu'à la butée. 2. Appuyez sur le levier pour faire sortir le distributeur. 3. Pour utiliser de la lessive en poudre, tournez le volet vers le haut. 4. Pour utiliser de la lessive liquide, tournez le volet vers le bas. Avec le volet en position BASSE : – N'utilisez pas de lessives liquides gélatineuses ou épaisses. – N'insérez pas de lessive liquide au-delà du niveau maximal indiqué sur le volet.
FRANÇAIS tionnée s'allume ou l'écran affiche le symbole correspondant. 5. Appuyez sur la touche 4 pour lancer le programme. Le voyant de la touche 4 est allumé. La pompe de vidange peut momentanément se mettre en route lorsque l'appareil se remplit d'eau. 57 9.7 Sélectionnez le départ différé. 1. Appuyez plusieurs fois sur la touche 5 jusqu'à ce que le délai du départ différé souhaité apparaisse sur l'afficheur. Les symboles correspondants apparaissent. 2.
www.aeg.com Si la température et le niveau de l'eau dans le tambour sont trop élevés, le symbole de verrouillage de la porte reste affiché et il est impossible d'ouvrir la porte. Pour ouvrir la porte, respectez la procédure suivante : 1. Mettez à l'arrêt l'appareil. 2. Attendez quelques minutes. 3. Assurez-vous qu'il n'y a pas d'eau dans le tambour. 2. Si vous mettez à l'arrêt l'appareil, il est nécessaire de sélectionner de nouveau le programme. 9.11 Séchage indépendant 9.
FRANÇAIS • Appuyez sur la touche 4 pour lancer le programme. Le symbole de verrouillage du hublot s'allume. Le symbole du séchage commence à clignoter. Certains degrés de séchage ne peuvent pas être sélectionnés selon le type de linge. Avec le séchage chronométrique : • Appuyez à plusieurs reprises sur la touche 7 pour régler la durée de séchage (reportez-vous au tableau du « Programme pour le séchage chronométrique »). La durée minimale s'affiche.
www.aeg.com Le degré de séchage Prêt à ranger s'affiche. Le degré de séchage Très sec s'affiche. Le symbole de séchage s'allume. La valeur affichée est la durée des cycles de lavage + séchage calculée selon le poids d'une charge par défaut. • Appuyez sur la touche 4 pour lancer le programme. Le symbole du degré de séchage sélectionné reste allumé. Les symboles des autres degrés de séchage s'éteignent. Le symbole de verrouillage du hublot s'allume.
FRANÇAIS 9.14 Peluches sur les textiles Durant les phases de lavage et/ou séchage, certains types de textiles, tels que le tissu éponge, la laine ou les sweat-shirts, peuvent perdre des peluches. Ces peluches peuvent ensuite s'accrocher aux tissus lavés au cours du cycle suivant. Cet inconvénient est encore plus fréquent avec des tissus techniques.
www.aeg.com 10.3 Produits de lavage et additifs • Utilisez uniquement des produits de lavage et des additifs spécialement conçus pour les lave-linge. • Ne mélangez pas différents types de produits de lavage. • Afin de préserver l'environnement, n'utilisez que la quantité nécessaire de produit de lavage. • Respectez les instructions qui se trouvent sur les emballages de ces produits. • Utilisez les produits adaptés au tissu, à la température du programme et au niveau de salissure.
FRANÇAIS 10.6 Étiquettes des vêtements Lorsque vous séchez le linge, respectez les indications se trouvant sur les étiquettes des fabricants des vêtements : • = Le vêtement peut être séché en machine • = Le cycle de séchage est à haute température • = Le cycle de séchage est à basse température • = Le vêtement ne peut pas être séché en machine. 10.
www.aeg.com • Utilisez une quantité correcte de poudre de lavage dotée de propriétés biologiques. Après chaque lavage, laissez la porte ouverte pendant un moment pour éviter les moisissures et les mauvaises odeurs. 11.4 Joint du hublot Examinez régulièrement le joint et enlevez tous les objets situés à l'intérieur. 11.5 Tambour Examinez régulièrement le tambour pour éviter la formation de calcaire ou de particules de rouille.
FRANÇAIS 5. 6. 65 Nettoyez le logement du panier à l'aide d'une brosse. Remettez le panier dans son logement. AVERTISSEMENT 1. Débranchez l'appareil électriquement. 2. Ne retirez pas le filtre pendant que l'appareil fonctionne. Ne nettoyez pas la pompe de vidange si l'eau de l'appareil est chaude. L'eau doit être froide pour que vous puissiez nettoyer la pompe de vidange. 11.7 Pompe de vidange Examinez régulièrement la pompe de vidange et assurez-vous qu'elle est propre.
www.aeg.com 5. 1 6. 2 2 1 11.8 Le filtre du tuyau d'arrivée d'eau et le filtre de la soupape Il peut être nécessaire de nettoyer les filtres lorsque : • L'appareil n'est pas approvisionné en eau. • L'appareil met du temps à s'approvisionner en eau. Lorsque le récipient est rempli, remettez la conduite de vidange en place et videz le récipient. Répétez les étapes 4 et 5 jusqu'à ce que l'eau ne s'écoule plus de la pompe de vidange.
FRANÇAIS 67 Pour nettoyer les filtres du tuyau d'arrivée d'eau : Fermez le robinet d'arrivée d'eau. Retirez le tuyau d'arrivée d'eau du robinet d'arrivée d'eau. 3. Nettoyez le filtre du tuyau à l'aide d'une petite brosse dure. 1. 2. 4. 5. 6. 7. 20° Retirez le tuyau d'alimentation situé à l'arrière de l'appareil. Nettoyez le filtre de la soupape à l'aide d'une petite brosse dure ou d'un chiffon. Réinstallez le tuyau d'alimentation.
www.aeg.com AVERTISSEMENT Assurez-vous que la température est supérieure à 0 °C avant d'utiliser l'appareil à nouveau. Le fabricant ne pourra être tenu pour responsable en cas de dommages dus aux basses températures. 12. EN CAS D'ANOMALIE DE FONCTIONNEMENT L'appareil ne démarre pas ou se met à l'arrêt en cours de programme. Dans un premier temps, essayez de trouver une solution au problème (reportezvous au tableau). Si vous n'y parvenez pas, contactez votre service après-vente.
FRANÇAIS Problème Cause probable 69 Solution possible Un programme de lava- Sélectionnez le programme de ge sans phase de vidan- vidange. ge a été sélectionné. La fonction « Arrêt cuve pleine » est activée. Sélectionnez le programme de vidange. Le hublot de l'appareil n'est pas fermé correctement. Fermez correctement le hublot. Le système de sécurité anti-débordement s'est déclenché. • Débranchez l'appareil. • Fermez le robinet d'eau. • Contactez votre service après-vente.
www.aeg.com Problème Cause probable Solution possible Impossible d'ouvrir le hublot de l'appareil. Le programme de lavage est en cours. Laissez le programme de lavage se terminer. Il y a de l'eau dans le tambour. Sélectionnez le programme de vidange ou d'essorage. L'appareil n'est pas de niveau. Mettez l'appareil de niveau. Reportez-vous au chapitre « Installation ». Vous n'avez pas retiré l'emballage et/ou les boulons de transport. Retirez l'emballage et/ou les boulons de transport.
FRANÇAIS 71 Problème Cause probable Le linge est couvert de peluches de différentes couleurs. Les textiles lavés au • La phase de séchage vous cours du cycle précépermet d'éliminer une partie dent ont libéré des pedes peluches. luches de couleurs diffé- • Lavez votre linge avec un antirentes. pelucheux.
www.aeg.com 2. 3. Retirez la partie supérieure du carton. Retirez les cales en polystyrène. 4. Retirez le film interne. 5. Ouvrez le hublot. Retirez la cale en polystyrène du joint du hublot et tous les articles présents dans le tambour. 6. Placez l'une des cales en polystyrène au sol derrière l'appareil. Couchez avec soin l'appareil sur le dos. Assurez-vous de ne pas endommager les tuyaux.
FRANÇAIS 7. 8. 73 Retirez la base en polystyrène en bas de l'appareil. Remettez l'appareil en position verticale. 1 2 9. Retirez le câble d'alimentation électrique et le tuyau de vidange de leurs supports. 10. Desserrez les trois boulons. Utilisez la clé fournie avec l'appareil. 11. Retirez les entretoises en plastique. 12. Mettez les bouchons en plastique dans les orifices. Ces bouchons se trouvent dans le même sachet que la notice d'utilisation.
www.aeg.com AVERTISSEMENT Retirez toutes les attaches de transport et les dispositifs de sécurité avant d'installer l'appareil. Nous vous recommandons de conserver l'emballage et les dispositifs de sécurité en vue d'un éventuel déménagement de l'appareil. 13.3 Positionnement et mise à niveau • Placez l'appareil sur un sol plat et dur. • Assurez-vous que la circulation de l'air sous l'appareil ne soit pas entravée par des tapis. • Veillez à ce que l'appareil ne touche pas le mur ou les autres meubles.
FRANÇAIS 75 13.4 Le tuyau d'arrivée • Reliez le tuyau à l'appareil. Le tuyau d'alimentation peut être orienté vers la gauche ou la droite. Desserrez la bague pour qu'il soit bien positionné. 20 O 45 O • Raccordez le tuyau d'arrivée d'eau à un robinet fileté (3/4 po). ATTENTION Assurez-vous que les raccords ne fuient pas. N'utilisez pas de rallonge si le tuyau d'alimentation est trop court. Contactez le service aprèsvente pour remplacer le tuyau d'alimentation.
www.aeg.com 13.5 Vidange de l'eau Il existe différentes procédures pour raccorder le tuyau de vidange : Avec le guide de tuyau en plastique. • Sur le bord d'un évier. • Veillez à ce que le guide de tuyau en plastique ne puisse pas se déplacer quand l'appareil se vidange. Fixez le guide au robinet d'arrivée d'eau ou au mur. • À une conduite fixe dotée d'une ventilation spéciale. Reportez-vous à l'illustration.
FRANÇAIS 77 • Directement dans une canalisation de vidange murale intégrée et serrez-le avec une attache. La longueur maximale du tuyau de vidange est de 400 cm. Contactez le service après-vente pour les autres longueurs de tuyaux de vidange et les rallonges. 14. EN MATIÈRE DE PROTECTION DE L'ENVIRONNEMENT Recyclez les matériaux portant le symbole . Déposez les emballages dans les conteneurs prévus à cet effet.
www.aeg.
FRANÇAIS 79
132925571-B-202013 www.aeg.