EN User Manual Washer Dryer L75670NWD
www.aeg.com CONTENTS 1. SAFETY INFORMATION.................................................................................................3 2. SAFETY INSTRUCTIONS................................................................................................ 5 3. PRODUCT DESCRIPTION.............................................................................................. 7 4. CONTROL PANEL...........................................................................................................7 5.
ENGLISH 1. 3 SAFETY INFORMATION Before the installation and use of the appliance, carefully read the supplied instructions. The manufacturer is not responsible for any injuries or damages that are the result of incorrect installation or usage. Always keep the instructions in a safe and accessible location for future reference. 1.1 Children and vulnerable people safety WARNING! Risk of suffocation, injury or permanent disability.
www.aeg.com • • • • • • • • • • • • • Connect the mains plug to the mains socket only at the end of the installation process. Make sure that the mains plug is accessible after installation. The ventilation opening in the base (if applicable) must not be covered by a carpet, mat, or any floor covering. Ensure good air ventilation in the located room to avoid the backflow of unwanted gases into the room from appliances burning gas or other fuels, including open fires.
ENGLISH • • • • • • • • 5 Items such as foam rubber (latex foam), shower caps, waterproof textiles, and rubber backed articles and clothes, or pillows fitted with foam rubber pads should not be dried in the washer dryer. Fabric softeners, or similar products, should only be used as specified by the product manufacturer’s instructions. Remove all objects from items that could be a source of fire ignition such as lighters or matches.
www.aeg.com fully level with the aid of a spirit level. If it is not, adjust the feet accordingly. 2.2 Electrical Connection WARNING! Risk of fire and electrical shock. • The appliance must be earthed. • Always use a correctly installed shockproof socket. • Do not use multi-plug adapters and extension cables. • Do not pull the mains cable to disconnect the appliance. Always pull the mains plug. • Do not touch the mains cable or the mains plug with wet hands. • This appliance complies with the E.E.C.
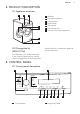
ENGLISH 3. PRODUCT DESCRIPTION 3.1 Appliance overview 1 2 3 Worktop Detergent dispenser Control panel Door handle Rating plate Drain pump filter Feet for levelling the appliance 1 2 3 4 5 6 7 4 5 6 7 3.2 Fixing plate kit (4055171146) Read carefully the instructions supplied with the accessory. Available from your authorised dealer. If you install the appliance on a plinth, secure the appliance in the fixing plates. 4. CONTROL PANEL 4.
www.aeg.com 3 Display 8 Drying level button 4 Start/Pause button 9 Spin button 5 Delay Start button 10 Temperature button 6 Time Save button 7 Drying time button 4.2 Display A B Temperature area: Temperature indicator A Cold water indicator Spin area: Spin speed indicator B No Spin indicator1) Rinse Hold indicator 1) Only available for Spin/Drain programme.
ENGLISH Dryness level symbols1): Iron dry Cupboard dry Extra dry Display indicators2): Door locked - You cannot open the door when this symbol is on. You can open the door only when the symbol goes off. C Washing phase Drying phase Child safety lock Extra rinse Delay start 1) They come on when you set an automatic drying programme. 2) The symbols appear on the display when the related phase or function is set.
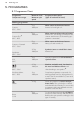
www.aeg.com 5. PROGRAMMES 5.1 Programme Chart Programme Temperature range Maximum load Maximum spin speed Programme description (Type of load and soil level) 7 kg 1600 rpm White cotton and coloured cotton. Normal soil and light soil. 7 kg 1600 rpm White cotton and fast-coloured cotton. Normal soil. The energy consumption decreases and the time of the washing programme is extended. 7 kg 1600 rpm White cotton and coloured cotton. Heavy soil and normal soil. 3.
ENGLISH Programme Temperature range Spin/Drain3) 20 Min. - 3 kg 40°C - 30°C Easy Iron 60°C - Cold Delicates 40°C - Cold 11 Maximum load Maximum spin speed Programme description (Type of load and soil level) 7 kg 1600 rpm To spin the laundry and to drain the water in the drum. All fabrics, except woollens and delicate fabrics. 3 kg 1200 rpm Cotton and synthetic items with light soil level or worn only once. 3.5 kg 800 rpm Synthetic items requiring a gentle 3.
www.aeg.com Programme 1) 2) Synthetics ■ ■ ■ ■ ■ Silk ■ ■ ■ ■ ■ Wool ■ ■ Steam ■ ■ Rinse ■ Spin/Drain4) ■ ■ ■ ■ ■ 20 Min. - 3 kg ■ ■ ■ ■ ■ Easy Iron ■ ■ Delicates ■ ■ ■ NonStop 60min. ■ ■ ■ ■ ■ ■ ■ 1) If the permanent Extra Rinse option is activated, the appliance adds some additional rinses. In the Rinse programme, if you set a low spin speed the appliance performs delicate rinses and a short spin.
ENGLISH Dryness Level Type of fabric Load Iron Dry Suitable for ironing Cottons and Linen (sheets, tablecloths, shirts, etc) up to 4 kg 13 1) Hints for test institute The test performance, in accordance with EN 50229, must be carried out with a FIRST drying load of the maximum declared drying capacity (load composition according to EN61121) by setting the AUTOMATIC CUPBOARD DRY programme for Cotton.
www.aeg.com 5.4 Woolmark Apparel Care Blue • The wool wash cycle of this machine has been approved by The Woolmark Company for the washing of wool garments labelled as «hand wash» provided that the garments are washed according to the instructions issued by the manufacturer of this washing machine. Follow the garment care label for drying and other laundry instructions.
ENGLISH Programmes Load (kg) Wool/Handwash 30°C 15 Energy Water conApproximate proconsump- sumption (li- gramme duration tion (kWh) tre) (minutes) 1.5 0.25 45 56 1) «Cotton Energy Saving programme » at 60°C with a load of 7 kg is the reference programme for the data entered in the energy label, in compliance with EEC 92/75 standards. 7. OPTIONS 7.1 Temperature • Iron dry – laundry to be ironed Set this option to change the default temperature.
www.aeg.com The display shows the related indicator and delay time. 8. SETTINGS 8.1 Acoustic signals The acoustic signals operate when: • You activate the appliance. • You deactivate the appliance. • You press the buttons. • The programme is completed. • The appliance has a malfunction. To deactivate/activate the acoustic signals, press Drying Level and Drying Time at the same time for 6 seconds. If you deactivate the acoustic signals, they continue operate when the appliance has a malfunction. 8.
ENGLISH CAUTION! Make sure that no laundry becomes trapped between the seal and the door. There is a risk of water leakage or damage to the laundry. 17 A 10.2 Filling the detergent and additives 3. To use powder detergent, turn the flap up. Compartment for prewash phase, soak programme or stain remover. Compartment for washing phase. Compartment for liquid additives (fabric conditioner, starch). Maximum level for quantity of liquid additives. Flap for powder or liquid detergent.
www.aeg.com With the flap in the position DOWN: • Do not use gelatinous or thick liquid detergents. • Do not put more liquid detergent than the limit shown on in the flap. • Do not set the prewash phase. • Do not set the delay start function. 5. Measure out the detergent and the fabric conditioner. 6. Carefully close the detergent dispenser. Make sure that the flap does not cause a blockage when you close the drawer. 10.4 Activating the appliance 1. Connect the mains plug to the mains socket. 2.
ENGLISH 1. Press button Start/Pause to set the appliance to pause. The related indicator flashes. 2. Press button Delay Start repeatedly The programme or the delay start continues. until the display shows . 3. Press button Start/Pause again to start the programme immediately. When the programme has finished, the appliance stops automatically. The acoustic signal operates (if it is active). 10.
www.aeg.com 4. Press On/Off some seconds to deactivate the appliance. The appliance drains and spins automatically after approximately18 hours. 10.15 AUTO Stand-by option • After 5 minutes from the end of the washing programme Press the button On/Off to activate the appliance again. The display shows the end of the last set programme. Turn the programme knob to set a new cycle.
ENGLISH • The display shows the set time value: e.g. . Each time you press this button the time value increases by 5 minutes. • After some seconds the display shows a new time value: e.g. . The appliance calculates also the duration of the anti-crease and the cooling phases. 2. Press Start/Pause to start the programme. • The display shows regularly a new time value. starts to • The drying indicator flash. • The display shows the door locked indicator .
www.aeg.com The display shows the indicator . The time value on the display is the duration of the washing + drying cycles, calculated on a default load size. To have a good drying the appliance does not let you set a too low spin speed for the items to be washed and dried. 2. Press Start/Pause to start the programme. In the display the indicator of the set dryness level stays on. goes on. The door locked indicator The display shows regularly a new time value.
ENGLISH 23 13. HINTS AND TIPS WARNING! Refer to Safety chapters. 13.1 The laundry load • Divide the laundry in: white, coloured, synthetics, delicates and wool. • Obey the washing instructions that are on the laundry care labels. • Do not wash white and coloured items together. • Some coloured items can discolour with the first wash. We recommend that you wash them separately for the first times. • Button up pillowcases, close zippers, hooks and poppers. Tie up belts.
www.aeg.com Use the correct quantity of the water softener. Obey the instructions that you find on the packaging of the product. 13.6 Drying hints Prepare the drying cycle • Open the water tap. • Check if the drain hose is connected properly. Refer to installation chapter for more information. • For the maximum laundry load of the drying programmes, refer to the drying programmes table. 13.7 Items not suitable for drying Do not set a drying programme for this laundry: • Very delicate items.
ENGLISH 25 • Select the cotton programme with the highest temperature with a small quantity of detergent. Regularly examine the drum to prevent limescale and rust particles. To remove rust particles use only special products for washing machines. Do this separately from the laundry wash. 14.4 Door seal Always obey the instructions that you find on the packaging of the product. 14.3 Maintenance wash With the low temperature programmes it is possible that some detergent stays in the drum.
www.aeg.com 14.6 Cleaning the inlet hose and the valve filter 1. 2. 1 2 3 3. 4. 45° 20° 14.7 Cleaning the drain filter Do not clean the drain filter if the water in the appliance is hot. 1. 2.
ENGLISH 3. 4. 2 1 5. 6. 1 7. 2 8. 1 2 9.
www.aeg.com 14.8 Emergency drain Because of a malfunction, the appliance cannot drain the water. If this occurs, do steps (1) through (9) of 'Cleaning the drain filter'. If necessary, clean the pump. When you drain the water with the emergency drain procedure, you must activate the drain system again: 1. Put 2 litres of water in the main wash compartment of the detergent dispenser. 2. Start the programme to drain the water. 0° C, remove the remaining water from the inlet hose and the drain pump. 1.
ENGLISH Problem 29 Possible solution Make sure that there is not a damaged fuse in the fuse box. Make sure that the Start/Pause has been pressed. If the delay start is set, cancel the setting or wait for the end of countdown. Deactivate the Child Lock function if it is on. The appliance does not fill with water properly. Make sure that the water tap is open. Make sure that the pressure of the water supply is not too low. For this information, contact your local water authority.
www.aeg.com Problem Possible solution There is water on the floor. Make sure that the couplings of the water hoses are tight and there is not water leakages. Make sure that the drain hose have no damages. Make sure you use the correct detergent and the correct quantity of it. You cannot open the appliance door. Make sure that the washing programme is finished. Set the drain or the spin programme if there is water in the drum. Make sure that the appliance receives electrical power.
ENGLISH Problem 31 Possible solution Make sure you have set the correct cycle. if necessary ,set again a short drying time. The laundry is full of different colours fluff. The fabrics washed in the previous cycle released fluff of a different colour: • The drying phase helps to eliminate some fluff. • Clean the clothes with a fluff remover. In case of an excessive amount of fluff in the drum run the special programme to clean it (refer to “Fluff in the fabrics" for more details).
www.aeg.com 16.
ENGLISH 33
www.aeg.
ENGLISH 35
132955800-A-172016 www.aeg.