L 76475 FL L 76675 FL EN User manual DE Benutzerinformation 2 33
www.aeg.com CONTENTS 1. 2. 3. 4. 5. 6. 7. 8. 9. 10. 11. 12. 13. SAFETY INFORMATION . . . . . . . . . . . . . . . . . . . . . . . . . . . . . . . . . . . . . . . . . . . . . . . . . . . . . . 3 SAFETY INSTRUCTIONS . . . . . . . . . . . . . . . . . . . . . . . . . . . . . . . . . . . . . . . . . . . . . . . . . . . . . . 4 TECHNICAL INFORMATION . . . . . . . . . . . . . . . . . . . . . . . . . . . . . . . . . . . . . . . . . . . . . . . . . . 5 PRODUCT DESCRIPTION . . . . . . . . . . . . . . . . . . . .
ENGLISH 3 1. SAFETY INFORMATION Before the installation and use of the appliance, carefully read the supplied instructions. The manufacturer is not responsible if an incorrect installation and use causes injuries and damages. Always keep the instructions with the appliance for future reference. 1.1 Children and vulnerable people safety WARNING! Risk of suffocation, injury or permanent disability.
www.aeg.com • If the supply cord is damaged, it must be replaced by the manufacturer, its service agent or similarly qualified persons in order to avoid a hazard. • The operating water pressure (minimum and maximum) must be between 0,5 bar (0,05 MPa) and 8 bar (0,8 MPa) • The ventilation openings in the base (if applicable) must not be obstructed by a carpet. • The appliance is to be connected to the water mains using the new supplied hose-sets. Old hose sets must not be reused. 2.
ENGLISH Water connection • Make sure not to cause damage to the water hoses. • The appliance is to be connected to the water mains using the new supplied hose-sets. Old hose sets must not be reused. • Before you connect the appliance to new pipes or pipes not used for a long time, let the water flow until it is clean. • The first time you use the appliance, make sure that there is no leakage. 2.2 Use WARNING! Risk of injury, electrical shock, fire, burns or damage to the appliance.
www.aeg.com Water supply pressure Minimum 0,5 bar (0,05 MPa) Maximum 8 bar (0,8 MPa) Water supply 1) Cold water Maximum load Cotton 7 kg Spin speed Maximum 1400 rpm (L 76475 FL) 1600 rpm (L 76675 FL) 1) Connect the water inlet hose to a water tap with a 3/4'' thread. 4.
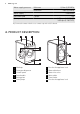
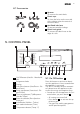
ENGLISH 7 4.1 Accessories 1 1 Spanner 2 To remove the transit bolts. 2 Plastic caps 4 To close the holes on the rear side of the cabinet after the removal of the transit bolts. 3 Anti-flood inlet hose To prevent possible leakage 4 Plastic hose guide To connect the drain hose on the edge of a sink. 3 5. CONTROL PANEL 1 2 Katoen Eco Katoen Coton Eco Blanc/Couleurs +Voorwas Super Eco +Prélavage Extra Stil 20 Min.
www.aeg.com • After 5 minutes from the end of the washing programme. Refer to 'At the end of programme'. 5.2 Programme knob 2 Turn this knob to set a programme. The related programme indicator comes on. 5.3 Display 3 A B C D The display shows: A • The maximum temperature of the programme. B • The default spin speed of the programme. • 'No Spin'1) and 'Rinse Hold' symbols. C • The display symbols.
ENGLISH D 9 • The programme time When the programme starts, the time decreases with steps of 1 minute. • The delay start When you press the delay start button, the display shows the delay start time. • Alarm codes If the appliance has a malfunction, the display shows alarm codes. Refer to 'Troubleshooting' chapter. • Err The display shows this message for some seconds if: – You set a function that is not applicable for the programme. – You change the programme while it operates.
www.aeg.com Spin phase is off. 'Rinse Hold' function is on. 5.10 Temperature button 10 Press button 10 to change the default temperature. -- = cold water • To activate the function, press button 10 and button 9 at the same time until the display shows the symbol . • To deactivate the function, press button 10 and button 9 at the same time until the symbol goes off. You can activate the function: • Before you press the Start/Pause button 4 : the appliance cannot start.
ENGLISH Programme Temperature Type of load Cycle max. weight of load description Functions Katoen + Voorwas — Blanc/ Couleurs + Prélavage (Cottons + Prewash) 95° - Cold White and coloured cotton with heavy soil. max. 7 kg Prewash Wash Rinses Long spin SPIN REDUCTION RINSE HOLD EXTRA RINSE TIME SAVING 2) Extra Stil — Extra Silence (Extra Silence) 95° - Cold White and coloured cotton with normal soil. max.
www.aeg.com Programme Temperature Type of load Cycle max. weight of load description Functions Centrifugeren/ Pompen — Essorage/Vidange4) (Spin/Drain) All fabrics The maximum load of the laundry is related to the type of laundry. Drainage of the water Spin phase at the maximum speed. SPIN REDUCTION NO SPIN Spoelen — Rin- All fabrics.
ENGLISH 13 2) If you press the button 6 two times (Extra Quick duration), we recommend that you decrease the quantity of the load. It is possible to load fully the appliance, however the washing results are reduced. 3) The wash and spin phase is soft to prevent the creases of the laundry. The appliance adds some rinses. 4) The default phase of the spin speed is related to cotton items. Set the spin speed. Make sure that it agrees with the laundry.
www.aeg.com Programmes Load (kg) Energy consumption (kWh) Water consumption (litre) Approxi- Remain- Remainmate ing ing promoismoisgramme ture ture duration (%)1) (%)1) (miL 76475 L 76675 nutes) FL FL Standard 60 °C cotton 3.5 0.62 33 190 52 44 Standard 40 °C cotton 3.5 0.46 34 186 52 44 1) At the end of spin phase. Off Mode (W) Left-On Mode (W) 0.48 0.
ENGLISH 15 Make sure that no laundry stays between the seal and the door. There is a risk of water leakage or damage to the laundry. 9.2 Filling the detergent and additives The detergent compartment for the prewash phase, the soak programme and for the stain function. Add the detergent for prewash, soak and stain remover before the start of the programme. The detergent compartment for the washing phase. If you use a liquid detergent, put it immediately before you start the programme.
www.aeg.com Check the position of the flap 1. Pull out the detergent dispenser until it stops. 2. Press the lever down to remove the dispenser. 3. To use powder detergent, turn the flap up. 4. To use liquid detergent, turn the flap down. With the flap in the position DOWN: – Do not use gelatinous or thick liquid detergents. – Do not put more liquid detergent than the limit showed in the flap. – Do not set the prewash phase. – Do not set the delay start function. 5. 6.
ENGLISH 5. Press button 4 to start the programme. The indicator of button 4 is on. The drain pump can operate for a short time when the appliance fills water. 9.8 Cancel the delay start 1. Press button 4 . The related indicator flashes. 2. Press button 5 again and again until the display shows 0’. 3. Press button 4 . The programme starts. 9.4 Interrupt a programme 1. Press button 4 . The indicator flashes. 2. Press button 4 again. The washing programme continues. 9.5 Cancel a programme 1.
www.aeg.com When you activate the appliance again, the display show the end of the last set programme. Turn the programme knob to set a new cycle. • Remove the laundry from the appliance. Make sure that the drum is empty. • Keep the door ajar, to prevent mildew and odours. • Close the water tap. The washing programme is completed, but there is water in the drum: – The drum turns regularly to prevent the creases in the laundry. – The door stays locked. – You must drain the water to open the door.
ENGLISH • If you use liquid detergents, do not set the prewash phase. • If your appliance has not the detergent dispenser with the flap device, add the liquid detergents with a dosing ball. 10.4 Water hardness If the water hardness in your area is high or moderate, we recommend that you use a water softener for washing machines. In areas where the water hardness is soft it is not necessary to use a water softener. 19 To know the water hardness in your area, contact your local water authority.
www.aeg.com 11.4 Door seal Regularly examine the seal and remove all objects from the inner part. 11.5 Drum Regularly examine the drum to prevent limescale and rust particles. Only use special products to remove rust particles from the drum. To do this: • Clean the drum with special product for stainless steel. • Start a short programme for cotton at the maximum temperature with a small quantity of detergent. 11.6 Detergent dispenser To clean the dispenser: 1 1. 2. Press the lever.
ENGLISH 11.7 Drain pump Regularly examine the drain pump and make sure that it is clean. 21 • The display shows an alarm code because of the problem with water drain. WARNING! 1. Disconnect the mains plug from the mains socket. 2. Do not remove the filter while the appliance operates. Do not clean the drain pump if the water in the appliance is hot. The water must be cold before you clean the drain pump. Clean the pump if: • The appliance does not drain the water. • The drum cannot turn.
www.aeg.com 2 1 11.8 The inlet hose filter and the valve filter 7. Remove fluff and objects from the pump. 8. Make sure that the impeller of the pump can turn. If this does not occur, contact the service centre. 9. Clean the filter under the water tap and put it back in the pump into the special guides. 10. Make sure that you tighten correctly the filter to prevent leakages. 11. Put the flap back and close the drain pump door.
ENGLISH 4. 5. 6. 7. 20° 23 Remove the inlet hose behind the appliance. Clean the filter in the valve with a stiff brush or a towel. Install again the inlet hose. Make sure that the couplings are tight to prevent leakages. Open the water tap. 45° 11.9 Emergency drain Because of a malfunction, the appliance cannot drain the water. If this occurs, do steps (1) through (6) of 'To clean the drain pump'. If necessary, clean the pump. Put the drainage duct back and close the drain pump flap.
www.aeg.com • • - The appliance does not drain the water. • - The appliance door is open or not closed correctly. - The anti-flood device is on. WARNING! Deactivate the appliance before you do the checks. Problem Possible cause Possible solution The appliance does not fill with water. The water tap is closed. Open the water tap. The water inlet hose is damaged. Make sure that the water inlet hose has no damages. The filters in the water inlet hose is blocked . Clean the filters.
ENGLISH Problem The programme does not start. There is water on the floor. 25 Possible cause Possible solution The filter of the drain pump is blocked. Clean the filter of the drain pump. Refer to 'Care and cleaning'. Balance problems with the laundry load. Adjust manually the items in the tub and start the spin phase again. The mains plug is not connected in the mains socket. Put in the mains plug. Blow out fuse in the household fuse box. Replace the fuse. You did not press button 4 .
www.aeg.com Problem Possible cause Possible solution You did not remove the stubborn stains before you wash the laundry. Use special products to remove the stubborn stains. Incorrect temperature was set. Make sure that you set the correct temperature. Too much laundry load. Decrease the laundry load. After the check, activate the appliance. The programme continues from the point of interruption. If the problem occurs again, contact the service centre.
ENGLISH 4. Remove the internal film. 5. Open the door and remove all the items from the drum. 6. Put one of the polystyrene packaging elements on the floor behind the appliance. Carefully put down the appliance with the rear side on it. Make sure not to damage the hoses. 7. Remove the polystyrene protection from the bottom. Pull up the appliance in vertical position. 8.
www.aeg.com 9. Remove the power supply cable and the drain hose from the hose holders. 10. Remove the three bolts. Use the key supplied with the appliance. 11. Pull out the plastic spacers. 12. Put the plastic caps in the holes. You can find these caps in the user manual bag. – We recommend that you keep the packaging and the transit bolts for when you move the appliance. – If the appliance is delivered in the winter months when there are minus temperatures.
ENGLISH 29 13.3 Positioning and levelling • Install the appliance on a flat hard floor. • Make sure that carpets do not stop the air circulation below the appliance. • Make sure that the appliance does not touch the wall or other units • Loosen or tighten the feet to adjust the level. A correct adjustment of the appliance level prevents the vibration, noise and the movement of the appliance when in operation. x4 • The appliance must be level and stable.
www.aeg.com • Connect the water inlet hose to the cold water tap with 3/4 thread. CAUTION! Make sure that there are no leaks from the couplings. Do not use an extension hose if the inlet hose is too short. Contact the service centre for the replacement of the inlet hose. Water-stop device The inlet hose has a water stop device. This device prevents water leaks in the hose because of its natural ageing. The red sector in the window «A» shows this fault .
ENGLISH 31 • On the edge of a sink. • Make sure that the plastic guide cannot move when the appliance drains. Attach the guide to the water tap or the wall. • To a stand pipe with vent-hole. Refer to the illustration. Directly into a drain pipe at a height of not less than 60 cm and not more than 100 cm. The end of the drain hose must always be ventilated , i.e. the inner diameter of the drainpipe must be larger than the external diameter of the drain hose. Without the plastic hose guide.
www.aeg.com 14. ENVIRONMENT CONCERNS Recycle the materials with the symbol . Put the packaging in applicable containers to recycle it. Help protect the environment and human health and to recycle waste of electrical and electronic appliances. Do not dispose appliances marked with the symbol with the household waste. Return the product to your local recycling facility or contact your municipal office.
DEUTSCH 33 INHALT 1. 2. 3. 4. 5. 6. 7. 8. 9. 10. 11. 12. 13. SICHERHEITSINFORMATIONEN . . . . . . . . . . . . . . . . . . . . . . . . . . . . . . . . . . . . . . . . . . . . . . SICHERHEITSHINWEISE . . . . . . . . . . . . . . . . . . . . . . . . . . . . . . . . . . . . . . . . . . . . . . . . . . . . . TECHNISCHE DATEN . . . . . . . . . . . . . . . . . . . . . . . . . . . . . . . . . . . . . . . . . . . . . . . . . . . . . . . GERÄTEBESCHREIBUNG . . . . . . . . . . . . . . . . . . . . . . . . . . . . . .
www.aeg.com 1. SICHERHEITSINFORMATIONEN Lesen Sie vor der Montage und dem Gebrauch des Geräts zuerst die Gebrauchsanleitung. Der Hersteller übernimmt keine Verantwortung für Verletzungen und Beschädigungen durch unsachgemäße Montage. Bewahren Sie die Gebrauchsanleitung griffbereit auf. 1.1 Sicherheit von Kindern und schutzbedürftigen Personen WARNUNG! Es besteht Erstickungsgefahr, Risiko von Verletzungen oder permanenten Behinderungen.
DEUTSCH 35 • Nehmen Sie keine technischen Änderungen am Gerät vor. • Beachten Sie die maximale Beladungsmenge von 7 kg (siehe Kapitel „Programmtabelle“). • Wenn das Netzkabel beschädigt ist, muss es vom Hersteller, seinem Kundenservice oder einer gleichermaßen qualifizierten Person ausgetauscht werden, um Gefahrenquellen zu vermeiden. • Der Betriebswasserdruck (Mindest- und Höchstdruck) muss zwischen 0,5 bar (0,05 MPa) und 8 bar (0,8 MPa) liegen.
www.aeg.com • • • • • • • chen. Wenden Sie sich andernfalls an eine Elektrofachkraft. Das Gerät darf ausschließlich an eine ordnungsgemäß installierte Schutzkontaktsteckdose angeschlossen werden. Verwenden Sie keine Mehrfachsteckdosen oder Verlängerungskabel. Achten Sie darauf, Netzstecker und Netzkabel nicht zu beschädigen. Falls das Netzkabel des Geräts ersetzt werden muss, lassen Sie dies durch unseren Kundendienst durchführen.
DEUTSCH 37 3. TECHNISCHE DATEN Abmessungen Breite / Höhe / Tiefe Elektrischer Anschluss: 600 / 850 / 522 mm Gesamttiefe 540 mm Spannung Gesamtleistung Sicherung Frequenz 230 V 2200 W 10 A 50 Hz Die Schutzverkleidung gewährleistet einen Schutz gegen das Eindringen von festen Fremdkörpern und Spritzwasser (Feuchtigkeit), außer an den Stellen, an denen das Niederspannungsgerät keinen Schutz gegen Feuchtigkeit besitzt. Wasserdruck IPX4 Min. 0,5 bar (0,05 MPa) Max.
www.aeg.com 5 Typenschild 9 Wassereinlassventil 6 Ablaufpumpe 7 Schraubfüße zum Ausrichten des Geräts 8 Wasserablaufschlauch 10 Netzkabel 11 Transportschrauben 12 Schraubfüße zum Ausrichten des Geräts 4.1 Zubehörteile 1 1 Schraubenschlüssel 2 4 Zum Lösen der Transportschrauben. 2 Kunststoffkappen Zum Verschließen der Öffnungen auf der Rückseite des Geräts nach dem Entfernen der Transportschrauben. 3 Aqua-Safe-Zulaufschlauch Zur Verhinderung von eventuellen Wasserlecks.
DEUTSCH 5.1 Ein-/Aus-Taste 1 Drücken Sie diese Taste, um das Gerät ein- oder auszuschalten. Wird das Gerät eingeschaltet, ist eine Tonfolge zu hören. Die Funktion AUTO Stand-by schaltet das Gerät in den folgenden Fällen automatisch aus, um den Energieverbrauch zu verringern: • Wenn Sie nicht innerhalb von 5 Minuten die Taste 4 drücken. – Alle Einstellungen werden gelöscht. – Drücken Sie die Taste 1 , um das Gerät wieder einzuschalten.
www.aeg.com D • Programmdauer Wenn das Programm beginnt, verringert sich die angezeigte Zeit in Minutenschritten. • Zeitvorwahl-Dauer Wenn Sie die Zeitvorwahl-Taste drücken, zeigt das Display die verbleibende Zeit bis zum Programmstart an. • Alarmcodes Bei einer Störung des Geräts erscheinen im Display Alarmcodes. Siehe Abschnitt „Fehlersuche“. • Err „Err“ erscheint einige Sekunden lang im Display, wenn: – Sie eine Funktion auswählen, die nicht mit dem eingestellten Waschprogramm kombinierbar ist.
DEUTSCH • Verringern der maximalen Schleuderdrehzahl bei der Einstellung eines Programms. Das Display zeigt nur die Schleuderdrehzahlen, die mit dem eingestellten Programm verfügbar sind. • Schalten Sie den Schleudergang aus. • Aktivieren Sie die Spülstopp-Funktion. Stellen Sie diese Funktion ein, um Knitterfalten zu vermeiden. Das Gerät pumpt das Wasser am Ende des Programms nicht ab. Die Schleuderphase ist ausgeschaltet. Die Spülstopp-Funktion ist eingeschaltet. 5.
www.aeg.com 6. PROGRAMME Programm Temperatur Beladung Max. Beladung Programmbeschreibung Funktionen Katoen — Blanc/Couleurs (Koch-/Buntwäsche) 95 °C - Kalt Weiße und bunte Baumwolle, normal verschmutzt. Max. 7 kg Hauptwaschgang Spülgänge Langer Schleudergang DREHZAHLREDUZIERUNG SPÜLSTOPP FLECKEN1) EXTRA SPÜLEN ZEITSPAREN2) Katoen + Voorwas — Blanc/ Couleurs + Prélavage (Koch-/Buntwäsche + Vorwäsche) 95 °C - Kalt Weiße und bunte Baumwolle, stark verschmutzt. Max.
DEUTSCH 43 Programm Temperatur Beladung Max. Beladung Programmbeschreibung Wol/Zijde — Laine/Soie (Wolle/Seide) 40°C - Kalt Waschmaschinenfeste Wolle. Handwaschbare Wolle und Feinwäsche mit dem „Handwäsche“-Pflegesymbol. Max. 2 kg Hauptwaschgang DREHZAHLRESpülgänge DUZIERUNG Kurzer Schleuder- SPÜLSTOPP gang Alle Gewebearten Die maximale Beladung hängt vom Wäschetyp ab. Abpumpen des Wassers Schleudergang mit maximaler Drehzahl. DREHZAHLREDUZIERUNG OHNE SCHLEUDERN Spoelen — Rin- Alle Gewebearten.
www.aeg.com Programm Temperatur Beladung Max. Beladung Programmbeschreibung Funktionen Super Eco6) Kalt Mischfasern (Baumwolle und Synthetik). Max. 3 kg Hauptwaschgang Spülgänge Kurzer Schleudergang DREHZAHLREDUZIERUNG SPÜLSTOPP EXTRA SPÜLEN Katoen Eco — Coton Eco Weiße und farbechte Baumwolle, normal verschmutzt. Max.
DEUTSCH Programme Beladung (kg) Energieverbrauch (kWh) Wasserverbrauch (Liter) Koch-/Buntwäsche 60 °C 7 1.25 70 146 52 44 Koch-/Buntwäsche 40 °C 7 0.78 70 161 52 44 Pflegeleicht 40 °C 3.5 0.47 50 171 35 35 Feinwäsche 40 °C 3.5 0.53 62 121 35 35 2 0.25 45 58 30 30 Wolle/Handwäsche 30 °C 45 UngeRestRestfähre feuchte feuchte Pro(%)1) (%)1) gramm- L 76475 L 76675 dauer (in FL FL Minuten) Standardprogramme Koch-/Buntwäsche Standardprogramm Koch-/Buntwäsche 60 °C 7 0.
www.aeg.com 9. TÄGLICHER GEBRAUCH 1. 2. Drehen Sie den Wasserhahn auf. Stecken Sie den Netzstecker in die Steckdose. 3. Drücken Sie die Taste 1 , um das Gerät einzuschalten. 4. Legen Sie die Wäsche in das Gerät. 5. Verwenden Sie die richtige Waschmittel- und Pflegemittelmenge. 6. Stellen Sie je nach Wäscheart und Verschmutzungsgrad das passende Waschprogramm ein. 9.1 Einfüllen der Wäsche 1. 2. Öffnen Sie die Tür des Geräts. Geben Sie jedes Wäschestück einzeln in die Trommel.
DEUTSCH 47 Maximale Menge für flüssige Pflegemittel. Klappe für Waschpulver oder Flüssigwaschmittel Drehen Sie die Klappe nach oben oder nach unten in die korrekte Position für Waschpulver oder Flüssigwaschmittel. Halten Sie sich immer an die Anweisungen auf der Verpackung der Waschmittelprodukte. Überprüfen Sie die Position der Klappe 1. Ziehen Sie die Waschmittelschublade bis zum Anschlag heraus. 2. Drücken Sie den Hebel nach unten und ziehen Sie die Schublade heraus. 3.
www.aeg.com 5. 6. Messen Sie Waschmittel und Weichspüler ab. Schließen Sie die Waschmittelschublade vorsichtig. Achten Sie darauf, dass die Klappe beim Schließen der Waschmittelschublade nicht blockiert. Das Gerät pumpt das Wasser nicht ab. 9.3 Einstellen und Starten eines Programms 1. Drehen Sie den Programmwahlschalter. Die entsprechende Programmanzeige leuchtet auf. 2. Die Kontrolllampe der Taste 4 blinkt rot. 3. Im Display werden die Standardwerte für Temperatur und Schleuderdrehzahl angezeigt.
DEUTSCH So öffnen Sie die Gerätetür: die Energiesparfunktion das Gerät automatisch aus. 1. Drücken Sie die Taste 4 . Das Türverriegelungssymbol im Display erlischt. 2. Öffnen Sie die Tür des Geräts. 3. Schließen Sie die Tür des Geräts und drücken Sie die Taste 4 . Das Programm bzw. die Zeitvorwahl läuft weiter. Wenn die Temperatur und der Wasserstand in der Trommel zu hoch sind, leuchtet das Türverriegelungssymbol weiterhin und die Tür lässt sich nicht öffnen.
www.aeg.com • Wenden Sie mehrlagige Textilien, Wolle und bedruckte Wäschestücke vor dem Waschen. • Entfernen Sie hartnäckige Flecken. • Waschen Sie stark verschmutzte Bereiche mit einem speziellen Waschmittel. • Seien Sie vorsichtig mit Gardinen. Entfernen Sie die Haken, oder stecken Sie die Gardinen in einen Beutel oder Kopfkissenbezug. • Nicht im Gerät waschen: – Ungesäumte Wäschestücke und Wäschestücke mit Schnitten im Stoff – Bügel-BHs – Verwenden Sie einen Beutel zum Waschen von kleinen Textilien.
DEUTSCH 51 11. REINIGUNG UND PFLEGE WARNUNG! Trennen Sie das Gerät von der Stromversorgung, bevor Sie es reinigen. 11.1 Entkalken Normales Leitungswasser enthält Kalk. Falls erforderlich, benutzen Sie einen Enthärter, um Kalkablagerungen zu entfernen. Verwenden Sie ein Produkt, das speziell für Waschmaschinen hergestellt wird. Halten Sie sich an die Herstelleranweisungen auf der Verpackung. Führen Sie die Entkalkung nicht gleichzeitig mit einer Wäsche durch. 11.2 Reinigen der Außenseiten 11.
www.aeg.com 11.6 Waschmittelschublade So reinigen Sie die Waschmittelschublade: 1 1. 2. Drücken Sie auf den Hebel. Ziehen Sie die Waschmittelschublade heraus. 3. Entfernen Sie den oberen Teil des Pflegemittelfachs. Reinigen Sie alle Teile mit Wasser. 2 4. 5. 6. 11.7 Ablaufpumpe Kontrollieren Sie regelmäßig die Ablaufpumpe und sorgen Sie dafür, dass sie sauber ist. Reinigen Sie die Pumpe in folgenden Fällen: • Das Gerät pumpt das Wasser nicht ab. • Die Trommel dreht sich nicht.
DEUTSCH 53 So reinigen Sie die Ablaufpumpe: 1. Öffnen Sie die Ablaufpumpenklappe. 2. Ziehen Sie die Klappe zum Entfernen heraus. 3. Stellen Sie einen Behälter unter die Ablaufpumpe, um das auslaufende Wasser aufzufangen. Drücken Sie die zwei Hebel und ziehen Sie den Ablaufkanal nach vorn, um das Wasser auslaufen zu lassen. 4. 1 5. 6. 2 Wenn der Behälter mit Wasser voll ist, stecken Sie den Ablaufkanal wieder ein und leeren Sie den Behälter aus.
www.aeg.com 9. Reinigen Sie den Filter unter fließendem Wasser und setzen Sie ihn wieder in die dafür vorgesehenen Führungen in der Pumpe ein. 10. Achten Sie darauf, dass Sie den Filter richtig fest anziehen, um Wasserlecks zu vermeiden. 11. Bringen Sie die Ablaufpumpenklappe wieder an und schließen Sie diese. 2 1 11.8 Zulaufschlauchfilter und Ventilfilter Die Filter müssen in folgenden Fällen gereinigt werden: • Es läuft kein Wasser in das Gerät. • Das Wasser läuft sehr lange in das Gerät ein.
DEUTSCH Bringen Sie den Ablaufkanal wieder in seine ursprüngliche Position und schließen Sie die Ablaufpumpenklappe. Wenn Sie das Wasser über das Notentleerungsverfahren abpumpen, müssen Sie das Abpumpsystem wieder aktivieren: 1. Füllen Sie 2 Liter Wasser in das Hauptfach der Waschmittelschublade ein. 2. Starten Sie das Programm zum Abpumpen des Wassers. 55 2. 3. Schließen Sie den Wasserhahn. Entfernen Sie den Wasserzulaufschlauch. 4.
www.aeg.com Problem Das Gerät pumpt das Wasser nicht ab. Mögliche Ursache Mögliche Abhilfe Der Wasserzulaufschlauch ist nicht richtig angeschlossen. Vergewissern Sie sich, dass die Schlauchverbindung in Ordnung ist. Der Wasserdruck ist zu niedrig. Wenden Sie sich an Ihr örtliches Wasserversorgungsunternehmen. Der Wasserablaufschlauch ist beschädigt. Vergewissern Sie sich, dass der Wasserablaufschlauch keine Beschädigungen aufweist. Der Filter der Ablaufpumpe ist zugesetzt.
DEUTSCH Problem Es befindet sich Wasser auf dem Boden. 57 Mögliche Ursache Mögliche Abhilfe Die Zeitvorwahl ist eingestellt. Um das Programm sofort zu starten, brechen Sie die Zeitvorwahl ab. Die Kindersicherung ist aktiviert. Deaktivieren Sie die Kindersicherung. An den Schlauchanschlüssen tritt Wasser aus. Vergewissern Sie sich, dass die Schlauchanschlüsse fest angeschlossen sind. An der Ablaufpumpe tritt Wasser aus. Vergewissern Sie sich, dass die Ablaufpumpe fest angeschlossen ist.
www.aeg.com Schalten Sie das Gerät nach der Überprüfung wieder ein. Das Programm wird an der Stelle fortgesetzt, an der es unterbrochen wurde. Tritt das Problem erneut auf, wenden Sie sich an den Kundendienst. Wenn das Display andere Alarmcodes anzeigt, wenden Sie sich an den Kundendienst. 13. MONTAGE 13.1 1 Satz Fixierplatten (4055171146) Sie erhalten den Bausatz bei Ihrem Vertragshändler. Wenn Sie das Gerät auf einem Sockel aufstellen, befestigen Sie es mithilfe der Fixierplatten.
DEUTSCH 59 5. Öffnen Sie die Tür und entnehmen Sie alle Gegenstände, die sich in der Trommel befinden. 6. Legen Sie eines der Styroporverpackungsteile hinter dem Gerät auf den Boden. Legen Sie das Gerät vorsichtig mit der Rückseite darauf ab. Achten Sie darauf, nicht die Schläuche zu beschädigen. 7. Entfernen Sie den Styroporschutz von der Geräteunterseite. Ziehen Sie das Gerät nach oben, sodass es wieder aufrecht steht. 8. 1 2 9.
www.aeg.com 10. Lösen Sie die drei Schrauben. Ver- wenden Sie dazu den mitgelieferten Schraubenschlüssel. 11. Ziehen Sie die Kunststoff-Abstandshalter heraus. 12. Setzen Sie die Kunststoffkappen in die Öffnungen. Diese Kappen finden Sie im Beutel mit der Gebrauchsanleitung. – Wir empfehlen, Verpackungsmaterial und Transportschrauben für einen späteren Transport aufzubewahren.
DEUTSCH 61 13.3 Aufstellen und Ausrichten • Stellen Sie das Gerät auf einen ebenen, festen Boden. • Stellen Sie sicher, dass die Luftzirkulation unter dem Gerät nicht durch Teppiche beeinträchtigt wird. • Vergewissern Sie sich, dass die Maschine weder die Wand noch andere Geräte berührt. • Schrauben Sie die Füße zum Ausrichten des Geräts weiter heraus oder hinein.
www.aeg.com • Schließen Sie den Wasserzulaufschlauch an einen Kaltwasserhahn mit einem 3/4"-Außengewinde an. VORSICHT! Achten Sie darauf, dass die Anschlüsse dicht sind. Verwenden Sie keinen Verlängerungsschlauch, falls der Zulaufschlauch zu kurz ist. Wenden Sie sich an den Kundendienst, um einen anderen Zulaufschlauch zu erhalten. Aquastopp-Einrichtung A 13.5 Wasserablauf Es gibt mehrere Möglichkeiten, den Ablaufschlauch anzuschließen: Mit der Kunststoff-Schlauchführung.
DEUTSCH 63 • Über eine Waschbeckenkante. • Stellen Sie sicher, dass die KunststoffFührung beim Abpumpen nicht abrutschen kann. Befestigen Sie deswegen die Führung am Wasserhahn oder an der Wand. • An ein Standrohr mit Entlüftungsöffnung. Orientieren Sie sich an der Abbildung. Direkte Einleitung in ein Ablaufrohr auf einer Höhe nicht unter 60 cm und nicht über 100 cm. Das Ende des Ablaufschlauchs muss immer belüftet sein, d.h.
www.aeg.com 14. UMWELTTIPPS Recyceln Sie Materialien mit dem Symbol . Entsorgen Sie die Verpackung in den entsprechenden Recyclingbehältern. Recyceln Sie zum Umwelt- und Gesundheitsschutz elektrische und elektronische Geräte. Entsorgen Sie Geräte mit diesem Symbol nicht mit dem Hausmüll. Bringen Sie das Gerät zu Ihrer örtlichen Sammelstelle oder wenden Sie sich an Ihr Gemeindeamt.
DEUTSCH 65
www.aeg.
DEUTSCH 67
132919730-A-362012 www.aeg.