EN User Manual Washing Machine L 77484 PFL
FOR PERFECT RESULTS Thank you for choosing this AEG product. We have created it to give you impeccable performance for many years, with innovative technologies that help make life simpler features you might not find on ordinary appliances. Please spend a few minutes reading to get the very best from it. Visit our website for: Get usage advice, brochures, trouble shooter, service information: www.aeg.com Register your product for better service: www.registeraeg.
CONTENTS 1. SAFETY INFORMATION ........................................................................ 6 1.1 Children and vulnerable people safety ......................................... 6 1.2 General Safety .............................................................................. 6 2. SAFETY INSTRUCTIONS ..................................................................... 2.1 Installation ..................................................................................... 2.
CONTENTS 11.2 11.3 11.4 11.5 11.6 11.7 11.8 Start/Pause ............................................................................. Zeitvorwahl ............................................................................. Zeit Sparen ............................................................................. Extra Spülen ........................................................................... Flecken ................................................................................... U./Min. ........
CONTENTS 16.2 16.3 16.4 Pedestal with the drawer ........................................................ 43 Fixing plate kit (4055171146) ................................................. 43 Rubber feet kit (4055126249) ................................................ 43 17. ENVIRONMENT CONCERNS ............................................................
1. SAFETY INFORMATION Before the installation and use of the appliance, carefully read the supplied instructions. The manufacturer is not responsible if an incorrect installation and use causes injuries and damages. Always keep the instructions with the appliance for future reference. 1.
SAFETY INFORMATION • The ventilation openings in the base (if applicable) must not be obstructed by a carpet. • The appliance is to be connected to the water mains using the new supplied hose-sets. Old hose sets must not be reused. • If the supply cord is damaged, it must be replaced by the manufacturer, its Authorised Service Centre or similarly qualified persons in order to avoid a hazard. • Before maintenance, deactivate the appliance and disconnect the mains plug from the mains socket.
2. SAFETY INSTRUCTIONS 2.1 Installation • Remove all the packaging and the transit bolts. • Keep the transit bolts. When you move the appliance again you must block the drum. • Always be careful when you move the appliance because it is heavy. Always wear safety gloves. • Do not use multi-plug adapters and extension cables. • Make sure not to cause damage to the mains plug and to the mains cable. Should the mains cable need to be replaced, this must be carried out by our Authorised Service Centre.
SAFETY INSTRUCTIONS plug form the mains socket. • Make sure that the inlet and drain hoses are not kinked or damaged. 2.6 Disposal WARNING! Risk of injury or suffocation. • Before you connect the appliance to a new standpipe or to a standpipe not used for a long time, let the water flow until it is clean. • Disconnect the appliance from the mains supply. • The first time you use the appliance, make sure that there is no leakage. • Cut off the mains cable and discard it. 2.
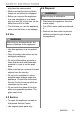
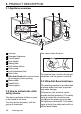
3. PRODUCT DESCRIPTION 3.1 Appliance overview 1 2 3 9 10 11 4 5 6 12 13 7 8 1 2 3 4 5 6 7 8 9 10 11 12 13 Worktop Detergent dispenser Control panel Door handle Rating plate Child safety device Drain pump Level adjustment feet Drain hose Ultra Anti-flood inlet hose and cord for emergency door opening Mains cable Transit bolts Hose support 3.2 How to activate the child safety device This device prevents children or pets to be closed in the drum.
PRODUCT DESCRIPTION A B CD E 3.4 Accessories 1 A. Connection casing with safety valve B. Water inlet hose C. Water valve D. Sump E. Anti-flood device The inlet hose (B) allows to convoy any water leakage into the sump (D) in the bottom of the appliance where the antiflood device (E) blocks all valves to stop the water flowing. The display shows the alarm code . 4 3 1 Spanner To remove the transit bolts.
4. TECHNICAL DATA Dimension Electrical connection Width Height Depth Total depth 600 mm 850 mm 605 mm 639 mm Voltage Overall power Fuse Frequency 230 V 2200 W 10 A 50 Hz Level of protection against ingress of solid particles and moisture ensured by the protective cover, except where the low voltage equipment has no protection against moisture Water supply pressure Minimum Maximum Water supply1) Maximum Load Cotton www.aeg.
5. HINTS AND TIPS WARNING! Refer to Safety chapters. dry without hems or with cuts. Use a washing bag to wash small and/or delicate items (e.g. underwired bras, belts, tights, etc. ). 5.1 The laundry load • Divide the laundry in: white, coloured, synthetics, delicates and wool. • Obey the washing instructions that are on the laundry care labels. • Do not wash together white and coloured items. • Some coloured items can discolour with the first wash.
HINTS AND TIPS grammes (60°C max) for all types of fabric, or special for woollens only. • Do not mix different types of detergents. • To help the environment, do not use more than the correct quantity of detergent. • Obey the instructions that you find on the on packaging of these products. • Use the correct products for the type and colour of the fabric, the programme temperature and the level of soil.
6. BEFORE FIRST USE 1. Make sure that all transit bolts are removed. 2. Make sure that the electrical and water connection are available. 3. Put 2 litre of water in the detergent compartment for washing phase. This activates the drain system. 4. Put a small quantity of detergent in the compartment for washing phase. 5. Set and start a programme for cotton at the highest temperature without laundry. This removes all possible dirt from the drum and the tub.
7. CONTROL PANEL 7.1 Control panel description 1 2 3 Glätten Koch/Bunt Auffrischen Baumwolle Eco Super Eco Extra Leise + Vorwäsche Pflegeleicht Leichtbügeln 20 Min.- 3Kg Jeans Spülen Schleudern/ Pumpen 1 2 3 4 5 Feinwäsche Wolle/ Seide Daunen Ein/Aus Temp. U./Min.
CONTROL PANEL Washing phase Rinses phase Spin phase Child safety lock C Display indicators: Door locked You cannot open the appliance door when the symbol is on. You can open the door only when the symbol goes off. Delay start Programme duration Delay start D Time area: Alarm codes Message of error Programme is completed 1) Only available for Spin/Drain programme.
8. PROGRAMMES 8.1 Programme Chart Washing programmes Programme Temperature range Maximum load Maximum spin speed Programme description (Type of load and soil level) Koch/Bunt 95°C - Cold 8 kg 1400 rpm White cotton and coloured cotton. Normal soil and light soil. Koch/Bunt + Vorwäsche 95°C - Cold 8 kg 1400 rpm White cotton and coloured cotton. Heavy soil and normal soil. Extra Leise 95°C - Cold 8 kg White and coloured cotton. Normal soil and light soil.
PROGRAMMES Programme Temperature range Maximum load Maximum spin speed Programme description (Type of load and soil level) 8 kg 1400 rpm To rinse and spin the laundry. All fabrics except woollens and very delicate fabrics. Reduce the spin speed accordingly to the type of laundry. Spülen4) Jeans 60°C - Cold 8 kg 1200 rpm Items in denim and jersey. Also for dark coloured items. 20 Min. - 3 kg 40°C - 30°C 3 kg 1200 rpm Cottons and synthetics items with light soil level or worn only once.
PROGRAMMES soiled cotton laundry. The water temperature of the washing phase may differ from the temperature declared for the selected programme. Steam programmes1) Steam can be used for dried, washed or worn once laundry. These programmes can reduce creases and odours and make your laundry more soft. Do not use any detergent. If necessary, remove stains by washing or using localized stain removal. Steam programmes do not perform any hygienic cycle.
PROGRAMMES Extra Spülen2) Zeit Sparen3) Zeitvorwahl ■ ■ ■ ■ ■ ■ Koch/Bunt + Vorwäsche ■ ■ ■ ■ ■ ■ ■ ■ ■ ■ ■ ■ ■ ■ ■ ■ ■ ■ ■ ■ U./Min. Koch/Bunt Programme Flecken1) Programme options compatibility Extra Leise Pflegeleicht ■ ■ Leichtbügeln ■ ■ Feinwäsche ■ ■ Wolle/Seide ■ ■ Daunen ■ Schleudern/Pumpen ■ Spülen ■ ■ ■ ■ Jeans ■ ■ ■ ■ 20 Min.
PROGRAMMES 8.2 Woolmark Apparel Care Blue The wool wash cycle of this machine has been approved by The Woolmark Company for the washing of wool garments labelled as «hand wash» provided that the garments are washed according to the instructions issued by the manufacturer of this washing machine. Follow the garment care label for drying and other laundry instructions. M1230 In UK, Eire, Hong Kong and India the Woolmark symbol is a certification trademark 22 www.aeg.
9. CONSUMPTION VALUES maximum load capacity (e.g. Cotton 60°C, maximum load capacity 8 kg, the programme duration exceeds 3 hours; real load 1 kg, the programme duration don’t reach 1 hour). When the appliance is calculating the real programme duration a dot blinks in the display. INFORMATION The data of this table are approximate. Different causes can change the data: the quantity and type of laundry, the water and ambient temperature.
CONSUMPTION VALUES Off Mode (W) Left On Mode (W) 0,30 0,30 The information given in the chart above are in compliance with the EU Commission regulation 1015/2010 implementing directive 2009/125/EC. 24 www.aeg.
10. SETTINGS 10.1 Acoustic signals The acoustic signals operate when: • You activate the appliance. • You deactivate the appliance. • You press the buttons. • The programme is completed. • The appliance has a malfunction. To deactivate/activate the acoustic signals, press Flecken and Extra Spülen at the same time for 6 seconds. appliance cannot start. 10.3 Permanent Extra Rinse With this option you can permanently have an extra rinse when you set a new programme.
11. OPTIONS 11.1 Programme knob The related indicator comes on. Turn this knob to set a programme. The related programme indicator comes on. 11.6 Flecken 11.2 Start/Pause Use this option for laundry with hard stains to remove. Press button Start/Pause to start or interrupt a programme. 11.3 Zeitvorwahl With this option you can delay the start of a programme from 30 minutes to 20 hours. The display shows the related indicator and delay time. 11.
OPTIONS • The door stays locked. You must drain the water to unlock the door. • The display shows the indicator . INFORMATION To drain the water refer to ‘At the end of the programme’. 11.8 Temp. Set this option to change the default temperature. Indicator = cold water. The display shows the set temperature.
12. DAILY USE 12.1 Activating the appliance 1. Connect the mains plug to the mains socket. 2. Open the water tap. 3. Press button Ein/Aus to activate the appliance. A short tune sounds. 12.3 Filling the detergent and additives 12.2 Loading the laundry 1. Open the appliance door 2. Put the laundry in the drum, one item at a time. 3. Shake the items before you put them in the appliance. Make sure not to put too much laundry in the drum. 4. Close the door firmly.
DAILY USE 12.4 Check the position of the flap 1. Pull out the detergent dispenser until it stops. 2. Press the lever down to remove the dispenser. 1 2 3. To use powder detergent, turn the flap up. INFORMATION With the flap in the position DOWN: • Do not use gelatinous or thick liquid detergents. • Do not put more liquid detergent than the limit showed in the flap. • Do not set the prewash phase. • Do not set the delay start function. 5. Measure out the detergent and the fabric conditioner. 6.
DAILY USE 12.6 Starting a programme without the delay start Press button Start/Pause to start the programme. The relevant indicator stops to flash and stays on. On the display the indicator of the phase is operation starts to flash. The programme starts, the door is locked. The display show the indicator . INFORMATION The drain pump can operate for a short time when the appliance fills water. 12.7 Behaviour of the appliance The appliance starts the countdown of the delay start.
DAILY USE Now, you can set a new washing programme. INFORMATION Before starting the new programme the appliance could drain the water. In this case, make sure that the detergent is still in the detergent compartment, if not fill the detergent again. 12.12 Opening the door 1. Press button Ein/Aus to deactivate the appliance. After five minutes from the end of the programme, the energy saving function automatically deactivates the appliance.
DAILY USE INFORMATION The appliance drains and spins automatically after approximately18 hours. 12.15 AUTO Stand-by option The AUTO Stand-by function automatically deactivates the appliance to decrease the energy consumption when: • You do not use the appliance for 5 minutes before you press Start/ Pause button. Press the button Ein/Aus to activate the appliance again. • After 5 minutes from the end of the washing programme Press the button Ein/Aus to activate the appliance again.
13. CARE AND CLEANING WARNING! Refer to Safety chapters. 13.4 Door seal Regularly examine the seal and remove all objects from the inner part. 13.1 External cleaning Clean the appliance only with soap and warm water. Fully dry all the surfaces. CAUTION! Do not use alcohol, solvents or chemical products. 13.2 Descaling If the water hardness in your area is high or moderate, we recommend that you use a water descaling product for washing machines.
CARE AND CLEANING 4. Clean the drawer recess with a brush. noise because of the blockage of the drain pump. • The display shows the alarm code . WARNING! • Do not remove the filter while the appliance operates. • Do not clean the pump if the water in the appliance is hot. Wait until the water cools down 5. Close the drawer gently. Proceed as follows to clean the pump: 1. Disconnect the mains plug from the mains socket. 2. Open the pump cover and remove it. 2 13.
CARE AND CLEANING 5. Let the water flow out. 10. Make sure that the impeller of the pump rotates. If it does not rotate, contact the Authorised Service Centre. 6. When the bowl is full of water, put the drainage duct back again and empty the container. 7. Repeat the steps 4 and 6 until the water stops to flow out. 11. Clean the filter under the water tap. 2 1 8. Close the drainage duct and turn the filter anti-clockwise to remove it. 12. Put the filter back into the special guides.
CARE AND CLEANING 13. Put the cover back and close the pump access. Proceed as follows to clean the water inlet filter: 1. Close the water tap. 2. Unscrew the water inlet hose from the water tap. 2 1 2 1 13.7 Cleaning the water inlet filter WARNING! The water inlet hose contains electrical components. Before unscrewing the water inlet hose from the water tap, disconnect the mains plug from the mains socket. INFORMATION Check regularly if the water inlet filter is clean.
CARE AND CLEANING When you drain the water with the emergency drain procedure, you must activate again the drain system: 1. When you drain the water with the emergency drain procedure, you must activate again the drain system: Put 2 litres of water in the main wash compartment of the detergent dispenser. 2. Start the programme to drain the water 13.
14. TROUBLESHOOTING WARNING! Refer to Safety chapters. • - The appliance does not drain the water. • - The appliance door is open or not closed correctly. Please check the door! • - The mains supply is unstable. Wait until the mains supply is stable. • - No communication between electronic elements of the appliance. Switch the appliance off and on again. 14.1 Introduction If the appliance does not start or it stops during the cycle, first check in the below table the cause and the possible solution.
TROUBLESHOOTING Problem Possible solution Make sure that the water tap is open. Make sure that the connection of the water inlet hose is correct. Make sure that the water tap is not clogged. The appliance does not load water properly. Make sure that the water inlet hose has no kinks, damage or bends. Make sure that the filter of the water inlet hose is not clogged. Refer to “Cleaning the water inlet filter”, in “Care and cleaning” chapter. Make sure that the pressure of the water supply is not too low.
TROUBLESHOOTING Problem Possible solution Set the spin programme. The spin phase does not operate or the washing cycle lasts longer than usually. Make sure that the drain filter is not clogged. Clean the filter, if necessary. Refer to “Cleaning the drain pump”, in “Care and cleaning” chapter. This problem may be caused by balance problems. Adjust manually the items in the tub and start the spin phase again. Make sure that the couplings of the water hoses are tight and there is not water leakages.
TROUBLESHOOTING Problem Possible solution The cycle is shorter than the time displayed. The appliance calculates a new time according to the laundry load. See the “Consumption values” chapter. The cycle is longer than the time displayed. An unbalanced laundry load increases the duration time. This is a normal behaviour of the appliance. Increase the detergent quantity or use a different detergent. The washing results are not satisfactory.
15. EMERGENCY DOOR OPENING In case of power failure or appliance failure the appliance door remains locked. The washing programme continues, when the power is restored. If the door remains locked in case of failure, it is possible to open it using the emergency unlock feature. Before opening the door: CAUTION! Make sure that the water temperature and the laundry are not hot. Wait till they cool down, if necessary. CAUTION! Make sure that the drum is not rotating.
16. ACCESORIES TO BUY INFORMATION 16.2 Pedestal with the drawer Accesories are avaiable in: • www.aeg.com/shop • authorised dealers. INFORMATION Only appropriate accessories approved by AEG ensure the safety standards of the appliance. If unapproved parts are used, any claims will be invalidated. 16.1 Stacking kit To put the appliance higher at the level what helps to easy load and remove the laundry. The drawer can be used for laundry storage e.g.: towels, cleaning products and more.
17. ENVIRONMENT CONCERNS Recycle the materials with the symbol . Put the packaging in applicable containers to recycle it. Help protect the environment and human health and to recycle waste of electrical and electronic appliances. Do not dispose appliances marked with the symbol with the household waste. Return the product to your local recycling facility or contact your municipal office. 44 www.aeg.
www.aeg.
www.aeg.
www.aeg.
132899780-B-392015 www.aeg.