LAVAMAT 84850 A User manual Washing machine
Contents Thank you for choosing one of our high-quality products. To ensure optimal and regular performance of your appliance please read this instruction manual carefully. It will enable you to navigate all processes perfectly and most efficiently. To refer to this manual any time you need to, we recommend you to keep it in a safe place. And please pass it to any future owner of the appliance. We wish you much joy with your new appliance.
Safety information Washing drum Door seal Drain pump Cleaning the water inlet filters Frost precautions Emergency emptying out What to do if… Technical data 24 25 25 26 27 28 28 32 Consumption values Installation instructions 32 33 Installation Unpacking Positioning and levelling Water inlet Water-stop device Water drainage Electrical connection Environment concerns Packaging materials Ecological hints 3 33 33 35 35 37 37 38 38 39 39 Subject to change without notice Operating instructions Safety info
Safety information • Do not use your appliance to wash articles with whalebones, material without hems or torn material. • Always unplug the appliance and turn off the water supply after use, cleaning and maintenance. • This appliance is provided with a white drum light. It is class 1, in accordance with IEC 60825-1:1993 + A1:1997 + A2:2001 standard. Should the appliance drum light need to be replaced, this must be carried out by a Service Centre.
Product description 5 Child Safety • This appliance is not intended for use by person (including children) with reduced physical sensory or mental capabilities or lack of experience and knowledge unless they have been given supervision or instruction concerning use of the appliance by a person responsible for their safety. • The packaging components (e.g. plastic film, polystyrene) can be dangerous to children - danger of suffocation! Keep them out of children's reach.
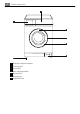
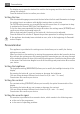
Product description 2 1 3 4 5 6 7 1 2 3 4 5 6 7 Detergent dispenser drawer Control panel Drum light Door opening handle Rating plate Drain pump Adjustable feet
Control panel 7 Detergent dispenser drawer Compartment for detergent used for prewash . The prewash detergent is added at the beginning of the wash programme. Compartment for powder or liquid detergent used for main wash . Compartment for liquid additives (fabric softener, starch). Compartment for stain remover used for main wash with STAIN-option . Control panel Below is a picture of the control panel. It shows the programme selector dial as well as the buttons and the display.
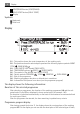
Display 7 START/PAUSE button (START/PAUSE) 8 DELAY START button (DELAY START) 9 Display Symbols: Handwash; Child Lock. Display 9.8 9.9 9.7 9.6 9.1 9.2 9.3 9.4 9.5 9.1 - This position shows the water temperature of the washing cycle 9.2 - This position shows the selected spin speed and the following options symbols: NIGHT CYCLE , RINSE HOLD 9.3 - CHILD SAFETY LOCK symbol (CHILD LOCK) 9.4 - TIME SAVING options: (DAILY), (SUPER QUICK) 9.
First use 9 an animated bar, that indicates the carried out cycle and the remaining one, the duration of the washing program and the end of cycle. Delay start If you have selected the button 8 , the relevant symbol 9.5 appears on the display. After having pressed the button 7 , the selected delay time value (max 20 hours) appears on the right side of the display with the corrisponding symbol. The delay time value decreases every minute ( 9.8 ).
Personalization The display says to press the button 5 to confirm the language and then the button 4 to change the selection. Press the button 5 twice to confirm your choice. Setting the time After the desired language you must set the time before the first wash. Remember to change the setting time in accordance with daylight-savings time or solar time. The CLOCK setting permits you to modify/set up the current time. It is important to keep it updated as the current END Cycle Time depends on it.
Daily use 11 If you wish to activate the acoustic device, press the button 4 in order to select the buzzer menu (BUZZER). Press button 5 to confirm your choice. The line around the corresponding symbol starts blinking in order to indicate that the regulation can be carried out. Press again the button 4 to activate or deactivate the acoustic signal. Then press the button 5 to confirm your choice. Return to main menu This setting function allows you to return to the option menu.
Daily use • the maximum load capacity of the selected programme, (i.e. 7 KG for Cottons; see «Washing Programmes» for the maximum load of each programme), • the actual loading from 0.0 KG to the maximum load provided for the selected washing programme. Loads of less than 0.5 KG are not displayed, • the animated bar that also fills itself with steps corresponding to 0.5 KG , • the detergent quantity recommended for current load expressed as a percentage.
Daily use 13 1. Pull out the dispenser drawer until it stops. Measure out the amount of detergent required, pour it into the main wash compartment and, if you wish to carry out the prewash phase, pour the detergent into the compartment marked . If you wish to perform the stain function, pour the stain remover into the compartment marked with an arrow. 2. If required, pour fabric softener into the compartment marked (the amount used must not exceed the MAX mark in the drawer). Close the drawer gently.
Daily use cycle is very noiseless and it can be selected at night or in times with a more economical power rate. On some programmes the rinses will be performed with more water. To empty out the water, please read «At the end of the programme» section in this chapter. For the compatibility between options and washing programmes consult the chapter «Washing programmes». Programme options (button 4) Depending on the programme, different functions can be combined.
Daily use 15 This option is recommended for non fast coloured items and for frequently washed items. EXTRA RINSE This appliance is designed for saving water. However, for people with a very delicate skin (allergic to detergents) it may be necessary to rinse the laundry using an extra quantity of water. The relevant symbol will appear on the display. Select the saving memory option (SAVE MEMORY) Programme settings that are frequently used can be saved (e.g.
Daily use Select the TIME option (button 6) (TIME ) The appliance proposes by default the washing cycle for normally soiled laundry. The washing cycle time can be reduced by means of this button. This option can be selected with the washing programmes for COTTONS, SYNTHETICS and DELICATES. By pressing this button once, the corresponding symbol and the message «DAILY» (DAILY ) appear on the display and you will be able to reduce the cycle duration . The display will show the reduced washing time.
Daily use 17 the previous washing programme. Start the new programme by pressing the button 7 again. The washing water in the tub will be not emptied out. Interrupting a programme Press the button 7 to interrupt a programme which is running, the corresponding light starts blinking. Press the same button again to restart the programme. Cancelling a programme Turn the selector dial to and then in the new selected programme. Press the button 5 to cancel the programme which is running.
Washing programmes Washing programmes Programme Maximum and Minimum Temperature Cycle Description Maximum Fabrics Load Type of Laundry COTTONS/LINEN 95°- Cold Main wash - Rinses - Long spin Max. load 7 kg - Reduced load 3,5 kg Maximum spin speed at 1400 rpm For white and coloured cotton (normally soiled items). HYGIENE 60° Main wash - Rinses - Long spin Max. load 7 kg Maximum spin speed at 1400 rpm The washing programme for white cottons.
Washing programmes Programme Maximum and Minimum Temperature Cycle Description Maximum Fabrics Load Type of Laundry SYNTHETICS 60°- Cold Main wash - Rinses - Short spin Max. load 3,5 kg - Reduced load 2 kg Maximum spin speed at 1200 rpm Synthetic or mixed fabrics: underwear, coloured garments, non-shrink shirts, blouses.
Washing programmes Programme Maximum and Minimum Temperature Cycle Description Maximum Fabrics Load Type of Laundry SPIN Drain and long spin Max. load 7 kg Maximum spin speed at 1400 rpm Separate spin for hand washed cotton garments and after programmes with the Rinse Hold option selected. Before selecting this programme the selector dial must be turned to . You can choose the spin speed by pressing the relevant button to adapt it to the fabrics to be spun.
Helpful hints and tips Programme Maximum and Minimum Temperature Cycle Description Maximum Fabrics Load Type of Laundry Options QUICK INTENSIVE 60° - 40° Main wash - Rinses - Short spin Max. load 5 kg Maximum spin speed at 1200 rpm Quick washing programme, to be used for lightly soiled white/fast coloured cottons and mixed fabrics. SPIN REDUCTION / RINSE HOLD - EXTRA RINSE SUPER ECO Cold Main wash - Rinses - Short spin Max. load 3 kg Maximum spin speed at 1200 rpm Mixed fabrics (cotton and synthetic).
Helpful hints and tips Before loading the laundry Never wash whites and coloureds together. Whites may lose their «whiteness» in the wash. New coloured items may run in the first wash; they should therefore be washed separately the first time. Button up pillowcases, close zip fasteners, hooks and poppers. Tie any belts or long tapes. Remove persistent stains before washing. Rub particularly soiled areas with a special detergent or detergent paste. Treat curtains with special care.
Care and cleaning 23 The detergent and any additives must be placed in the appropriate compartments of the dispenser drawer before starting the wash programme. If using liquid detergents, a programme without prewash must be selected. Your appliance incorporates a recirculation system which allows an optimal use of the concentrated detergent. Follow the product manufacturer’s recommendations on quantities to use and do not exceed the «MAX» mark in the detergent dispenser drawer .
Care and cleaning • Use a normal measure of detergent, must be a powder with biological properties. External cleaning Clean the exterior cabinet of the appliance with soap and water only, and then dry thoroughly. Do not use methylated spirits, solvents or similar products to clean the cabinet. Detergent dispenser drawer The detergent dispenser drawer should be cleaned regularly. 1. Remove the detergent dispenser drawer by pulling it firmly. 2. Remove the conditioner insert from the middle compartment.
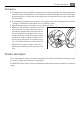
Care and cleaning 25 Door seal Check from time to time the door seal and eliminate eventual possible objects that could be trapped in the fold. Drain pump The pump should be inspected regularly and particularly if: • the machine does not empty and/or spin • the machine makes an unusual noise during draining due to objects such as safety pins, coins etc. blocking the pump. Proceed as follows: 1. Disconnect the appliance. 2. If necessary wait until the water has cooled down. 3. Open the pump door. 4. 5.
Care and cleaning 6. When no more water comes out, unscrew the pump and remove it. Always keep a rag nearby to dry up spillage of water when removing the pump. 7. Remove any objects from the pump impeller by rotating it. 8. Put the cap back on the emergency emptying hose and place the latter back in its seat. 9. Screw the pump fully in. 10. Close the pump door. WARNING! When the appliance is in use and depending on the programme selected there can be hot water in the pump.
Care and cleaning 27 1. Turn off the water tap. 2. Unscrew the hose from the tap. 3. Clean the filter in the hose with a stiff brush. 4. Screw the hose back onto the tap. Make sure the connection is tight. 5. Unscrew the hose from the machine. Keep a rug nearby because some water may flow. 6. Clean the filter in the valve with a stiff brush or with the piece of cloth. 7. Screw the hose back to the machine and make sure the connection is tight. 8. Turn on the water tap.
What to do if… By doing this, any water remaining in the machine is removed, avoiding ice forming and consequently damage to the appliance. When you use the machine again, make sure that the ambient temperature is above 0°C. Emergency emptying out If the water is not discharged, proceed as follows to empty out the machine: 1. pull out the plug from the power socket; 2. close the water tap; 3. if necessary, wait until the water has cooled down; 4. open the pump door; 5.
What to do if… Problem 29 Possible cause/Solution The washing machine does not start: The door has not been closed. «Please check that the door is closed properly and then press START/PAUSE» • Close the door firmly. The plug is not properly inserted in the power socket. • Insert the plug into the power socket. There is no power at the socket. • Please check your domestic electrical installation. The main fuse has blown. • Replace the fuse.
What to do if… Problem Possible cause/Solution The drain hose is squashed or kinked. «Cannot drain the water. Please check that the filter is clean and then press button START/ PAUSE» • Check the drain hose connection. The drain filter is clogged. «Cannot drain the water. Please check that the filter is clean and then press button START/PAUSE» The machine does not empty and/or does not • Clean the drain filter.
What to do if… Problem 31 Possible cause/Solution The door will not open: The programme is still running. • Wait the end of washing cycle. There is water in the drum. • Select drain or spin programme to empty out the water. For opening the door refer to display message. The machine vibrates or is noisy: The transit bolts and packing have not been removed. • Check the correct installation of the appliance. The support feet have not been adjusted • Check the correct levelling of the appliance.
Technical data If you are unable to identify or solve the problem, contact our service centre. Before telephoning, make a note of the model, serial number and purchase date of your machine: the Service Centre will require this information. Technical data Dimensions Width Height Depth Depth (Overall dimensions) 60 cm 85 cm 60 cm 63 cm Electrical connection Voltage - Overall power - Fuse Information on the electrical connection is given on the rating plate, on the inner edge of the appliance door.
Installation 33 The consumption data shown on this chart is to be considered purely indicative, as it may vary depending on the quantity and type of laundry, on the inlet water temperature and on the ambient temperature. Installation instructions Installation Unpacking All transit bolts and packing must be removed before using the appliance. You are advised to keep all transit devices so that they can be refitted if the machine ever has to be transported again. 1.
Installation 3. Unscrew the three bolts with the key supplied with the machine. 4. Slide out the relevant plastic spacers. 5. Open the porthole, take out the inlet hose from the drum and remove the polystyrene block fitted on the door seal.
Installation 35 6. Fill the smaller upper hole and the two large ones with the corresponding plastic plug caps supplied in the bag containing the instruction booklet. 7. Connect the water inlet hose as described under the paragraph «Water inlet». Positioning and levelling Install the machine on a flat hard floor. Make sure that air circulation around the machine is not impeded by carpets, rugs etc. Before placing it on small tiles, apply a rubber coating.
Installation 1. Open the porthole and extract the inlet hose. 2. Connect the hose with the angled connection to the machine. Do not place the inlet hose downwards. Angle the hose to the left or right depending on the position of your water tap. 3. Set the hose correctly by loosening the ring nut. After positioning the inlet hose, be sure to tighten the ring nut again to prevent leaks. 4. Connect the hose to a tap with a 3/4” thread. Always use the hose supplied with the appliance.
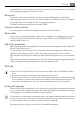
Installation 37 Water-stop device The inlet hose is provided with a water stop device, which protects against damage caused by water leaks in the hose which could develop due to natural ageing of the hose. This fault is shown by a red sector in the window «A» . Should this occur, turn the water tap off and refer to your Service Centre to replace the hose. Water drainage The end of the drain hose can be positioned in three ways: 1.
Electrical connection The drain hose may be extended to a maximum of 4 metres. An additional drain hose and joining piece is available from your local Service Centre. Electrical connection Information on the electrical connection is given on the rating plate on the inner edge of the appliance door. Check that your domestic electrical installation can take the maximum load required, also taking into account any other appliances in use. WARNING! Connect the machine to an earthed socket.
Packaging materials The materials marked with the symbol are recyclable. >PE<=polyethylene >PS<=polystyrene >PP<=polypropylene This means that they can be recycled by disposing of them properly in appropriate collection containers. Ecological hints To save water, energy and to help protect the environment, we recommend that you follow these tips: • Normally soiled laundry may be washed without prewashing in order to save detergent, water and time (the environment is protected too!).
132946420 - 00 - 072010 www.electrolux.