EN ES User Manual Washing Machine Manual de instrucciones Lavadora 2 28 L 85275 XFL
www.aeg.com CONTENTS 1. SAFETY INFORMATION...........................................................................................3 2. SAFETY INSTRUCTIONS.......................................................................................... 4 3. PRODUCT DESCRIPTION........................................................................................ 5 4. CONTROL PANEL.....................................................................................................6 5. PROGRAMMES ............
ENGLISH 1. 3 SAFETY INFORMATION Before the installation and use of the appliance, carefully read the supplied instructions. The manufacturer is not responsible if an incorrect installation and use causes injuries and damages. Always keep the instructions with the appliance for future reference. 1.
www.aeg.com • • • • • The appliance is to be connected to the water mains using the new supplied hose-sets. Old hose sets must not be reused. If the supply cord is damaged, it must be replaced by the manufacturer, its Authorised Service Centre or similarly qualified persons in order to avoid a hazard. Before maintenance, deactivate the appliance and disconnect the mains plug from the mains socket. Do not use water spray and steam to clean the appliance. Clean the appliance with a moist soft cloth.
ENGLISH 2.3 Water connection • Make sure not to cause damage to the water hoses. • Before you connect the appliance to new pipes or pipes not used for a long time, let the water flow until it is clean. • The first time you use the appliance, make sure that there is no leakage. 2.4 Use WARNING! Risk of injury, electrical shock, fire, burns or damage to the appliance. • Use this appliance in a household only. • Obey the safety instructions on the detergent packaging.
www.aeg.com 3.2 How to activate the child safety device To close the door, turn the device anticlockwise until the groove is vertical. This device prevents children or pets to be closed in the drum. 3.3 Fixing plate kit (4055171146) Turn the device clockwise, until the groove is horizontal. You cannot close the door. Available from your authorized dealer. If you install the appliance on a plinth, secure the appliance in the fixing plates. Read carefully the instructions supplied with the accessory.
ENGLISH 4.2 Display A B C D L E K F G J H I The display shows: Temperature of the set programme A Cold water Spin speed of the set programme B No Spin symbol1) Rinse hold symbol 1) Only available for SPIN/DRAIN programme. The phase symbols When a programme is set, all the symbols of the phases related to the programme come on. When the programme starts, only the symbol of the phase in operation flashes. When the programme is completed, the symbol of the last phase is on.
www.aeg.com You cannot open the appliance door when the symbol is on. You can open the door only when the symbol goes off. F If the programme is completed but the symbol stays on: • The «Rinse hold» function is on. • There is water in the drum. The delay start symbol comes on when you set the delay start function. G Programme time When the programme starts, the programme time decreases with steps of 1 minute.
ENGLISH 9 The extra rinse symbol comes on when this function is activated. K The value shows the total number of the rinses. The indicator bar is fully filled when you set the maximum number of rinses. the Stain symbol comes on when you activate the function. The Prewash symbol comes on when this function is activated. L The indicator bar is not fully filled when you set only one of the functions. The indicator bar is fully filled when you set the two functions. 5. PROGRAMMES 5.
www.aeg.com Programme Temperature range Maximum load Maximum spin speed Programme description (Type of load and soil level) Anti-Alergia 60°C 7 kg 1200 rpm White cotton items. This programme removes micro-organisms thanks to the washing by 60°C and adds one rinse. In this way the wash is more effective. Centrif./Descarga3) 7 kg 1200 rpm To spin the laundry and to drain the water in the drum. All fabrics. Aclarado/Enxaguar 4) 7 kg 1200 rpm Cold To rinse and spin the laundry. All fabrics.
ENGLISH Programme Temperature range Maximum load Maximum spin speed 11 Programme description (Type of load and soil level) Steam programme for synthetic items. This cycle helps to dewrinkle the laundry. Anti-arrugas / An- 1.5 kg ti-rugas 40°C 1) To reduce the creases of the laundry, this cycle regulates the water temperature and performs a soft wash and spin phase. The appliance adds some rinses. 2) During this cycle the drum rotates slowly to ensure a gentle washing.
www.aeg.com Extra Aclarado/Enxag. 2) Extra Rapido 3) Inicio Diferido Programme Manchas-Nódoas/Prelava. 1) 12 Sintéticos ■ ■ ■ ■ ■ ■ Fácil ■ ■ ■4) ■ ■ ■ Delicados ■ ■ ■ ■ ■ ■ Lana/Lãs ■ ■ Edredón ■ Anti-Alergia ■ Centrif./Descarga5) ■ Aclarado/Enxaguar ■ ■ Jeans ■ ■ 20 Min.-3 Kg ■ Super Eco ■ ■ ■ ■ Algod. Eco ■ ■ ■ ■ ■ ■ ■ ■ ■ 4) ■ ■ ■ ■ ■ ■ ■ ■ ■ ■ 6) ■ 1) If you use liquid detergent, set a programme without Prewash.
ENGLISH 5.2 Woolmark Apparel Care Blue Company for the washing of wool garments labelled as «hand wash» provided that the garments are washed according to the instructions issued by the manufacturer of this washing machine. Follow the garment care label for drying and other laundry instructions. M1380 In UK, Eire, Hong Kong and India the Woolmark symbol is a certification trademark. The wool wash cycle of this machine has been approved by The Woolmark 6.
www.aeg.com Programmes Load (kg) Energy con- Water consumption sumption (kWh) (litre) ApproxiRemaining mate promoisture gramme du- (%)1) ration (minutes) Standard 60 °C cotton 7 0.76 47 248 53 Standard 60 °C cotton 3.5 0.66 35 205 53 Standard 40 °C cotton 3.5 0.54 35 209 53 1) At the end of spin phase. 2) Not available for some models.
ENGLISH This option is not available with a temperature lower than 40° C. • Prelava.: Use this option to add a prewash phase before the washing phase. We recommend that you use this option when you have laundry with a high level of soil. The set of this option increases the programme duration. 7.6 Centrif. Press this button to: • Decrease the maximum speed of the spin phase of the programme. 15 The display shows only the spin speeds available with the set programme. • Deactivate the spin phase.
www.aeg.com 10. DAILY USE WARNING! Refer to Safety chapters. 10.3 Filling the detergent and additives 10.1 Activating the appliance 1. Open the water tap. 2. Connect the mains plug to the mains socket. 3. Press button Auto Off to activate the appliance. A short tune sounds. 10.2 Loading the laundry 1. Open the appliance door 2. Put the laundry in the drum, one item at a time. 3. Shake the items before you put them in the appliance. Make sure not to put too much laundry in the drum. 4.
ENGLISH 1 2 3. To use powder detergent, turn the flap up. A 17 With the flap in the position DOWN: • Do not use gelatinous or thick liquid detergents. • Do not put more liquid detergent than the limit showed in the flap. • Do not set the prewash phase. • Do not set the delay start function. 5. Measure out the detergent and the fabric conditioner. 6. Carefully close the detergent dispenser. Make sure that the flap does not cause a blockage when you close the drawer. 10.5 Setting a programme 4.
www.aeg.com 10.7 Starting a programme with the delay start 1. Press button Inicio Diferido again and again until the display shows the number of minutes or hours of delay. The related indicator comes on. 2. Press button Inicio/Pausa. The appliance starts the countdown of the delay start. When the countdown is completed, the programme starts automatically. Before you press button Inicio/Pausa to start the appliance, you can cancel or change the set of the delay start. 10.
ENGLISH After five minutes from the end of the programme, the energy saving function automatically deactivates the appliance. When you activate the appliance again, the display show the end of the last set programme. Turn the programme knob to set a new cycle. 2. Remove the laundry from the appliance. 3. Make sure that the drum is empty. 4. Keep the door ajar, to prevent mildew and odours 10.
www.aeg.com washing bag to wash small and/or delicate items (e.g. underwired bras, belts, tights, etc. ). • A very small load can cause balance problems with the spin phase. If this occurs, adjust manually the items in the tub and start the spin phase again. 11.2 Stubborn stains For some stains, water and detergent is not sufficient. We recommend that you remove these stains before you put the items in the appliance. Special stain removers are available.
ENGLISH Regularly examine the seal and remove all objects from the inner part. Always obey the instructions that you find on the packaging of the product. 12.5 Cleaning the drum 12.3 Maintenance wash Regularly examine the drum to prevent limescale and rust particles. Only use special products to remove rust particles from the drum. With the low temperature programmes it is possible that some detergent stays in the drum. Make regularly a maintenance wash.
www.aeg.com 12.7 Cleaning the drain filter Do not clean the drain filter if the water in the appliance is hot. 1. 2. 2 1 1 2 1 3. 4. 1 5. 6.
ENGLISH 7. 8. 1 2 9. 2 1 12.8 Cleaning the inlet hose and the valve filter 1. 2.
www.aeg.com 3. 4. 45° 20° 12.9 Emergency drain Because of a malfunction, the appliance cannot drain the water. If this occurs, do steps (1) through (9) of 'Cleaning the drain filter'. If necessary, clean the pump. When you drain the water with the emergency drain procedure, you must activate again the drain system: 1. When you drain the water with the emergency drain procedure, you must activate again the drain system: Put 2 litres of water in the main wash compartment of the detergent dispenser. 2.
ENGLISH • - No communication between electronic elements of the appliance. Switch off and switch on again. • - The anti-flood device is on. Disconnect the appliance and close the water tap. Contact the Authorised Service Centre. 25 WARNING! Deactivate the appliance before you do the checks. 13.2 Possible failures Problem Possible solution The programme does not start. Make sure that the mains plug is connected to the mains socket. Make sure that the appliance door is closed.
www.aeg.com Problem Possible solution Set the drain programme if you set an option which ends with water in the tub. The spin phase does not operate or the washing cycle lasts longer than usually. Set the spin programme. Make sure that the drain filter is not clogged. Clean the filter, if necessary. Refer to 'Care and cleaning'. Adjust manually the items in the tub and start the spin phase again. This problem may be caused by balance problems. There is water on the floor.
ENGLISH Problem Possible solution You cannot set an option. Make sure that you press only the wanted button(s). 27 After the check, activate the appliance. The programme continues from the point of interruption. If the problem occurs again, contact the Authorised Service Centre. If the display shows other alarm codes. Deactivate and activate the appliance. If the problem continues, contact the Authorised Service Centre. 14.
www.aeg.com CONTENIDO 1. INFORMACIÓN SOBRE SEGURIDAD...................................................................29 2. INSTRUCCIONES DE SEGURIDAD....................................................................... 30 3. DESCRIPCIÓN DEL PRODUCTO...........................................................................32 4. PANEL DE MANDOS..............................................................................................33 5. PROGRAMAS ................................................
ESPAÑOL 1. 29 INFORMACIÓN SOBRE SEGURIDAD Antes de instalar y utilizar el aparato, lea atentamente las instrucciones facilitadas. El fabricante no se hace responsable de los daños y lesiones causados por una instalación y uso incorrectos. Guarde siempre las instrucciones junto con el aparato para futuras consultas. 1.
www.aeg.com • • • • • • • La presión de trabajo del agua (mínima y máxima) debe oscilar entre 0,5 bares (0,05 MPa) y 8 bares (0,8 MPa). Vigile que ninguna alfombra obstruya las aberturas de ventilación de la base (si existen). El aparato debe conectarse a la toma de agua utilizando los nuevos juegos de tubos suministrados. No se deben reutilizar los juegos de tubos antiguos.
ESPAÑOL • • • • terminado la instalación. Asegúrese de tener acceso al enchufe del suministro de red una vez instalado el aparato. No toque el cable de red ni el enchufe con las manos mojadas. No desconecte el aparato tirando del cable de conexión a la red. Tire siempre del enchufe. Sólo para el R.U. e Irlanda: El aparato tiene un enchufe de 13 amp. Si fuera necesario cambiar el fusible del enchufe, use un fusible ASTA (BS 1362) de 13 amp. Este aparato es conforme con las Directivas de la CEE. 2.
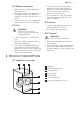
www.aeg.com 3. DESCRIPCIÓN DEL PRODUCTO 3.1 Descripción general del aparato 1 2 3 4 1 2 3 4 5 6 7 Encimera Dosificador de detergente Panel de mandos Tirador de la puerta Placa de datos técnicos Filtro de la bomba de desagüe Pata para nivelación del aparato 5 6 7 3.2 Cómo activar el dispositivo de seguridad para niños Este dispositivo evitará que los niños o mascotas queden encerrados en el tambor. Gire el dispositivo hacia la derecha hasta que la ranura esté en posición horizontal.
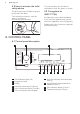
ESPAÑOL 33 4. PANEL DE MANDOS 4.1 Descripción del panel de mandos 1 2 Anti-arrugas/ Anti-rugas Refrescar 3 Algod. Extra silencio Algod. Eco Sintéticos Super Eco Fácil 20 Min. - 3 kg Delicados Jeans Aclarado/ Enxaguar Centrif./Drenar Lana/Lãs Edredón Auto Off Anti-alergia Temp. Centrif.
www.aeg.com Temperatura del programa seleccionado A Agua fría Velocidad de centrifugado del programa ajustado B Símbolo de no centrifugado1) Símbolo Agua en la cuba 1) Solo disponible para el programa de CENTRIFUGADO/DESCARGA. Los símbolos de la fase Cuando se ajusta un programa, todos los símbolos de las fases correspondientes al programa se encienden. Cuando empieza el programa, solo parpadea el símbolo de la fase en curso. Cuando termina el programa, el símbolo de la última fase se enciende.
ESPAÑOL 35 Duración del programa Cuando se inicia el programa, el tiempo se reduce a intervalos de 1 minuto. Inicio diferido Cuando se pulsa el botón de inicio diferido, la pantalla muestra la hora del mismo Códigos de alarma Si el aparato presenta una avería, la pantalla muestra los códigos de alarma. Consulte "Solución de problemas".
www.aeg.com el símbolo de Manchas se enciende cuando se activa esta función. El símbolo de prelavado se enciende cuando esta función está activada. L La barra indicadora no está completamente llena cuando se ajusta únicamente una de las funciones. La barra indicadora está completamente llena cuando se ajustan dos funciones. 5. PROGRAMAS 5.
ESPAÑOL Programa Margen de temperatura Carga máxima Velocidad máxima de centrifugado Descripción del programa (Tipo de carga y grado de suciedad) Centrif./Descarga3) 7 kg 1200 rpm Para centrifugar la colada y drenar el agua en el tambor. Todos los tejidos. 37 Aclarado/Enxaguar 4) 7 kg 1200 rpm Frío Para aclarar y centrifugar prendas. Todos los tejidos. Jeans 60°C - Frío 7 kg 1200 rpm Prendas de tela vaquera y jerséis. También para prendas de colores oscuros. 20 Min.
www.aeg.com Programa Margen de temperatura Carga máxima Velocidad máxima de centrifugado Anti-arrugas / An- 1.5 kg ti-rugas 40°C Descripción del programa (Tipo de carga y grado de suciedad) Programa de vapor para prendas sintéticas. Este ciclo ayuda a reducir las arrugas de la colada. 1) Para reducir las arrugas en la colada, este ciclo regula la temperatura del agua y realiza una fase de lavado y centrifugado suaves. El aparato añade algunos aclarados.
ESPAÑOL 39 Compatibilidad con opciones de programa Extra Silencio Inicio Diferido ■ Extra Rapido 3) ■ Extra Aclarado/Enxag. 2) Algod. Manchas-Nódoas/Prelava. 1) Programa ■ ■ ■ ■ ■ ■ ■ ■ Sintéticos ■ ■ ■ ■ ■ ■ Fácil ■ ■ ■4) ■ ■ ■ Delicados ■ ■ ■ ■ ■ ■ Lana/Lãs ■ ■ Edredón ■ Anti-Alergia ■ Centrif./Descarga5) ■ Aclarado/Enxaguar ■ ■ Jeans ■ ■ 20 Min.-3 Kg ■ Super Eco ■ ■ ■ ■ Algod.
www.aeg.com 5.2 Woolmark Apparel Care Azul Woolmark Company para el lavado de productos con la etiqueta de la prenda "lavado a mano" siempre que las prendas se laven de acuerdo con las instrucciones indicadas por el fabricante de esta lavadora. Siga la etiqueta de la prenda para el secado y demás instrucciones de la colada. M1380 En el Reino Unido, Irlanda, Hong Kong e India el símbolo Woolmark constituye una marca comercial de certificación.
ESPAÑOL Programas Carga (kg) Consumo energético (KWh) Consumo de agua (litros) 41 Duración Humedad aproximada restante del progra- (%)1) ma (minutos) Algodón estándar 60°C 7 0.76 47 248 53 Algodón estándar 60°C 3.5 0.66 35 205 53 Algodón estándar 40°C 3.5 0.54 35 209 53 1) Al finalizar la fase de centrifugado. 2) No disponible para algunos modelos.
www.aeg.com . Esta función aumenta la duración del programa. Esta opción función no está disponible con temperaturas inferiores a 40°C. • Prelava.: Use esta opción para añadir una fase de prelavado antes de la de lavado. Se recomienda utilizar esta opción cuando la colada está muy sucia. El ajuste de esta opción aumenta la duración del programa. 7.6 Centrif. Pulse esta tecla para: • Reducir la velocidad máxima de la fase de centrifugado del programa.
ESPAÑOL 2. Ponga una pequeña cantidad de detergente en el compartimento para la fase de lavado. 3. Ajuste e inicie un programa para algodón a la temperatura más alta sin colada. 43 De esta forma se elimina toda la posible suciedad del tambor y de la cuba. 10. USO DIARIO ADVERTENCIA! Consulte los capítulos sobre seguridad. 10.3 Introducción del detergente y los aditivos 10.1 Puesta en marcha del aparato 1. Abra la llave de paso. 2. Conecte el enchufe a la toma de corriente. 3.
www.aeg.com 1 2 3. Para usar detergente en polvo, gire la tapa abatible hacia arriba. A Con la tapa abatible en posición BAJADA: • No utilice detergentes líquidos gelatinosos ni espesos. • No ponga más detergente líquido que el límite mostrado en la tapa abatible. • No ajuste la fase de prelavado. • No ajuste la función de inicio diferido. 5. Dosifique el detergente y el suavizante. 6. Cierre con cuidado el dosificador de detergente.
ESPAÑOL 45 10.7 Inicio de un programa con el inicio diferido 10.10 Cancelación de un programa en curso 1. Pulse la tecla Inicio Diferido repetidamente hasta que la pantalla muestre el número de minutos u horas. Se enciende el indicador correspondiente. 2. Pulse la tecla Inicio/Pausa. El aparato inicia la cuenta atrás del inicio diferido. El programa de lavado se pone en marcha de forma automática cuando termina la cuenta atrás. 1. Pulse la tecla Auto Off para cancelar el programa y apagar el aparato.
www.aeg.com 10.13 Fin de ciclo Debe vaciar el agua para abrir la puerta. Cuando haya finalizado el programa, el aparato se para automáticamente. Suena la señal acústica, si está activada. 1. Si fuera necesario, reduzca la velocidad de centrifugado. 2. Pulse la tecla Inicio/Pausa. El aparato desagua y centrifuga. 3. Cuando el programa termina y el indicador de bloqueo de la puerta En la pantalla, indicador apaga.
ESPAÑOL • No lave juntas las prendas blancas y de color. • Algunas prendas de color pueden desteñir en el primer lavado. Se recomienda lavarlas por separado la primera vez. • Abotone las fundas de almohadas y cierre las cremalleras, los ganchos y los broches. Ate las correas. • Vacíe los bolsillos y despliegue las prendas. • Dé la vuelta a las prendas de varias capas, de lana y con motivos pintados. • Retire las manchas difíciles. • Lave con detergente especial las manchas difíciles.
www.aeg.com 12. MANTENIMIENTO Y LIMPIEZA ADVERTENCIA! Consulte los capítulos sobre seguridad. 12.1 Limpieza del exterior Limpie el aparato solo con agua templada y jabón. Seque completamente todas las superficies. periódicamente un lavado de mantenimiento. Para ello: • Saque las prendas del tambor. • Ajuste el programa de algodón con la temperatura más alta y utilice una pequeña cantidad de detergente. 12.
ESPAÑOL 12.6 Limpieza del dosificador de detergente 1. 2. 1 2 3. 4. 12.7 Limpieza del filtro de desagüe No limpie el filtro si el agua del aparato está caliente. 1. 2.
www.aeg.com 3. 4. 1 5. 2 6. 1 2 7. 8. 1 2 9.
ESPAÑOL 51 12.8 Limpieza del tubo de entrada y el filtro de la válvula 1. 2. 1 2 3 3. 4. 45° 20° 12.9 Desagüe de emergencia Debido a una avería, el aparato no puede desaguar. Si esto ocurre, realice los pasos (1) a (9) del apartado "Limpieza del filtro de desagüe". Limpie la bomba si fuera necesario. Cuando se desagua con el procedimiento de drenaje de emergencia, se debe activar de nuevo el sistema de desagüe: 1.
www.aeg.com ADVERTENCIA! Asegúrese de que la temperatura es superior a 0°C antes de usar de nuevo el aparato. El fabricante no se hace responsable de los daños derivados de las bajas temperaturas. 13. SOLUCIÓN DE PROBLEMAS • - La puerta del aparato está abierta o no está bien cerrada. Revise la puerta. • El aparato no se pone en marcha o se detiene durante el funcionamiento. - La corriente eléctrica es inestable. Espere hasta que la corriente eléctrica se estabilice.
ESPAÑOL Problema 53 Posible solución El aparato no carga agua Compruebe que el grifo esté abierto. correctamente. Asegúrese de que la presión del agua no sea demasiado baja. Solicite información a la compañía local de suministro de agua. Compruebe que el grifo no esté obstruido. Asegúrese de que el filtro de la manguera de entrada y el filtro de la válvula no estén obstruidos. Consulte el apartado “Mantenimiento y limpieza”. Asegúrese de que la manguera de entrada no esté doblada ni retorcida.
www.aeg.com Problema Posible solución Compruebe que la manguera de desagüe no está dañada. Asegúrese de que usa el detergente adecuado y la cantidad correcta. No se puede abrir la puerta del aparato. Asegúrese de que el programa de lavado ha terminado. Ajuste el programa de centrifugado o descarga si hay agua en el tambor. Asegúrese de que el aparato no recibe electricidad. Este problema puede deberse a un fallo del aparato. Póngase en contacto con el servicio técnico autorizado.
ESPAÑOL Conexión eléctrica Tensión Potencia total Fusible Frecuencia 230 V 2200 W 10 A 50 Hz El nivel de protección contra la entrada de partículas sólidas y humedad está garantizado por la tapa protectora, excepto si el equipo de baja tensión no tiene protección contra la humedad.
132927713-A-272015 www.aeg.