L 87485 FL EN User manual
www.aeg.com CONTENTS 1. 2. 3. 4. 5. 7. 8. 9. 13. 14. 15. 16. 17. 18. SAFETY INFORMATION . . . . . . . . . . . . . . . . . . . . . . . . . . . . . . . . . . . . . . . . . . . . . . . . . . . . 3 TECHNICAL INFORMATION . . . . . . . . . . . . . . . . . . . . . . . . . . . . . . . . . . . . . . . . . . . . . . . . . 4 PRODUCT DESCRIPTION . . . . . . . . . . . . . . . . . . . . . . . . . . . . . . . . . . . . . . . . . . . . . . . . . . . 5 ACCESSORIES . . . . . . . . . . . . . . . . . . . . . . . . . . . .
ENGLISH 1. 3 SAFETY INFORMATION Before the installation and use, read this manual carefully: • For your safety and the safety of your property • To help the environment • For the correct operation of the appliance. Always keep these instructions with the appliance also if you move or give it to a different person. The manufacturer is not responsible if an incorrect installation and use causes damage. 1.
www.aeg.com • Do not install and connect a damaged appliance. • Make sure to remove all packaging and transport bolts. • Make sure that the mains plug is disconnected from the mains socket during installation. • Only a qualified person must do the electrical installation, the plumbing and the installation of the appliance. This to prevent the risks of structural damage or injury. • Do not install or use the appliance where the temperature is less than 0 °C.
ENGLISH Water supply pressure 5 Minimum 0,5 bar (0,05 MPa) Maximum 8 bar (0,8 MPa) Water supply 1) Cold water Maximum load Cotton 8 kg Spin speed Maximum 1400 rpm 1) Connect the water inlet hose to a water tap with a 3/4'' thread. 3.
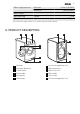
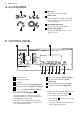
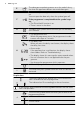
www.aeg.com 4. ACCESSORIES 1 1 Spanner 2 To remove the transit bolts. 2 Plastic caps 4 To close the holes on the rear side of the cabinet after the removal of the transit bolts. 3 Anti-flood inlet hose To prevent possible leakage 4 Plastic hose guide To connect the drain hose on the edge of a sink. 3 5. CONTROL PANEL 1 2 3 10 9 8 7 6 5 4 1 On/Off button 7 Extra rinse button (Επιπλ. Ξέβγαλ.
ENGLISH • After 5 minutes from the end of the washing programme. Refer to 'At the end of programme'. 6.2 Programme knob 2 Turn this knob to set a programme. The related programme indicator comes on. 6.3 Display 3 A B C D L E F K G J H I The display shows: The temperature of the set programme A Cold water The spin speed of the set programme B No Spin symbol1) Rinse Hold symbol 1) Only available for Spin/Drain programme.
www.aeg.com The detergent overdosing comes on at the end of the cycle when the appliance detects too much detergent. E You cannot open the appliance door when the symbol is on. You can open the door only when the symbol goes off. If the programme is completed but the symbol stays on: • The 'Rinse Hold' function is on. • There is water in the drum. F The delay start symbol comes on when you set the delay start function.
ENGLISH 9 The extra rinse symbol comes on when this function is activated. K The value shows the total number of the rinses. The indicator bar is fully filled when you set to the maximum number of rinses. The Stain symbol comes on when you activate the function. The Prewash symbol comes on when you activate the function. L The indicator bar is not fully filled when you set only one of the functions. The indicator bar is fully filled when you set the two functions. 6.
www.aeg.com 6.10 Temperature button 10 Press button 10 to change the default temperature. When the display shows - -, the appliance does not heat the water. 6.11 Acoustic signals function You can hear the acoustic signals when: • You activate the appliance. • You deactivate the appliance. • You press the buttons. • The programme is completed. • The appliance has a malfunction. To deactivate/activate the acoustic signals, press button 8 and button 7 at the same time for 6 seconds.
ENGLISH Programme Temperature Type of load Max. weight of load Cycle description Functions Συνθετικά 60° - Cold Synthetic or mixed fabric items with normal soil. max. load 4 kg Wash Rinses Short spin SPIN REDUCTION Ακύρωση Ξεβγάλματος Πρόπλυση1) Επιπλέον ξέβγαλμα Λεκέδες2) Eξoικ. Xρόvoυ Εύκολο Σιδέρωμα4) 60 - 0° Synthetic fabrics with normal soil. max. load 4 kg Wash Rinses Short spin SPIN REDUCTION Ακύρωση Ξεβγάλματος Πρόπλυση1) Επιπλέον ξέβγαλμα Eξoικ.
www.aeg.com Programme Temperature Type of load Max. weight of load Cycle description Functions Στύψιμο/ ´Aδειασμα5) 0° All fabrics. The maximum load of the laundry is related to the type of laundry. max. load 8 kg Drainage of the water Spin phase SPIN REDUCTION NO SPIN Ξέβγαλμα 0° All fabrics. max. load 8 kg One rinse with additive Spin phase SPIN REDUCTION Ακύρωση Ξεβγάλματος Επιπλέον ξέβγαλμα6) Τζήν 60° - 0° All items in jeans. Jersey made items with hi-tech materials. max.
ENGLISH 13 5) Set the spin speed. Make sure that it agrees with the laundry. To select the DRAIN programme only, set the function NO SPIN. 6) Press 'Επιπλέον ξέβγαλμα' button to add rinses. With a low spin speed the appliance performs delicate rinses and a short spin. 7) Set this programme to decrease the time and the consumption of energy and water. Use a special detergent for very low temperature. 8) Set this programme to have good washing results and decrease the energy consumption.
www.aeg.com Programmes Load (Kg) Energy con- Water consumption sumption (li(kWh) tre) Approximate programme duration (minutes) Remaining moisture (%)1) Cottons 60 °C 8 1.6 66 179 52 Cottons 40 °C 8 1.00 66 175 52 Synthetics 40 °C 4 0.60 48 110 35 Delicates 40 °C 4 0.70 58 91 35 Wool/Hand wash 30 °C 2 0.35 57 56 30 Standard cotton programmes Standard 60 °C cotton 8 0.89 60 223 52 Standard 60 °C cotton 4 0.74 37 190 52 Standard 40 °C cotton 4 0.
ENGLISH 15 10. LOADING THE LAUNDRY 1. 2. Open the appliance door. Put the laundry in the drum, one item at a time. Shake the items before you put them in the appliance. Make sure not to put too much laundry in the drum. 3. Close the door. Make sure that no laundry stays between the seal and the door. There is a risk of water leakage or damage to the laundry. 11. FILLING DETERGENT AND ADDITIVES The detergent compartment for the prewash phase and the soak programme.
www.aeg.com The compartment for the stain remover. Put the product in the compartment and set the stain function before you start the programme. Flap for powder or liquid detergent Turn it (up or down) in the correct position to use powder or liquid detergent. Always obey the instructions that you find on the packaging of the detergent products. Check the position of the flap 1. Pull out the detergent dispenser until it stops. 2. Press the lever down to remove the dispenser. 3.
ENGLISH 5. 6. 17 Measure out the detergent and the fabric conditioner. Carefully close the detergent dispenser. Make sure that the flap does not cause a blockage when you close the drawer. 12. SETTING AND STARTING A PROGRAMME 1. Turn the programme knob. The related programme indicator comes on. 2. 2. The indicator of button 4 flashes with red colour. 3. The display shows the default temperature, the spin speed and the empty indicator bars of the available functions. 4.
www.aeg.com If the temperature and level of the water in the drum are too high, the door lock symbol stays on and you cannot open the door. To open the door do the steps that follow: 1. Deactivate the appliance. 2. Wait for some minutes. 3. Make sure that no water is in the drum. 12.6 Open the door While a programme or the delay start operates, the appliance door is locked. To open the appliance door: 1. Press button 4 . The door lock symbol in the display goes off. 2. Open the appliance door. 3.
ENGLISH • Button up pillowcases, close zippers, hooks and poppers. Tie up belts. • Empty the pockets and unfold the items. • Turn inside out multilayered fabrics, wool and items with painted illustrations. • Remove hard stains. • Wash with a special detergent heavy soil stains. • Be careful with the curtains. Remove the hooks or put the curtains in a washing bag or pillowcase. • Do not wash in the appliance : – Laundry without hems or with cuts – Underwired bras. – Use a washing bag to wash small items.
www.aeg.com 15. CARE AND CLEANING WARNING! Disconnect the appliance from the mains supply before you clean it. 15.1 Descaling The water we use contains limescale. If it becomes necessary, use a water softener to remove limescales. Use a special product made for washing machines. Obey the instructions that you find on the packaging of the manufacturer. Do this separately from the laundry wash. 15.2 External cleaning CAUTION! Do not use alcohol, solvents or chemical products. 15.
ENGLISH 21 15.6 Detergent dispenser To clean the dispenser: 1 1. 2. Press the lever. Pull the dispenser out. 3. Remove the top part of the liquid additive compartment. Clean all the parts with water. 2 4. 5. 6. 15.7 Drain pump Regularly examine the drain pump and make sure that it is clean. Clean the pump if: • The appliance does not drain the water. • The drum cannot turn. • The appliance makes an unusual noise because of the blockage of the drain pump. Clean the dispenser recess with a brush.
www.aeg.com To clean the drain pump: 1. Open the drain pump door. 2. Pull the flap out to remove it. 3. Put a container below the recess of the drain pump to collect the water that flows out. Press the two levers and pull forward the drainage duct to let the water flow out. 4. 1 5. 6. When the container is full of water, put the drainage duct back again and empty the container. Do steps 4 and 5 again and again until no more water flows out from the drain pump.
ENGLISH 23 9. Clean the filter under the water tap and put it back in the pump into the special guides. 10. Make sure that you tighten correctly the filter to prevent leakages. 11. Put the flap back and close the drain pump door. 2 1 15.8 The inlet hose filter and the valve filter • The indicator of button 4 flashes and the display shows the related alarm. Refer to 'Troubleshooting'. It could be necessary to clean the filters when: • The appliance does not fill with water.
www.aeg.com Put the drainage duct back and close the drain pump flap. When you drain the water with the emergency drain procedure, you must activate again the drain system: 1. Put 2 litres of water in the main wash compartment of the detergent dispenser. 2. Start the programme to drain the water. 2. 3. 4. Close the water tap. Remove the water inlet hose Put the two ends of the inlet hose in a container and let the water flow out of the hose. 5. Empty the drain pump.
ENGLISH Problem Possible cause The appliance The water drain hose is does not drain the damaged. water. Possible solution Make sure that the water drain hose has no damages. The filter of the drain pump is blocked. Clean the filter of the drain pump. Refer to 'Care and cleaning'. The connection of the water drain hose is not correct. Make sure that the connection is correct. A washing programme without the drain phase is set. Set the drain programme. The function Rinse & Hold is on.
www.aeg.com Problem Possible cause Possible solution Leakages from the drain Make sure that the drain pump pump. filter is tight. You cannot open the appliance door. The appliance makes an unusual noise. The water drain hose is damaged. Make sure that the water inlet hose has no damages. The washing programme is in operation. Let the washing programme end. There is water in the drum. Set the drain or the spin programme. Incorrect level of the ap- Adjust the level of the applipliance. ance.
ENGLISH 27 17.2 Unpacking 1. Use the gloves. Remove the external film. If necessary, use a cutter. 2. 3. Remove the cardboard top. Remove the polystyrene packaging materials. 4. Remove the internal film. 5. Open the door. Remove the polystyrene piece from the door seal and all the items from the drum.
www.aeg.com 6. Put one of the polystyrene packaging elements on the floor behind the appliance. Carefully put down the appliance with the rear side on it. Make sure not to damage the hoses. 7. Remove the polystyrene protection from the bottom. Pull up the appliance in vertical position. 8. 1 2 9. Remove the power supply cable and the drain hose from the hose holders. 10. Remove the three bolts. Use the key supplied with the appliance. 11. Pull out the plastic spacers.
ENGLISH 29 12. Put the plastic caps in the holes. You can find these caps in the user manual bag. WARNING! Remove all the packaging and the transit bolts before you install the appliance. We recommend that you keep the packaging and the transit bolts for when you move the appliance. 17.3 Positioning and levelling • Install the appliance on a flat hard floor. • Make sure that carpets do not stop the air circulation below the appliance.
www.aeg.com 17.4 The inlet hose • Connect the hose to the appliance. Turn the inlet hose only left or right. Loose the ring nut to set it in the correct position. 20 O 45 O • Connect the water inlet hose to the cold water tap with 3/4 thread. CAUTION! Make sure that there are no leaks from the couplings. Do not use an extension hose if the inlet hose is too short. Contact the service centre for the replacement of the inlet hose. Water-stop device The inlet hose has a water stop device.
ENGLISH 31 With the plastic hose guide. • On the edge of a sink. • Make sure that the plastic guide cannot move when the appliance drains. Attach the guide to the water tap or the wall. • To a stand pipe with vent-hole. Refer to the illustration. Directly into a drain pipe at a height of not less than 60 cm and not more than 100 cm. The end of the drain hose must always be ventilated , i.e. the inner diameter of the drainpipe must be larger than the external diameter of the drain hose.
www.aeg.com You can extend the drain hose to maximum 400 cm. Contact the service centre for the other drain hose and the extension. 18. ENVIRONMENT CONCERNS Recycle the materials with the symbol . Put the packaging in applicable containers to recycle it. Help protect the environment and human health and to recycle waste of electrical and electronic appliances. Do not dispose appliances marked with the symbol with the household waste.
ENGLISH 33
www.aeg.
ENGLISH 35
132924720-A-172012 www.aeg.