L 75480 WD EN WASHER DRYER USER MANUAL
www.aeg.com CONTENTS 4 6 7 8 12 15 16 16 19 20 21 23 25 30 33 SAFETY INFORMATION TECHNICAL INFORMATION PRODUCT DESCRIPTION CONTROL PANEL PROGRAMMES CONSUMPTION VALUES BEFORE FIRST USE USING THE APPLIANCE - WASHING ONLY AT THE END OF THE PROGRAMME USING THE APPLIANCE - DRYING ONLY USING THE APPLIANCE - WASHING & DRYING HELPFUL HINTS AND TIPS CARE AND CLEANING TROUBLESHOOTING INSTALLATION ENVIRONMENT CONCERNS Recycle the materials with the symbol .
ENGLISH 3 FOR PERFECT RESULTS Thank you for choosing this AEG product. We have created it to give you impeccable performance for many years, with innovative technologies that help make life simpler – features you might not find on ordinary appliances. Please spend a few minutes reading to get the very best from it. ACCESSORIES AND CONSUMABLES In the AEG webshop, you’ll find everything you need to keep all your AEG appliances looking spotless and working perfectly.
www.aeg.com SAFETY INFORMATION Before the installation and use of the appliance, carefully read the supplied instructions. The manufacturer is not responsible if an incorrect installation and use causes injuries and damages. Always keep the instructions with the appliance for future reference. CHILDREN AND VULNERABLE PEOPLE SAFETY WARNING! Risk of suffocation, injury or permanent disability.
ENGLISH with a hinge on the opposite side in such a way that a full opening of the door is restricted. • Fabric softener or equivalent products must be used as specified by the fabric softener manufacturer. • Obey the safety instructions on the detergent packaging to prevent burns to eyes, mouth and throat. • Plastic items are not heat resistant. – If you use a detergent ball, remove it before you set the drying programme. – Do not use a detergent ball when you set a non-stop programme.
www.aeg.com • Make sure not to cause damage to the mains plug and cable. • Connect the mains plug to the mains socket only at the end of the installation. Make sure that there is access to the mains plug after the installation. • Do not pull the mains cable to disconnect the appliance. Always pull the mains plug. • Only for UK and Ireland. The appliance has a 13 amp mains plug. If it is necessary to change the fuse in the mains plug, use a 13 amp ASTA (BS 1362) fuse. • Permanent connection.
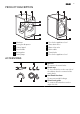
ENGLISH PRODUCT DESCRIPTION 1 2 3 8 9 10 4 5 11 6 12 7 1 Worktop 7 Feet for the appliance level 2 Detergent dispenser 8 Water drain hose 3 Control panel 4 Door handle 9 Water inlet valve 10 Mains cable 5 Rating plate 11 Transit bolts 6 Drain pump 12 Feet for the appliance level ACCESSORIES 1 2 1 Spanner To remove the transit bolts. 2 Plastic caps 4 3 To close the holes on the rear side of the cabinet after the removal of the transit bolts.
www.aeg.com CONTROL PANEL 1 2 3 Economy Cottons Super Eco Non Stop 60 Min. Cottons dry + Prewash Synthetics + Prewash Synthetics dry Easy Iron Wool dry Delicates Spin/Drain Wool/Silk Rinse Spin Drying Level Drying Time Time Save Delay Start Start/Pause 9 8 7 6 5 4 20 Min. - 3 kg Temp.
ENGLISH C 9 Dryness levels symbols:2) Iron dry Store dry Extra dry The display symbols:3) Washing phase Drying phase Extra rinse Child lock You cannot open the appliance door when the symbol is on. You can open the door only when the symbol goes off. If the programme is completed but the symbol stays on: • There is water in the drum. • The 'Rinse Hold' function is on. Delay start D • The programme time (washing and/or drying phase) When the programme starts, the time decreases with steps of 1 minute.
www.aeg.com TIME SAVE BUTTON 6 Press the button 6 to decrease the programme duration. • Press one time to set 'Shortened duration' for items with daily soil. • Press two times to set 'Extra Quick' for items with almost no soil. The display shows only the spin speeds available with the set programme. • Deactivate the spin phase. • Activate the 'Rinse Hold' function. Set this function to prevent fabric creases. The appliance does not drain the water when the programme is completed. Spin phase is off.
ENGLISH • After you press the Start/Pause button 4 , all the buttons and the programme knob are deactivated.
www.aeg.com PROGRAMMES Programme Temperature Type of load max. weight of load Cycle description Functions WASHING PROGRAMMES Cottons 95° - Cold White and coloured cotton with normal soil. max. 8 kg Wash Rinses Long spin SPIN REDUCTION RINSE HOLD EXTRA RINSE TIME SAVE1) Cottons + Prewash 95° - Cold White and coloured Prewash cotton with heavy soil. Wash max.
ENGLISH 13 Programme Temperature Type of load max. weight of load Cycle description Rinse All fabrics. One rinse with ad- SPIN REDUCTION ditive spin phase RINSE HOLD EXTRA RINSE3) Spin/Drain All fabrics The maximum load of the laundry is related to the type of laundry. Drainage of the water Spin phase at the maximum speed. 4) Functions SPIN REDUCTION NO SPIN DRYING PROGRAMMES Wool items max. 1 kg Timed drying only Synthetics dry Synthetic items max.
www.aeg.com 6) Cotton Energy Saving programme » at 60°C with a load of 8 kg is the reference programme for the data entered in the energy label, in compliance with EEC 92/75 standards.
ENGLISH 15 CONSUMPTION VALUES Programme Energy consumption (KWh) Water consumption (litres) White Cottons 95° 2.5 76 Cottons 60° 1.60 72 Cotton Energy Saving Programme 60° 1) 1.04 59 Cottons 40° 1.0 72 Synthetics 40° 0.60 50 Delicates 40° 0.70 60 Wool/ Handwash 30° 0.35 57 Programme duration (minutes) For the duration of the programmes, please refer to the display on the control panel.
www.aeg.com BEFORE FIRST USE To activate the drain system, put 2 litre of water in the main wash compartment of the detergent dispenser. 2. Put a small quantity of detergent in the main wash compartment of the detergent dispenser. Set and start a programme for cotton at the highest temperature without laundry. This removes all possible dirt from the drum and the tub. 1. USING THE APPLIANCE - WASHING ONLY 1. 2. Open the water tap. Connect the mains plug to the mains socket. 3.
ENGLISH 17 The detergent compartment for the prewash phase, the soak programme and for the stain function. Add the detergent for prewash, soak and stain remover before the start of the programme. The detergent compartment for the washing phase. If you use a liquid detergent, put it immediately before you start the programme. Liquid additives compartment (fabric conditioner, starch). Put the product in the compartment before you start the programme.
www.aeg.com 4. To use liquid detergent, turn the flap down. With the flap in the position DOWN: – Do not use gelatinous or thick liquid detergents. – Do not put more liquid detergent than the limit showed in the flap. – Do not set the prewash phase. – Do not set the delay start function. 5. 6. Measure out the detergent and the fabric conditioner. Carefully close the detergent dispenser. Make sure that the flap does not cause a blockage when you close the drawer. SETTING AND STARTING A PROGRAMME 1.
ENGLISH nutes or hours. The related symbols comes on. 2. Press button 4 , the appliance starts the countdown of the delay start. When the countdown is completed, the programme starts automatically. Before you press button 4 to start the appliance, you can cancel or change the set of the delay start. You cannot set the delay start with the Steam programme. To open the appliance door: 1. Press button 4 . The door lock symbol in the display goes off. 2. Open the appliance door. 3.
www.aeg.com USING THE APPLIANCE - DRYING ONLY WARNING! Open the water tap. Put the drain hose in the sink or connect to the drain pipe. • Load the laundry. • Turn the programme dial to the programme suitable for the items to dry. The drying symbol come on. To have best performances in drying when you wash the laundry set a spin cycle at the maximum speed allowed for your type of items.
ENGLISH 21 USING THE APPLIANCE - WASHING & DRYING NON-STOP PROGRAMME WASHING & AUTOMATIC DRYING CAUTION! Do not put a plastic device/ball for the detergent into the drum. • Press button 1 to activate the appliance. • Load the laundry. • Measure out the detergent and fabric conditioner. • Turn the programme dial to the washing programme. The display shows the wash symbols. CAUTION! Do not set a spin speed lower than the automatic speed of the set programme. • Set the available options.
www.aeg.com If you set a drying time of only 10 minutes, the final time value includes also the anti-crease and the cooling phases. • Press button 4 to start the programme. The door is locked The display shows the new time value each minute. • When the programme is completed, the appliance stops automatically. • The acoustic signals operate. • When the door locked symbol goes off, you can open the door. • Remove the laundry from the appliance. Make sure that the drum is empty. • Close the water tap.
ENGLISH 23 HELPFUL HINTS AND TIPS THE LAUNDRY LOAD DETERGENTS AND ADDITIVES • Divide the laundry in: white, coloured, synthetics, delicates and wool. • Obey the washing instructions that are on the laundry care labels. • Do not wash together white and coloured items. • Some coloured items can discolour with the first wash. We recommend that you wash them separately for the first times. • Button up pillowcases, close zippers, hooks and poppers. Tie up belts. • Empty the pockets and unfold the items.
www.aeg.com Level Type 2 Water hardness °dH °T.H. mmol/l Clarke medium 8-14 16-25 1.6-2.5 10-16 3 hard 15-21 26-37 2.6-3.7 17-25 4 very hard > 21 > 37 >3.7 >25 DRYING HINTS Prepare the drying cycle • Open the water tap. • Do a check if the connection of the drain hose is correct. Refer to installation chapter for more information. • For the maximum laundry load of the drying programmes, refer to the drying programmes table.
ENGLISH 25 CARE AND CLEANING WARNING! Disconnect the appliance from the mains supply before you clean it. DESCALING The water we use contains limescale. If it becomes necessary, use a water softener to remove limescales. Use a special product made for washing machines. Obey the instructions that you find on the packaging of the manufacturer. Do this separately from the laundry wash. EXTERNAL CLEANING CAUTION! Do not use alcohol, solvents or chemical products.
www.aeg.com DETERGENT DISPENSER To clean the dispenser: 1 1. 2. Press the lever. Pull the dispenser out. 3. Remove the top part of the liquid additive compartment. Clean all the parts with water. 2 4. 5. 6. DRAIN PUMP Regularly examine the drain pump and make sure that it is clean. Clean the pump if: • The appliance does not drain the water. • The drum cannot turn. • The appliance makes an unusual noise because of the blockage of the drain pump.
ENGLISH 27 To clean the drain pump: 1. Open the drain pump door. 2. Pull the flap out to remove it. 3. Put a container below the recess of the drain pump to collect the water that flows out. Press the two levers and pull forward the drainage duct to let the water flow out. 4. 1 5. 6. When the container is full of water, put the drainage duct back again and empty the container. Do steps 4 and 5 again and again until no more water flows out from the drain pump.
www.aeg.com 9. Clean the filter under the water tap and put it back in the pump into the special guides. 10. Make sure that you tighten correctly the filter to prevent leakages. 11. Put the flap back and close the drain pump door. 2 1 THE INLET HOSE FILTER AND THE VALVE FILTER • The indicator of button 4 flashes and the display shows the related alarm. Refer to 'Troubleshooting'. It could be necessary to clean the filters when: • The appliance does not fill with water.
ENGLISH Put the drainage duct back and close the drain pump flap. When you drain the water with the emergency drain procedure, you must activate again the drain system: 1. Put 2 litres of water in the main wash compartment of the detergent dispenser. 2. Start the programme to drain the water. FROST PRECAUTIONS If the appliance is installed in an area where the temperature can be less than 0 °C, remove the remaining water from the inlet hose and the drain pump. 1.
www.aeg.com TROUBLESHOOTING The start of the appliance does not occur or it stops during operation. First try to find a solution to the problem (refer to the table). If not, contact the service centre. With some problems, the acoustic signals operate and the display shows an alarm code: • - The appliance does not fill with water. • - The appliance does not drain the water. • - The appliance door is open or not closed correctly. • - The anti-flood device is on.
ENGLISH Problem Possible cause The anti-flood device is on. The spin phase does not operate. The programme does not start. 31 Possible solution • Disconnect the appliance. • Close the water tap. • Contact the service centre. The spin phase is off. Set the spin programme. The filter of the drain pump is blocked. Clean the filter of the drain pump. Refer to 'Care and cleaning'. Balance problems with the laundry load. Adjust manually the items in the tub and start the spin phase again.
www.aeg.com Problem Possible cause Possible solution The appliance fills with water and drain immediately. The end of the drain hose is too low. Make sure that the drain hose is in the correct position. The washing results are not satisfactory. The detergent you used was not sufficient or correct. Increase the detergent quantity or use a different one. You did not remove the stubborn stains before you wash the laundry. Use special products to remove the stubborn stains.
ENGLISH 33 INSTALLATION FIXING PLATE KIT (405517114) Available from your authorized dealer. If you install the appliance on a plinth, secure the appliance in the fixing plates. Follow the instructions supplied with the kit. UNPACKING 1. Use the gloves. Remove the external film. If necessary, use a cutter. 2. 3. Remove the cardboard top. Remove the polystyrene packaging materials. 4. Remove the internal film.
www.aeg.com 5. Open the door. Remove the polystyrene piece from the door seal and all the items from the drum. 6. Put one of the polystyrene packaging elements on the floor behind the appliance. Carefully put down the appliance with the rear side on it. Make sure not to damage the hoses. 7. Remove the polystyrene protection from the bottom. Pull up the appliance in vertical position. 8. 1 2 9. Remove the power supply cable and the drain hose from the hose holders.
ENGLISH 35 10. Remove the three bolts. Use the key supplied with the appliance. 11. Pull out the plastic spacers. 12. Put the plastic caps in the holes. You can find these caps in the user manual bag. WARNING! Remove all the packaging and the transit bolts before you install the appliance. We recommend that you keep the packaging and the transit bolts for when you move the appliance. POSITIONING AND LEVELLING • Install the appliance on a flat hard floor.
www.aeg.com • The appliance must be level and stable. CAUTION! Do not put cardboard, wood or equivalent materials below the appliance feet to adjust the level. THE INLET HOSE • Connect the hose to the appliance. Turn the inlet hose only left or right. Loose the ring nut to set it in the correct position. 20 O 45 O • Connect the water inlet hose to the cold water tap with 3/4 thread. CAUTION! Make sure that there are no leaks from the couplings.
ENGLISH 37 Water-stop device The inlet hose has a water stop device. This device prevents water leaks in the hose because of its natural ageing. The red sector in the window «A» shows this fault . If this occur, close the water tap and contact the service centre to replace the hose. A WATER DRAINAGE There are different procedures to connect the drain hose: With the plastic hose guide. • On the edge of a sink. • Make sure that the plastic guide cannot move when the appliance drains.
www.aeg.com Without the plastic hose guide. • To a sink spigot. Refer to the illustration. Put the drain hose in the spigot and tighten it with a clip. Make sure that the drain hose makes a loop to prevent that remaining particles go in the appliance from the sink. • Directly to a built-in drain pipe in the room wall and tighten it with a clip. You can extend the drain hose to maximum 400 cm. Contact the service centre for the other drain hose and the extension.
ENGLISH 39
www.aeg.