L8WBE68SI USER MANUAL BG Ръководство за употреба Пералня-сушилня
www.aeg.com СЪДЪРЖАНИЕ 1. ИНФОРМАЦИЯ ЗА БЕЗОПАСНОСТ..................................................................3 2. ИНСТРУКЦИИ ЗА БЕЗОПАСНОСТ................................................................... 6 3. ИНСТАЛИРАНЕ...................................................................................................8 4. ОПИСАНИЕ НА УРЕДА.....................................................................................17 5. КОМАНДНО ТАБЛО...................................................
БЪЛГАРСКИ Запазваме си правото на изменения. 1. ИНФОРМАЦИЯ ЗА БЕЗОПАСНОСТ Внимателно прочетете предоставените инструкции преди инсталиране и употреба на уреда. Производителят не е отговорен за контузии или наранявания в резултат на неправилна инсталация или употреба. Винаги дръжте инструкциите на безопасно и лесно за достъп място за справка в бъдеще. 1.1 Безопасност за децата и хората с ограничени способности ВНИМАНИЕ! Риск от задушаване, нараняване или трайно увреждане.
www.aeg.com • • Ако уредът има устройство за детска безопасност, то трябва да се активира. Деца няма да извършват почистване или поддръжка на уреда без надзор. 1.2 Основна безопасност • • • • • • • • Не променяйте предназначението на уреда. Този уред е предназначен за употреба в домашни условия и подобни приложения като: – кухненски зони за персонал в магазини, офиси и други работни места.
БЪЛГАРСКИ • • • • • • • • • • • • 5 Готварските пари не трябва да се извеждат в комин, който се използва за изгорелите газове от уреди, които работят с газ и друг вид гориво. Налягането постъпващата водата постъпваща мрежата трябва да е между 0,5 бара (0,05 MPa) и 8 бара (0,8 MPa). Не превишавайте обема на максимално зареждане от 8 кг (вижте глава „Таблица с програми“).
www.aeg.com • • • • • • Премахнете всички предмети от прането, които могат да причинят запалване, като запалки или кибрити. Не спирайте сушилнята преди края на цикъла на сушене, освен ако няма да извадите бързо всички дрехи и ги разделите, така че остатъчната топлина да се разпръсне. Заключителният цикъл на сушене се извършва без нагряване (цикъл на охлаждане), за да се гарантира, че дрехите ще достигнат температура, която няма да ги повреди.
БЪЛГАРСКИ 2.2 Свързване към електрическата мрежа ВНИМАНИЕ! Риск от пожар или токов удар. • • • • • • Уредът трябва да е заземен. Винаги използвайте правилно монтиран контакт със защита от токов удар. Не зползвайте разклонители или адаптери с много входове. Не издърпвайте захранващия кабел, за да изключите уреда. Винаги издърпвайте щепсела. Не пипайте захранващия кабел или щепсела с мокри ръце. Уредът съответства на Директивите на E.E.C. • • • • 2.
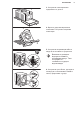
www.aeg.com 3. ИНСТАЛИРАНЕ ВНИМАНИЕ! Вж. глава "Безопасност". 3.2 Уредът е оборудван с ... A B C D E x4 x2 x1 x1 x1 3.1 Бъдете подготвени за монтажа Препоръчва се монтажът да се извърши от двама души. F G H L x1 x2 x1 x1 x2 3.3 Разопаковане ВНИМАНИЕ! Използвайте ръкавиците. ВНИМАНИЕ! Отстранете всички транспортни болтове и опаковки, преди да монтирате уреда. 1. Поставете двата полистиренови опаковъчни елемента на пода под уреда.
БЪЛГАРСКИ 9 3. Отстранете полистиреновия предпазител от дъното. 1 2 4. Върнете уреда във вертикално положение и отстранете защитния полистирен. 1 2 5. Отстранете захранващия кабел и маркуча за източване от държачите. Възможно е да видите вода да се излива от източващия маркуч. Това е породено от тестването на уреда с вода в завода. 6. Отстранете трите болта, държачите на маркуча и пластмасовите шайби с ключа, предоставен с уреда.
www.aeg.com F 7. Затворете отворите с пластмасовите капачки, които се намират в плика с потребителското ръководство. Поставете най-малката капачка F в горния отвор и двете поголеми капачки G в долните отвори. G Препоръчваме да запазите опаковките и транспортните болтове, в случай че Ви се наложи местите уреда. 3.4 Поставяне и нивелиране 1. Монтирайте уреда върху плоска, твърда подова настилка. ВНИМАНИЕ! Уверете се, че килима не спира циркулацията на въздух под уреда.
БЪЛГАРСКИ 11 3.5 Свързване на маркучи и кабел 1100 mm 1450 mm 1360 mm 900 mm max 1000 mm 960 mm min. 600 mm max 1000 mm min. 600 mm 1230 mm Маркучът за подаване на вода 1.Извадете маркуча за подаване на вода от вътрешността на барабана. 2. За да свържете маркуча за подаване на вода в правилната посока и с правилен наклон, вижте позицията на крана за вода, преди да го свържете с гърба на уреда. Уверете се, че маркучът не е нито пречупен, нито смачкан, нито опънат. 45 20 O O 3.
www.aeg.com 5. Свържете маркуча за подаване на вода към крана за студена вода с резба 3/4 цола. ВНИМАНИЕ! Уверете се, че няма течове от съединенията. Използвайте ключа, предоставен с уреда. Не използвайте удължение за маркуч, ако маркучът за подаване на вода е твърде къс. Свържете се с оторизиран сервизен център за смяна на маркуча за подаване на вода. Източване на вода Маркучът за оттичане може да се свърже: Ø 40 mm max.
БЪЛГАРСКИ 13 Към стенна тръба Директно към вградена тръба за източване в стаята и затегнете с предоставената свинска опашка L. L Можете да удължите маркуча за източване до максимум 400 см. Свържете се със сервизния център за другия маркуч за източване и удължението. 3.6 Вграждане Този уред е проектиран за вграждане в кухненски мебели. Прорезът трябва да е с размерите, показани на тази фигура. min. 600 mm min. 560 mm min.
www.aeg.com Преди да продължите с вграждането на уреда, го донесете близо до нишата и поставете предварително маркуча за подаване на вода, маркуча за оттичане и захранващия кабел. ВНИМАНИЕ! Погрижете се да не са прегънати или смачкани. 3.7 Подготовка и монтаж на вратата на шкафа Размерите на вратата на шкафа трябва да бъдат: • ширина мин. 595 - макс. 598 мм; • дебелина 16 – 22 мм. Фабрична предварителна настройка Уредът първоначално е приспособен за монтаж на врата на шкаф с отваряне от дясно наляво.
БЪЛГАРСКИ N M 15 Ако вратата на шкафа трябва да се отваря отляво надясно, обърнете позицията на опорите за пантите M с магнитната планка N и долната планка O. O Уверете се, че планката с магнита е отгоре. M N O Подготовка на вратата на шкафа За да зенкеровате вратата се препоръчва да повикате професионалист. y Подравнете правилно вратата на шкафа с мебела. Измерете разстоянието X, за да фиксирате височината на отвора с цел зенкероване на горната панта.
www.aeg.com Панти За да поставите пантите, е необходимо да пробиете два отвора (диам. 35 мм, дълбочина 12,5-14 мм, в зависимост от дълбочината на мебела, към който е вратичката) на вътрешната страна на вратичката Пантите ще бъдат фиксирани към вратичката с помощта на доставените четири винта A. A За да подравните вратата перфектно, се уверете, че ръбът на вратата на шкафа е успореден с ръба на уреда и спазва подходящ ъгъл на отваряне (макс. 105°). max.
БЪЛГАРСКИ 17 4. ОПИСАНИЕ НА УРЕДА 4.1 Преглед на уреда 1 2 10 3 11 12 4 5 6 7 8 9 1 2 3 4 5 6 7 8 Опори за панти Дозатор за препарати Контролен панел Магнитна планка Дръжка на люка Табелка с технически данни Планка с гумена бъркалка Филтър на помпата за източване на водата 13 9 Предни крачета за хоризонтиране на уреда 10 Маркуч за оттичане 11 Захранващ кабел 12 Свързване на маркуча за подаване 13 Задни крачета за хоризонтиране на уреда 5. КОМАНДНО ТАБЛО 5.
www.aeg.com Постоянните опции се избират като задържите съответния бутон за наймалко 3 секунди.
БЪЛГАРСКИ 19 Дигиталният индикатор може да показва: • Продължителност на програмата (напр. и/или сушене). • Време на отлагане (напр. • Край на цикъла ( • Код за предупреждение (напр. • Индикатор за грешка ( , фаза пране ). ). ). ). Спестете време индикатор. Сушене за време индикатор. Индикатор за фаза на парна обработка. Сушене индикатор: Сухо за гладене Сухо за прибиране Съвсем сухо Индикатор за фаза пране Индикатор за допълнително изплакване. Опция за допълнително омекотяване.
www.aeg.com 6. ВЪРТЯЩО КОПЧЕ И БУТОНИ 6.1 Въведение Опциите/функциите не са достъпни с всички програми за изпиране. Проверете съвместимостта между опциите/функциите и програмата за изпиране в "Таблица на програмите". Опция/функция може да се самоизключват и в този случай уредът не позволява да нагласяте несъвместимите опции/ функции. Denim. С тази опция можете да намалите зададената скорост на центрофугиране. Натиснете този бутон неколкократно, за да: • Намалите скоростта на центрофугиране.
БЪЛГАРСКИ е активиран, индикаторът на бутона е включен. 6.6 Предпране С тази опция можете да добавите предпране към програмата. Съответният индикатор над сензорния бутон светва. • Използвайте тази опция, за да добавите фаза предпране на 30 °C преди фазата пране. Тази опция се препоръчва за силно замърсено пране, особено ако съдържа пясък, прах, кал или други твърди частици. Опциите може да увеличат продължителността на програмата. 6.
www.aeg.com бърз цикъл за пълно натоварване с леко замърсени дрехи. много бърз цикъл за по-малко натоварване с леко замърсени дрехи (препоръчва се макс.половин натоварване). най-краткият цикъл за освежаване на малко количество пране. индикаторът на дисплея. се включи/изключи Когато бъде активиран, уредът ще изпълни тази опция след изключване или промяна/нулиране на програмата. Ако натиснете някой бутон, индикаторът мига, за да покаже, че бутоните не са активни.
БЪЛГАРСКИ • 6.16 Отложен старт Допълнително сушене: прането да бъде напълно изсушено. С тази опция може да отложите старта на програмата за по-удобно време. Не можете да зададете автоматично всички нива за всеки тип тъкан. Натиснете бутона неколкократно, за да зададете нужното отлагане. Времето се увеличава постепенно от 1 до 20 часа. 6.
www.aeg.com Програма Температура по подразби‐ ране Температурен диапазон Синтетично 40 °C 60 °C - Студе‐ на вода Фини материи 30 °C 40 °C - Студе‐ на вода Вълна/Ръчно пране 40 °C 40 °C - Студе‐ на вода Еталонна скорост на центро‐ фугиране Обхват на скоростта на центро‐ фугата Макси‐ мално коли‐ чество за за‐ режда‐ не Описание на програмата (Тип зареждане и ниво на замърсяване) 1200 3 кг об./мин (1200 - 400 об./мин) Синтетични и смесени тъкани. Нормално замърсяване. 1200 об./мин (1200- 400 об.
БЪЛГАРСКИ Програма Температура по подразби‐ ране Температурен диапазон Еталонна скорост на центро‐ фугиране Обхват на скоростта на центро‐ фугата Макси‐ мално коли‐ чество за за‐ режда‐ не 1 кг Пара - 25 Описание на програмата (Тип зареждане и ниво на замърсяване) Памучни, синтетични, деликатни тъкани. Кратка и нежна програма за пара, за да осве‐ жите дори много деликатните си дрехи, вклю‐ чително много деликатни дрехи с пайети, дан‐ тели и т.н.
www.aeg.com Програма Температура по подразби‐ ране Температурен диапазон Еталонна скорост на центро‐ фугиране Обхват на скоростта на центро‐ фугата Макси‐ мално коли‐ чество за за‐ режда‐ не 1200 Почистване на об./мин (1200 - 400 машината об./мин) 60 °C - Описание на програмата (Тип зареждане и ниво на замърсяване) Цикъл за поддръжка с гореща вода за почи‐ стване, освежаване на барабана и премахва‐ не на утайките, които могат да причинят лоша миризма.
БЪЛГАРСКИ Програма Температура по подразби‐ ране Температурен диапазон Outdoor 30 °C 40 °C - Студе‐ на вода Еталонна скорост на центро‐ фугиране Обхват на скоростта на центро‐ фугата Макси‐ мално коли‐ чество за за‐ режда‐ не 1200 об./мин (1200- 400 об./мин) 2 кг 27 Описание на програмата (Тип зареждане и ниво на замърсяване) Не използвайте омекотител за тъкани и се уверете, че няма остатъци от омекотител в отде‐ лението за препарат.
www.aeg.
Denim ■ ■ ■ ■ ■ ■ Петна ■ NonStop 60min 29 Отложен старт ■ Предпране2) ■ 1) Без центрофугиране Outdoor Центрофугиране Програма Спестете време БЪЛГАРСКИ ■ ■ ■ ■ ■ ■ 1) Тази опция изключва опцията . 2) Предпране и Петна не могат да се избират заедно. 3) Ако нагласите опцията „Без центрофуга", уредът само източва водата. 7.
www.aeg.com 7.3 Автоматично сушене Степен на изсъхналост 1) Екстра сухо За хавлиени тъкани Тип тъкан Зареждане Памук и лен (хавлии, хавлиени кърпи и др.) до 4 кг Дънчени дрехи до 3 кг Памук и лен Cupboard Dry (Сухо за прибира‐ (хавлии, хавлиени кърпи и др.) не)2) За пране, което е ще бъде опак. и Синтетични и смесени тъкани съхран.
БЪЛГАРСКИ 7.4 Сушене за определено време Степен на из‐ съхналост Тип тъкан Ко‐ личе‐ ство пра‐ не (кг) Екстра сухо За хавлиени тъкани Памук и лен (хавлии, хавлиени кърпи и др.
www.aeg.com • Направите невалиден избор (3 кратки звука). • Програмата е завършена (последователност от звуци за около 2 минути). • Уреда има повреда (последователност от кратки звуци за около 5 минути). За да активирате/деактивирате звуковите сигнали, когато програмата е завършена, докоснете и бутоните заедно за около 2 секунди. Дисплеят показва индикатора On или Off. Ако деактивирате звуковите сигнали, те ще продължат да работят, ако има неизправност в уреда. 9. ПРЕДИ ПЪРВАТА УПОТРЕБА 1.
БЪЛГАРСКИ Миенето на силно омаслени и мазни петна може да причини повреда на гумените части на пералната машина. 10.3 Слагане на препарат и добавки 33 След цикъл на пране, ако е необходимо премахнете всякакви останки от препарат от отделението за такъв. 10.4 Проверете позицията на преградата за препрарат 1. Дръпнете доколкото е възможно навън чекмеджето за дозиране на препарати. - Отделение за фаза на предпра‐ не, програма за накисване или отстра‐ няване на петна. - Отделение за фазата за пране.
www.aeg.com 5. Измерване на перилния препарат и омекотителя за тъкани. 6. Внимателно затворете дозатора. изключен и не мига (например ако вратата е отворена). Съответният индикатор спира да мига и остава включен. Програмата стартира, вратата е заключена. Дисплеят показва индикатора . Източващата помпа може да работи за кратко, преди уреда да се пълни с вода. 10.7 Стартиране на програма с отложен старт Уверете се, че преградата не предизвиква блокиране, когато затворите чекмеджето. 10.
БЪЛГАРСКИ пауза. Съответният индикатор мига. 2. Докоснете бутона Отложен старт неколкократно, докато дисплеят покаже желаното време на отлагане. 3. Натиснете бутона Старт/Пауза отново, за да стартирате новото отброяване. 10.8 Измерване на пране ProSense System Времетраенето на програмата на дисплея се отнася за средно/голямо зареждане. След като докоснете бутона Старт/ индикаторът за максимално Пауза зареждане се изключва, ProSense System стартира измерване на пране: 1.
www.aeg.com Ако ProSense System е завършена и пълненето на водата е започнало, новата програма стартира без да повтаря ProSense System. Водата и препарата не се източват, за да няма отпадъци. Дисплея показва максималното времетраене на програмата, актуализирана до 20 минути след началото на новата програма. Има и алтернативен начин за отмяна: 1. Завъртете ключа за избиране на 10.12 Край на програмата Когато програмата завърши, уредът спира автоматично. Прозвучават звукови сигнали (ако са активирани).
БЪЛГАРСКИ намалите скоростта на центрофугиране предложена от уреда. 2. Натиснете бутона Старт/Пауза : уредът източва водата и центрофугира. Индикаторът на опцията Задържане на изплакването изчезва. Ако сте избрали „Без центрофуга” , уредът само ще източи водата. 3. Когато програмата приключи и индикаторът за блокирана вратичка изгасва, може да отворите вратичката. 4. Натиснете бутона On/Off за няколко секунди, за да деактивирате уреда. 10.
www.aeg.com подразбиране уредът е само в режим на изпиране и индикаторът за бутона Пране е включен. Дисплеят показва температурата и скоростта на центрофугиране по подразбиране. Ако е необходимо, ги променете съгласно прането Ви. Дисплеят също показва максималното препоръчително натоварване за фазата на изпиране. 5. Задайте желаните опции, ако са налични. 6. Докоснете бутона Режим - Сушене, за да активирате и функцията за сушене. И двата индикатора за бутоните Пране и Режим - Сушене са включени.
БЪЛГАРСКИ препоръчваме да извадите прането, когато фазата е почти приключила или приключила. • 39 1. Извадете прането от уреда. 2. Уверете се, че барабанът е празен. Индикаторът остава включен. Натиснете бутона On/Off за няколко секунди, за да деактивирате уреда. След фазата на сушенем, почистете барабана, уплътнението и вътрешността на люка с влажна кърпа. Няколко минути след края на програмата енергоспестяващата функцията автоматично изключва уреда. 12.
www.aeg.com увеличава с 5 минути. На дисплея се показва зададената нова стойност на продължителност. 2. Докоснете бутона Старт/Пауза за да стартирате програмата. , На дисплея светва индикаторът за заключена врата. Дисплеят също показва и оставащото време на програмата. 12.4 След завършване на програмата за сушене • • Уредът спира автоматично. Прозвучават звукови сигнали (ако са активирани). • • Появява се на дисплея.
БЪЛГАРСКИ 41 14. ПРЕПОРЪКИ И СЪВЕТИ ВНИМАНИЕ! Вж. глава "Безопасност". 14.1 Зареждане на прането • • • • • • • • • • • • • Разделете прането на: бяло пране, цветно пране, изкуствени тъкани, фини тъкани и вълна. Спазвайте инструкциите за пране, обозначени на етикетите. Не поставяйте заедно бяло и цветно пране. Някои цветни дрехи може да се обезцветят при първото пране. Препоръчваме ви в началото да ги изпирате отделно.
www.aeg.com 14.4 Екологични съвети • • • • Задайте програма без предпране за пране на дрехи с нормално замърсяване. Винаги стартирайте програма за измиване с максимално допустимия обем пране. Ако предварително третирате петната или използвате препарат за премахване на петна, изберете програма с ниска температура. За да използвате правилното количество препарат, проверете твърдостта на водата в домашната ви система. Вижте "Твърдост на водата". 14.
БЪЛГАРСКИ Опитът ще ви помогне по-добре да сушите прането. Отбелязвайте си времетраенето на циклите, които вече сте изпълнили. За да избегнете натрупването на статично електричество в края на сушилния цикъл: 43 2. Използвайте кондициониращ препарат, който е специално предназначен за барабанни сушилни. Когато програмата за сушене приключи, извадете бързо прането. 1. През перилната фаза използвайте препарат за кондициониране на тъкани. 15. ГРИЖИ И ПОЧИСТВАНЕ ВНИМАНИЕ! Вж. глава "Безопасност". 15.
www.aeg.com вътрешната му част. Монети, копчета и други малки предмети, забравени в джобовете на дрехите, се отделят по време на цикъла на пране в специалния двоен улей в уплътнението на отвора, откъдето могат да се възстановят удобно в края на цикъла. 15.5 Почистване на барабана Редовно проверявайте барабана, за да предотвратите нежелани отлагания.
БЪЛГАРСКИ 45 15.7 Почистване на помпата за източване ВНИМАНИЕ! изключете щепсела от контакта на захранващата мрежа. Редовно преглеждайте филтъра на помпата за източване и се уверете, че е чист. 3. Уверете се, че всички остатъци от препарат са премахнати от горната и долната част на прореза. Използвайте малка четка, за да почистете прореза. Почиствайте помпата за източване, ако: • Уредът не източва водата. • Барабанът не се върти. • Уредът издава необичайни шумове поради блокирала помпа за източване.
www.aeg.com 1. Отворете капака на помпата. 2 1 2. Поставете подходяща купа под отвора на помпата за източване, за да събере водата, която ще изтече. При отстраняване на филтъра винаги трябва да имате кърпа подръка за подсушаване на изтеклата вода. 180˚ 3. Завъртете филтъра на 180 градуса обратно на часовниковата стрелка, за да го отворите, без да го изваждате. Оставете водата да се изтече. 4. Когато купата се напълни с вода, отново завийте филтъра и изпразнете контейнера. 5.
БЪЛГАРСКИ 47 7. Ако е необходимо, премахнете мъха и предмети от прореза на филтъра. Уверете се, че роторът на помпата се върти. В противен случай се свържете с оторизирания сервизен център. 8. Почистете филтъра под течаща вода. 2 9. Сложете го обратно в специалния водач, като завъртите по часовниковата стрелка. Уверете се, че сте затегнали филтъра, за да предотвратите течове. 1 2 10. Затворете капака на помпата.
www.aeg.com 15.8 Почистване на маркуча за подаване на вода и филтъра на вентила 1 2 3 45° 20° 15.9 Аварийно източване Ако уреда не може да източи водата, извършете същата процедура, описана в параграф 'Почистете помпата за източване'. При необходимост почистете помпата. Когато източите водата чрез процедурата за аварийно източване, трябва пак да активирате системата за източване: 1. Поставете 2 литра вода в отделението за пране на дозатора. 2. Стартирайте програмата, за да източите водата. 15.
БЪЛГАРСКИ 49 16. ОТСТРАНЯВАНЕ НА НЕИЗПРАВНОСТИ ВНИМАНИЕ! Вж. глава "Безопасност". 16.1 Въведение Уредът не се включва или спира по време на работа. Първо се опитайте да намерите решение на проблема (вижте таблицата). Ако проблемът продължи, се обърнете към оторизирания сервизен център. ВНИМАНИЕ! Деактивирайте уреда преди извършването на каквато и да било проверка.
www.aeg.com 16.2 Възможни неизправности Проблем Програмата не се включва. Възможно решение • • • Уверете се, че щепселът е включен в контакта. Уверете се, че вратата на уреда е затворена. Уверете се, че няма повреден бушон в електрическата кутия. • • Уверете се, че бутона Старт/Пауза е докоснат. Ако сте задали отложен старт, отменете настройката или изчакайте края на отброяването. Изключете функцията за защита за деца, ако е включе‐ на. Проверете позицията на копчето на избраната програ‐ ма.
БЪЛГАРСКИ Проблем Възможно решение • По пода има вода. • • • • • Не можете да отворите люка на уреда. • • • Уредът издава необи‐ чаен шум и вибрира. 51 • • Уверете се, че маркучите са здраво прикрепени към уреда и няма теч от мятото на свързване. Уверете се, че маркучът за подаване на вода и марку‐ чът за източване на вода не са повредени. Уверете се, че използвате правилния перилен препа‐ рат, в правилното количество. Уверете се, че програма на изпиране, която свършва с вода в барабана е избрана.
www.aeg.com Проблем Възможно решение • Уредът не изсушава • или не изсушава до же‐ • ланото ниво. • По прането има мъх с различни цветове. Отворете крана за вода. Уверете се, че филтърът за оттичане не е запушен. Намалете зареденото количество. Уверете се, че сте задали правилен цикъл, ако е нео‐ бходимо задайте отново кратко време на сушене. Тъканите, изпрани при предходния цикъл, са отделили мъх с различен цвят: • Фазата на сушене спомага за елиминиране на мъхчета‐ та.
БЪЛГАРСКИ 53 4. Извадете прането и след това затворете вратичката на уреда. 17. ДАННИ ЗА ПОТРЕБЛЕНИЕТО Посочените стойности са получени в лабораторни условия със съо‐ тветните стандарти. Данните могат да варират поради различни причини: количеството и вида на прането и околната температура. Налягането на водата, захранващото напрежение и температурата на подаваната вода могат също да повлияят на продължителността на програмата за изпиране.
www.aeg.
БЪЛГАРСКИ 55
157022300-A-342018 www.aeg.