L 99695 HWD EN User Manual
www.aeg.com CONTENTS 1. SAFETY INFORMATION.................................................................................................3 2. SAFETY INSTRUCTIONS................................................................................................ 5 3. PRODUCT DESCRIPTION.............................................................................................. 7 4. CONTROL PANEL...........................................................................................................8 5.
ENGLISH 1. 3 SAFETY INFORMATION Before the installation and use of the appliance, carefully read the supplied instructions. The manufacturer is not responsible if an incorrect installation and use causes injuries and damages. Always keep the instructions with the appliance for future reference. 1.1 Children and vulnerable people safety WARNING! Risk of suffocation, injury or permanent disability.
www.aeg.com • • • • • • • • • • • • • side, where the appliance door can not be fully opened. Connect the mains plug to the mains socket only at the end of the installation. Make sure that there is access to the mains plug after the installation. The ventilation openings in the base (if applicable) must not be obstructed by a carpet. Ensure you have good ventilation in the installation room to avoid the back flow of gases into the room from appliances burning other fuels, including open fires.
ENGLISH • • • • • • • • 5 Items such as foam rubber (latex foam), shower caps, waterproof textiles, rubber backed articles and clothes or pillows fitted with foam rubber pads should not be dried in the wash dryer. Fabric softeners, or similar products, should be used as specified by the fabric softener instructions. Remove all objects from pockets such as lighters and matches.
www.aeg.com level with the aid of a spirit level. If it is not, adjust the feet until it is. • To make sure the compressor works properly, wait 6 hours after the installation before using the appliance. 2.2 Electrical Connection WARNING! Risk of fire and electrical shock. • The appliance must be earthed. • Always use a correctly installed shockproof socket. • Do not use multi-plug adapters and extension cables. • Do not pull the mains cable to disconnect the appliance. Always pull the mains plug.
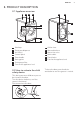
ENGLISH 3. PRODUCT DESCRIPTION 3.1 Appliance overview 1 2 3 10 4 11 12 5 6 13 7 9 8 1 2 3 4 5 6 7 8 Worktop Detergent dispenser Air filter(s) Control panel Door handle Rating plate Drain pump filter Feet for the appliance level 3.2 How to activate the child safety device This device prevents children or pets to be closed in the drum. Turn the device clockwise, until the groove is horizontal. You cannot close the door.
www.aeg.com 3.3 Accessories 1 2 4 3 1 Spanner To remove the transit bolts. 2 Plastic caps To close the holes on the rear side of the cabinet after the removal of the transit bolts. 3 Anti-flood inlet hose To prevent possible leakage 4 Plastic hose guide To connect the drain hose on the edge of a sink. 4. CONTROL PANEL 4.1 Control panel description 1 2 SPECIAL WA S H / D R Y Delicates Cottons Easy Iron Cottons Eco Super Eco Synthetics 20 Min.
ENGLISH 4.2 Display A K J B I H G C F D E The display shows: A The text bar: • Guides you in the use of the appliance. • Shows the programme status and phase. • Shows alarm messages. Refer to 'Troubleshooting' . The symbols appear on the display when the related phase or function is set. B Child safety lock Door locked C You cannot open the appliance door when the symbol is on. You can open the door only when the symbol goes off.
www.aeg.com Digit area Time of the day When you activate the appliance the display shows the time of the day for some seconds. To adjust the clock, refer to "Clock setting". Programme duration When you set the programme, the cycle duration is displayed for a few seconds then, the time of the programme end appears again. Programme duration indicator The indicator comes on when the digits shows the programme duration.
ENGLISH Time save The indicator comes on when you set one of the programme duration. F Shortened time Extra Quick G Indicator for air filters Extra rinsing H The value shows the total number of the rinses. The indicator bar fills accordingly the numbers of rinses. Stain indicator Prewash indicator I Soak indicator The indicator bar fills accordingly to the set functions. Spin speed of the set programme J No Spin indicator1) Rinse Hold indicator 1) Only available for SPIN/DRAIN programme.
www.aeg.com 5. PROGRAMMES 5.1 Programme Chart Programme Temperature range Maximum load Maximum spin speed Programme description (Type of load and soil level) Washing/Drying programmes1) Cottons 95°C - Cold Cottons Eco2) 60°C - 40°C Synthetics 60°C - Cold Wool/Silk 40°C - Cold Anti-Allergy 60°C 9 kg 1600 rpm White cotton and coloured cotton. Normal soil and light soil. 9 kg 1600 rpm White cotton and colour-fast cotton. Normal soil.
ENGLISH Programme Temperature range Maximum load Maximum spin speed Programme description (Type of load and soil level) Super Eco Cold 3 kg 1200 rpm Mixed fabric (cotton and synthetic items).5) 20 Min.-3kg 40°C - 30°C 3 kg 1200 rpm Cottons and synthetics items with light soil level or worn only once. 9 kg 1600 rpm To rinse and spin the laundry. All fabrics. 9 kg 1600 rpm To spin the laundry and to drain the water in the drum. All fabrics.
www.aeg.com Programme Temperature range Maximum load Maximum spin speed up to 1.5 kg Programme description (Type of load and soil level) Steam programme for cotton and synthetic items. This cycle removes odours from the laundry.8) Refresh 40°C 1) When you set a Washing / Drying programme, the display tells you that the drying cycle is not set. If you want to dry your laundry, set an automatic drying or a timed drying.
ENGLISH Programme Prewash Spin Spin/Drain ■ Stains Soak 15 Time Extra 2) Delay Rinse 1) Save Start ■ ■ 1) If the Permanent Extra Rinse option is activated, the appliance adds some additional rinses. In the Rinse programme, if you set a low spin speed the appliance performs delicate rinses and a short spin. 2) If you set a shorter duration, we recommend that you decrease the quantity of the load. It is possible to load fully the appliance, however the washing results are reduced.
www.aeg.com Dryness Level Type of fabric Iron Dry Suitable for ironing Cottons and Linen (sheets, tablecloths, shirts, etc) Wool dry Load (kg) Wool (wool jumpers) 5.
ENGLISH Programmes Load (kg) Cotton Energy Saving Pro- Energy Water conApproximate proconsump- sumption (li- gramme duration tion (kWh) tre) (minutes) 9 1.094 69 238 Cottons 40 °C 9 1.05 71 175 Synthetics 40 °C 4 0.88 60 142 Delicates 40 °C 4 0.70 63 91 1.5 0.35 59 58 gramme 60 °C1) Wool/Handwash 30 °C 17 1) «Cotton Energy Saving programme » at 60°C with a load of 9 kg is the reference programme for the data entered in the energy label, in compliance with EEC 92/75 standards.
www.aeg.com to decrease the energy consumption when: • You do not use the appliance for 5 minutes before you pressStart/Pause button. All setting are cancelled. Press the button On/Off to activate the appliance again. Set again the washing programme and all possible functions. • After 5 minutes from the end of the washing programme Refer to 'At the end of the programme' 8.3 Programme knob Turn this knob to set a programme. The related programme indicator comes on. 8.
ENGLISH The programme duration increases. This function is not available with a temperature lower than 40° C. 8.12 Spin Touch button Spin to: • Decrease the maximum speed of the spin phase of the programme. The display shows only the spin speeds available for the set programme. 19 • Deactivate the spin phase ( 'No spin' function). • Activate the Rinse Hold function. Set this function to prevent fabric creases. The appliance does not drain the water when the programme is completed. 8.13 Temp.
www.aeg.com 10. DAILY USE - WASHING ONLY 10.1 Before activating the appliance 1. Open the water tap. 2. Connect the mains plug to the mains socket. 10.2 Activating the appliance and setting a programme 1. Press button On/Off to activate the appliance. 2. Turn the programme knob to the necessary programme or touch one of the Memory buttons to set a memorised programme. The programme indicator comes on. The indicator of Start/Pause button flashes with red colour.
ENGLISH 10.5 Liquid or powder detergent 1 A 2 1. 2. B 4. 3. • Position A for powder detergent (factory setting). • Position B for liquid detergent. When you use the liquid detergent: • Do not use gelatinous or thick liquid detergents. • Do not put more liquid then the maximum level. • Do not set the prewash phase. • Do not set the delay start. 10.6 Starting a programme without the delay start Touch button Start/Pause to start the programme.
www.aeg.com 10.8 Starting a programme with the delay start 1. Touch button Delay Start again and again to set the desired delayed start. The display show the expected end of the programme. 2. Touch button Start/Pause. The appliance starts the countdown of the delay start. When the countdown is completed, the programme starts automatically. Before you touch button Start/Pause to start the appliance, you can cancel or change the set of the delay start. 10.9 Cancelling the delay start 1.
ENGLISH 4. Keep the door and air filter ajar, to prevent mildew and odours. 5. Close the water tap. 10.14 Draining water out after end of cycle The washing programme is completed, but there is water in the drum: • The drum turns regularly to prevent the creases in the laundry. • The door stays locked. • You must drain the water to open the door: 1. If necessary, decrease the spin speed. 2. Touch the Start/Pause button. The appliance drains the water and spins. 3.
www.aeg.com b. CUPBOARD DRY level - 2 indicators on: for cotton and synthetic items c. EXTRA DRY level - 3 indicators on : indicator for cotton items You cannot set all dryness levels for any type of laundry. The display shows the time end and the set drying programme. 2. Touch button Start/Pause to start the programme. The text bar tells that the appliance is drying. The display shows the door locked indicator and the programme in progress indicator and, alternatively, the time of the cycle end.
ENGLISH 12.2 Washing and Drying at automatic levels 1. Touch button Auto Dry repeatedly until the display shows the required dryness level. The indicators above the button illuminate accordingly: a. IRON DRY level: 1 indicator on for cotton items; b. CUPBOARD DRY level: 2 indicators on - for cotton and synthetic items; c. EXTRA DRY level: 3 indicators on - for cotton items. The display shows that the appliance is ready to start.
www.aeg.com • Button up pillowcases, close zippers, hooks and poppers. Tie up belts. • Empty the pockets and unfold the items. • Turn inside out multilayered fabrics, wool and items with painted illustrations. • Remove hard stains. • Wash with a special detergent heavy soil stains. • Be careful with the curtains. Remove the hooks or put the curtains in a washing bag or pillowcase. • Do not wash in the appliance laundry without hems or with cuts. Use a washing bag to wash small and/or delicate items (e.
ENGLISH • • • • • • • • Pieces of clothing with metal inserts. Nylon stockings. Quilts. Bed covers. Duvets. Anoraks. Sleeping bags Fabrics with residue of hair sprays, nail solvents or similar. • Garments with foam-rubber or materials similar to foam-rubber. 13.
www.aeg.com 14.4 Door seal Regularly examine the seal and remove all objects from the inner part. 14.5 Cleaning the detergent dispenser 1. 2. 1 2 3. 4. 14.6 Cleaning the air filters The air filters collect the fluff. The fluff normally occurs when the clothes are dried in a washer-dryer. • At the end of each drying cycle in the display the indicator the primary air filter. The text bar says to clean the primary filter (see pict. 1-5).
ENGLISH 1. 2. LL PU PU 3. LL 4. U P L L 5. 6. 7. 8. + 9. 10.
www.aeg.com Cleaning regularly the air filters with warm water allows you to have best drying performances. Clogged filter increases the drying time. WARNING! The primary filter recess must not be blocked by any object. If you only wash the laundry with your washer-dryer, it is normal to find some humidity in the primary air filter. 14.7 Cleaning the drain filter WARNING! Do not clean the drain filter if the water in the appliance is hot. 1. 2. 2 1 1 2 1 3. 4.
ENGLISH 5. 6. 1 2 7. 8. 1 2 9. 2 1 14.8 Cleaning the inlet hose filter and the valve filter It could be necessary to clean the filters when: • The appliance does not fill with water. • The appliance fills with the water for a long time. • The indicator of button Start/Pause flashes and the display shows the related alarm. Refer to 'Troubleshooting'.
www.aeg.com • Close the water tap. • Remove the water inlet hose from the water tap. • Clean the filter in the inlet hose with a stiff brush. 1 2 3 • Remove the inlet hose behind the appliance. • Clean the filter in the valve with a stiff brush or a towel. • Install again the inlet hose. Make sure that the couplings are tight to prevent leakages. • Open the water tap. 45° 20° 14.9 Emergency drain Because of a malfunction, the appliance cannot drain the water.
ENGLISH compartment of the detergent dispenser. 2. Start the programme to drain the water 33 4. Empty the drain pump. Refer to the emergency drain procedure. 5. When the drain pump is empty, install the inlet hose again. 14.10 Frost precautions If the appliance is installed in an area where the temperature can be less than 0° C, remove the remaining water from the inlet hose and the drain pump. 1. Disconnect the mains plug from the mains socket. 2. Close the water tap. 3.
www.aeg.com Message Possible solution Make sure that the connection of the water inlet hose is correct. The display tells to check the Make sure that the drain hose is not damaged. drain filter: the appliance does not drain the water. Make sure that the drain filter is not clogged. Clean the filter, if necessary. Refer to 'Care and cleaning'. Make sure that the connection of the drain hose is correct. The display tells to check the Make sure that the appliance door is not open or closed door.
ENGLISH Problem 35 Possible solution The appliance fills with water Make sure that the drain hose is in the correct position. and drains immediately. The hose may be too low. The spin phase does not operate or the washing cycle lasts longer than usually. Make sure that the spin phase is not off. Make sure that the drain filter is not clogged. Clean the filter, if necessary. Refer to 'Care and cleaning'. Make sure that the this is not a balance problem.
www.aeg.com Problem Possible solution The washing cycle is longer than the time displayed. An unbalanced laundry load increases the duration time. This is a normal behaviour of the appliance. The internal lamp is off. Make sure that he lamp is not burned. To replace the lamp, contact the service centre. After a steam programme, garments are partially wet. Make sure that the appliance is accurately levelled. Adjust the appliance by raising or lowering the feet.
ENGLISH 37 Make sure that the water level inside the drum is not too high. Proceed with an emergency drain, if necessary (refer to «Emergency drain» in «Care and cleaning» chapter). To open the door, proceed as follows: 1. Press the button On/Off to switch the appliance off. 2. Disconnect the mains plug from the mains socket. 3. Open the filter flap. 4. Keep the emergency unlock trigger pulled downward and, at the same time, open the appliance door. 5.
www.aeg.com • Remove the cardboard top. • Remove the polystyrene packaging materials. • Remove the internal film. • Open the door. • Remove the polystyrene piece from the door seal and all the items from the drum. • Put one of the polystyrene packaging elements on the floor behind the appliance. • Carefully put down the appliance with the rear side on it. • Make sure not to damage the hoses. • Remove the polystyrene protection from the bottom.
ENGLISH 39 • Pull up the appliance in vertical position. • Remove the power supply cable and the drain hose from the hose holders. • Remove the three bolts. • Use the key supplied with the appliance. • Pull out the plastic spacers. • Put the plastic caps in the holes. • You can find these caps in the user manual bag. We recommend that you keep the packaging and the transit bolts for any movement of the appliance. 16.2 Fixing plate kit (4055171146) Available from your authorized dealer.
www.aeg.com 16.3 Installation under a counter The appliance can be installed as freestanding or below the kitchen counter with correct space (see picture). 600 mm ≥ 870 mm CAUTION! To assure free air circulation under the appliance, do not attach the sound barriers (if available). 600 mm 16.4 Positioning and levelling • Install the appliance on a flat hard floor. • Make sure that carpets do not stop the air circulation below the appliance.
ENGLISH 41 16.5 The inlet hose • Connect the hose to the back appliance. Turn the inlet hose only left or right. • Loose the ring nut to set it in the correct position. 45 20 O O • Connect the water inlet hose to the cold water tap with 3/4 thread. CAUTION! Make sure that there are no leaks from the couplings. Do not use an extension hose if the inlet hose is too short. Contact the service centre for the replacement of the inlet hose. 16.6 Water-stop device The inlet hose has a water stop device.
www.aeg.com • Making an U form with the drain hose. On the edge of a sink • Make sure that the plastic guide cannot move when the appliance drains. Attach the guide to the water tap or the wall. To a stand pipe with vent-hole • Directly into a drain pipe at a height of not less than 60 cm (23.6”) and not more than 100 cm (39.3”). Refer to the illustration. • The end of the drain hose must always be ventilated , i.e. the inner diameter of the drain pipe (min. 38 mm - min. 1.
ENGLISH 43 To a sink spigot • Refer to the illustration. Put the drain hose in the spigot and tighten it with a clip. • Make sure that the drain hose makes a loop to prevent that remaining particles go in the appliance from the sink. To a wall-pipe • Directly to a built-in drain pipe in the room wall and tighten it with a clip. You can extend the drain hose to maximum 400 cm. Contact the service centre for the other drain hose and the extension. 17.
www.aeg.com Spin Speed Wool 1 Maximum 1600 rpm 1) Connect the water inlet hose to a water tap with a 3/4'' thread. 18. ENVIRONMENTAL CONCERNS Recycle the materials with the symbol . Put the packaging in applicable containers to recycle it. Help protect the environment and human health and to recycle waste of electrical and electronic appliances. Do not dispose appliances marked with the symbol with the household waste.
ENGLISH 45
www.aeg.
ENGLISH 47
132907360-B-132014 www.aeg.