EN User Manual Washer Dryer L 99695 HWD
www.aeg.com CONTENTS 1. SAFETY INFORMATION.................................................................................................3 2. SAFETY INSTRUCTIONS................................................................................................ 5 3. PRODUCT DESCRIPTION.............................................................................................. 7 4. CONTROL PANEL...........................................................................................................8 5.
ENGLISH 1. 3 SAFETY INFORMATION Before the installation and use of the appliance, carefully read the supplied instructions. The manufacturer is not responsible if an incorrect installation and use causes injuries and damages. Always keep the instructions with the appliance for future reference. 1.1 Children and vulnerable people safety WARNING! Risk of suffocation, injury or permanent disability.
www.aeg.com • • • • • • • • • • • • • side, where the appliance door can not be fully opened. Connect the mains plug to the mains socket only at the end of the installation. Make sure that there is access to the mains plug after the installation. The ventilation openings in the base (if applicable) must not be obstructed by a carpet. Ensure you have good ventilation in the installation room to avoid the back flow of gases into the room from appliances burning other fuels, including open fires.
ENGLISH • • • • • • • • 5 Items such as foam rubber (latex foam), shower caps, waterproof textiles, rubber backed articles and clothes or pillows fitted with foam rubber pads should not be dried in the wash dryer. Fabric softeners, or similar products, should be used as specified by the fabric softener instructions. Remove all objects from pockets such as lighters and matches.
www.aeg.com 2.2 Electrical Connection WARNING! Risk of fire and electrical shock. • The appliance must be earthed. • Always use a correctly installed shockproof socket. • Do not use multi-plug adapters and extension cables. • Do not pull the mains cable to disconnect the appliance. Always pull the mains plug. • Do not touch the mains cable or the mains plug with wet hands. • Only for UK and Ireland: The appliance has a 13 amp mains plug.
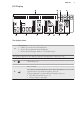
ENGLISH 3. PRODUCT DESCRIPTION 3.1 Appliance overview 1 2 3 10 4 11 12 5 6 13 7 9 8 1 2 3 4 5 6 7 8 9 10 11 12 13 14 Worktop Detergent dispenser Air filter(s) Control panel Door handle Rating plate Drain pump filter Feet for the appliance level Airflow slots Water drain hose Water inlet valve Mains cable Transit bolts Feet for the appliance level 14 3.2 How to activate the child safety device This device prevents children or pets to be closed in the drum.
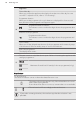
www.aeg.com 3.3 Accessories 1 2 4 3 1 Spanner To remove the transit bolts. 2 Plastic caps To close the holes on the rear side of the cabinet after the removal of the transit bolts. 3 Anti-flood inlet hose To prevent possible leakage 4 Plastic hose guide To connect the drain hose on the edge of a sink. 4. CONTROL PANEL 4.
ENGLISH 4.2 Display A K J B I H G C F D E The display shows: A The text bar: • Guides you in the use of the appliance. • Shows the programme status and phase. • Shows alarm messages. Refer to 'Troubleshooting' . The symbols appear on the display when the related phase or function is set. B Child safety lock Door locked C You cannot open the appliance door when the symbol is on. You can open the door only when the symbol goes off.
www.aeg.com Digit area Time of the day When you activate the appliance the display shows the time of the day for some seconds. To adjust the clock, refer to "Clock setting". Programme duration When you set the programme, the cycle duration is displayed for a few seconds then, the time of the programme end appears again. Programme duration indicator The indicator comes on when the digits shows the programme duration.
ENGLISH Time save The indicator comes on when you set one of the programme duration. F Shortened time Extra Quick G Indicator for air filters Extra rinsing H The value shows the total number of the rinses. The indicator bar fills accordingly the numbers of rinses. Stain indicator Prewash indicator I Soak indicator The indicator bar fills accordingly to the set functions. Spin speed of the set programme J No Spin indicator1) Rinse Hold indicator 1) Only available for SPIN/DRAIN programme.
www.aeg.com 5. PROGRAMMES 5.1 Programme Chart Programme Temperature range Maximum load Maximum spin speed Programme description (Type of load and soil level) Washing/Drying programmes1) Katoen - Blanc/ Couleurs 95°C - Cold 9 kg 1600 rpm 9 kg Katoen Eco - Co- 1600 rpm ton Eco2) 60°C - 40°C Synthetica - Synthétiques 60°C - Cold Wol/Zijde Laine/Soie 40°C - Cold Anti-Allergie Anti-Allergies 60°C White cotton and coloured cotton. Normal soil and light soil. White cotton and colour-fast cotton.
ENGLISH Programme Temperature range 13 Maximum load Maximum spin speed Programme description (Type of load and soil level) 4 kg 1200 rpm Delicate fabrics as acrylics, viscose, polyester items. Normal soil. 4 kg 800 rpm Synthetic items to be gentle washed. Normal and Super Eco Cold 3 kg 1200 rpm Mixed fabric (cotton and synthetic items).5) 20 Min. - 3 kg 40°C - 30°C 3 kg 1200 rpm Cottons and synthetics items with light soil level or worn only once. To rinse and spin the laundry. All fabrics.
www.aeg.com Programme Temperature range Maximum load Maximum spin speed Programme description (Type of load and soil level) up to 1.5 kg Steam programme for cotton and synthetic items. This cycle removes odours from the laundry.9) Opfrissen - Rafraîchir 40°C 1) When you set a Washing / Drying programme, the display tells you that the drying cycle is not set. If you want to dry your laundry, set an automatic drying or a timed drying.
ENGLISH Programme T./ min PreStains wash Soak Extra Spoelen Rinçage + 1) Tijd Besparen Gain de Temp s2) 15 Startuitstel Départ Différé ■ ■ Anti-Allergie - AntiAllergies ■ ■ ■ ■ ■ Fijne Was - Délicats ■ ■ ■ ■ ■ ■ ■ Strijkvrij - Repassage Facile ■ ■ ■ ■ ■ ■ ■ Super Eco ■ ■ 20 Min. - 3 kg ■ Spoelen - Rinçage ■ Centrif.
www.aeg.com 5.
ENGLISH 17 At programme start the display shows the duration programme for the maximum load capacity. During the washing phase the programme duration is automatically calculated and can be greatly reduced if the laundry load is lower than the maximum load capacity (e.g. Cotton 60°C, maximum load capacity 9 kg, the programme duration exceeds 2 hours; real load 1 kg, the programme duration don’t reach 1 hour). When the appliance is calculating the real programme duration a dot blinks in the display.
www.aeg.com • To activate/deactivate this function touch Tijd Besparen - Gain de Temps and Startuitstel - Départ Différé at the same time until the display show the indicator comes on/goes off. 8. OPTIONS 8.1 Touch Screen Make sure the touch screen and buttons are always clean and dry. 8.2 Aan/Uit - Marche/Arrêt Press this button to activate or deactivate the appliance. A tune sounds when the appliance is activated.
ENGLISH 8.10 Extra Spoelen - Rinçage+ Touch this button to add rinsing phases to a programme. 19 The programme duration increases. This function is not available with a temperature lower than 40° C. Use this function for persons allergic to detergents and in areas where the water is soft. 8.12 T./min 8.11 Vlekken - Taches/ Voorwas - Prélavage Touch button T./min to: • Decrease the maximum speed of the spin phase of the programme.
www.aeg.com 9.3 Language setting The first time you activate the appliance, the display shows the default language and tells you to confirm it or change it: 1. Turn the programme knob to set the desired language. 2. When the display shows the necessary language touch Start/ Pauze - Départ/Pause button to confirm the selection. Prélavage at the same time for some seconds. 2. When the display shows the language set, turn the programme knob to set the new language. 3.
ENGLISH 10.4 Filling the detergent and additives Compartment for washing phase. Compartment for liquid additives (fabric conditioner, starch). Maximum level for quantity of liquid additives. Flap for powder or liquid detergent. Always obey the instructions that you find on the packaging of the detergent products. 10.5 Liquid or powder detergent Compartment for prewash phase, soak programme or stain remover. 1 A 2 1. 21 2. B 4. 3. • Position A for powder detergent (factory setting).
www.aeg.com 10.6 Starting a programme without the delay start Touch button Start/Pauze - Départ/Pause to start the programme. The relevant indicator stops to flash and stays on with red colour. The programme starts, the door is locked. The display show the indicator . The drain pump can operate for a short time when the appliance fills water. 10.
ENGLISH To open the appliance door: 1. Touch button Start/Pauze - Départ/ Pause. The door lock symbol in the display goes off. 2. Open the appliance door. 3. Close the appliance door and touch button Start/Pauze - Départ/Pause. The programme or the delay start continues 10.13 End of the programme When the programme has finished, the appliance stops automatically. The acoustic signal operates (if it is active). In the display comes on and a message tells you that the programme is completed.
www.aeg.com 11.1 Preparation to drying WARNING! Open the water tap. Put the drain hose in the sink or connect to the drain pipe. 1. Press buttonAan/Uit - Marche/Arrêt for some seconds to activate the appliance 2. Load the laundry one item at a time. 3. Turn the programme dial to the drying programme applicable for the items to dry. The text bar in the display tells which programme you have chosen.
ENGLISH • Press the button Aan/Uit - Marche/ Arrêt for some seconds to deactivate the appliance. 25 After some minutes from the end of the programme, the energy saving function automatically deactivates the appliance. 1. Remove the laundry from the appliance. 2. Make sure that the drum is empty. 12. DAILY USE - WASHING & DRYING WARNING! Refer to Safety chapters. 12.1 NON-STOP programme You can wash and dry your laundry setting a «non stop-programme». Proceed as follows: 1.
www.aeg.com • To do not wash dark fabrics after you washed and dried light coloured fabrics (new sponge, hand towel, wool, sweatshirt ) and the contrary. • To dry this type of fabrics at open air when they are washed the first time. • To clean the drain filter. • After the drying phase, clean the air filters, the empty drum, the gasket and the door with a wet cloth. • Empty the drum. • Clean the drum, the gasket and the door with a wet cloth. • Set the rinse programme. • Press at the same time T.
ENGLISH 13.4 Ecological hints • Set a programme without the prewash phase to wash laundry with normal soil. • Always start a washing programme with the maximum load of laundry. • If necessary, use a stain remover when you set a programme with a low temperature. • To use the correct quantity of the detergent, check the water hardness of your domestic system 13.5 Water hardness If the water hardness in your area is high or moderate, we recommend that you use a water softener for washing machines.
www.aeg.com 14. CARE AND CLEANING 14.3 Maintenance wash WARNING! Refer to Safety chapters. With the low temperature programmes it is possible that some detergent stays in the drum. Make regularly a maintenance wash. To do this: 14.1 External cleaning Clean the appliance only with soap and warm water. Fully dry all the surfaces. • Remove the laundry from the drum. • Set the cotton programme with the highest temperature with a small quantity of detergent.
ENGLISH 3. 4. 14.6 Cleaning the air filters The air filters collect the fluff. The fluff normally occurs when the clothes are dried in a washer-dryer. • At the end of each drying cycle in the display the indicator the primary air filter. The text bar says to clean the primary filter (see pict. 1-5). is on to tell you to clean may flash to remind you that both air filters should be • Occasionally the indicator cleaned.
www.aeg.com U P L L 5. 6. 7. 8. + 10. 9. To have best drying performances clean regularly the air filters with warm water and afterwards dry them with a towel. Clogged filter increases the drying time. WARNING! The primary filter recess must not be blocked by any object. If you only wash the laundry with your washer-dryer, it is normal to find some humidity in the primary air filter. 14.7 Cleaning the drain filter WARNING! Do not clean the drain filter if the water in the appliance is hot.
ENGLISH 1. 2. 2 1 1 2 1 3. 4. 1 5. 6. 1 7. 2 2 8.
www.aeg.com 9. 2 1 14.8 Cleaning the inlet hose filter and the valve filter It could be necessary to clean the filters when: • The appliance does not fill with water. • The appliance fills with the water for a long time. • The indicator of button Start/Pauze - Départ/Pause flashes and the display shows the related alarm. Refer to 'Troubleshooting'. To clean the water inlet filters: • Close the water tap. • Remove the water inlet hose from the water tap.
ENGLISH 33 • Clean the filter in the valve with a stiff brush or a towel. • Install again the inlet hose. Make sure that the couplings are tight to prevent leakages. • Open the water tap. 45° 20° 14.9 Emergency drain Because of a malfunction, the appliance cannot drain the water. If this occurs, do steps (1) through (9) of 'Cleaning the drain filter'. If necessary, clean the pump. When you drain the water with the emergency drain procedure, you must activate again the drain system: 1.
www.aeg.com 15.1 Introduction The start of the appliance does not occur or it stops during operation. First try to find a solution to the problem (refer to the table). If not, contact the Authorised Service Centre. With some problems, the acoustic signals operate and the display shows an alarm message: CAUTION! Deactivate the appliance before you do the checks. 15.
ENGLISH 35 Message Possible solution At the end of the washing cycle the display tells that too much detergent was used. This is not a failure but a suggestion for next wash to decrease the detergent quantity. The display tells to check the Make sure that the filter drawer is correctly inserted. air filter (the indicator flashes and the acoustic signal operates) Problems without alarm messages Problem Possible solution The programme does not start.
www.aeg.com Problem Possible solution Make sure that the drain hose have no damages. Make sure you use the correct detergent and the correct quantity of it. You cannot open the appliance door. Make sure that the washing programme is finished. Set the drain or the spin programme if there is water in the drum. Make sure that the appliance receives electrical power. This problem may be caused by a failure of the appliance. Contact the Authorised Service Centre.
ENGLISH Problem 37 Possible solution Make sure you have set the correct cycle. If necessary, set a short drying time again. The drying cycle is too long. Make sure the air filters are properly cleaned. Make sure your laundry load does not exceed the declared load for the set programme. Make sure that the room temperature is in the correct range. The laundry is full of different colours fluff. Set a drying cycle to remove some fluff (for more details refer to 'FLUFF IN THE FABRICS' ).
www.aeg.com 5. Take out the laundry and then close the appliance door. 6. Close the filter flap. 16. INSTALLATION WARNING! Refer to Safety chapters. 16.1 Unpacking WARNING! As you will put down the appliance on the rear side, wait about 6 hours before you use it. This time is necessary to enable the compressor to work properly. WARNING! Remove all the packaging and the transit bolts before installing the appliance. Use the gloves. • Remove the external film.
ENGLISH 39 • Remove the cardboard top. • Remove the polystyrene packaging materials. • Remove the internal film. • Open the door. • Remove the polystyrene piece from the door seal and all the items from the drum. • Put one of the polystyrene packaging elements on the floor behind the appliance. • Carefully put down the appliance with the rear side on it. • Make sure not to damage the hoses. • Remove the polystyrene protection from the bottom.
www.aeg.com • Pull up the appliance in vertical position. • Remove the power supply cable and the drain hose from the hose holders. It is possible to see water flowing from the drain hose. This is due to the testing with water of the appliances in factory. • Remove the three bolts. • Use the key supplied with the appliance. • Pull out the plastic spacers. • Put the plastic caps in the holes. • You can find these caps in the user manual bag.
ENGLISH 41 16.3 Installation under a counter The appliance can be installed as freestanding or below the kitchen counter with correct space (see picture). 600 mm ≥ 870 mm CAUTION! To assure free air circulation under the appliance, do not attach the sound barriers (if available). 600 mm 16.4 Positioning and levelling • Install the appliance on a flat hard floor. • Make sure that carpets do not stop the air circulation below the appliance.
www.aeg.com 16.5 The inlet hose • Connect the hose to the back appliance. Turn the inlet hose only left or right. • Loose the ring nut to set it in the correct position. 45 20 O O • Connect the water inlet hose to the cold water tap with 3/4 thread. CAUTION! Make sure that there are no leaks from the couplings. Do not use an extension hose if the inlet hose is too short. Contact the service centre for the replacement of the inlet hose. 16.
ENGLISH 43 • Making an U form with the drain hose. On the edge of a sink • Make sure that the plastic guide cannot move when the appliance drains. Attach the guide to the water tap or the wall. To a stand pipe with vent-hole • Directly into a drain pipe at a height of not less than 60 cm (23.6”) and not more than 100 cm (39.3”). Refer to the illustration. • The end of the drain hose must always be ventilated , i.e. the inner diameter of the drain pipe (min. 38 mm - min. 1.
www.aeg.com To a sink spigot • Refer to the illustration. Put the drain hose in the spigot and tighten it with a clip. • Make sure that the drain hose makes a loop to prevent that remaining particles go in the appliance from the sink. To a wall-pipe • Directly to a built-in drain pipe in the room wall and tighten it with a clip. You can extend the drain hose to maximum 400 cm. Contact the service centre for the other drain hose and the extension. 17.
ENGLISH Spin Speed Wool 1 Maximum 1600 rpm 1) Connect the water inlet hose to a water tap with a 3/4'' thread. 18. ENVIRONMENTAL CONCERNS Recycle the materials with the symbol . Put the packaging in applicable containers to recycle it. Help protect the environment and human health and to recycle waste of electrical and electronic appliances. Do not dispose appliances marked with the symbol with the household waste. Return the product to your local recycling facility or contact your municipal office.
www.aeg.
ENGLISH 47
132906061-A-302014 www.aeg.