L 99695 HWD USER MANUAL PL Instrukcja obsługi Pralko-suszarka
www.aeg.com SPIS TREŚCI 1. INFORMACJE DOTYCZĄCE BEZPIECZEŃSTWA..............................................3 2. WSKAZÓWKI DOTYCZĄCE BEZPIECZEŃSTWA...............................................6 3. OPIS URZĄDZENIA..............................................................................................8 4. PANEL STEROWANIA......................................................................................... 9 5. PROGRAMY............................................................................
POLSKI 1. 3 INFORMACJE DOTYCZĄCE BEZPIECZEŃSTWA Przed przystąpieniem do instalacji i rozpoczęciem eksploatacji urządzenia należy uważnie zapoznać się z załączoną instrukcją obsługi. Producent nie odpowiada za obrażenia ciała ani szkody spowodowane nieprawidłową instalacją lub eksploatacją urządzenia. Należy zachować instrukcję obsługi w bezpiecznym i łatwo dostępnym miejscu do wykorzystania w przyszłości. 1.
www.aeg.com 1.2 Ogólne zasady bezpieczeństwa • • • • • • • • • • • Nie zmieniać parametrów technicznych urządzenia. Urządzenie należy zainstalować jako wolnostojące lub pod kuchennym blatem roboczym, jeśli jest wystarczająco dużo przestrzeni. Nie instalować urządzenia za zamykanymi lub przesuwanymi drzwiami ani za drzwiami, których zawiasy są umieszczone po przeciwnej stronie, co uniemożliwiłoby całkowite otworzenie drzwi urządzenia.
POLSKI • • • • • • • • • • • • 5 Jeśli przewód zasilający jest uszkodzony, musi go wymienić producent, autoryzowane centrum serwisowe lub inna wykwalifikowana osoba, aby zapobiec ryzyku porażenia prądem. Usuwać włókna z tkanin i inne zanieczyszczenia nagromadzone wokół urządzenia. Nie uruchamiać urządzenia bez filtrów. Przed każdym użyciem urządzenia lub po każdym użyciu oczyścić filtr.
www.aeg.com • • Wyczyścić urządzenie za pomocą wilgotnej szmatki. Stosować wyłącznie obojętne środki do czyszczenia. Nie używać produktów ściernych, myjek do szorowania, rozpuszczalników ani metalowych przedmiotów. Przed przystąpieniem do konserwacji należy wyłączyć urządzenie i wyjąć wtyczkę przewodu zasilającego z gniazda. 2. WSKAZÓWKI DOTYCZĄCE BEZPIECZEŃSTWA 2.1 Instalacja • • • • • • • • • • • Należy postępować zgodnie z instrukcją instalacji dołączoną do urządzenia.
POLSKI • instalacji, z której nie korzystano przez dłuższy czas lub która była naprawiana lub do której podłączono nowe urządzenia (liczniki wody itp.), należy umożliwić wypływ wody, aż będzie ona czysta. Podczas pierwszego użycia urządzenia i bezpośrednio po nim należy sprawdzić, czy nie ma widocznych wycieków wody. 2.4 Obsługa OSTRZEŻENIE! Występuje zagrożenie odniesieniem obrażeń, porażeniem prądem, wznieceniem pożaru lub uszkodzeniem urządzenia.
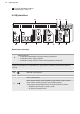
www.aeg.com 3. OPIS URZĄDZENIA 3.1 Widok urządzenia 1 2 3 10 4 11 12 5 6 13 7 9 8 1 2 3 4 5 6 7 8 Blat roboczy Dozownik detergentu Filtr(y) powietrza Panel sterowania Uchwyt drzwi Tabliczka znamionowa Filtr pompy opróżniającej Nóżki do poziomowania urządzenia 14 9 10 11 12 13 14 Szczeliny wentylacyjne Wąż spustowy Zawór dopływu wody Kabel zasilający Blokady transportowe Nóżki do poziomowania urządzenia 3.
POLSKI 9 3.3 Akcesoria 1 2 4 3 1 Klucz płaski Służy do odkręcenia blokad transportowych. 2 Plastikowe zatyczki Służą do zaślepiania otworów z tyłu urządzenia, po usunięciu blokad transportowych. 3 Wąż dopływowy z zabezpieczeniem przed zalaniem Zabezpiecza przed potencjalnym zalaniem. 4 Plastikowa prowadnica węża Służy do zamocowania węża spustowego na krawędzi umywalki. 4. PANEL STEROWANIA 4.
www.aeg.com 13 Przycisk dotykowy wyboru temperatury (Temp.°C) 4.2 Wyświetlacz A K J B I H G C F D E Wyświetlacz pokazuje: A Pasek tekstowy: • Przedstawia wskazówki dotyczące obsługi urządzenia. • Przedstawia stan i fazę programu. • Przedstawia kody alarmów. Patrz „Rozwiązywanie problemów”. Symbole pojawiają się na wyświetlaczu, gdy zostanie ustawiona odpowiednia faza lub funkcja. B Blokada uruchomienia Drzwi zablokowane C Nie można otworzyć drzwi urządzenia, gdy świeci się ten symbol.
POLSKI 11 Obszar cyfrowy Aktualna godzina Po włączeniu urządzenia przez kilka sekund na wyświetlaczu widoczna jest aktual‐ na godzina. Informacje na temat ustawiania zegara można znaleźć w punkcie „Us‐ tawianie aktualnej godziny”. Czas trwania programu Po ustawieniu programu przez kilka sekund wyświetlany jest czas trwania cyklu, a następnie ponownie pojawia się czas zakończenia programu. D Wskaźnik długości programu Wskaźnik pojawia się, gdy cyfry pokazują czas trwania programu.
www.aeg.com Oszczędzanie czasu Wskaźnik pojawia się w przypadku wybrania jednej z opcji czasu trwania programu. F Skrócony czas Super szybkie G Wskaźnik filtrów powietrza Dodatkowe płukanie H Wyświetlana wartość odpowiada łącznej liczbie płukań. Wskaźnik paskowy zapełnia się w zależności od liczby płukań. Wskaźnik odplamiania Wskaźnik prania wstępnego I Wskaźnik namaczania Wskaźnik paskowy wypełnia się zależnie od ustawionych funkcji.
POLSKI 13 5. PROGRAMY 5.1 Tabela programów Program Maksymalny Opis programu Zakres tempera‐ wsad (Rodzaj i stopień zabrudzenia prania) tur Maksymalna prędkość wiro‐ wania Programy prania/suszenia1) Cottons 95°C – pranie w zimnej wodzie Cottons Eco2) 60°C – 40°C Synthetics 60°C – pranie w zimnej wodzie Wool/Silk 40°C – pranie w zimnej wodzie Anti-Allergy 60°C 9 kg 1600 obr./min Białe i kolorowe tkaniny bawełniane. Średnio i lek‐ ko zabrudzone. 9 kg 1600 obr.
www.aeg.com Program Maksymalny Opis programu Zakres tempera‐ wsad (Rodzaj i stopień zabrudzenia prania) tur Maksymalna prędkość wiro‐ wania 4 kg 1200 obr./min Delikatne tkaniny, takie jak akryl, wiskoza i po‐ liester. Średnio zabrudzone. 4 kg 800 obr./min Tkaniny syntetyczne do delikatnego prania. Nor‐ Super Eco Pranie w zimnej wodzie 3 kg 1200 obr./min Tkaniny mieszane (bawełniane i syntetyczne)5). 20 Min.-3kg 40°C – 30°C 3 kg 1200 obr.
POLSKI 15 Program Maksymalny Opis programu Zakres tempera‐ wsad (Rodzaj i stopień zabrudzenia prania) tur Maksymalna prędkość wiro‐ wania do 1.5 kg Refresh Program parowy do tkanin bawełnianych i synte‐ tycznych. Cykl służy do usuwania nieprzyjemnego zapachu z prania.7) 1) Po wybraniu programu prania/suszenia na wyświetlaczu pojawi się informacja, że cykl suszenia nie jest ustawiony. Aby wysuszyć pranie, należy ustawić automatyczny program suszenia lub program su‐ szenia z określonym czasem.
■ ■ ■ Easy Iron ■ ■ ■ ■ Super Eco ■ ■ 20 Min.-3kg ■ Rinse ■ Spin/Drain ■ ■ Delay Start ■ Time Save2) Plamy Delicates Extra Rinse1) Pranie wstępne Program Namaczanie www.aeg.com Spin 16 ■ ■ ■ ■ ■ ■ ■ ■ ■ ■ ■ ■ ■ ■ 1) Jeśli aktywna jest funkcja Stałe dodatkowe płukanie, urządzenie doda kilka cykli płukania. Jeśli w pro‐ gramie Płukanie ustawiono niską prędkość wirowania, urządzenie wykona delikatne płukania i krótką fa‐ zę wirowania.
POLSKI 17 5.3 Programy z ustawionym czasem suszenia Stopień wysuszenia Rodzaj tkaniny Wsad (kg) Ekstra suche Materiały frotte Tkaniny bawełniane i lnia‐ ne (szlafroki, ręczniki kąpielowe itp.) Pręd‐ Zalecany kość wi‐ czas (min) rowania (obr.
www.aeg.com 6. PARAMETRY EKSPLOATACYJNE Dane zawarte w tej tabeli są wartościami przybliżonymi. Różne zmienne parametry mogą mieć wpływ na dane: ilość i rodzaj prania oraz tempera‐ tura wody i otoczenia, mogą wpływać na zmianę tych wartości. Po rozpoczęciu programu wyświetlany jest czas trwania programu z maksymalnym wsadem. W trakcie prania czas ten jest obliczany automatycznie i może ulec znacznemu skróceniu, jeśli rzeczywisty ciężar prania jest mniejszy od maksymalnego (np.
POLSKI Jeśli sygnały dźwiękowe są wyłączone, będą one emitowane jedynie w przypadku dotknięcia przycisków lub w razie nieprawidłowego działania urządzenia. 7.2 Funkcja blokady uruchomienia Funkcja ta pozwala zapobiec manipulowaniu przez dzieci przy panelu sterowania. • Funkcję można włączyć: • • Po dotknięciu Start/Pause : wszystkie przyciski i pokrętło wyboru programów są wyłączone. Przed dotknięciem Start/Pause : urządzenie nie uruchomi się. 7.
www.aeg.com 8.5 Time Dry 8.11 Stains/Prewash Dotknąć ten przycisk, aby ustawić czas odpowiadający tkaninom, które mają być suszone. Pasek tekstowy na wyświetlaczu informuje o ustawionej wartości. Dotknąć ten przycisk, aby ustawić jedną z następujących funkcji: • Pranie wstępne Tę funkcję należy stosować w przypadku mocno zabrudzonych rzeczy. Urządzenie dodaje fazę prania wstępnego do prania głównego. Czas trwania programu ulegnie wydłużeniu.
POLSKI 21 9. PRZED PIERWSZYM UŻYCIEM 1. Umieścić niewielką ilość detergentu w przegródce na detergent do fazy prania. 2. Ustawić i uruchomić program do prania bawełny z ustawioną najwyższą temperaturą, nie wkładając prania. Spowoduje to usunięcie wszelkich możliwych zabrudzeń z bębna i zbiornika. 9.1 Ustawienie godziny Po ustawieniu języka na wyświetlaczu pojawi się opcja ustawiania zegara. Migają cyfry godziny. 1. Ustawić godzinę za pomocą pokrętła wyboru programu. 2.
www.aeg.com maksymalny wsad dla ustawionego programu (informacja ta zniknie po zamknięciu drzwi). 3. W razie potrzeby dotknąć przyciski Temp.°C i Spin, aby zmienić temperaturę wody i prędkość wirowania. 4. W razie potrzeby dotknąć inne przyciski, aby włączyć inne opcje lub ustawić opóźnienie rozpoczęcia programu. Na wyświetlaczu pojawi się symbol ustawionej opcji, a wskaźnik cyfrowy będzie sygnalizować czas opóźnienia rozpoczęcia programu. 10.4 Stosowanie detergentów i dodatków 10.
POLSKI 2. A Położenie A: detergent w proszku (ustawienie fabryczne). 3. B Korzystając z detergentu w płynie: • Nie stosować gęstych ani żelowych detergentów. • Nie przekraczać maksymalnego poziomu płynu. • Nie ustawiać fazy prania wstępnego. • Nie ustawiać opóźnienia rozpoczęcia programu. 10.6 Uruchamianie programu bez opóźnienia Dotknąć przycisk Start/Pause, aby uruchomić program. Odpowiedni wskaźnik przestanie migać i będzie świecił na czerwono. Program uruchomi się, a drzwi zostaną zablokowane.
www.aeg.com Na wyświetlaczu pojawia się informacja o spodziewanym zakończeniu programu. 2. Dotknąć przycisk Start/Pause. Urządzenie rozpocznie odliczanie czasu opóźnienia. Po zakończeniu odliczania program rozpocznie się automatycznie. Przed dotknięciem przycisku Start/Pause w celu uruchomienia urządzenia, można zmienić lub anulować ustawienie funkcji opóźnienia uruchomienia programu. 10.9 Anulowanie opóźnienia rozpoczęcia programu 1. Dotknąć przycisk Start/Pause. Zacznie migać odpowiedni wskaźnik. 2.
POLSKI Urządzenie automatycznie odpompuje wodę i przeprowadzi odwirowanie po upływie około 18 godzin. 10.14 Opcja Automatyczny tryb czuwania Funkcja Automatyczny tryb czuwania automatycznie wyłącza urządzenie, aby ograniczyć zużycie energii, gdy: • • Urządzenia nie użytkowano przez 5 minut przed naciśnięciem przycisku Start/Pause. Nacisnąć przycisk On/Off, aby ponownie włączyć urządzenie. Po 5 minutach od zakończenia programu prania Nacisnąć przycisk On/Off, aby ponownie włączyć urządzenie.
www.aeg.com Na początku cyklu suszenia (3-5 min) urządzenie może pracować nieco głośniej. Jest to normalne zjawisko w przypadku urządzeń wyposażonych w sprężarkę, takich jak np. chłodziarki lub zamrażarki, podczas uruchomienia sprężarki. 11.2 Suszenie automatyczne 1. Dotknąć kilka razy przycisk Auto Dry, aby ustawić wymagany poziom suszenia. Zaświecą się odpowiednie wskaźniki na panelu sterowania: a. Poziom DO PRASOWANIA – 1 wskaźnik włączony: tkaniny bawełniane b.
POLSKI 27 12. CODZIENNA EKSPLOATACJA – PRANIE I SUSZENIE OSTRZEŻENIE! Patrz rozdział dotyczący bezpieczeństwa. 12.1 Program NON-STOP Możliwe jest pranie i suszenie z wykorzystaniem programu „non-stop”. Należy postępować w następujący sposób: 1. Nacisnąć i przytrzymać przez kilka sekund przycisk On/Off, aby włączyć urządzenie. 2. Włożyć pranie (rzeczy należy wkładać pojedynczo). 3. Umieścić detergent i dodatki w odpowiednich przegródkach. 4. Ustawić pokrętło wyboru programów na programie prania.
www.aeg.com 12.4 Po zakończeniu programu Urządzenie zatrzymuje się automatycznie. Rozlegnie się sygnał dźwiękowy (jeśli jest włączony). • Więcej informacji znajduje się w punkcie „Po zakończeniu programu suszenia” w poprzednim rozdziale. • • Po zakończeniu fazy suszenia wyczyścić mokrą szmatką filtry powietrza, bęben, uszczelkę oraz wewnętrzną stronę drzwi. 12.
POLSKI wirowania. W takim przypadku należy ręcznie rozmieścić pranie w bębnie i powtórzyć próbę wirowania. 13.2 Uporczywe plamy 13.4 Wskazówki dotyczące ekologii • Woda i detergent nie wystarczą do usunięcia niektórych plam. • Zalecamy usunięcie takich plam przed włożeniem prania do urządzenia. • Dostępne są specjalne odplamiacze. Należy użyć specjalnego odplamiacza przystosowanego do określonego typu plamy i tkaniny. • 13.
www.aeg.com • • • • • • • Kołdry. Narzuty. Koce. Kurtki. Śpiwory. Tkaniny z pozostałościami lakieru do włosów, zmywaczy do paznokci lub podobnych produktów. Ubrania z gumową pianką lub podobnym materiałem. 13.8 Metki Podczas suszenia odzieży należy przestrzegać wskazówek umieszczonych na metkach: • = produkt może być suszony w suszarce • = cykl suszenia w wysokiej temperaturze • = cykl suszenia w niższej temperaturze • = produkt nie może być suszony w suszarce. 13.
POLSKI • • Należy regularnie sprawdzać bęben, aby nie dopuścić do nagromadzenia się osadów kamienia lub rdzy. Do usuwania osadów rdzy należy stosować wyłącznie specjalne produkty przeznaczone do pralek. Tę procedurę należy przeprowadzać jako oddzielny cykl prania (bez odzieży). 31 Wyjąć pranie z bębna. Ustawić program do prania bawełny z najwyższą temperaturą i dodać niewielką ilość detergentu. 14.4 Uszczelka drzwi Należy zawsze przestrzegać instrukcji umieszczonych na opakowaniu produktu. 14.
www.aeg.com 14.6 Czyszczenie filtrów powietrza Na filtrze powietrza gromadzą się włókna. Gromadzenie się włókien jest normalnym zjawiskiem podczas suszenia odzieży. • Na końcu każdego cyklu suszenia wskaźnik na wyświetlaczu informuje o konieczności wyczyszczenia głównego filtra powietrza. Pasek tekstowy informuje o konieczności wyczyszczenia filtra głównego (patrz ilustracje od 1 do 5). • Co pewien czas wskaźnik może migać, przypominając o konieczności wyczyszczenia obu filtrów powietrza.
POLSKI + 10. 9. Aby zapewnić najlepsze efekty suszenia, należy regularnie czyścić filtry powietrza ciepłą wodą, a następnie osuszyć je ręcznikiem. Niedrożny filtr powietrza powoduje wydłużenie czasu suszenia i zwiększenie zużycia energii! OSTRZEŻENIE! Wnęka filtra głównego nie może być niczym zablokowana. Jeżeli pralko-suszarka jest używana wyłącznie do prania, obecność wilgoci w głównym filtrze powietrza jest normalna. 14.
www.aeg.com 3. 4. 1 5. 2 6. 1 2 7. 8. 1 2 9.
POLSKI 35 14.8 Czyszczenie filtra węża dopływowego i filtra w zaworze Czyszczenie filtrów może być konieczne, jeśli: • Urządzenie nie napełnia się wodą. • Napełnianie urządzenia wodą trwa długo. • Miga wskaźnik przycisku Start/Pause, a na wyświetlaczu pojawia się odpowiedni alarm. Patrz „Rozwiązywanie problemów”. Czyszczenie filtrów dopływu wody: 1 • • • Zakręcić zawór wody. Odkręcić wąż dopływowy wody od zaworu wody. Oczyścić filtr w wężu dopływowym za pomocą szczotki o twardym włosiu.
www.aeg.com 14.9 Awaryjne spuszczanie wody W razie awarii urządzenie nie odpompowuje wody. Należy wtedy przeprowadzić czynności od (1) do (9) z punktu „Czyszczenie filtra odpływowego”. W razie potrzeby wyczyścić pompę. Po spuszczeniu wody przy użyciu procedury awaryjnej należy ponownie uruchomić układ odpływowy: 1. Wlać 2 litry wody do głównej komory prania dozownika detergentu. 2. Uruchomić program, aby odpompować wodę.
POLSKI 37 15.2 Możliwe usterki Problemy sygnalizowane kodami alarmowymi Komunikat Możliwe rozwiązanie Na wyświetlaczu pojawia się Upewnić się, że zawór wody jest otworzony. instrukcja, aby sprawdzić zawór wody: urządzenie nie napełnia się wodą. Upewnić się, że ciśnienie wody nie jest za niskie. W tym celu należy skontaktować się z miejscowym zakładem wodociągowym. Upewnić się, że zawór wody jest drożny i niezatkany osa‐ dem kamiennym. Upewnić się, że filtr w wężu dopływowym oraz filtr zaworu są drożne.
www.aeg.com Komunikat Możliwe rozwiązanie Na wyświetlaczu pojawia się Upewnić się, że szufladę filtra włożono prawidłowo. instrukcja, aby sprawdzić filtr powietrza (wskaźnik miga i emitowany jest syg‐ nał dźwiękowy) Problemy niesygnalizowane kodami alarmowymi Problem Możliwe rozwiązanie Program nie uruchamia się. Upewnić się, że wtyczkę przewodu zasilającego włożono do gniazdka. Upewnić się, że bezpiecznik w skrzynce bezpieczników jest sprawny. Upewnić się, że dotknięto Start/Pause.
POLSKI Problem 39 Możliwe rozwiązanie Upewnić się, że temperatura pomieszczenia mieści się w odpowiednim zakresie. Zapewnić odpowiednią cyrkulację powietrza pod urządze‐ niem. Nie można otworzyć drzwi urządzenia. Upewnić się, że zakończył się program prania. Jeśli w bębnie pozostaje woda, wybrać program odpom‐ powania lub wirowania. Upewnić się, że urządzenie jest zasilane. Problem może być spowodowany awarią urządzenia. Na‐ leży skontaktować się z autoryzowanym centrum serwi‐ sowym.
www.aeg.com Problem Możliwe rozwiązanie Urządzenie nie suszy lub nie Upewnić się, że filtry powietrza są drożne. Sprawdzić suszy prawidłowo. główny i dodatkowy filtr powietrza. Upewnić się, że filtr odpływowy jest drożny. Należy sprawdzić, czy ustawiono właściwy program. W razie potrzeby należy ponownie ustawić krótki czas su‐ szenia. Zbyt długi cykl suszenia. Upewnić się, że filtry powietrza są prawidłowo wyczy‐ szczone.
POLSKI 2. Wyjąć wtyczkę przewodu zasilającego z gniazda elektrycznego. 3. Otworzyć osłonę filtra. 4. Nacisnąć i przytrzymać przycisk zwolnienia blokady i jednocześnie otworzyć drzwi. 5. Wyjąć pranie i zamknąć drzwi urządzenia. 6. Zamknąć pokrywę filtra. 16. INSTALACJA OSTRZEŻENIE! Patrz rozdział dotyczący bezpieczeństwa. 16.1 Rozpakowanie OSTRZEŻENIE! Ponieważ urządzenie zostanie położone na tylnej ścianie, należy odczekać 6 godzin przed jego użyciem.
www.aeg.com • • Zdjąć kartonową przykrywkę. Zdjąć styropianowe opakowanie. • Zdjąć wewnętrzną folię. • • Otworzyć drzwi. Zdjąć z uszczelki drzwi zabezpieczenie styropianowe oraz wyjąć wszystkie przedmioty z bębna. • Położyć jeden ze styropianowych elementów opakowania na podłodze za urządzeniem. Ostrożnie położyć na nim urządzenie na tylnej ściance. Uważać, aby nie uszkodzić węży. • • • 1 2 Usunąć blok styropianu ze spodu urządzenia.
POLSKI • Podnieść urządzenie do pozycji pionowej. • Zdjąć przewód zasilający i wąż spustowy z uchwytów. Możliwe, że z węża spustowego wypłynie woda. Jest to rezultat testów z użyciem wody przeprowadzanych w fabryce. • • • • • Odkręcić trzy śruby. W tym celu użyć klucza dostarczonego z urządzeniem. Wyciągnąć plastikowe rozpórki. Umieścić w otworach plastikowe zaślepki. Zaślepki znajdują się w torebce z instrukcją obsługi. Zaleca się zachowanie opakowania oraz blokad transportowych na przyszłość.
www.aeg.com 16.3 Instalacja pod blatem Urządzenie można zainstalować jako wolnostojące lub pod blatem kuchennym, zachowując odpowiednią przestrzeń (patrz rysunek). 600 mm ≥ 870 mm UWAGA! Nie instalować urządzenia w ciasnej wnęce! Zapewnić odpowiednią cyrkulację powietrza przez dolną część mebli. 600 mm UWAGA! Aby zapewnić swobodną cyrkulację powietrza pod urządzeniem, nie zakładać listew wygłuszających (jeśli dotyczy). 16.
POLSKI 45 16.5 Wąż dopływowy • • 45 20 Podłączyć wąż do tylnej części urządzenia. Wąż dopływowy można obracać jedynie w lewo lub w prawo. Poluzować nakrętkę wieńcową, aby ustawić w odpowiednim położeniu. O O • Podłączyć wąż dopływowy do zaworu zimnej wody z gwintem 3/4". UWAGA! Upewnić się, że nie ma wycieków ze złączek. Nie stosować węży przedłużających, jeśli wąż dopływowy jest za krótki. Należy skontaktować się z punktem serwisowym, aby zamówić dłuższy wąż dopływowy. 16.
www.aeg.com • Uformować wąż spustowy w kształt litery „U”. Na krawędzi umywalki • Uwaga: plastikowa prowadnica nie może poruszać się podczas odpompowywania wody. Przymocować prowadnicę do zaworu wody lub do ściany. Do rury kanalizacyjnej z otworem odpowietrzającym • Bezpośrednio do rury kanalizacyjnej na wysokości nie mniejszej niż 60 cm i nie większej niż 100 cm. Patrz ilustracja. • Należy zawsze zapewnić wentylację końcówki węża spustowego, tj. wewnętrzna średnica rury kanalizacyjnej (min.
POLSKI 47 Do syfonu umywalki • Patrz ilustracja. Zamocować wąż spustowy na króciec syfonu i zabezpieczyć obejmą. • Należy ułożyć wąż spustowy w pętlę, aby nie dopuścić do przedostawania się zanieczyszczeń ze zlewu do urządzenia. Do rury naściennej • Bezpośrednio do rury kanalizacyjnej zabudowanej w ścianie i zabezpieczyć obejmą. Wąż spustowy można przedłużyć maksymalnie do 400 cm. Więcej informacji na temat innych węży spustowych i przedłużających można uzyskać w punkcie serwisowym. 17.
www.aeg.com Maksymalny wsad suszenia Bawełniane 6 kg Syntetyczne 4 kg Wełna 1 kg Maks. 1600 obr./min Prędkość wirowania Produkt zawiera 0,12 kg hermetycznie zamkniętego gazu fluoropochodnego HFC – R134a/GWP1430. 1) Podłączyć wąż doprowadzający wodę do zaworu z gwintem 3/4'' . 18. OCHRONA ŚRODOWISKA ludzkie zdrowie. Nie wolno wyrzucać Materiały oznaczone symbolem należy poddać utylizacji. Opakowanie urządzenia włożyć do odpowiedniego pojemnika w celu przeprowadzenia recyklingu.
POLSKI 49
www.aeg.
POLSKI 51
132905205-A-042017 www.aeg.