L9FEA966C USER MANUAL EN User Manual Washing Machine
www.aeg.com CONTENTS 1. SAFETY INFORMATION............................................................................................. 3 2. SAFETY INSTRUCTIONS.............................................................................................5 3. INSTALLATION............................................................................................................6 4. PRODUCT DESCRIPTION.........................................................................................11 5.
ENGLISH FOR PERFECT RESULTS Thank you for choosing this AEG product. We have created it to give you impeccable performance for many years, with innovative technologies that help make life simpler features you might not find on ordinary appliances. Please spend a few minutes reading to get the very best from it. Visit our website for: Get usage advice, brochures, trouble shooter, service information: www.aeg.com/webselfservice Register your product for better service: www.registeraeg.
www.aeg.com • • • • • Children aged 3 years and under must be kept away from this appliance when it is in operation at all times. Keep all packaging away from children and dispose of it appropriately. Keep detergents away from children. Keep children and pets away from the appliance when the door is open. Children shall not carry out cleaning and user maintenance of the appliance without supervision. 1.2 General Safety • • • • • • • • • • Do not change the specification of this appliance.
ENGLISH 5 2. SAFETY INSTRUCTIONS 2.1 Installation • Remove all the packaging and the transit bolts. • Keep the transit bolts in a safe place. If the appliance is to be moved in future they must be reattached to lock the drum to prevent internal damage. • Always take care when moving the appliance as it is heavy. Always use safety gloves and enclosed footwear. • Do not install or use a damaged appliance. • Follow the installation instruction supplied with the appliance.
www.aeg.com • Make sure that all metal objects are removed from the laundry. • Do not wash fabrics which are heavily soiled with oil, grease or other greasy substances. It can damage rubber parts of the washing machine. Prewash such fabrics by hand before loading them into the washing machine. • Do not touch the glass door while a programme is in operation. The glass can get hot. 2.5 Service • To repair the appliance contact an Authorised Service Centre. • Use original spare parts only. 2.
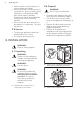
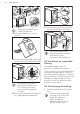
ENGLISH 7 1 2 4. Open the door and remove the polystyrene piece from the door seal and all the items from the drum. 5. Carefully put down the appliance with the rear side on it. 6. Put the front polystyrene packaging element on the floor under the appliance. 8. Fully clean and dry the bottom of the appliance. CAUTION! Do not use alcohol, solvents or chemical products. 9. Make sure to identify the different sizes and the positions of the sound barriers.
www.aeg.com x4 A B Attach the sound barriers at a room temperature. 13. Pull up the appliance in vertical position. 16. Pull out the plastic spacers. 17. Put the plastic caps, that you find in the user manual bag, in the holes. We recommend that you keep the packaging and the transit bolts for any movement of the appliance. 14. Remove the power supply cable and the drain hose from the hose holders. 3.
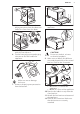
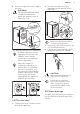
ENGLISH 2. Loosen or tighten the feet to adjust the level. WARNING! Do not put cardboard, wood or equivalent materials below the appliance feet to adjust the level. 2. Position it toward left or right depending on the position of the water tap. 45 20 x4 The appliance must be level and stable. A correct adjustment of the appliance level prevents the vibration, noise and the movement of the appliance when in operation.
www.aeg.com You can extend the drain hose to maximum 400 cm. Contact the authorized service centre for the other drain hose and the extension. It is possible to connect the drain hose in different ways: 1. Make a U shape with the drain hose and put it around the plastic hose guide. 2. On the edge of a sink - Fasten the guide to the water tap or to the wall. The end of the drain hose must always be ventilated , i.e. the inner diameter of the drain pipe (min. 38 mm min. 1.
ENGLISH 11 6. Position the hose directly to a builtin drain pipe in the room wall and tighten it with a clamp. 4. PRODUCT DESCRIPTION 4.1 Special features Your new washing machine meets all modern requirements for an effective treatment of laundry with low water, energy and detergent consumption and respectful of fabric care. • The interactive touch screen display makes the setting and the use of the appliance more immediate and agreeable.
www.aeg.com 4.2 Appliance overview 1 2 9 8 3 10 4 5 11 12 6 7 4.3 Detergent dispenser and salt compartment Always follow the instructions that you find on the packaging of the detergent products. Anyway, we recommend not to exceed the maximum indicated level in each compartment ( ).
ENGLISH Salt Compartment for salt. Read carefully 'The Water Softener technology ( Soft Water)'. 13 After a washing cycle, if necessary, remove any detergent residue from the detergent dispenser. Maximum level for detergent/ additives quantity. When selecting a prewash phase, put the detergent/ additive in a dosing ball inside the drum. 5. THE WATER SOFTENER (SOFTWATER TECHNOLOGY) 5.1 Introduction The water contains harsh minerals. The higher the content of these minerals the harder the water is.
www.aeg.com 8. Scroll up and down the setting list to find the Water Softener bar and tap on it to enter. Spin Machine Clean Info 9.
ENGLISH Levels as indicated on the test- Levels 15 Water hardness range er1) 7 C07 ≥46 ≥26 ≥33 ≥4.6 1) If supplied with the appliance. 2) Factory setting, able to satisfy most of the use conditions. 5.3 Pouring salt The water softener function acts through special resins present in the appliance. To regenerate the resins and make them ready to soften the water pour a special Max ▼ SALT ▼ ax M salt in the compartment M ax ▼ Salt : 1. Open the detergent dispenser. Max ▼ ax M 4.
www.aeg.com WARNING! Do not put anything but salt Salt in the compartment . If any other detergent/additive is poured inadvertently in this compartment, please refer to 'Eliminating detergent or other additives from salt compartment' in 'Troubleshooting' chapter. The appliance works normally even without salt, but without exploiting its full potential.
ENGLISH 17 2. Tap on the Set Clock bar to set the time. Info 3/4 AEG 13:45 Set Clock 13.45 <12 13h 14> The first time you turn the appliance on, after the Start-up Screen you are guided through the initial setup procedure. <44 45min 46> 7.1 Language setup 1. Scroll the language list to find the desired language and hold the desired language pressed to set it. 3. The following screen pops up: • tap on OK to confirm the set time. • tap on Change to change it.
www.aeg.com 7.4 Water Hardness Detergent advice The display suggests to set the proper water hardness level to improve the washing results. The following window pops up. Water Hardness Select water hardness for best results. Keep default setting? Advise on detergent level for best results. Set now or later? Later Set 1. Tap on Set. The following window pops up. Detergent advice Change OK • Tap on OK to confirm the default setting. 1. Tap on Change to enter the Water Hardness submenu.
ENGLISH Detergent advice OK Settings complete. To connect your machine to WiFi, see instructions in user manual You’ve selected: 50 Change 19 OK OK Refer to the "Wi-Fi Connectivity setup" section in the "Settings" chapter. 7.6 Wi-Fi The startup ends with following dialog window. 8. TOUCH SCREEN Each time you turn the appliance on, the Start-up Screen appears on the touch screen. 1h07min Max 9.0 Kg 40 Cottons 1200 AEG More The summary screen shows: 13.
www.aeg.com 1h07min Max 9.0 Kg • right or left. 40 Cottons 1200 More When a shortcut is visible on the summary screen, it is possible to enter an option/ setting menu by just tapping on the relevant shortcut. To set some options or settings it is sufficient to change the status from OFF to ON just tapping on the relevant bar. Programmes, options and settings can also be set by turning the programme dial and in horizontal submenus the desired choice can be set just tapping on the arrows < or >.
ENGLISH 5. Follow the instructions on the App for the washing machine registration and configuration. A message appears on the washing machine display to confirm that the configuration was successful. 9.2 Configuring the washing machine wireless connection 1. In the programme list screen, tap on the shortcut to enter the setting menu. 2. Tap on the Wi-Fi bar to switch the connection on . A pop-up message will appear, the icon starts flashing and wireless module begins starting up.
www.aeg.com WARNING! If the temperature and level of the water in the drum are too high and/or the drum still rotates you cannot open the door. If the door is open, the Remote Start Mode is deactivated. If you pause or stop the cycle remotely, the door remains locked. To unlock the door, you should be in front of the appliance and press the Start/Pause. To avoid accidental unlocking of the doors, the Child Lock option can be activated. 10. BEFORE FIRST USE 1.
ENGLISH 23 Programme Programme description Cottons White cotton and coloured cotton. Normal soil and light soil. Cottons Eco White cotton and coloured cotton. Normal soil and light soil. Standard programmes for the Energy Label consumption values. According to regulation 1061/2010, the programmes Cottons Eco at 60 °C and the programme Cottons Eco at 40 °C are respectively the «Standard 60°C cotton programme» and the «Standard 40°C cotton programme».
www.aeg.com Programme Programme description Steam Steam programme for cotton and synthetic items. Steam can be used for dried2), washed or worn once laundry. This programme reduce creases and odours3) and relaxes the fibres. When the programme is completed, quickly remove the laundry from the drum. After a steam programme, ironing becomes effortless. Do not use any detergent. If necessary, remove stains by washing or using localized stain removal. Steam programmes do not perform any hygienic cycle.
ENGLISH 25 Programme Programme description Anti-Allergy White cotton items. This programme removes micro-organisms thanks to a washing phase with the temperature maintained above 60°C for several minutes. This helps remove germs, bacteria, micro-organism and particles. An additional rinsing phase ensures a proper removal of detergent residues and pollens/allergenic items. In this way the wash is more effective. Rinse All fabrics, except woollens and very delicate fabrics.
www.aeg.
ENGLISH 27 Programme options compatibility When you set a washing programme and enter the menu play shows the available options only.
www.aeg.com 12. OPTIONS 12.1 Introduction When you enter the menu 1h07min
ENGLISH 1. Tap on the Delay Start bar to enter the submenu. 2. Scroll left or right the hour and/ minute bars to set the desired delay start. When you return to programme summary screen, the indicator and the set delay time appear alternating and the with the indicator programme duration. After touching the Start/Pause button, the appliance begins the countdown and the door is locked. 12.4 Time Save With this option you can decrease the programme duration (OFF= normal programme duration). 1.
www.aeg.com 12.7 Eco Set this option for slightly or normally soiled items washed at 30°C or higher temperatures. Tap on the Eco bar to turn the option on. The appliance decreases the washing temperature and extends the washing time to obtain a good washing efficiency by saving energy. When you return to programme summary screen, the shortcut be on. 12.8 will Stains 1. Tap on the Stains bar to enter the submenu. 2.
ENGLISH When you return to programme summary screen, the shortcut will be on. 12.11 Soft Plus Set the Soft Plus option to optimise the fabric softener distribution and improve the fabric softness. It is suggested when using the fabric softener and especially when the drum is full and the laundry is very soiled. This option increases slightly the programme duration. Tap on the Soft Plus bar to activate the option (ON status). When you return to programme summary screen, the shortcut on. 12.
www.aeg.com 12.15 Remote Start Mode The remote start is available after you have completed the App installing and downloading and washing machine wireless connection. Refer to "Wi-Fi Connectivity setup" chapter. With this option you can start a washing programme remotely. Tap on the Remote Start Mode bar to activate it. When you return to programme summary screen, the shortcut will be on and the door will be locked.
ENGLISH 3h01min OKOPower ColourPro Cottons Cottons Eco Synthetics 40 1200 More Or just tap on the programme name in the programme summary window to return to the programme list window and scroll the programme list up or down to set the desired programme. 2. After a few seconds the display shows programme summary screen indicating the maximum load, the default temperature, the maximum spin speed and the programme duration. 3. You can tap on the Temperature bar to change the water temperature. 4.
www.aeg.com Cottons 40 Max Detergent advice: ▼ 60ml / 50ml M ▼ Sa lt M ax ▼ Type 1 / Type 2 ax Ready to start Refer to the "Detergent Dosing" section in the chapter "Settings". 3. If desired, pour the fabric softener in the compartment . Max ▼ ▼ ax M M ax ▼ If you change the washing programme after closing the door, the display may tell you that the laundry is now exceeding the maximum recommended load for the new programme: open the door and remove a few garments. Sa lt 13.
ENGLISH 35 Cottons 40 3h01min Max ▼ ax Washing Finished at 15:42 ▼ Sa lt M ax ▼ M 2. Pour the liquid detergent in the . compartment Max ▼ ▼ ax qu id M Li 2. If necessary, tap on to enter the option list and activate the Child Lock option. Refer to "Child Lock" section in the "Options" chapter. shows up. Keep The shortcut pressed for about three seconds to deactivate the Child Lock. ▼ M ax ▼ ax M The drain pump can operate shortly before the appliance fills water.
www.aeg.com 13.9 The ProSense load detection After touching the Start/Pause button: 1. The ProSense starts the laundry load detection to calculate the real programme duration. The display shows the message Adjusting programme to current load. The appliance adjusts automatically the programme duration to the load to achieve perfect washing results in the minimum possible time. The programme duration could increase or decrease. 2.
ENGLISH 2. 3. 4. 5. When you activate the appliance again, the display shows the end of the last selected programme. Turn the programme dial to set a new cycle. Remove the laundry from the appliance. Make sure that the drum is empty. Keep the door and the detergent dispenser slightly ajar to prevent mildew and odours. Close the water tap. 37 • The indicator is still on and the door stays locked. • You must drain the water to open the door: 1.
www.aeg.com Language Back SV DE EN IT FR Svenska Deutch English Italiano Francais If the Cycle End Buzzer is on, the screen shows the shortcut (buzzer on) or (buzzer off). Refer to "Shortcuts" section in this chapter. 14.6 To set the proper water hardness level, read the "The Water Softener (SoftWater Technology)" chapter carefully. 3. The screen returns to the setting list automatically. Tap on the Programmes bar to return to the programme summary screen. 14.
ENGLISH 14.8 Soft Plus Default Info Set the Soft Plus Default to optimise the fabric softener distribution and improve the fabric softness. The Soft Plus option remains permanently on. It is suggested when using the fabric softener and especially when the drum is full and the laundry is very soiled. This option increases slightly the programme duration. To activate/deactivate this option: 1. Tap on the Soft Plus Default bar (ON status). 2.
www.aeg.com Services Back Reserved for service 0 1 5 6 2 7 3 8 14.13 4 9 < The shortcut appears when the relevant option is set. OK Machine Information Here you can find a short description about all programmes, options and settings. To find the desired description, e.g.: 14.12 Shortcuts This setting allows to bring the shortcuts shown in the next drawing visible on the summary screen. To activate the shortcuts: 1. Tap on the Shortcuts bar to open the list of the available shortcuts.
ENGLISH • Button up pillowcases, close zippers, hooks and poppers. Tie up belts. • Empty pockets and unfold. • Turn multilayered fabrics, wool and items with printed illustrations inside out. • Pre-treat tough stains. • Wash heavy soil stains with a special detergent. • Be careful with curtains. Remove the hooks and put the curtains in a washing bag or pillowcase. • Do not wash laundry without hems or with cuts. • Use a washing bag to wash small and/or delicate items (e.g.
www.aeg.com CAUTION! Do not use alcohol, solvents or chemical products. CAUTION! Do not clean the metal surfaces with chlorine-based detergent. If the cleaning programme is postponed, the message keeps on popping up during next uses until it is run. 16.4 Door seal 16.2 Descaling If you use the salt regularly to activate the SoftWater Technology, the descaling procedure described in this paragraph is not necessary.
ENGLISH 43 M ax 4. Make sure that all detergent residue is removed from the detergent conveyor. Use a cloth. Max ▼ ▼ Sa lt M ax ▼ ax M 2. Remove the insert for the softener and, if inserted, the container for liquid detergent. ▼ ax Max M Sa lt M ax ▼ ▼ 5. Make sure that all detergent residue is removed from the upper and lower part of the recess. Use a small brush to clean the recess. Max ▼ ax ▼ Sa lt M ax ▼ M Max ▼ ax ▼ Sa lt M ax ▼ M 6.
www.aeg.com Regularly check the drain pump filter and make sure that it is clean. Clean the drain pump if: • The appliance does not drain the water. • The drum does not turn. • The appliance makes an unusual noise because of the blockage of the drain pump. • The message Check that the drain filter is not clogged pops up. WARNING! • Do not remove the filter while the appliance operates. • Do not clean the pump if the water in the appliance is hot. Wait until the water cools down 4.
ENGLISH 45 rotate, contact the Authorised Service Centre. 2 1 10. Clean the filter under the water tap. When you drain the water with the emergency drain procedure, you must activate the drain system again: a. Put 2 litres of water in the main wash compartment of the detergent dispenser. b. Start the programme to drain the water. 16.8 Cleaning the inlet hose and the valve filter 11. Put the filter back into the special guides by turning it clockwise.
www.aeg.com 16.9 Emergency drain If the appliance cannot drain the water, carry out the same procedure, described in 'Cleaning the drain filter' paragraph. If necessary, clean the pump. When you drain the water with the emergency drain procedure, you must activate the drain system again: 3. Clean the valve filter on the back of the appliance with a toothbrush. 1. Put 2 litres of water in the main wash compartment of the detergent dispenser. 2. Start the programme to drain the water. 16.
ENGLISH First try to find a solution to the problem (refer to the "Possible failures" table). If the problem persists, contact the Authorised Service Centre. In case of major problems, the buzzer operates, an alarm message pops and the Start/Pause button may flash continuously, e.g.: • Check that the water inlet tap is open - The appliance does not fill with water properly. • Check that the drain filter is not clogged - The appliance does not drain the water.
www.aeg.com Problem The appliance does not fill with water properly. Possible solution • Make sure that the water tap is open. • Make sure that the pressure of the water supply is not too low. For this information, contact your local water authority. • Make sure that the water tap is not clogged. • Make sure that the inlet hose has no kinks, damages or bends. • Make sure that the connection of the water inlet hose is correct.
ENGLISH 49 Problem Possible solution The appliance makes an unusual noise and vibrates. • Make sure the levelling of the appliance is correct. Refer to 'Installation instruction'. • Make sure that the packaging and/or the transit bolts are removed. Refer to 'Installation instruction'. • Add more laundry in the drum. The load may be too small. The programme duration • The ProSense function is able to adjust the programme duincreases or decreases ration according to the type and the laundry load size.
www.aeg.com failure, it is possible to open it using the emergency unlock function. Before opening the door: CAUTION! Risk of burns! Make sure that the water temperature is not too high and the laundry is not hot. If necessary, wait until they cool down. 5. Take out the laundry and then close the appliance door. 6. Close the filter flap. 17.
ENGLISH 51 18. CONSUMPTION VALUES Stated values are obtained in laboratory conditions with relevant standards. Different causes can change the data: the quantity and type of laundry and ambient temperature. Water pressure, the supply voltage and the temperature of inlet water may also affect the washing programme duration. Technical specifications may be changed without prior notice to improve the quality of product.
www.aeg.com Time to networked standby (min.) 15 The information given in the chart above is compliant with the EU Commission regulation 1015/2010 implementing directive 2009/125/EC and EU commission regulation No. 1275/2008. 19.
ENGLISH 20.3 Stacking kit 53 WARNING! Do not put the tumble dryer under the washing machine. 20.4 Pedestal with the drawer The tumble dryer can be stacked on the top of the washing machine only by using the correct stacking kit manufactured and approved by AEG. To raise your appliance and make loading and unloading laundry easier. Verify the compatible stacking kit by checking the depth of your appliances. The drawer can be used for laundry storage e.g.: towels, cleaning products and more.
www.aeg.
ENGLISH 55
157011552-A-312017 www.aeg.com/shop GE T I T ON The software included in this product contains copyrighted software that is licensed under the BSD, GPL-2.0, LGPL-2.0, LGPL-2.1, zLib, MIT, ISC, Apache 2.0 and others. It is possible to display the complete copy of the licenses in the AEG App that can be downloaded from the corresponding App store from the License menu section.