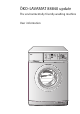
ÖKO-LAVAMAT 88840 update The environmentally friendly washing machine User information
Dear Customer, Please read this user information carefully. Pay particular attention to the section "Safety" on the first Info pages. Please keep this user information in a safe place for later reference. Pass it on to any future owners of the unit. 1 The warning triangle and /or signal words (Warning!, Caution!, Important!) emphasise information which is important for your safety or for the unit's functional reliability. It is imperative that this information is observed. 0 1.
Contents Operating Instructions .................................... 6 Safety . . . . . . . . . . . . . . . . . . . . . . . . . . . . . . . . . . . . . . . . . . . . . . . . . . . . . . . . 6 Disposal . . . . . . . . . . . . . . . . . . . . . . . . . . . . . . . . . . . . . . . . . . . . . . . . . . . . . . 8 Environmental Tips . . . . . . . . . . . . . . . . . . . . . . . . . . . . . . . . . . . . . . . . . . . . 8 Unit description . . . . . . . . . . . . . . . . . . . . . . . . . . . . . . . . .
Wash Programme Progress . . . . . . . . . . . . . . . . . . . . . . . . . . . . . . . . . . . . . . . 25 Wash Cycle Complete/Removing Washing . . . . . . . . . . . . . . . . . . . . . . . . . . 27 Programme Tables . . . . . . . . . . . . . . . . . . . . . . . . . . . . . . . . . . . . . . . . . . . . . Washing . . . . . . . . . . . . . . . . . . . . . . . . . . . . . . . . . . . . . . . . . . . . . . . . . . . . . . Separate Rinsing/Conditioning/Starching/Soaking . . . . . . . . . . . . . . . . . .
Electrical connection . . . . . . . . . . . . . . . . . . . . . . . . . . . . . . . . . . . . . . . . . . . 51 Water connection . . . . . . . . . . . . . . . . . . . . . . . . . . . . . . . . . . . . . . . . . . . . . Permissible water pressure . . . . . . . . . . . . . . . . . . . . . . . . . . . . . . . . . . . . . . . Water inflow . . . . . . . . . . . . . . . . . . . . . . . . . . . . . . . . . . . . . . . . . . . . . . . . . . Water drain . . . . . . . . . . . . . . . . . . . . . . . . . . . . . . . .
Operating Instructions Operating Instructions 1 Safety The safety aspects of AEG electrical appliances comply with accepted technical standards and the German Appliance Safety Law. However, as manufacturers we regard it as our responsibility to inform you about the following safety instructions. Before Using for the First Time • Refer to the "Installation and Connection Instructions" further on in this user information.
Operating Instructions Safety of Children and Infirm Persons • Packaging materials (e.g. films, polystyrene) can be dangerous for children. Risk of suffocation! Keep packaging away from children. • The appliance is not intendet for use by young children or infirm persons without supervision. • Children frequently cannot recognise hazards involved in handling electrical appliances.
Operating Instructions • Allow the washing solution to cool down before performing and emergency emptying of the appliance, before cleaning the solution pump or before an emergency opening of the filling door. • Small animals can chew on power cables and water hoses. This can cause a danger of electric shock and water damage. Keep small animals away from washing machines. 2 Disposal Disposing of the Packaging Material! Dispose of the packaging of your washing machine correctly.
Operating Instructions Unit description Front view Drawer for detergent and conditioner Control panel Rating plate (behind filling door) Filling door Screw feet (height-adjustable); rear left: Automatic adjustment foot Flap in front of the drain pump Drawer for detergent and care agent Stain removers Main wash detergent (powder form) and possibly water softener Pre-wash detergent/ soaking agent or water softener Liquid care agents (conditioner, finisher, starch) 9
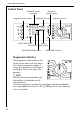
Operating Instructions Control Panel SPIN SPEED button with display Programme option buttons Programme progress display DOOR/LIGHT button Programme selector button DELAY TIMER button Multi-display START/PAUSE MOISTURE/LOADING display OVER DOSING indicator Programme Selector The programme selector defines the nature of the wash cycle (e.g. water level, drum movement, number of rinses, spin speed) to suit the type of washing, as well as the water temperature.
Operating Instructions t } (COTTONS/LINEN, EASY-CARES) Wash programme between 20 °C and 95 °C, may be used for all cotton and linen washing (cottons/linen), easy-cares (blended fabrics, e.g., cotton/polyester) and synthetics. The wash programme adjusts to suit the various types of fabric and quantities. If there is mostly cotton/linen a suitable cottons/linen programme is carried out; if there is more synthetic material a programme for easy-cares is selected.
Operating Instructions f (FASHION) A particularly gentle special programme at 40 °C for modern fabrics such as viscose, modal, cupro, lyocell, with a gentler wash action than the à (DELICATES) programme, but washing more thoroughly than the hand wash programmes. g (REFRESH) A special programme lasting approx. 20 minutes at 30 °C to give fabrics a quick wash, such as, for example, very slightly soiled sports clothes that have been worn only once.
Operating Instructions ä (STAIN) For treating heavily soiled or stained washing. (In-wash stain treatment or tablets are washed in from the compartment at the optimal point in the programme cycle.) 3 When s (WOOL)/P (Hand wash) has been set the programme options cannot be selected using the buttons. ] (TIME SAVER) Shortened wash programme for less soiled washing; may be selected in three stages for the t } (COTTONS/LINEN, EASY-CARES) programme and in two stages for other programmes.
Operating Instructions Consumption Values and Wash Times The values given in the following table for selected programmes were calculated under standard conditions. Apart from the settings selected (optional functions), the consumption values also depend on external conditions such as water temperature or the detergent used. They provide a useful guide for operation in the home.
Operating Instructions Wash Time Display 3 The wash times for the wash programmes depend on the usual washing practice and the ambient conditions at the place of installation. The washing type and quantity, the type of washing detergent, the water temperature and the room temperature etc. can influence the duration of the wash programme. What does “UPDATE” mean? The wash programmes in your washing machine are controlled by software.
Operating Instructions Before the First Wash 0 Run a wash cycle without washing; t } (COTTONS/LINEN, EASYCARES 95) programme with half the amount of washing detergent. This removes any residues from the drum and solution container which may have been left during manufacturing. Preparing a Wash Load Sorting and preparing a wash load • Sort the washing according to care symbol (see “Washing Types and Care Symbols”). • Empty all pockets. • Remove metal objects (paper clips, safety pins etc.).
Operating Instructions Washing Types and Care Symbols The care symbols help you choose the correct wash programme. Washing should be sorted according to type and care symbol. The temperatures indicated in the care symbols are all maximum temperatures. Cottons ç Fabrics made from cotton and linen with this care symbol will withstand maximum wash actions and high temperatures. The t } (COTTONS/LINEN, EASY-CARES) programme is suitable for this type of washing.
Operating Instructions Detergents and care agents Which detergent and care agent? Use only detergents and care agents which are suitable for use in washing machines. Always follow the manufacturer's instructions.
Operating Instructions Running a Wash Cycle Brief Instructions A wash cycle consists of the following steps: 0 1. Set the correct wash programme: – select the programme and temperature using the programme selector – if required, select programme option 2. If required change the spin speed/select o (RINSE HOLD). 3. If required, set the b (DELAY TIMER). 4. Open the door and load the washing. 5. Close the door. 6. Add detergent/conditioner. 7.
Operating Instructions Setting the Wash Programme 3 See “Programme Tables” for a suitable programme, correct temperature and possible programme options to suit the type of washing. 0 1. Use the programme selector to set the required wash programme and temperature. The selected programme is illuminated from behind. The anticipated duration of the selected programme appears in minutes in the multi-display. 2.
Operating Instructions Change the spin speed/Select Rinse Hold 0 If necessary, select the spin speed for the final spin. Press the button K (SPIN SPEED) as often as necessary until the required spin speed appears in the display. • 1800, 1400, 1200, 1000, 800, 600 or 400 revolutions per minute are possible. • With the display "0“ the washing remains in the last rinsing water - it is not spun (Rinse hold).
Operating Instructions Setting the Delay Timer/Soaking Duration Delay Timer The b (DELAY TIMER) button allows the start of a wash programme to be delayed by 1 hour up to a maximum of 19 hours. 0 1. Select wash programme. 2. Press b (DELAY TIMER). 3. Press the O/s (START/PAUSE) button. When the start is delayed b (DELAY TIMER) is illuminated. Press the b (DELAY TIMER) button repeatedly until the required delay appears in the multi-display.
Operating Instructions Opening and closing the filling door 0 0 3 Open: Press the button K/W (DOOR/LIGHT). The filling door springs open. Close: Press the filling door firmly closed.
Operating Instructions Add detergent/conditioner For information concerning detergent and conditioners see the section “Detergent and Conditioners”. 0 1. Open the detergent dispenser drawer: grasp the drawer at the flap at the bottom (1), and pull out the drawer to its full extent (2). 3 2. Add detergent/conditioner. Compartment for in-wash stain treatment/tablets Only for ä (STAIN) programme option.
Operating Instructions Starting the Wash Programme 0 1. Check that the water is on. 2. Start the wash programme: press the O/s (START/ PAUSE) button. The wash programme has started or will start at the end of the time delay set. 3 If K/W (DOOR/LIGHT) flashes in red when the O/s (START/PAUSE) button is pressed, the door is not closed correctly. Press the door firmly and press the O/s (START/PAUSE) button again.
Operating Instructions Multi-display The remaining wash time (in minutes) is displayed in the multi-display until the programme has finished. 3 The remaining wash time may increase or remain stationary during the wash cycle because the wash programme adjusts itself to the various conditions as the wash sequence progresses (e.g. type and quantity of washing, identification of imbalance during spin cycle, special rinse etc.).
Operating Instructions Wash Cycle Complete/Removing Washing Once the wash programme has come to an end, L (END) is illuminated on the programme progress display. The washing machine switches to standby mode if no button is pressed or the programme selector is not turned within approx. 3 minutes after the end of the programme. Only L (END) is illuminated from behind. All other displays on the control panel are switched off in order to save energy. Pressing any button cancels the standby mode.
Operating Instructions 3 28 If Å (OVERDOSING) is illuminated from the rear, too much detergent was used in the washing program which has just ended. During the next wash, pay attention to the detergent manufacturer's dosing information and to the load quantity! Caution! If the washing machine is not used for a long time: Close the water tap and disconnect the washing machine from the electricity mains. (Anti-flood system Aqua Control with Aqua Alarm does not function if the power supply is interrupted.
Operating Instructions Programme Tables Washing Not all the possible settings are listed below - only those which are useful and meaningful in everyday use. Type of washing, Max. load1) Care symbols (dry weight)2) Cottons/Linen3) èç Cottons/Linen ëèç Programme selector Temperature [in °C] 5kg ECO (ENERGY SAVING) 60 k (PRE WASH) e (SENSITIVE) ä (STAIN) ] (TIME SAVER) 5kg t } (COTTONS/LINEN, EASY-CARES) 20 to 95 k (PRE WASH) e (SENSITIVE) ä (STAIN) ] (TIME SAVER) 2.5kg g (REFRESH) 30 2.
Operating Instructions Separate Rinsing/Conditioning/Starching/Soaking Max. load quantity (dry weight) Programme selector Cottons/Linen 5kg À (STARCHING) Wool/ Hand wash 2kg À (STARCHING) + ] (TIME SAVER) button Type of washing Separate Spin Type of washing Cottons/Linen 30 Max. load quantity (dry weight) 5kg Easy-cares 2.5kg Delicates 2.
Operating Instructions Cleaning and Care Control panel 0 Important! Do not use any furniture cleaning agents or aggressive cleaning agents in order to clean panel and control parts. Wipe control panels with a damp cloth. When doing so, use warm water. Detergent Drawer The detergent drawer should be cleaned from time to time. 0 1. Pull the detergent drawer out as far as it will go. 2. Remove the detergent drawer by pulling sharply. 3. Take the conditioner insert out of the middle compartment. 4.
Operating Instructions 7. Use a brush to clean the entire rinsing-in section of the washing machine, particularly also the nozzles on the top side of the rinsingin chamber. 8. Set the detergent drawer into the guide tracks and push in. Washing Drum 0 The washing drum is made of stainless steel. Rusting foreign bodies in the washing can cause rust deposits on the drum.
Operating Instructions What to do if... Remedying faults In the event of a fault, try to solve the problem yourself with the aid of the information provided here. If you use the Customer Service for one of the faults listed here or to remedy an operating error, the Customer Service technician's visit will not be free of charge, even during the warranty period. • If the fault code C1 or C2 is shown in the Multi display, you may be able to remedy the problem yourself (see the faults table below).
Operating Instructions Problem The washing machine vibrates during operation or is unstable. Possible Cause Remedy The transport packaging has not been removed. Remove transport packaging in accordance with the installation and connection instructions. The height-adjustable screw feet are wrongly positioned. Adjust in accordance with the installation and connection instructions. There is very little washing in This does not impair the the drum (e.g. only one function. dressing gown).
Operating Instructions Problem Possible Cause The drain pump in the washing machine is The Aqua Control water prorunning continuously tection system has cut in. even with the appliance switched off. Softener was not washed into the machine; compartment æ for conditioner is filled with water. Remedy Turn off the tap, then unplug the appliance from the mains and contact customer service.
Operating Instructions Problem Detergent deposits are building up in the detergent dispenser drawer. The rinse water is cloudy. Possible Cause Remedy Water tap is not fully turned Turn the water tap on fully. on. Filter in the screw connection of the inlet hose at the water tap or at the appliance is blocked. Turn off the water tap. Unscrew the inlet hose from the water tap and from the appliance. Clean the filters. The cause is probably a detergent with a high silicate content.
Operating Instructions If the washing results are not satisfactory If the washing has turned grey and if limescale is deposited in the drum, then • Too little detergent was used. • The wrong detergent was used. • Special soiling was not pre-treated. • Program or temperature not set correctly. • If multi-component detergents are used, the individual components were not used in the correct ratio.
Operating Instructions Carrying out emergency drainage • If the washing machine no longer pumps off the washing solution, emergency drainage must be performed. • If the washing machine is in a room where there is a risk of frost, emergency drainage must be performed if there is a possibility of frost. In addition: unscrew the inlet hose form the water tap and place it on the floor. Empty the drainage hose.
Operating Instructions When the water is completely drained: 6. Push the plug securely into the emergency drainage hose and turn it clockwise to secure it. 7. Replace the emergency drainage hose in its holder. 8. Put on the flap and close. Drain pump The drain pump is maintenance-free. The cover of the drain pump is required to be opened only in the event of a malfunction when no more water is being pumped out, e.g. if the pump wheel is blocked.
Operating Instructions 5. Replace the pump cover. Laterally insert the webs on the cover into the guide slots and screw on the cover in a clockwise motion. 6. Close the emergency emptying hose and place it in the holder. 7. Close the flap. Emergency unlocking of the door If the filling door can no longer be opened, it can be opened with the aid of the emergency unlocking facility. Warning! Switch off the washing machine before operating the emergency unlocking and remove the plug from the mains! 0 1.
Operating Instructions Additional Rinse +Á (RINSE+) The washing machine is set for very economical water consumption. However, for persons who suffer from allergies to detergents, it can be helpful to rinse with extra water. 3 If this function is set, an additional rinse cycle is carried out for the t } (COTTONS/LINEN, EASY-CARES), <(EASY IRON) and à (DELICATES) programmes. When the appliance is supplied from the factory, the additional rinse function is not set.
Operating Instructions Water Cooling It may be necessary to cool down the water before pumping it out in order to prevent thermal damage to the plastic drainage pipes. 3 The water is cooled down before pumping out at the end of the main wash cycle (by adding cold water). This setting only works on the t } (COTTONS/LINEN, EASY-CARES) programme when the temperature is above 40 °C. When the appliance is supplied water cooling is not set except for the e (SENSITIVE) programme option.
Operating Instructions Variomatic Loose Spin A spin function that can be set as an integrated part of the final spin. The washing clings less to the drum wall and can be removed more easily. May be selected with t } (COTTONS/LINEN, EASY-CARE). Setting loose spin: 0 1. Turn the programme selector to L (SHORT SPIN). 2. Press the ä (STAIN) button for at least 5 seconds. After the button has been kept pressed for 5 seconds, L (END) flashes on the programme progress display for 5 seconds. 3.
Operating Instructions Programme Protection To safeguard a programme setting against unwanted changes (e. g. programme selector turned, option buttons pressed etc.), you can set the programme protection. This prevents your washing being damaged. 3 It is possible to set or cancel the programme protection at any time during a programme. Selecting programme protection: 0 1. Select the desired wash programme settings. 2. Press the O/s (START/PAUSE) button to start the programme. 3.
Operating Instructions Child Safety Feature If the child safety feature is set, the filling door can no longer be closed and no washing program can be started. 0 1 0 Setting the child safety feature Use a coin to turn the rotary knob on the inside of the filling door clockwise as far as it will go. Warning! The rotary knob must not be in a vertical position after adjustment, otherwise the child safety feature is not active.
Installation and connection instructions Installation and connection instructions Installation Safety Precautions • Do not tilt the washing machine onto its front or onto its right side (viewed from the front). Electronic components can get wet. • Check the washing machine for transport damages. A damaged unit must never be put into operation under any circumstances. In the event of damage, please contact your supplier.
Installation and connection instructions Installation of the appliance 3 Washing machines with curved panels are not suitable for installing under units. Transporting the appliance • Do not place the washing machine on its front or on its right side (viewed from the front). Otherwise, electrical components can get wet. • Never transport the unit without the transport safeguard. Do not remove the transport safeguard until the appliance is at the installation location.
Installation and connection instructions 2. Pull both hose holders off the appliance with a strong pull. 3 48 The special spanner (A) and the caps (B) (2 each) and (C) (1 each) are supplied with it. 3. Remove the screw D, including the compression spring with the special spanner A. 4. Cover the hole with the cap C. Important! When fitting the plastic caps, press until they snap into the rear panel securely. 5. Remove the two screws (E) with the special spanner (A). 6. Remove the 4 screws (F). 7.
Installation and connection instructions Prepare the installation place • The installation surface must be clean and dry, free of floor polish residues and other greasy coatings so that the unit does not slip away. Do not use lubricants as a sliding aid. • Installation on a high-veil carpet or floor tiles with soft sponge backs is not recommended because the standing safety of the appliance is then no longer ensured.
Installation and connection instructions Compensate for floor unevenness Automatic adjustment foot: The rear left foot of your washing machine is designed as a spring leg. This means that it guarantees that your unit will stand securely even at high spin speeds. If, nevertheless, the washing machine is unstable during spinning, please proceed as follows: 0 1. Set the three adjusted feet at the nominal value of 10 mm. To do this, use the supplied special spanner to remove the transport safeguard.
Installation and connection instructions Electrical connection Details of the mains voltage, current type and required fuses can be found on the rating plate. The rating plate is located at the top above the filling door. For permanent electrical connection within the electrical circuit, provisions must be made which allow for electrical disconnection of the appliance from the mains with a contact opening of at least 3 mm at all poles.
Installation and connection instructions Water inflow A pressure hose 1.5m in length is supplied. If a longer inflow hose is required, only a VDE-approved, complete set of hoses with fitted hose screw connections offered by our Customer Service is permissible. – Hose sets in lengths of 2.2m, 3.5m and 5m are available for washing machines without Aqua-Control. – Hose sets in lengths of 2.0m, 2.9m and 3.9m are available for washing machines with Aqua-Control.
Installation and connection instructions Water drain The drainage hose can either be connected to a siphon or hung in a wash basin or discharge basin or a bath tub. Only original hoses may be used for extensions (max. 3m laid on the floor and then up to 80cm high). Customer Service stocks drainage hoses in lengths of 2.7 and 4m. Important! It is essential to lay the drainage hose without kinks. 0 Water drain-off inside a siphon The grommet on the hose end fits all standard siphon types.
Installation and connection instructions Technical data Adjustment possibility Filling quantity (program-dependent) Area of use Drum speed, spinning Water pressure Dimensions (dimensions in mm) 54 Approx. +10 / -5mm max. 5kg Domestic See rating plate 1-10 bar (= 10 - 100 N/cm2 = 0.1 - 1.
Warranty conditions / Customer service centres Warranty conditions / Customer service centres Weitere Kundendienststellen im Ausland In diesen Ländern gelten die Garantiebedingungen der örtlichen Partner. Diese können dort eingesehen werden. Further after-sales service agencies overseas In these countries our AEG agents’ own guarantee conditions are applicable. Please obtain further details direct.
Warranty conditions / Customer service centres 56 Australia ANDI-Co Pty. Ltd 9 Kingston Town Close Oakleigh VIC 3166 Tel.: (03) 9569 1235 Fax: (03) 9569 1450 Korea (South) Core Incorp. 3/F Chewoo Bldg. 200 Nonhyun-Dong Kangnam-Ku Seoul Telefon 82 2 549 89 61 Namibia AEG NAMIBIA (PTY) LIMITED-Jeppe Street Northern Industrial Area Windhoek Tel.: (061) 21-6082/4 Fax: (061) 217838 Bahrain/Arabian Gulf A.A. Zayani & Sons P.O. Box 9 32 Bahrain Tel.: 261060 Croatia Electrolux D.O.O.
Warranty conditions / Customer service centres Israel Electricity & Electronic Services-Evis LTD. 19 Hataasia st. Raanana, Industrial area 43654 Tel: 972-9-7448118 Fax: 972-9-7603618 e-mail:evis@evis.co.il Malaysia Arzbergh Engineering No. 49A/B, Jalan Petaling Utama 7 4600 Petaling Jaya Tel.: 3 795 1084 Fax: 3 795 1082 Saudi Arabia Alia Trading Corporation P.O. Box 4101 King Abdul Aziz Street Riyadh Tel.: 4645977 Al Nahas Est. Musaidia Market I P.O. Box 1 15 29 Jeddah Tel.
Index Index A P Aqua Control . . . . . . . . . . . . . . . . . 15, 28, 35 Automatic adjustment foot . . . . . . . . . . 9, 50 Pre wash . . . . . . . . . . . . . . . . . 12, 20, 24, 29 Pre-wash detergent . . . . . . . . . . . . . . . . 9, 24 Program saving . . . . . . . . . . . . . . . . . . . . . .23 Programme option buttons . . . . .12, 20, 29 Programme progress display . . . . . . . . . . . .25 Programme protection . . . . . . . . . . . . 27, 44 C Care agent . . . . . . . . . . . . . . . . . . . . .
Service Service In the chapter "What to do if...“ , some faults are listed which you can remedy yourself. Look there first if a fault occurs. If you do not find any information there, please consult your Customer Service. (You can find the addresses and telephone numbers in the section "Customer Service Centres“.) Always prepare in advance for the discussion. By doing so you will simplify the diagnosis and the decision on whether customer service is necessary. Note the PNC number and S. number.
From the Electrolux Group. The world´s No.1 choice. The Electrolux Group is the world´s largest producer of powered appliances for kitchen, cleaning and outdoor use. More than 55 million Electrolux Group products (such as refrigerators, cookers, washing machines, vacuum cleaners, chain saws and lawn mowers) are sold each year to a value of approx. USD 14 billion in more than 150 countries around the world. AEG Hausgeräte GmbH Postfach 1036 D-90327 Nürnberg http://www.aeg.hausgeraete.