ÖKO-LAVAMAT euroline L update The Environmentally-Friendly Washing Machine User Information
Dear customer, Please read this user information carefully. In particular, pay attention to the section ”Safety” on the first pages. Keep this user information in a safe place for later reference. Pass it on to any subsequent owners of the unit. 1 Points which are necessary for your safety or which are important for the unit's functional capability are highlighted by a warning triangle and/or signal words (Warning!, Caution!, Attention!). Always remember. 0 1.
Contents Instructions for use . . . . . . . . . . . . . . . . . . . . . . . . . . . . . . . . . . . . . . . . 6 Safety . . . . . . . . . . . . . . . . . . . . . . . . . . . . . . . . . . . . . . . . . . . . . . . . . . . . . . . . 6 Disposal . . . . . . . . . . . . . . . . . . . . . . . . . . . . . . . . . . . . . . . . . . . . . . . . . . . . . . 8 Environment Tips . . . . . . . . . . . . . . . . . . . . . . . . . . . . . . . . . . . . . . . . . . . . . . 9 Unit Description . . . . . . . . . . . .
Program Tables . . . . . . . . . . . . . . . . . . . . . . . . . . . . . . . . . . . . . . . . . . . . . . . . Washing . . . . . . . . . . . . . . . . . . . . . . . . . . . . . . . . . . . . . . . . . . . . . . . . . . . . . . Separate Conditioning/Starching/Impregnating . . . . . . . . . . . . . . . . . . . . Separate Rinse . . . . . . . . . . . . . . . . . . . . . . . . . . . . . . . . . . . . . . . . . . . . . . . . . Separate Spin . . . . . . . . . . . . . . . . . . . . . . . . . . . . . . . . . . . . .
Electrical Connection . . . . . . . . . . . . . . . . . . . . . . . . . . . . . . . . . . . . . . . . . . 47 Water Connection . . . . . . . . . . . . . . . . . . . . . . . . . . . . . . . . . . . . . . . . . . . . . Permissible Water Pressure . . . . . . . . . . . . . . . . . . . . . . . . . . . . . . . . . . . . . . . Water Inflow . . . . . . . . . . . . . . . . . . . . . . . . . . . . . . . . . . . . . . . . . . . . . . . . . . Water Drainage . . . . . . . . . . . . . . . . . . . . . . . . . . . . . . . .
Instructions for use Instructions for use 1 Safety The safety of AEG electrical appliances conforms to the recognised technical regulations and the legislation covering the safety of appliances. However, as manufacturers, we still regard it as our responsibility to inform you of the following safety information. Before Putting into Operation for the First Time • Refer to the ”Installation and Connection Instructions” later in this user information.
Instructions for use Child Safety • Packaging components (e.g. films, polystyrene) can be hazardous to children. Risk of suffocation! Keep packaging away from children. • Children often cannot recognise the hazards associated with handling electrical appliances. Therefore, ensure the necessary supervision during operation and do not allow children to play with the washing machine – there is a risk that children can get trapped inside.
Instructions for use • Allow the washing solution to cool before carrying out an emergency emptying operation or cleaning the drain pump. • Small animals can chew the power cables and water hoses. Risk of electric shock and danger of water damage! Keep small animals away from the washing machine. 2 Disposal Dispose the packing material! Dispose of your washing machine's packaging correctly. All the packaging materials used are harmless to the environment and can be recycled.
Instructions for use 2 Environment Tips • The pre-wash cycle is not required for averagely dirty washing. This saves washing powder/liquid, water and time (and does not harm the environment). • The washing machine is especially economical when you fully utilise the stated filling quantities. • For small amounts of washing, use only half to two thirds the recommended amount of washing powder/liquid. • Suitable pretreatment enables stains and small amounts of dirt to be removed.
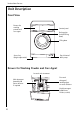
Instructions for use Unit Description Front View Drawer for washing powder and care agent Control panel Rating plate (behind filling door) Filling door Flap in front of drain pump Screw feet (height-adjustable) Drawer for Washing Powder and Care Agent In-wash stain treatment Main detergent (powder) and water-softener if required Pre-wash detergent/ soaking agent or water-softener Liquid care agent (conditioner, finisher, starch) 10
Instructions for use Control Panel Spin button / RINSE HOLD Additional program buttons Program sequence display DOOR display Multidisplay Program selector Button START/PAUSE OVER DOSING display Program Selector The program selector determines the type of washing cycle (e.g. water level, drum movement, number of rinses, spin speed) according to the type of garments being washed, and also the washing solution. OFF (UIT, ARRET) Switches off the washing machine. All other positions are "switched on".
Instructions for use EASY-CARES (KREUKHERSTELLEND, DEFROISSABLE) Main washing cycle for easy-care textiles (mixed fabrics) at 40 °C to 60 °C. EASY IRON position (STRIJKVRIJ, SANS REPASSAGE): Main washing cycle at 40 °C for easy-care textiles which, with the aid of this program, only have to be either gently ironed or not ironed at all. DELICATES (FIJNE WAS, LINGE DELICAT) Main washing cycle for delicates at 30 °C or 40 °C.
Instructions for use Additional Program Buttons The additional program buttons are for adapting the washing program to the dirtiness of the washing. Additional programs are not required for washing which is not excessively dirty. Various functions can be combined with each other, depending on the program. PRE WASH (VOORWAS, PRELAV.
Instructions for use Consumption Values The values for selected programs in the following tables were determined under normal conditions. However, there is a helpful orientation aid for domestic operation.
Instructions for use What Does ”Update” Mean? The washing programs of your washing machine are controlled by software. New types of textiles or new washing powders/liquids could, in the future, require new washing programs. The software can be adapted to these in most cases. For further information on the ”Update”, consult the Customer Service. You can also ask the Customer Service about the costs of an ”Update”. Before the First Wash 0 1. Pull out the washing powder drawer slightly. 2.
Instructions for use Prepare the Washing Cycle Sort and Prepare the Washing • Sort the washing according to care codes and type (see ”Washing Types and Care Codes”). • Empty pockets. • Remove metal parts (paper clips, safety pins etc.). • To prevent washing damage and washing snags: Close zip fasteners, button closed bed covers and pillow cases, and tie together ribbons, e.g. on aprons. • Use clothing made of double-layer fabric (sleeping bag, anorak etc.).
Instructions for use Washing Types and Care Codes The care codes help you choose the correct washing program. The washing should be sorted according to type and care code. The temperatures stated in the care codes are all maximum values. Cottons ç Textiles made of cotton and linen with this care code are insensitive to mechanical stress and high temperatures. The program COTTONS/LINEN (WITTE/BONTE WAS, BLANC/COULEURS) is suitable for this type of washing.
Instructions for use Washing Detergents and Care Agents Which washing detergent and care agent? Use only washing detergents and care agents which are suitable for use in washing machines. Always follow the manufacturer's instructions.
Instructions for use Run a Washing Cycle Brief Instructions A washing cycle is run in the following steps: 0 1. Set the correct washing program: – Set the program and temperature with the program selector – Set any additional program(s) 2. If necessary, change the spin speed/select RINSE HOLD (GEEN CENTR., SANS ESSOR.). 3. Open the filling door and fill with washing. 4. Close the filling door. 5. Add washing detergent/care agent. 6. Start the washing program.
Instructions for use Set the Washing Program For a suitable program, the right temperature and possible additional programs for the relevant washing type, refer to the ”Program Tables”. 0 1. Set the program selector to the required washing program with the required temperature. The probable duration of the set program in minutes is shown in the multi-display. 3 2. Select any additional programs: The indicator for the selected additional program lights up.
Instructions for use Changing the spin speed/Selecting the rinse hold function If required, change the spin speed for the final spin/select rinse hold: 0 3 Changing the spin speed Continue pressing the spin speed/RINSE HOLD (GEEN CENTR., SANS ESSOR.) button until the indicator for the desired spin speed is illuminated.
Instructions for use Opening and Closing the Filling Door 0 0 Open: Pull on the handle of the filling door. Close: Press the filling door firmly closed.
Instructions for use Add Washing Detergent/Care Agent Refer to the information on washing detergents and care agents, see section ”Washing Detergents and Care Agents”. 0 1. Open the washing detergent drawer: grip inside the flap on the drawer at the bottom (1) and pull out the drawer as far as it will go (2). 3 2.
Instructions for use Start the Washing Program 0 1. Check that the water valve is open. 2. Start the washing program: Press the button START/PAUSE (START/PAUZE, MARCHE/PAUSE). The washing program is started. 3 The filling door is not correctly closed if, when the button START/PAUSE (START/PAUSE, MARCHE/PAUSE) is pressed, – the indicator DOOR (DEUR, PORTE) flashes red – the fault code E40 in the multidisplay flashes – and the indicator MAIN WASH (HOOFDWAS, LAVAGE) flashes.
Instructions for use Changing a Washing Program Changing or aborting a program 0 1. Press button START/PAUSE (START/PAUZE, MARCHE/PAUSE). 2. Turn programme knob to OFF (UIT, ARRET). The washing program is aborted. 3. If required, set a new washing program. Otherwise turn the programme knob to PUMP OUT (POMPEN, VIDANGE) and then press the button START/PAUSE (START/PAUZE, MARCHE/PAUSE).
Instructions for use Washing Cycle Ended/Remove Washing After a washing program has ended, END (EINDE, FIN) lights up on the program sequence display. If you selected RINSE HOLD (GEEN CENTR., SANS ESSOR.), the indicator next to the button START/PAUSE (START/PAUZE, MARCHE/PAUSE) flashes. 0 1.
Instructions for use Program Tables Washing Not all possible settings are listed below - only the ones most commonly used in everyday operation and the most appropriate ones. Max. Type of Washing, Filling Quantity1) Care Codes (dry weight)2) Cottons ç Energy-Saving Program: Cottons ç Linen è ë 5kg 5kg 5kg Program Selector Temperature Possible Additional Programs COTTONS/LINEN (WITTE/BONTE WAS, BLANC/COULEURS) 95 PRE WASH (VOORWAS, PRELAV.
Instructions for use Max. Type of Washing, Filling Quantity1) Care Codes (dry weight)2) 2.5kg Easy-Cares ê í 1kg Delicates ì Woollens/ Handwash 9 ì ï 2.5kg (or 15-20m2 curtains) 2kg Program Selector Temperature EASY-CARES (KREUKHERSTELLEND, DEFROISSABLE) 40 to 60 EASY IRON5) (STRIJKVRIJ, SANS REPASSAGE) 40 DELICATES (FIJNE WAS, LINGE DELICAT) 30, 40 Possible Additional Programs PRE WASH (VOORWAS, PRELAV.
Instructions for use Separate Conditioning/Starching/Impregnating Type of Washing Cottons/Linen Max. Filling Quantity (dry weight) Program Selector 5kg STARCHING (STIJVEN, AMIDON.) Max. Filling Quantity (dry weight) Program Selector Separate Rinse Type of Washing Cottons/Linen 5kg Easy-Cares 2.5kg Delicates 2.5kg Woollens/Handwash GENTLE RINSE (FIJN SPOELEN, RINC. DELICAT) 2kg Separate Spin Type of Washing Cottons/Linen Max.
Instructions for use Cleaning and Care Control Panel 0 Attention! For cleaning panels and control parts, do not use furniture polish or any aggressive cleaning agents. Wipe off control panels with a damp cloth. Use warm water to do this. Washing Detergent Drawer The washing detergent drawer should be cleaned from time to time. 0 1. Pull out the washing detergent drawer as far as it will go. 2. Remove the washing detergent drawer with a firm pull. 3.
Instructions for use 7. Use a brush to clean the entire rinsing-in part of the washing machine, especially the nozzles on the top side of the rinsing-in chamber. 8. Insert the washing detergent drawer into the guide rails and push it in. Washing Drum 0 The washing drum is made of high-quality stainless steel. Rust deposits on the drum can occur due to foreign bodies in the washing which can cause rust.
Instructions for use What to do if ... Remedying Faults In the event of a fault, try to solve the problem yourself with the aid of the information provided here. If you call Customer Service to deal with one of the faults listed here or to remedy an operating fault, the customer service technician's visit will not be free of charge, even during the warranty period. • If the fault code E10, E20 or E40 is shown in the multidisplay, you may be able to remedy the fault yourself (see Faults Table below).
Instructions for use Problem Possible Cause Water valve is closed. No water runs in. Fault code E10 appears. The indicator RINSE+ (SPOELEN+, RINCAGE+) flashes. The washing machine vibrates during operation or it is on an uneven surface. The washing solution of the main wash froths up a lot. Remedy Open the water valve. Restart the program. Close the water valve. Unscrew the hose from the Filter in screw connection of water valve, remove the filter the intake hose is blocked.
Instructions for use Problem Possible Cause Remedy The screw connection on the Tighten the intake hose intake hose is leaky. screw connection. Water runs out under the washing machine. The drainage hose is leaky. Check the drainage hose and replace it if necessary. The washing solution pump cover is not correctly closed. Close cover correctly. Washing stuck in the filling door. Stop the program, remove washing from the filling door, start a new program.
Instructions for use Problem Possible Cause Drainage hose bent. Washing not well spun. Residual water still visible in the drum. Fault code E20 appears. The indicator RINSE (SPOELEN, RINCAGE) flashes. Remedy Remove the bend. Consult Customer Service. Maximum pump head (outlet They can supply a retrofit kit as a special accessory for head 1m from unit's floor delivery heads of more than surface) exceeded. 1m. Solution pump blocked. Switch off the unit and pull out the mains plug.
Instructions for use Problem The rinsing water is murky. Possible Cause Remedy The cause is probably a No negative influence on the detergent with a high silicate rinsing result, use liquid content. detergent if necessary. The corresponding display does not light up The selected additional prowhen one of the addi- gram cannot be combined tional program butwith the set program. tons is pressed. Make another selection.
Instructions for use Carry Out an Emergency Emptying Operation • When the washing machine no longer pumps off the washing solution, an emergency emptying operation must be carried out. • When the washing machine is in a room where there is a frost risk, an emergency emptying operation must be carried out when there is a frost risk. Also: Unscrew the intake hose from the water tap and lay it on the floor. Empty the drainage hose.
Instructions for use When all the washing solution has drained off: 6. Firmly push the plug into the emergency emptying hose and turn it tight clockwise. 7. Put the emergency emptying hose back into the holder. 8. Insert the flap into the base panel and close. Drain pump The drain pump is maintainance-free. The cover of the drain pump is required to be opened only in the event of a malfunction when no more water is being pumped out, e.g. if the pump wheel is blocked.
Instructions for use 5. Check that you are able to turn the pump wheel at the very rear of the pump housing. (If the wheel rotates with a jerky motion, this is normal.) If you cannot turn the pump wheel, please contact customer service. 6. Replace the pump cover. Laterally insert the webs on the cover into the guide slots and securely screw on the cover in a clockwise motion. 7. Close the emergency emptying hose and place it in the holder. 8. Close the flap.
Instructions for use Additional Rinse (RINSE+/SPOELEN+/RINCAGE+) The washing machine is set for extremely economical water consumption. However, for persons who suffer from allergies, it can be helpful to rinse with more water. 3 If RINSE+ (SPOELEN+, RINCAGE+) is set, an additional rinse is performed in the case of the programs COTTONS/LINEN (WITTE/BONTE WAS, BLANC/COULEURS), EASY-CARES (KREUKHERSTELLEND, DEFROISSABLE)/EASY IRON (STRIJKVRIJ, SANS REPASSAGE) and DELICATES (FIJNE WAS, LINGE DELICAT).
Instructions for use Child Safety Feature When the child safety feature is used, the filling door can no longer be closed and no more washing programs can be started. 0 1 0 Setting the Child Safety Feature: Use a coin to turn the rotary knob (on the inside of the filling door) clockwise as far as it will go. Warning! The rotary knob must not be pressed in following adjustment, otherwise the child safety feature is not active. The rotary knob must project as shown in the diagram.
Setting up and connection instructions Setting up and connection instructions Safety Instructions for Installation • Do not tilt the washing machine onto its front or onto its right side (looking from the front). Electrical components could get wet! • Check the washing machine for transport damage. Never connect a damaged unit. Consult your supplier in the event of damage.
Setting up and connection instructions Setting Up the Unit 3 Washing machines with curved panels are not suitable for substructures. Transporting the Unit • Do not place the washing machine on its front side or on its right side (looking from the front). Otherwise the electrical components can get wet. • Never transport the unit without using the transport safeguard. Do not remove the transport safeguard until you reach the installation site.
Setting up and connection instructions 3 44 The special button A and the plug caps B (2 ea.) and C (1 ea.) are supplied with the unit. 3. Remove the screw D, including the compression spring with the special button A. 4. Close off the hole with the plug cap C. Attention! Push in the plug cap so firmly that it engages in the rear panel (this protects the inside of the unit against splash water). 5. Unscrew the two screws E using the special button A. 6.
Setting up and connection instructions Prepare the Installation Location • The installation surface must be clean, dry and free of floor wax residue and other lubricating coatings so that the unit does not slide away. Do not use any lubricants as sliding aids. • It is not recommended to set up the washing machine on deep-pile carpets or on floor coverings with soft foam underlays, as this would mean that the stability of the unit would not be guaranteed.
Setting up and connection instructions Compensate for Floor Unevenness Floor unevenness can be compensated for and the height can be corrected with the four adjustable screw feet. The height can be adjusted in a range of +10 ... -5 mm. To adjust the feet use the special spanner supplied for removing the transport braces. 0 1. Slide the special key firmly onto the hexagon head of the threaded foot as far as it will go. 2. Adjust the screw feet so that the unit is horizontal and stable.
Setting up and connection instructions Electrical Connection Refer to the rating plate for details of the mains voltage, current type and the necessary fuses. The rating plate is located at the top behind the filling door.
Setting up and connection instructions Water Inflow A pressure hose 1.5m in length is supplied. If a longer inflow hose is required, only a VDE-approved, complete set of hoses with fitted hose screw connections offered by our Customer Service is permissible. – Sets of hoses in lengths of 2.2m, 3.5m and 5m are available for washing machines without Aqua-Control. – Sets of hoses in lengths of 2.0m, 2.9m and 3.9m are available for washing machines with Aqua-Control.
Setting up and connection instructions Water Drainage The drainage hose can either be connected to a siphon or hung in a wash basin or bath tub. Only original hoses may be used for extension purposes (max. 3m on the floor and then up to 80cm high). The Customer Service stocks hoses in lengths of 2.7 and 4m. Attention! It is absolutely essential to install the drainage hose free of pinches. 0 Water Drainage into a Siphon The grommet on the end of the hose fits all commonly used siphon types.
Setting up and connection instructions Delivery Heads over 1m To pump off the washing / rinsing agent, every washing machine has a pump which transports liquids via the drainage hose up to a height of 1m, calculated from the machine's floor. For delivery heads over 1m, consult the Customer Service. Technical Data Height adjustment Filling quantity (program-dependent) Use Drum speed, spin Water pressure Dimensions (Measurements in mm) 50 Approx. +10/-5mm max.
Guarantee conditions Guarantee conditions Belgium DECLARATION OF GUARANTEE TERMS. Our appliances are produced with the greatest of care. However, a defect may still occur. Our consumer services department will repair this upon request, either during or after the guarantee period. The service life of the appliance will not, however, be reduced as a result. This declaration of guarantee terms is based on European Union Directive 99/44/EC and the provisions of the Civil Code.
Guarantee conditions 12. If, during the guarantee period, repairing the same defect repeatedly is not conclusive, or if the repair costs are considered disproportionate, in agreement with the consumer, the defective appliance may be replaced with another appliance of the same value. In this event, we reserve the right to ask for a financial contribution calculated according to the length of time it has been used. 13.
Customer services Customer services Belgium Tel.: Electrolux Home Products Belgium ELECTROLUX SERVICE Bergensesteenweg 719 1502 Lembeek Province de Liège: S.D.E. Rue Gaucet 26 4020 Liege Fax.: Consumer services 02/363.04.44 02/363.04.00 02/363.04.60 04/343.11.60 04/343.47.
Index Index C Care agent . . . . . . . . . . . . . . . .10, 18, 19, Child safety feature . . . . . . . . . . . . . . .32, Conditioner . . . . . . . . . . . . 9, 10, 12, 23, Cottons . . . . . . . . . . . . . . . . . . .11, 17, 27, Curtains . . . . . . . . . . . . . . . . . . . . . . . . .16, Customer service . . . . . . . 15, 31, 32, 53, 23 41 29 29 28 55 D Delicates . . . . . . . . . . . . . . . . . . . . . 12, 17, Detergent . . . . . . . . . . . . . . . . . . . . 10, 18, Detergent dispenser drawer . . .
Service Service In the section ”What to do if ...” there is a list of some faults which you can remedy yourself. Look there first if a fault occurs. If you find no information there, please consult your Customer Service Centre. Always prepare in advance for the discussion. By doing so you will simplify the diagnosis and the decision on whether customer service is necessary. Note the PNC-number and the S-number. Both can be found on the rating plate on the inside of the door on your washing machine. PNC ...
From the Electrolux Group. The world´s No.1 choice. The Electrolux Group is the world´s largest producer of powered appliances for kitchen, cleaning and outdoor use. More than 55 million Electrolux Group products (such as refrigerators, cookers, washing machines, vacuum cleaners, chain saws and lawn mowers) are sold each year to a value of approx. USD 14 billion in more than 150 countries around the world. AEG Hausgeräte GmbH Postfach 1036 D-90327 Nürnberg http://www.aeg.hausgeraete.