LAVAMAT Princess 5250 Washing Machine User Information
Dear customer, Please read this user information carefully. In particular, pay attention to the section ”Safety” on the first pages. Keep this user information in a safe place for later reference. Pass it on to any subsequent owners of the unit. 1 Points which are necessary for your safety or which are important for the unit's functional capability are highlighted by a warning triangle and/or signal words (Warning!, Caution!, Attention!). Always remember. 0 1.
Contents Instructions for use . . . . . . . . . . . . . . . . . . . . . . . . . . . . . . . . . . . . . . . . 6 Safety . . . . . . . . . . . . . . . . . . . . . . . . . . . . . . . . . . . . . . . . . . . . . . . . . . . . . . . . 6 Disposal . . . . . . . . . . . . . . . . . . . . . . . . . . . . . . . . . . . . . . . . . . . . . . . . . . . . . . 8 Environment Tips . . . . . . . . . . . . . . . . . . . . . . . . . . . . . . . . . . . . . . . . . . . . . . 9 Unit Description . . . . . . . . . . . .
Programme Tables . . . . . . . . . . . . . . . . . . . . . . . . . . . . . . . . . . . . . . . . . . . . . Washing . . . . . . . . . . . . . . . . . . . . . . . . . . . . . . . . . . . . . . . . . . . . . . . . . . . . . . Separate Rinsing . . . . . . . . . . . . . . . . . . . . . . . . . . . . . . . . . . . . . . . . . . . . . . . Separate Spinnin . . . . . . . . . . . . . . . . . . . . . . . . . . . . . . . . . . . . . . . . . . . . . . . 24 24 25 25 Cleaning and Care . . . . . . . . . . . . . . . . . .
Electrical Connection . . . . . . . . . . . . . . . . . . . . . . . . . . . . . . . . . . . . . . . . . . 44 Water Connection . . . . . . . . . . . . . . . . . . . . . . . . . . . . . . . . . . . . . . . . . . . . . Permissible Water Pressure . . . . . . . . . . . . . . . . . . . . . . . . . . . . . . . . . . . . . . . Water Inflow . . . . . . . . . . . . . . . . . . . . . . . . . . . . . . . . . . . . . . . . . . . . . . . . . . Water Drainage . . . . . . . . . . . . . . . . . . . . . . . . . . . . . . . .
Instructions for use Instructions for use 1 Safety The safety of AEG electrical appliances conforms to the recognised technical regulations and the legislation covering the safety of appliances. However, as manufacturers, we still regard it as our responsibility to inform you of the following safety information. Before Putting into Operation for the First Time • Refer to the ”Installation and Connection Instructions” later in this user information.
Instructions for use Child Safety • Packaging components (e.g. films, polystyrene) can be hazardous to children. Risk of suffocation! Keep packaging away from children. • Children often cannot recognise the hazards associated with handling electrical appliances. Therefore, ensure the necessary supervision during operation and do not allow children to play with the washing machine – there is a risk that children can get trapped inside.
Instructions for use • Allow the washing solution to cool before carrying out an emergency emptying operation or cleaning the drain pump. • Small animals can chew the power cables and water hoses. Risk of electric shock and danger of water damage! Keep small animals away from the washing machine. 2 Disposal Dispose the packing material! Dispose of your washing machine's packaging correctly. All the packaging materials used are harmless to the environment and can be recycled.
Instructions for use 2 Environment Tips • The pre-wash cycle is not required for averagely dirty washing. This saves washing powder/liquid, water and time (and does not harm the environment). • The washing machine is especially economical when you fully utilise the stated filling quantities. • For small amounts of washing, use only half to two thirds the recommended amount of washing powder/liquid. • Suitable pretreatment enables stains and small amounts of dirt to be removed.
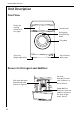
Instructions for use Unit Description Front View Drawer for washing powder and care agent Control panel Rating plate (behind filling door) Filling door Screw feet (height-adjustable) Flap in front of drain pump Drawer for Detergent and Additives Main wash detergent (powder) and water softener if required Pre-wash detergent/in-wash stain treatment or water softener Liquid additives (softeners, wash-care products to preserve the shape of garments, starch) 10
Instructions for use Control Panel Spin speed/RINSE HOLD button Control knob Programme Progress Display START/PAUSE button Additional Programme Buttons DOOR indicator Programme Knob The programme knob is used to set the wash cycle (for example, water level, drum movement, number of rinses, spin speed) most suitable for the type of washing, as well as the temperature of the water. OFF (AUS, ARRET) • Switches the washing machine off - at all other positions the machine is on.
Instructions for use DELICATES (FEINWÄSCHE, DELICAT) Main wash programme for Delicates at 30 °C or 40 °C. WOOL/SILK (WOLLE/SEIDE, LAINE/SOIE) P (Handwash) Main wash cycle (cold or 30 °C) for machine-washable or hand-washable woollen items and silk, which bear the symbol ï (Handwash). GENTLE RINSE (FEINSPÜLEN, RINCAGE DELICAT) Separate gentle rinse, for example to rinse hand-washed items (3 rinses, liquid additive washed in from compartment æ, spin).
Instructions for use QUICK WASH (KURZ, COURT) Shortened wash programme for lightly soiled washing. 3 With the WOOL/SILK (WOLLE/SEIDE, LAINE/SOIE) P (Handwash) setting, the additional programme buttons cannot be used. (Any buttons that are pressed have no effect.) Consumption values and programme times The values for selected programmes given in the following table were established under normal conditions.
Instructions for use Before the First Wash 0 1. Pull out the washing powder drawer slightly. 2. Pour about 1 litre of water through the washing powder drawer into the washing machine. With the next program start, this will close the solution container and the eco-sluice can function correctly. 3. Run a washing cycle without washing: COTTONS (KOCH-/BUNTWÄSCHE, BLANC/COULEURS) 95 °C, with half the amount of washing detergent).
Instructions for use • Loosen up the washing before loading it into the washing machine. • Put the washing into the drum folded out. • Pay attention to the care instructions ”Wash separately” and ”Wash separately several times”! Types of washing and care symbols Care symbols help you to choose the correct wash programme. Washing should be sorted by type and according to care symbols. The temperatures indicated on the care symbols are the maximum wash temperatures.
Instructions for use Washing Detergents and Care Agents Which washing detergent and care agent? Use only washing detergents and care agents which are suitable for use in washing machines. Always follow the manufacturer's instructions.
Instructions for use Performing a Wash Cycle Brief guide A wash cycle consists of the following steps: 1. Open the door and load the washing. 2. Close the door. 3. Add detergent/additives. 4. Set the appropriate wash programme: – Set the programme and temperature using the programme knob – Set additional programme functions as required. 5. Change the Spin Speed/press RINSE HOLD (SPÜLSTOPP, ARRET CUVE PLEINE) as necessary. 6.
Instructions for use Opening and Closing the Door 0 0 To open: pull the door by the handle. To close: push the door in firmly. When the appliance is switched on, the DOOR (TÜR, PORTE) and the START/PAUSE (START/ PAUSE, MARCHE/PAUSE) light indicate whether the door can be opened.
Instructions for use Add detergent/additives Instructions on the use of detergents and additives are contained in the section “Detergents and additives”. 0 1. To open the detergent/additives drawer: grasp the flap under the drawer (1) and pull the drawer out (2) till it reaches the stop. 3 2. Add the detergent/additives.
Instructions for use Setting the Wash Programme For the correct programme, temperature and additional programme functions suitable for each type of washing, see "Programme Tables". 0 1. Set the programme knob to the desired programme and temperature. 3 2. Select any additional programme functions: The indicator light for the selected additional programme function comes on. – To change the selection, press another button. – To de-select, press the button again.
Instructions for use Changing Spin Speed/Selecting RINSE HOLD (SPÜLSTOPP, ARRET CUVE PLEINE) 0 To change the Spin Speed for the final rinse or select RINSE HOLD (SPÜLSTOPP, ARRET CUVE PLEINE): Keep pressing the Spin Speed/RINSE HOLD (SPÜLSTOPP, ARRET CUVE PLEINE) button until the light for the desired speed (or RINSE HOLD/SPÜLSTOPP, ARRET CUVE PLEINE) comes on. If RINSE HOLD (SPÜLSTOPP, ARRET CUVE PLEINE) is selected, the washing is left to soak in the last rinse water, without spinning.
Instructions for use Wash Programme Progress Programme Progress Display Before the programme starts, the steps to be carried out are indicated on the Programme Progress Display. During the wash programme, this indicates the current stage of the programme. Changing the Wash Programme Changing or cancelling the programme 1. Press the START/PAUSE (START/PAUSE, MARCHE/PAUSE) button. 2. Turn the programme knob to OFF (AUS, ARRET). The wash programme is cancelled. 3. Set another wash programme, if required.
Instructions for use End of Wash Cycle/Removing the Washing When a wash cycle is completed, the END (ENDE, FIN) light on the Programme Progress Display comes on. If RINSE HOLD (SPÜLSTOPP, ARRET CUVE PLEINE) was selected, the indicator lights DOOR (TÜR, PORTE) and END (ENDE, FIN) come on. 1.
Instructions for use Programme Tables Washing The tables do not show all the possible settings but only those likely to be selected for everyday operation. Type of washing, Care symbol Cottons ç Cottons/Coloureds3) è ç Coloureds è ë max.
Instructions for use Type of washing, Care symbol max. load1) (Dryweight)2) Wool/Silk (Handwash) 9 ì ï 2kg Programme knob Temperature [in °C] Possible additionalprogramme functions P WOOL/SILK (WOLLE/SEIDE, LAINE/SOIE) COLD (KALT, FROID), 30 1) The load amount inquiry operates in accordance with the EN 60456 standard load. 2) A 10 litre bucket holds around 2.5kg of dry clothes (cotton).
Instructions for use Cleaning and Care Control Panel 0 Attention! For cleaning panels and control parts, do not use furniture polish or any aggressive cleaning agents. Wipe off control panels with a damp cloth. Use warm water to do this. Washing Detergent Drawer The washing detergent drawer should be cleaned from time to time. 0 1. Pull out the washing detergent drawer as far as it will go. 2. Remove the washing detergent drawer with a firm pull. 3.
Instructions for use 7. Use a brush to clean the entire rinsing-in part of the washing machine, especially the nozzles on the top side of the rinsing-in chamber. 8. Insert the washing detergent drawer into the guide rails and push it in. Washing Drum 0 The washing drum is made of high-quality stainless steel. Rust deposits on the drum can occur due to foreign bodies in the washing which can cause rust.
Instructions for use What to do if ... Remedying Faults In the event of a fault, try to solve the problem yourself with the aid of the information provided here. If you call Customer Service to deal with one of the faults listed here or to remedy an operating fault, the customer service technician's visit will not be free of charge, even during the warranty period. Problem Possible Cause The power plug is not connected. Connect the plug to a power outlet. A domestic fuse has tripped. Replace the fuse.
Instructions for use Problem The END (ENDE, FIN) indicator flashes 8 times. The washing machine vibrates when operating or is noisy. Possible Cause Remedy The programme selector has not clicked into place correctly. First turn the programme selector to OFF (AUS, ARRET), then set the desired programme to the exact position. The transit bolt/bars were not removed. Remove the transit bolts/bars as described in the Installation and Connection instructions.
Instructions for use Problem Possible Cause The threaded inlet hose fitting is not watertight. Remedy Screw the inlet hose in firmly. The outlet hose is not water- Check the outlet hose and tight. replace it, if necessary. The drain pump cover is not closed properly. Water runs out from under the washing machine. Stop the programme and Washing has been trapped in free the washing from the the door. Start a new prodoor. gramme. The emergency drain hose is not connected properly or is leaking.
Instructions for use Problem Possible Cause There is a kink in the outlet hose. Straighten the hose. The maximum pump height (outlet height 1m from the washing machine’s installation surface) has been exceeded. Contact Customer Service, who will be able to provide an adaptor kit for pump lifts greater than 1m as a special accessory. Washing is not spun thoroughly and water remains visible in the drum. The END (ENDE, FIN) indicator flashes twice. The drain pump is blocked.
Instructions for use Problem Possible Cause Remedy Programme continues, when the power failure is over. Power failure during a wash programme (all lights have gone out). The water tap is not turned on fully. Turn the water tap on fully. The filter in the threaded inlet hose fitting is blocked at the water tap or at the washing machine. Close the water tap. Unscrew the inlet hose from the water tap and from the machine. Clean the filters. The rinse water is cloudy.
Instructions for use If the washing result is not satisfactory If the washing is grey and limescale forms in the drum • Not enough washing detergent added. • The right washing detergent was not used. • Special types of stain were not pretreated. • Program or temperature incorrectly set. • If binary wahing detergents were used, the individual components were not added in the correct ratio.
Instructions for use Carry Out an Emergency Emptying Operation • When the washing machine no longer pumps off the washing solution, an emergency emptying operation must be carried out. • When the washing machine is in a room where there is a frost risk, an emergency emptying operation must be carried out when there is a frost risk. Also: Unscrew the intake hose from the water tap and lay it on the floor. Empty the drainage hose.
Instructions for use When all the washing solution has drained off: 6. Firmly push the plug into the emergency emptying hose and turn it tight clockwise. 7. Put the emergency emptying hose back into the holder. 8. Insert the flap into the base panel and close. Drain pump The drain pump is maintainance-free. The cover of the drain pump is required to be opened only in the event of a malfunction when no more water is being pumped out, e.g. if the pump wheel is blocked.
Instructions for use 5. Check that you are able to turn the pump wheel at the very rear of the pump housing. (If the wheel rotates with a jerky motion, this is normal.) If you cannot turn the pump wheel, please contact customer service. 6. Replace the pump cover. Laterally insert the webs on the cover into the guide slots and securely screw on the cover in a clockwise motion. 7. Close the emergency emptying hose and place it in the holder. 8. Close the flap.
Instructions for use Additional rinse cycles (RINSE+) (SPÜLEN+, RINCAGE+) The washing machine is set for very economical water consumption. However, for people who suffer from allergies, it can be helpful to rinse with extra water. 3 If RINSE+ (SPÜLEN+, RINCAGE+) is set, two extra rinse cycles are added to the COTTONS/LINEN (KOCH-/BUNTWÄSCHE, BLANC/COULEURS), EASY-CARES/EASY IRON (PFLEGELEICHT/LEICHTBÜGELN, TEXTILES MELANGES/FACILE A REPASSER) and DELICATES (FEINWÄSCHE, DELICAT) programmes.
Instructions for use Child Safety Feature When the child safety feature is used, the filling door can no longer be closed and no more washing programs can be started. 0 1 0 38 Setting the Child Safety Feature: Use a coin to turn the rotary knob (on the inside of the filling door) clockwise as far as it will go. Warning! The rotary knob must not be pressed in following adjustment, otherwise the child safety feature is not active. The rotary knob must project as shown in the diagram.
Setting up and connection instructions Setting up and connection instructions Safety Instructions for Installation • Do not tilt the washing machine onto its front or onto its right side (looking from the front). Electrical components could get wet! • Check the washing machine for transport damage. Never connect a damaged unit. Consult your supplier in the event of damage.
Setting up and connection instructions Setting Up the Unit 3 Washing machines with curved panels are not suitable for substructures. Transporting the Unit • Do not place the washing machine on its front side or on its right side (looking from the front). Otherwise the electrical components can get wet. • Never transport the unit without using the transport safeguard. Do not remove the transport safeguard until you reach the installation site.
Setting up and connection instructions 3 The special spanner (A) and the caps (B) (2 each) and (C) (1 each) are supplied with it. 3. Remove the screw D, including the compression spring with the special spanner A. 4. Cover the hole with the cap C. Important! When fitting the plastic caps, press until they snap into the rear panel securely. 5. Remove the two screws (E) with the special spanner (A). 6. Remove the 4 screws (F). 7. Remove the transit bar (G). 8.
Setting up and connection instructions Prepare the Installation Location • The installation surface must be clean, dry and free of floor wax residue and other lubricating coatings so that the unit does not slide away. Do not use any lubricants as sliding aids. • It is not recommended to set up the washing machine on deep-pile carpets or on floor coverings with soft foam underlays, as this would mean that the stability of the unit would not be guaranteed.
Setting up and connection instructions Compensate for Floor Unevenness Floor unevenness can be compensated for and the height can be corrected with the four adjustable screw feet. The height can be adjusted in a range of +10 ... -5 mm. To adjust the feet use the special spanner supplied for removing the transport braces. 0 1. Slide the special key firmly onto the hexagon head of the threaded foot as far as it will go. 2. Adjust the screw feet so that the unit is horizontal and stable.
Setting up and connection instructions Electrical Connection Refer to the rating plate for details of the mains voltage, current type and the necessary fuses. The rating plate is located at the top behind the filling door.
Setting up and connection instructions Water Inflow A pressure hose 1.35m in length is supplied. If a longer inflow hose is required, only a VDE-approved, complete set of hoses with fitted hose screw connections offered by our Customer Service is permissible. – Sets of hoses in lengths of 2.2m, 3.5m and 5m are available for washing machines without Aqua-Control. – Sets of hoses in lengths of 2.0m, 2.9m and 3.9m are available for washing machines with Aqua-Control.
Setting up and connection instructions Water Drainage The drainage hose can either be connected to a siphon or hung in a wash basin or bath tub. Only original hoses may be used for extension purposes (max. 3m on the floor and then up to 80cm high). The Customer Service stocks hoses in lengths of 2.7 and 4m. Attention! It is absolutely essential to install the drainage hose free of pinches. 0 Water Drainage into a Siphon The grommet on the end of the hose fits all commonly used siphon types.
Setting up and connection instructions Delivery Heads over 1m To pump off the washing / rinsing agent, every washing machine has a pump which transports liquids via the drainage hose up to a height of 1m, calculated from the machine's floor. For delivery heads over 1m, consult the Customer Service. Technical Data Height adjustment Filling quantity (program-dependent) Use Drum speed, spin Water pressure Approx. +10/-5mm max. 5kg Domestic see rating plate 1-10bar (=10–100N/cm2 = 0.1–1.
Customer Services Customer Services Schweiz - Suisse - Svizzera A + T Hausgeräte AG Kundendienst AEG Industriestraße 10 5506 Mägenwil Service Eine Tel.-Nr. für die ganze Schweiz ServicePhon 0848 848 348 Fax 062/889 95 85 Ersatzteildienst Ersatzteilverkauf ganze Schweiz Telefon 0848 848 028 Fax 062/889 94 90 Regionalbüro Westschweiz: 1028 Préverenges Le Trési 6, Verkauf Tel. 021/803 24 15 Fax 021/803 25 24 Regionalbüro Tessin: 6616 Losone Centro Montana Verkauf Tel.
Index Index A P Additives . . . . . . . . . . . . . . . . . . . . 10, 17, 19 Pre-wash . . . . . . . . . . . . . . . . . . . . .12, 20, 24 Pre-wash detergent . . . . . . . . . . . . . . . . . . .10 Programme progress display . . . . . . . . 11, 22 C Cancelling the programme . . . . . . . . . . . . 22 Care agent . . . . . . . . . . . . . . . . . . . . . . . . . . 16 Changing the programme . . . . . . . . . . . . . 22 Child safety feature . . . . . . . . . . . . . . .28, 38 Coloureds . . . . . . . . . . .
Service Service In the chapter "What to do if...“ , some faults are listed which you can remedy yourself. Look there first if a fault occurs. If you do not find any information there, please consult your Customer Service. (You can find the addresses and telephone numbers in the section "Customer Services“.) Always prepare in advance for the discussion. By doing so you will simplify the diagnosis and the decision on whether customer service is necessary. Note the PNC number and Serial number.
From the Electrolux Group. The world´s No.1 choice. The Electrolux Group is the world´s largest producer of powered appliances for kitchen, cleaning and outdoor use. More than 55 million Electrolux Group products (such as refrigerators, cookers, washing machines, vacuum cleaners, chain saws and lawn mowers) are sold each year to a value of approx. USD 14 billion in more than 150 countries around the world. AEG Hausgeräte GmbH Postfach 1036 D-90327 Nürnberg http://www.aeg.hausgeraete.