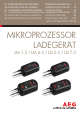
BEDIENUNGSANLEITUNG DE 3 Mikroprozessor-Ladegerät INSTRUCTIONS FOR USE GB 23 Microprocessor Charger MODE D’EMPLOI FR 43 Chargeur à microprocesseur IT 63 caricabatterie con microprocessore MANUALE D’ISTRUZIONI CZ 83 Mikroprocesorová nabíječka NÁVOD K OBSLUZE SK 103 Mikroprocesorová nabíjačka NÁVOD NA OBSLUHU 97015, 97016, 97017, 97018 Mikroprozessor Ladegerät LM 1.5 / LM 4.0 / LD 5.0 / LD 7.
DE - Seite 3 Vor jeder Benutzung unbedingt lesen. Anleitung und Ratschläge befolgen. GB - Page 17 Read these instructions before using the charger. Follow all instructions and recommendations. FR - Page 31 Veuillez lire les présentes instructions avant toute utilisation de l’appareil et suivre les conseils mentionnés ici. IT - Pagina 45 Leggere attentamente le istruzione i seguire tutti i consigli e gli avvisi prima di utilizzare il prodotto.
DE 3 Inhalt Einleitung ����������������������������������������������������������������������������������������������������� 4 Bestimmungsgemäßer Gebrauch ����������������������������������������������������������������� 5 Lieferumfang ������������������������������������������������������������������������������������������� 5 Technische Daten ������������������������������������������������������������������������������������� 6 Sicherheit ���������������������������������������������������������������
Einleitung Erklärung der Symbole und Signalworte, die in dieser Bedienungsanleitung und/ oder am Gerät verwendet werden: Beachten Sie diese Bedienungsanleitung bei der Verwendung des Geräts.
DE 5 Bestimmungsgemäßer Gebrauch Das Ladegerät ist zum Aufladen von offenen und einer Vielzahl von geschlossenen, wartungsfreien Blei-Säure-Akkus (Batterien) hergestellt, wie sie in Autos, Schiffen, LKW und anderen Fahrzeugen eingebaut sind z. B.
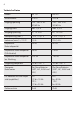
Technische Daten Modell LM 1.5 LM 4.0 Artikelnummer 97015 97016 Eingangsspannung 220 - 240 V AC 50/60 Hz 220 - 240 V AC 50/60 Hz Eingangsstrom max. 0,9 A max. 0,9 A Ausgangsspannung 6 / 12 V DC 6 / 12 V DC Ladespannung (max.) 7,4 V / 14,7 V 7,4 V / 14,7 V Ladestrom (max.
DE Technische Daten Modell LD 5.0 LD 7.0 Artikelnummer 97017 97018 Eingangsspannung 220 - 240 V AC 50/60 Hz 220 - 240 V AC 50/60 Hz Eingangsstrom max 1,2 A max. 1,5 A Ausgangsspannung 6 / 12 V DC 6 / 12 V DC Ladespannung (max.) 7,4 V / 14,7 V 7,4 V / 14,7 V Ladestrom (max.
Sicherheit Allgemeine Sicherheitshinweise Lesen Sie alle Sicherheitshinweise und Anweisungen. Versäumnisse bei der Einhaltung der Sicherheitshinweise und Anweisungen können elektrischen Schlag, Brand und/oder schwere Verletzungen verursachen. Bewahren Sie alle Sicherheitshinweise und Anweisungen für die Zukunft auf. Warnung! Lebens- und Unfallgefahr für Kleinkinder und Kinder. Lassen Sie Kinder niemals unbeaufsichtigt mit dem Verpackungsmaterial allein. Es besteht Erstickungsgefahr.
DE 9 Verätzungsgefahr! ▪▪Batterien enthalten Säure, welche Augen und Haut schädigen. Beim Laden der Batterie entstehen zudem Gase und Dämpfe, welche die Gesundheit gefährden. ▪▪Vermeiden Sie jeglichen Kontakt mit ätzender Batteriesäure. Waschen Sie Haut- stellen und Gegenstände, die mit Säure in Kontakt gekommen sind, sofort gründlich mit Wasser ab. Sollten Ihre Augen in Kontakt mit Batteriesäure kommen, spülen Sie sie mindestens 5 Minuten lang mit fließendem Wasser.
Stromschlaggefahr ▪▪Ladegeräte können aktive elektronische Implantate wie z. B. Herzschrittmacher in ihrem Betrieb stören und dadurch Personen gefährden. ▪▪Das Gerät ist gegen Spritz- und Strahlwasser geschützt. Stellen Sie trotzdem sicher, dass sich das Gerät immer an einem sicheren Standort befindet. Setzen Sie das Gerät nicht Regen oder nassen Bedingungen aus. Vermeiden Sie es, Wasser oder andere Flüssigkeiten darüber zu verschütten oder zu tropfen.
DE 11 Verletzungsgefahr ▪▪Versuchen Sie niemals, nicht wiederaufladbare, beschädigte oder gefrorene Batterien aufzuladen. ▪▪Verwenden Sie das Ladegerät nicht für das Aufladen von Trockenzellenbatterien. Diese können platzen und zur Verletzung von Personen und zu Sachbeschädigung führen. ▪▪Beachten Sie vor der Verwendung des Geräts die Bedienungsanleitung und alle Sicherheitsanweisungen der aufzuladenden Batterie und des Fahrzeugs.
prodUktÜBersiCht 13 1 SELECT 3,5 A 7A Artikel-Nr: 97018 2 DISPLAY Mikroprozessor-Ladegerät LD 7A WZ-Nr.: Power SPA SystemPartner GmbH & Co. KG Benzstr. 1 ▪ D-76185 Karlsruhe 12 www.aeg-automotive.com AEG is a registered trademark used under license from AB Electrolux (publ) Charge Full 11 Error 10 Input: 220 - 240 V AC; 50/60 Hz; max.
DE 13 Nr. Bezeichnung Funktion 1 Taste SELECT zur Spannungswahl Mikroprozessor-Ladegerät LM 1.5: 6 V / 1,5 A oder 12 V / 1,5 A Mikroprozessor-Ladegerät LM 4.0: 6 V / 2 A oder 12 V / 4 A Mikroprozessor-Ladegerät LD 5.0: 6 V / 2 A oder 12 V / 5 A Mikroprozessor-Ladegerät LD 7.0: 6 V / 3,5 A oder 12 V / 7 A Entsprechend der Auswahl leuchtet die rote LED neben der Taste 6 V oder 12 V. ▪▪ ▪▪ ▪▪ ▪▪ 2 Nur bei Mikroprozessor-Ladegerät LD 5.0 und LD 7.
Funktionen Das Ladegerät ist mit einem Mikroprozessor (MCU - Micro-Computer-Unit) ausgerüstet und besitzt vollautomatische Lade-, Diagnose-, Rettungs- und Wartungsfunktionen. Nach der Auswahl des angeschlossenen Batterietyps (6 V oder 12 V) erkennt das Ladegerät die Batteriekapazität und den Batteriezustand und berechnet daraus die benötigten Ladeparameter (Ladespannung, Ladestrom). Dadurch wird ein effizientes und sicheres Laden ermöglicht.
DE 15 Hinweis: Das schwarze Polanschlusskabel kann auch an die Fahrzeug-Karosserie angeschlossen werden (Beachten Sie dabei die Bedienungsanleitung des Fahrzeugs!). Stellen Sie sicher, dass beide Klemmen oder Ösen guten Kontakt haben und fest sitzen. SELECT 3,5 A 7,5 A LD 8.7 DISPLAY Power Charge Full Error 4. Stecken Sie den Netzstecker des Ladegeräts in eine 230 V-Netzsteckdose. Wenn das Ladegerät richtig angeschlossen ist, leuchtet die LED „Power“ (12).
Nur bei Mikroprozessor-Ladegerät LD 5.0 und LD 7.0: ▪▪Im Display wird 100 angezeigt und die LED „%“ leuchtet. ▪▪Über die Taste DISPLAY (2) kann die Anzeige während des Ladevorgangs umgeschaltet werden (siehe „Produktübersicht“). Ladedauer Die Ladedauer einer Batterie hängt im Wesentlichen von ihrem Ladezustand und ihrer Kapazität ab. Ladedauer in Stunden (ca.) Modell Ladestrom Batterie- (max.) größe LM 1.5 1,5 A 6 V/12 V LM 4.0 2A 6V 4A 12 V LD 5.0 2A 6V 5A 12 V LD 7.
DE 17 Ladephasen Das Prinzip des Ladevorgangs wird ausgehend von einer 12 V-Batterie erklärt. V A 1 2 3 4 5 6 7 8 Diagnose Diagnosefunktion, bei der automatisch der Batteriestatus überprüft und die Spannung erkannt wird. Spannung Funktion 0 V bis 1,5 V LED „Error“ (9) leuchtet. Batterie defekt. 1,5 V bis 12 V Ladevorgang startet. 12 V bis 13 V Erhaltungsladung startet. 14,6 V Batterie voll geladen. LED „Full“ (10) leuchtet. >15 V LED „Error“ (9) leuchtet.
Schritt 1: Zustandsprüfung Das Ladegerät prüft den Batteriezustand und berechnet die benötigten Ladeparameter. Schritt 2: Desulfatierung (Rettung) ▪▪Das Ladegerät kann die meisten verbrauchten Batterien mit Spannungen bis minimal 1,5 ±0,5 V retten. ▪▪Durch die Sicherheitsschaltung beginnt das Ladegerät nicht mit dem Ladevorgang, wenn die Spannung unter 1,5 ± 0,5 V liegt. ▪▪Im Spannungsbereich von 1,5 ± 0,5 V bis 10,5 ± 0,5 V initiiert das Ladegerät einen Impulsladungsvorgang.
DE 19 Sicherheitsfunktionen Das Ladegerät ist mit folgenden Schutzeinrichtungen versehen, um Beschädigungen des Ladegeräts und der Batterie oder des Fahrzeugs zu vermeiden: ▪▪Kurzschluss (defekte Batterie) ▪▪Falschanschluss (Anschluss mit umgekehrter Polarität) ▪▪Funkenbildung ▪▪Überhitzung ▪▪Überstrom ▪▪Überladung Fehlersuche Fehler/Problem Mögliche Ursache Abhilfe LED „Error“ (9) leuchtet Defekte Batterie: ▪▪Batteriespannung liegt unter 1,5 V und über 0,5 V ▪▪Batteriespannung liegt unter 5 V bei ein
Fehler/Problem Mögliche Ursache Abhilfe Batterie falsch angeschlossen Ladegerät ausstecken und die Anschlüsse kontrollieren. Falsche Batteriespannung (6/12 V) gewählt Ladegerät ausstecken und warten, bis die LEDs nicht mehr leuchten. Dann das Ladegerät wieder einstecken und die korrekte Batteriespannung einstellen. Batterie lässt sich nicht laden Keine Netzspannung vorhanden, Ladegerät nicht eingesteckt.
DE 21 Reinigung, Pflege und Wartung ▪▪Reinigen Sie die Batterieklemmen jedes Mal nach Beendigung des Ladevorgangs. Wischen Sie, um Korrosion zu vermeiden, jegliche Batterieflüssigkeit ab, die eventuell mit den Batterieklemmen in Kontakt gekommen ist. ▪▪Rollen Sie die Kabel ordentlich auf, wenn Sie das Gerät lagern. Das hilft, versehentliche Beschädigungen der Kabel und des Geräts zu vermeiden. ▪▪Reinigen Sie das Gerät mit einem weichen Tuch. ▪▪Lagern Sie das Gerät an einem sauberen und trockenen Ort.
GB 23 Table of contents Introduction ����������������������������������������������������������������������������������������������� 24 Normal use ������������������������������������������������������������������������������������������� 25 Contents ����������������������������������������������������������������������������������������������� 25 Technical data ��������������������������������������������������������������������������������������� 26 Technical data ��������������������������������������
Introduction Explanation of symbols and signal words used in these operating instructions and/ or the device: Follow instructions when using the machine. Risk of bodily or fatal injury to children! Follow warnings and safety instructions! Only use device in locations protected from weather! Double-insulated casing Consider the environment when disposing of the packaging! Dust- and hose water proof Note: These instructions also refer to the battery charger as device.
GB 25 Normal use The charger is intended for charging open and a variety of closed, maintenancefree lead-acid rechargeable batteries (batteries) as found in cars, boats, lorries and other vehicles, e.g.
Technical data Model LM 1.5 LM 4.0 Item number 97015 97016 Input 220 - 240 V AC 50/60 Hz 220 - 240 V AC 50/60 Hz Input current max. 0,9 A max. 0,9 A Output 6 / 12 V DC 6 / 12 V DC Charging voltage (max.
GB 27 Technical data Model LD 5.0 LD 7.0 Item number 97017 97018 Input 220 - 240 V AC 50/60 Hz 220 - 240 V AC 50/60 Hz Input current max 1,2 A max. 1,5 A Output 6 / 12 V DC 6 / 12 V DC Charging voltage (max.
Safety General Safety Guidelines Read all safety guidelines and instructions. Noncompliance with safety guidelines and instructions can cause electric shock, fire and / or serious injury.Keep all safety guidelines and instructions for future reference. Warning! Life-threatening danger to infants and children! Never leave children unsupervised with the packing material as this can cause suffocation.
GB 29 Risk of chemical burns! ▪▪Batteries contain acid, which could damage the eyes and skin. Charging batteries further generates gasses and vapours hazardous to the health. ▪▪Avoid any contact with caustic battery acid. Immediately thoroughly flush skin and any objects which have come into contact with acid. If eyes have come into contact with battery acid, flush eyes with running water at least 5 minutes. Contact your physician. ▪▪Use safety goggles and acid-proof safety gloves. Protect clothing, e.g.
Risk of electrical shock! ▪▪Chargers may interfere with the operation of active electronic implants, e.g. pacemakers, thus pose a personal hazard. ▪▪Avoid pouring or dripping water or other liquids over it. If water penetrates electrical devices, the risk of electric shock increases. ▪▪Ensure that all plugs and cables are free of moisture. Never connect the device to the mains with wet or moist hands. ▪▪Never touch both connections at once when the device is in uses.
GB 31 Risk of damage! ▪▪Never place the device over or near the battery to be charged. Gasses from the battery could damage the unit. Place the device as far from the battery as the connecting cable will allow. ▪▪Never operate the device if it has been dropped or damaged in any other way.
prodUCt oVerVieW 13 1 SELECT 3,5 A 7A Artikel-Nr: 97018 2 DISPLAY Mikroprozessor-Ladegerät LD 7A WZ-Nr.: Power SPA SystemPartner GmbH & Co. KG Benzstr. 1 ▪ D-76185 Karlsruhe 12 www.aeg-automotive.com AEG is a registered trademark used under license from AB Electrolux (publ) Charge Full 11 Error 10 Input: 220 - 240 V AC; 50/60 Hz; max.
GB 33 No. Designation Function 1 SELECT button for selecting the voltage LM 1.5 Microprocessor Charger: 6 V / 1.5 A or 12 V / 1.5 A LM 4.0 Microprocessor Charger: 6 V / 2 A or 12 V / 4 A LD 5.0 Microprocessor Charger: 6 V / 2 A or 12 V / 5 A LD 7.0 Microprocessor Charger: 6 V / 3.5 A or 12 V / 7 A The red LED will light up next to 6 V or 12 V per the selection. ▪▪ ▪▪ ▪▪ ▪▪ 2 LD 5.0 and LD 7.
Functions The charger is equipped with a microprocessor (MCU - Micro Computer Unit) and features fully automatic charging-, diagnostic-, emergency- and maintenance functions. After selecting the battery type connected (6 V or 12 V) the battery charger will recognise the battery capacity and the battery condition and calculate the required charging parameters (charging voltage, charging current). This allows for efficient and safe charging.
GB 35 Note: The black (-) clamp can also be connected to the vehicle chassis (Please refer to the auto maker‘s instructions!). Be sure both clamps have good contact and are securely seated. SELECT 3,5 A 7,5 A LD 8.7 DISPLAY Power Charge Full Error 4. Plug the charger plug into a 230V power socket. If the charger is connected correctly, the “Power” LED (12) will light up. In this mode the charger will automatically reset to the default settings.
Charging time A battery’s charging time greatly depends on its charge condition and the capacity. Charging time in hours (approx.) Model LM 1.5 Charging current 1.5 A (max.) 6 V/12 V Battery size LM 4.0 2A 6V 4A 12 V LD 5.0 2A 6V 5A 12 V LD 7.0 3.
GB 37 Charging phases The concept of the charging process is explained based on a 12 V battery. V A 1 2 3 4 5 6 7 8 Diagnosis Diagnostic function which automatically checks the battery status and recognises the voltage. Voltage Function 0 V to 1.5 V “Error” LED (9) lit. Battery defective. 1.5 V to 12 V Charging starts. 12 V to 13 V Maintenance charging starts. 14.6 V Battery fully charged. “Full” LED (10) lit. >15 V “Error” LED (9) lit.
▪▪At a voltage range of 1.5 ± 0.5 V to 10.5 ± 0.5 V the charger will initiate pulse charging. ▪▪If the voltage rises above 10.5 ± 0.5 V, the charger will switch to the previously selected regular charging mode, which will charge faster and more safely. Step 3: Precharging The battery is gently charged with a low charging current to return the battery to a chargeable state Step 4: Soft start The battery is gently charged with a low charging current.
GB 39 Troubleshooting Error/Problem Possible cause Correction “Error” LED (9) lit Defective battery: ▪▪Battery voltage is under 1.5 V and over 0.5 V ▪▪Battery voltage is under 5 V for a 6 V battery, or under 11 V for a 12 V battery, after charging the battery for 4 minutes ▪▪Battery voltage is under 6 V or 12 V 2 minutes after fully charging ▪▪unable to fully charge within 24 h Have the battery checked by a speciality repair shop.
Error/Problem Possible cause Correction Long charging time Only a very low charging current is used in very low temperatures (below 0 ºC). This will extend the charging time. As the battery warms up, the charging current is adjusted accordingly. Charge battery in normal conditions. Explosion hazard! Never charge frozen batteries. Battery capacity too high for the charger being used. Use a suitable charger. Battery wasn’t charged long enough. Ensure the battery is charged long enough.
GB 41 Disposal The packaging consists of non-contaminating materials that you can dispose of at your local recycling point. Do not throw electrical appliances in with domestic waste! In accordance with European Directive 2002 / 96 / EC for waste electrical and electronic equipment (WEEE) and conversion to national law, used electrical appliances must be collected separately and taken to a recycling point. For ways to dispose of old electrical appliances please contact your community or city administration.
FR 43 Table des matières Introduction ����������������������������������������������������������������������������������������������� 44 Utilisation conforme ������������������������������������������������������������������������������� 45 Contenu de l‘emballage ��������������������������������������������������������������������������� 45 Caractéristiques techniques ��������������������������������������������������������������������� 46 Sécurité �������������������������������������������������������
Introduction Explication des symboles et mots d‘avertissements qui sont utilisés dans la présente notice d‘explication et/ou sur l‘appareil: Lorsque vous utilisez l‘appareil, veuillez vous conformer à la présente notice d‘utilisation.
FR 45 Utilisation conforme Ce chargeur est conçu pour recharger toutes les batteries au plomb (accumulateurs plomb-acide) ouvertes ainsi qu‘un grand nombre de batteries fermées ne demandant aucun entretien comme celles installées dans les voitures, les bateaux, les camions et autres véhicules par ex.
Caractéristiques techniques Modèle LM 1.5 LM 4.0 Numéro d‘article 97015 97016 Tension d‘entrée 220 - 240 V AC 50/60 Hz 220 - 240 V AC 50/60 Hz Courant d‘entrée max. 0,9 A max. 0,9 A Tension de sortie 6 / 12 V DC 6 / 12 V DC Tension de charge (max.) 7,4 V / 14,7 V 7,4 V / 14,7 V Courant de charge (max.
FR 47 Caractéristiques techniques Modèle LD 5.0 LD 7.0 Numéro d‘article 97017 97018 Tension d‘entrée 220 - 240 V AC 50/60 Hz 220 - 240 V AC 50/60 Hz Courant d‘entrée max. 1,2 A max. 1,5 A Tension de sortie 6 / 12 V DC 6 / 12 V DC Tension de charge (max.) 7,4 V / 14,7 V 7,4 V / 14,7 V Courant de charge (max.
Sécurité Consignes generales de sécurité Veuillez lire toutes les consignes de sécurité et les instructions. Le nonrespect des consignes de sécurité et des instructions peut provoquer un choc électrique, des brûlures et / ou des blessures graves. Conservez toutes les consignes de sécurité et des instructions afin de pouvoir les consulter ultérieurement..
FR 49 Risque de brûlure ! ▪▪Les batteries contiennent des acides qui peuvent brûler les yeux et la peau. Lors de la charge de la batterie, des gaz et des vapeurs nocifs pour la santé se forment également. ▪▪Évitez tout contacter avec l‘acide irritant de la batterie. Nettoyez immédiatement à l‘eau les zones de la peau et les objets étant entrés en contact avec de l‘acide. Si vos yeux devaient entrer en contact avec de l‘acide de la batterie, rincez-les au moins pendant 5 minutes à l‘eau courante.
Risque de choc électrique ! ▪▪Les chargeurs peuvent gêner le fonctionnement des implants électroniques comme les pacemakers cardiaques et ainsi mettre en danger les personnes. ▪▪Veillez à empêcher que de l‘eau d‘autres liquides ne soient renversés sur l‘appa- reil. Le risque de choc électrique augmente si de l‘eau pénètre dans un appareil électrique. ▪▪Assurez-vous que les prises et les câbles ne sont pas humides.
FR 51 Risque de blessure ! ▪▪N‘essayez jamais de charger des batteries non rechargeables, endommagées ou gelées. ▪▪N‘utilisez pas l‘appareil pour charger des batteries à cellules sèches. Celles-ci peuvent exploser et entraîner des blessures physiques et des dommages matériels. ▪▪Avant d‘utiliser l‘appareil, veuillez observer la notice d‘utilisation et tous les avertissements de sécurité de la batterie à charger et du véhicule.
aperÇU dU prodUit 13 1 SELECT 3,5 A 7A Artikel-Nr: 97018 2 DISPLAY Mikroprozessor-Ladegerät LD 7A WZ-Nr.: Power SPA SystemPartner GmbH & Co. KG Benzstr. 1 ▪ D-76185 Karlsruhe 12 www.aeg-automotive.com AEG is a registered trademark used under license from AB Electrolux (publ) Charge Full 11 Error 10 Input: 220 - 240 V AC; 50/60 Hz; max.
FR 53 Nr. Dénomination Fonction 1 Touche SELECT pour sélection de tension Chargeur à microprocesseur LM 1.5 : 6 V / 1,5 A ou 12 V / 1,5 A Chargeur à microprocesseur LM 4.0 : 6 V / 2 A ou 12 V / 4 A Chargeur à microprocesseur LD 5.0 : 6 V / 2 A ou 12 V / 5 A Chargeur à microprocesseur LD 7.0 : 6 V / 3,5 A ou 12 V / 7 A Selon la sélection le voyant LED rouge s‘allume à côté de la touche 6 V ou 12 V. ▪▪ ▪▪ ▪▪ ▪▪ 2 Uniquement pour chargeur à microprocesseur LD 5.0 et LD 7.
Nr. Dénomination 13 Possibilité d‘accrochage Fonction 14 Câble de batterie avec branchement de confort pour prise de bord (disponible comme accessoire) Fonctions Le chargeur est équipé d‘un microprocesseur (MCU - Micro Computer Unit) et possèdent des fonctions de charge, de diagnostic, de sauvegarde et de maintenance entièrement automatiques.
FR 55 Brancher l‘appareil 1. Connectez le câble de branchement nécessaire (avec branchements annulaires ou pinces) à la fiche de confort (3) sur le chargeur. 2. Branchez le câble rouge (+) sur le pôle positif de la batterie. 3. Branchez le câble noir (-) sur le pôle négatif de la batterie. SELECT 3,5 A 7,5 A LD 8.7 DISPLAY Power Charge Full Error Indication : La pince noire (-) peut également être raccordée à la carrosserie du véhicule (ce faisant, respectez le mode d‘emploi du véhicule !).
Remarque : Lorsque la batterie est rechargée complètement, le chargeur passe en mode de charge de maintien afin de conserver l‘état de charge et de protéger la batterie contre une surcharge. Uniquement dans le cas du chargeur à microprocesseur LD 5.0 et LD 7.0 : ▪▪100 est indiqué sur l‘afficheur et le voyant LED « % » s‘allume. ▪▪La touche DISPLAY (2) permet de commuter l‘affichage pendant le processus de charge (voir « Aperçu du produit »).
FR 57 Terminer le processus de charge et débrancher le chargeur 1. Débranchez toujours en premier la fiche secteur de la prise 230 V. 2. Débranchez le câble noir (-) du pôle négatif de la batterie. 3. Débranchez le câble rouge (+) du pôle positif de la batterie. Phases de charge Le principe du processus de charge est expliqué sur la base d‘une batterie 12 V.
Étape 1 : Vérification d‘état Le chargeur vérifie l‘état de batterie et calcule les paramètres de charge nécessaire. Étape 2 : Désulfatation (sauvetage) ▪▪Le chargeur peut sauver la plupart des batteries usagées présentant des tensions minimales jusqu‘à 1,5 ±0,5 V. ▪▪Le circuit de sécurité fait que le chargeur ne démarre pas le processus de charge tant que la tension se trouve sous 1,5 ± 0,5 V.
FR 59 Fonctions de sécurité Le chargeur est équipé des dispositifs de protection suivants permettant d‘éviter des détériorations du chargeur et de la batterie ou du véhicule : ▪▪court-circuit (batterie défectueuse), ▪▪branchement erroné (branchement avec polarité inversée), ▪▪formations d‘étincelles ▪▪surchauffe ▪▪surintensité ▪▪surcharge Analyse d‘erreurs Erreur/Problème Cause possible Remède Le voyant LED « Error » (9) s‘allume Batterie défectueuse : ▪▪La tension de batterie est inférieure à 1,5 V e
Erreur/Problème Cause possible Remède Tension de batterie sélectionnée incorrecte (6/12 V) Débrancher le chargeur et attendre que les voyants LED s‘éteignent. Rebrancher ensuite le chargeur et ajuster la tension de batterie correcte. Impossible de charger la batterie. Absence de tension secteur, chargeur non branché. S‘assurer que le chargeur est branché dans une prise secteur 230 V et que le voyant LED « Power » (12) s‘allume.
FR 61 Nettoyage, entretien et maintenance ▪▪Nettoyez la pince à chaque fois une fois que le processus de charge est terminé. Essuyez tout liquide de la batterie pouvant être entré en contact avec les pinces pour éviter toute corrosion. ▪▪Enroulez correctement le câble lorsque vous rangez l‘appareil. Cela permet d‘éviter des dommages par erreur du câble et de l‘appareil. ▪▪Nettoyez le produit avec un chiffon doux et sec. ▪▪Stocker l‘appareil dans un endroit propre et sec.
IT 63 Sommario Introduzione ����������������������������������������������������������������������������������������������� 64 Uso conforme ����������������������������������������������������������������������������������������� 65 Fornitura ����������������������������������������������������������������������������������������������� 65 Dati tecnici ������������������������������������������������������������������������������������������� 66 Sicurezza ��������������������������������������������������
Introduzione Spiegazione dei simboli e dei termini di avvertenza utilizzati in queste istruzioni per l’uso e/o sul dispositivo: Per l’utilizzo del dispositivo attenersi a queste istruzioni.
IT 65 Uso conforme Questo caricabatterie è adatto per ricaricare le batterie piombo-acido aperte e molti accumulatori (batterie) piombo-acido chiusi che non necessitano manutenzione, quali i tipi impiegati su auto, navi, autocarri e altri veicoli, ad esempio: ▪▪batterie WET, batterie piombo-acido (elettrolita liquido) ▪▪batterie gel (elettrolita in gel) ▪▪batterie AGM (elettrolita in matrice di fibre di vetro) ▪▪batterie piombo-acido che non necessitano manutenzione (MF) Questo prodotto non è concepito per
Dati tecnici Modello LM 1.5 LM 4.0 Codice articolo 97015 97016 Potenza assorbita 220 - 240 V AC 50/60 Hz 220 - 240 V AC 50/60 Hz Corrente in entrata max. 0,9 A max. 0,9 A Potenza 6 / 12 V DC 6 / 12 V DC Tensione di carica (max.
IT 67 Dati tecnici Modello LD 5.0 LD 7.0 Codice articolo 97017 97018 Potenza assorbita 220 - 240 V AC 50/60 Hz 220 - 240 V AC 50/60 Hz Corrente in entrata max 1,2 A max. 1,5 A Potenza 6 / 12 V DC 6 / 12 V DC Tensione di carica (max.
Sicurezza Indicationi di sicurezza generali Leggere tutte le indicazioni e le istruzioni di sicurezza. Omissioni nell’osservanza delle indicazioni di sicurezza e delle istruzioni possono provocare scosse elettriche, ustioni e/o gravi lesioni. Conservare per future consultazioni tutte le indicazioni di sicurezza e le istruzioni. Attenzione! Pericolo di vita e di incidenti per i bambini piccol i! Non lasciare mai il materiale d’imballaggio in mano a bambini senza la supervisione di un adulto.
IT 69 Pericolo di corrosione! ▪▪Le batterie contengono acido dannoso per gli occhi e per la pelle. Durante il processo di ricarica vengono emessi gas e vapori dannosi per la salute. ▪▪Evitare qualsiasi contatto con l’acido corrosivo della batteria. In caso di contatto con l’acido della batteria, lavare subito con abbondante acqua corrente la parte del corpo e gli oggetti interessati.
Pericolo di folgorazione! ▪▪I caricabatterie possono condizionare il funzionamento di impianti elettronici, quali ad esempio i pace-maker, e quindi essere pericolosi per le persone che li portano. ▪▪Accertarsi sempre di conservarlo in un luogo asciutto e sicuro. La penetrazione di acqua nei dispositivi elettrici accresce il pericolo di folgorazione. ▪▪Assicurarsi che tutte le spine e i cavi siano privi di umidità. Non collegare mai il dispositivo alla rete elettrica con mani umide o bagnate.
IT 71 Pericolo di lesioni! ▪▪Non cercare mai di caricare batterie danneggiate, non ricaricabili o congelate. ▪▪Non utilizzare il caricabatterie per caricare batterie a celle secche. Queste potrebbero infatti scoppiare causando lesioni a persone o danni materiali. ▪▪Prima di utilizzare il dispositivo leggere le istruzioni e le avvertenze per la sicurezza delle batterie da caricare e del veicolo.
desCrizioNe deL prodotto 13 1 SELECT 3,5 A 7A Artikel-Nr: 97018 2 DISPLAY Mikroprozessor-Ladegerät LD 7A WZ-Nr.: Power SPA SystemPartner GmbH & Co. KG Benzstr. 1 ▪ D-76185 Karlsruhe 12 www.aeg-automotive.com AEG is a registered trademark used under license from AB Electrolux (publ) Charge Full 11 Error 10 Input: 220 - 240 V AC; 50/60 Hz; max.
IT 73 Nr. Denominazione Funzione 1 Tasto SELECT per selezionare la tensione Caricabatterie con microprocessore LM 1.5: 6 V / 1,5 A o 12 V / 1,5 A Caricabatterie con microprocessore LM 4.0: 6 V / 2 A o 12 V / 4 A Caricabatterie con microprocessore LD 5.0: 6 V / 2 A o 12 V / 5 A Caricabatterie con microprocessore LD 7.0: 6 V / 3,5 A o 12 V / 7 A In base alla selezione effettuata si illumina il LED rosso accanto al tasto 6 V o 12 V. ▪▪ ▪▪ ▪▪ ▪▪ 2 Solo nei caricabatterie con microprocessore LD 5.
Nr. Denominazione 11 Charge (Carica), arancione Si illumina durante il processo di ricarica. Funzione 12 Power (Collegamento rete), verde Si illumina se il caricabatterie è collegato alla presa di rete da 230 V.
IT 75 Collegamento del dispositivo 1. Collegare il cavo di collegamento polo necessario (con attacchi a occhiello o morsetti) all’attacco a spina comfort (3) nel caricabatterie. 2. Collegate il cavo di allacciamento con polarità (+) al terminale positivo della batteria. 3. Collegate il cavo di allacciamento nero con polarità (-) al terminale negativo della batteria.
Avvertenza: quando la batteria è completamente carica, il dispositivo passa alla carica di mantenimento per mantenere appunto la carica e proteggere la batteria da un’alimentazione eccessiva. Solo nei caricabatterie con microprocessore LD 5.0 ed LD 7.0: ▪▪il display visualizza “100” e il LED “%” si illumina. ▪▪Attraverso il tasto DISPLAY (2) è possibile cambiare la visualizzazione durante la ricarica (vedere “Descrizione del prodotto”).
IT 77 Fine del processo di ricarica e stacco del caricabatterie 1. Staccare sempre prima la spina dalla presa a corrente alternata 230 V. 2. Scollegare il cavo di collegamento polo nero (-) dal polo negativo della batteria. 3. Scollegare il cavo di collegamento polo rosso (+) dal polo positivo della batteria. Fasi di carica Il principio del processo di ricarica è spiegato con una batteria da 12 V.
Fase 1: verifica dello stato Il caricabatterie verifica lo stato della batteria e calcola i parametri di ricarica necessari. Fase 2: desolfatazione (recupero) ▪▪Il caricabatterie può recuperare la maggior parte di batterie esaurite con tensioni fino a minimo di 1,5 ±0,5 V. ▪▪Grazie alla funzione di sicurezza il caricabatterie non avvia la ricarica se rileva una tensione inferiore a 1,5 ± 0,5 V.
IT 79 Funzioni di sicurezza Il caricabatterie è provvisto di funzioni di sicurezza che proteggono la batteria, il veicolo e lo stesso caricabatterie dal rischio di danneggiamenti dovuti a: ▪▪cortocircuito (batteria difettosa), ▪▪collegamento errato (polarità invertita), ▪▪scintille ▪▪surriscaldamento ▪▪sovracorrente ▪▪sovraccarico Analisi degli errori Guasto / problema Possibili cause Soluzione Il LED “Error” (9) si illumina.
Guasto / problema Possibili cause Soluzione Selezionata una tensione batteria (6/12 V) non corretta Staccare il caricabatterie e attendere che i LED si spengano. Ricollegare quindi il caricabatterie e impostare la tensione batteria corretta. La batteria non si ricarica Non c’è tensione di rete, il caricabatterie non è collegato. Assicurarsi che il caricabatterie sia collegato a una presa da 230 V e che il LED “Power” (12) sia acceso.
IT 81 Pulizia, manutenzione e riparazioni ▪▪Pulire sempre i morsetti dopo la ricarica. Per evitare la corrosione, pulire i morsetti da eventuali residui di liquido batteria. ▪▪Avvolgere con cura i cavi del dispositivo prima di riporlo. Ciò aiuta a evitare danneggiamenti accidentali ai cavi del dispositivo. ▪▪Pulire il prodotto con un panno morbido e asciutto. ▪▪Conservare il dispositivo in un luogo pulito e asciutto.
CZ 83 Obsah Úvod ���������������������������������������������������������������������������������������������������������� 84 Použití ke stanovenému účelu ������������������������������������������������������������ 85 Obsah dodávky ������������������������������������������������������������������������������������ 85 Technická data �������������������������������������������������������������������������������������� 86 Bezpečnost ������������������������������������������������������������������������
Úvod Vysvětlení symbolů a signální slov, použitých v tomto návodu k obsluze nebo na přístroji: Při používání přístroje dbejte vždy na tento návod k obsluze.
IT 85 Použití ke stanovenému účelu Nabíječka je vyrobena k nabíjení otevřených a početných uzavřených, bezúdržbových kyselino-olovnatých akumulátorů (baterií), vestavěných v osobních autech, lodích, nákladních automobilech a jiných vozidlech, jako například: ▪▪mokrých (WET) kyselino-olovnatých baterií (tekutý elektrolyt) ▪▪gelových baterií (gelový elektrolyt) ▪▪AGM baterií (elektrolyt ve sklolaminátovém rounu) ▪▪bezúdržbových kyselino-olovnatých baterií (MF) Tento přístroj nesmí používat děti, osoby s omeze
Technická data Model LM 1.5 LM 4.0 Číslo artiklu 97015 97016 Vstup napětí 220 - 240 V AC 50/60 Hz 220 - 240 V AC 50/60 Hz Vstupní proud max. 0,9 A max. 0,9 A Výstup 6 / 12 V DC 6 / 12 V DC Nabíjecí napětí (max.) 7,4 V / 14,7 V 7,4 V / 14,7 V Nabíjecí proud +/-10 % 1,5 A 2A/4A Doporučená kapacita baterie 35 Ah 80 Ah Doporučená kapacita baterie (24 hod.
CZ Technická data Model LD 5.0 LD 7.0 Číslo artiklu 97017 97018 Vstupní napětí 220 - 240 V AC 50/60 Hz 220 - 240 V AC 50/60 Hz Vstupní proud max. 1,2 A max. 1,5 A Výstupní napětí 6 / 12 V DC 6 / 12 V DC Nabíjecí napětí (max.) 7,4 V / 14,7 V 7,4 V / 14,7 V Nabíjecí proud +/-10 % 2A/5A 3,5 A / 7 A Doporučená kapacita baterie 110 Ah 150 Ah Doporučená kapacita baterie (24 hod.
Bezpečnost Všeobecné bezpečnostní pokyny Přečtěte si bezpečnostní pokyny a pokyny pro použití. nedodržení bezpečnostních pokynů a pokynů pro použití může způsobit zásah elektrickým proudem, vznik požáru a/nebo vážné ublížení na zdraví. Uschovejte si všechny bezpečnostní pokyny a pokyny pro použití kvůli další konzultaci. Výstraha! Nebezpečí nehody a ohrožení života kojenců a dětí! Nikdy nenechávejte děti bez dozoru s obalovým materiálem. Hrozí nebezpečí zadušení.
CZ 89 Nebezpečí poleptání! ▪▪Baterie obsahují kyselinu, která může zranit oči a pokožku. Při nabíjení baterie vznikají plyny a páry ohrožující zdraví. ▪▪Vyhýbejte se jakémukoliv kontaktu se žíravou kyselinou z baterie. Pokožku nebo předměty, které se dostaly do kontaktu s kyselinou ihned důkladně omyjte vodou. Jestliže se Vám dostala kyselina do očí, vyplachujte je nejméně 5 minut pod tekoucí vodou. Kontaktujte ihned Vašeho lékaře. ▪▪Používejte ochranné brýle a ochranné rukavice odolné proti kyselině.
Nebezpečí zásahu elektrickým proudem! ▪▪Nabíječky mohou rušit aktivní implantáty jako např. kardiostimulátory a ohrozit tím dotyčné osoby. ▪▪I přesto ale zajistěte, aby se přístroj nacházel vždy na bezpečném mís- tě. Nedovolte, aby bylo zařízení vystaveno tekoucí nebo kapající vodě nebo jiným tekutinám. Když voda vnikne do elektrických zařízení, dojde ke zvýšení rizika zásahu elektrickým proudem. ▪▪Ujistěte se, že jsou všechny zástrčky a kabely chráněné před vlhkostí.
CZ 91 Nebezpečí zranění! ▪▪Nenabíjejte nikdy vadné nebo zmrzlé baterie ani baterie, které nejsou určené k nabíjení. ▪▪Nepoužívejte přístroj k nabíjení baterií se suchými články. Takové baterie mohou prasknout a zranit přítomné osoby nebo způsobit věcné škody. ▪▪Při použití přístroje dbejte vždy na pokyny uvedené v návodu k obsluze a na všechna bezpečnostní upozornění týkající se nabíjené baterie a vozidla. Nebezpečí poškození! ▪▪Neumísťuje přístroj nikdy do blízkosti nabíjené baterie.
POPIS VýrOBKU 13 1 SELECT 3,5 A 7A Artikel-Nr: 97018 2 DISPLAY Mikroprozessor-Ladegerät LD 7A WZ-Nr.: Power SPA SystemPartner GmbH & Co. KG Benzstr. 1 ▪ D-76185 Karlsruhe 12 www.aeg-automotive.com AEG is a registered trademark used under license from AB Electrolux (publ) Charge Full 11 Error 10 Input: 220 - 240 V AC; 50/60 Hz; max.
CZ Č. Název Funkce 1 Tlačítko SELECT pro volbu napětí Podle volby svítí červená LED vedle tlačítka 6 V nebo 12 V. ▪▪Mikroprocesorová nabíječka LM 93 1.5: 6 V / 1,5 A nebo 12 V / 1,5 A Mikroprocesorová nabíječka LM 4.0: 6 V / 2 A nebo 12 V / 4 A Mikroprocesorová nabíječka LD 5.0: 6 V / 2 A nebo 12 V / 5 A Mikroprocesorová nabíječka LD 7.0: 6 V / 3,5 A nebo 12 V / 7 A ▪▪ ▪▪ ▪▪ 2 Jen pro mikroprocesorovou nabíječku LD 5.0 a LD 7.
Č. Název Funkce 11 Charge (nabíjení) oranžová Svítí během nabíjení. 12 Power (připojení na proud) zelená Svítí, jestliže je nabíječka připojená na zásuvku elektrického proudu s napětím 230 V. 13 Možnost pověšení 14 Připojovací kabel s komfortní přípojkou pro palubní zásuvku (k dostání jako příslušenství) Funkce Nabíječka je vybavena mikroprocesorem (MCU - Micro-Computer-Unit) a funkcemi automatického nabíjení, diagnózy, záchrany a údržby baterií.
CZ 95 ▪▪Očistěte póly baterie. Jestliže má baterie odnímatelná odvětrávací víčka, naplňte každý článek destilovanou vodou na doporučenou výšku hladiny. Články nepřeplňujte. Připojení přístroje 1. Spojte potřebný pólový kabel (s oky nebo svorkami) s komfortní zástrčkovou přípojkou (3) na nabíječce. 2. Připojte červený kabel (+) na kladný pól baterie. 3. Připojte černý kabel (-) na záporný pól baterie. Upozornění: estliže jste zvolili nesprávný režim nabíjení, signalizuje nabíječka poruchu.
2. Nabíjení začne automaticky. LED „Charge“ (11) svítí po celou dobu nabíjení. 3. Baterie je úplně nabitá, jestliže svítí LED „Full“ (10) a zhasne LED „Charge“ (11). Upozornění: Po úplném nabití baterie se nabíječka přepne do režimu udržování stavu nabití a současně chrání baterii před přebitím. Jen pro mikroprocesorovou nabíječku LD 5.0 und LD 7.0: ▪▪Na displeji se ukáže 100 a svíti LED „%“. ▪▪Tlačítkem DISPLAY (2) je možné ukazatel během nabíjení přepnout (viz „Popis výrobku“).
CZ Ukončení nabíjení a odpojení nabíječky 1. Vytáhněte nedříve zástrčku nabíječky ze zásuvky s napětím 230 V. 2. Odpojte černý kabel (-) od záporného pólu baterie. 3. Odpojte červený kabel (+) od kladného pólu baterie. Fáze nabíjení Princip nabíjení je vysvětlený na příkladu nabíjení 12 V baterie. V A 1 2 3 4 5 6 7 8 Diagnóza Diagnostická funkce kontroluje automaticky stav baterie a identifikuje napětí. Napětí Funkce 0 V až 1,5 V LED „Error“ (9) svítí. Baterie vadná.
Krok 1: Kontrola stavu Nabíječka kontroluje stav baterie a vypočítá potřebné parametry nabíjení. Krok 2: Záchrana ▪▪Nabíječka je schopná zachránit většinu vybitých baterií s minimálním napětím 1,5 ±0,5 V. ▪▪Bezpečnostní nastavení přístroje blokuje začátek nabíjení, jestliže je napětí baterie nižší než 1,5 ± 0,5 V. ▪▪V rozmezí napětí od 1,5 ± 0,5 V do 10,5 ± 0,5 V vyvolá nabíječka impuls nabíjení.
CZ 99 Bezpečnostní funkce Nabíječka je vybavena následujícími, ochrannými funkcemi, aby se zabránilo jejímu poškození nebo poškození baterie a vozidla: ▪▪Zkrat (vadná baterie), ▪▪Nesprávné připojení (připojení s opačnou polaritou), ▪▪Jiskření ▪▪přehřátí ▪▪nadproud ▪▪přebití Analýza poruch Chyba/Problém Možné příčina Pomoc LED „Error“ (9) svítí Vadná baterie: ▪▪Napětí baterie je nižší než 1,5 V a vyšší než 0,5 V ▪▪Po 4 minutách nabíjení baterie 6 V je napětí pod 5 V nebo při nabíjení baterie 12 V je n
Chyba/Problém Možné příčina Pomoc Zvolené nesprávné napětí baterie (6/12 V) Nabíječku odpojit od přívodu proudu a počkat až LED zhasnou. Nabíječku připojit na proud a nastavit správné napětí baterie. Baterii nelze nabt Napětí ze sítě není k dispozici, nabíječka není zapojená. Zajistit, aby byla nabíječka připojená do zásuvky s napětím 230 V a svítila LED „Power“ (12).
CZ 101 Čištění, ošetřování a údržba ▪▪Po každém nabíjení vyčistěte svorky. Otírejte vždy tekutinu z baterie, která zůstala na svorkách, aby jste zabránili korozi. ▪▪Před skladováním přístroje pečlivě stočte kabely. Toto pomáhá vyloučit nechtěné poškození kabelů a přístroje. ▪▪Přístroj čistěte měkkým, suchým hadrem. ▪▪Přístroj skladujte na čistém a suchém místě.
SK 103 Obsah Úvod �������������������������������������������������������������������������������������������������������� 104 Používanie v súlade s určeným účelom �������������������������������������������� 105 Obsah dodávky ���������������������������������������������������������������������������������� 105 Technické údaje ���������������������������������������������������������������������������������� 106 Bezpečnosť �����������������������������������������������������������������������������������
Úvod Význam symbolov a výstražných upozornení, ktoré sú používané v tomto návode na používanie a/alebo na prístroji: Pri používaní prístroja dodržiavajte tento návod na ovládanie.
SK 105 Používanie v súlade s určeným účelom Nabíjačka je určená na nabíjanie otvorených a mnohých uzatvorených, bezúdržbových olovo-kyselinových akumulátorov (batérií), ktoré sú zabudované v automobiloch, lodiach, nákladných automobiloch a iných vozidlách, napr.
Technické údaje Model LM 1.5 LM 4.0 Číslo výrobku 97015 97016 Príkon 220 - 240 V AC 50/60 Hz 220 - 240 V AC 50/60 Hz Vstupný prúd max. 0,9 A max. 0,9 A Užitočný výkon 6 / 12 V DC 6 / 12 V DC Nabíjacie napätie (max.
SK 107 Technické údaje Model LD 5.0 LD 7.0 Číslo výrobku 97017 97018 Príkon 220 - 240 V AC 50/60 Hz 220 - 240 V AC 50/60 Hz Vstupný prúd max 1,2 A max. 1,5 A Užitočný výkon 6 / 12 V DC 6 / 12 V DC Nabíjacie napätie (max.
Bezpečnosť Všeobecné bezpečnostné pokyny Prečítajte si bezpečnostné pokyny a pokyny pre použitie. nedodržanie bezpečnostných pokynov a pokynov pre použitie môže spôsobiť zásah elektrickým prúdom, vznik požiaru a/alebo vážne ublíženie na zdraví. Uschovajte všetky bezpečnostné pokyny a pokyny pre použitie kvôli neskoršiemu nahliadnutiu. Výstražné upozornenie! Nebezpečenstvo nehody a ohrozenia života kojencov a detí ! Nikdy nenechávajte deti bez dozoru s obalovým materiálom.
SK 109 Nebezpečenstvo poranenia!! ▪▪Batérie obsahujú kyselinu, ktorá poškodzuje oči a pokožku. Pri do- bíjaní batérií okrem toho dochádza k tvorbe plynov a výparov, ktoré ohrozujú zdravie. ▪▪Zabráňte akémukoľvek kontaktu s leptavou batériovou kyselinou. Pokožku a predmety, ktoré prišli do kontaktu s kyselinou, okamžite dôkladne umyte vodou. Ak sa Vaše oči dostali do kontaktu s batériovou kyselinou, vymývajte ich minimálne 5 minút tečúcou vodou. Kontaktujte lekára.
Nebezpečenstvo zásahu elektrickým prúdom! ▪▪Nabíjačky batérií môžu rušiť činnosť aktívnych elektronických implantátov ako je napr. kardiostimulátor a tým ohroziť osoby. ▪▪Napriek tomu zabezpečte, aby bol prístroj uložený vždy na bezpeč- nom mieste. Nedovoľte, aby na zariadenie tiekla alebo kvapkala voda alebo iné tekutiny. Keď voda vnikne do elektrických zariadení, dôjde k zvýšeniu rizika zásahu elektrickým prúdom. ▪▪Uistite sa, že všetky zástrčky a káble sú chránené pred vlhkosťou.
SK 111 Nebezpečenstvo poranenia! ▪▪Nikdy sa nepokúšajte dobíjať nedobíjateľné, poškodené alebo zamrznuté batérie. ▪▪Nabíjačku batérií nikdy nepoužívajte na nabíjanie batérií so suchými článkami. Mohli by prasknúť a viesť k poraneniu osôb a vzniku vecných škôd. ▪▪Pred používaním prístroja si dôkladne prečítajte návod na používanie a všetky bezpečnostné pokyny týkajúce sa batérie, ktorú chcete nabíjať, a vozidla.
preHĽaD proDUkTU 13 1 SELECT 3,5 A 7A Artikel-Nr: 97018 2 DISPLAY Mikroprozessor-Ladegerät LD 7A WZ-Nr.: Power SPA SystemPartner GmbH & Co. KG Benzstr. 1 ▪ D-76185 Karlsruhe 12 www.aeg-automotive.com AEG is a registered trademark used under license from AB Electrolux (publ) Charge Full 11 Error 10 Input: 220 - 240 V AC; 50/60 Hz; max.
SK 113 Č. Označenie Funkcia 1 Tlačidlo SELECT pre voľbu napätia Závisle od výberu svieti červená LED-kontrolka vedľa tlačidla 6 V alebo 12 V. ▪▪Mikroprocesorová nabíjačka LM 1.5: 6 V / 1,5 A alebo 12 V / 1,5 A Mikroprocesorová nabíjačka LM 4.0: 6 V / 2 A alebo 12 V / 4 A Mikroprocesorová nabíjačka LD 5.0: 6 V / 2 A alebo 12 V / 5 A Mikroprocesorová nabíjačka LD 7.0: 6 V / 3,5 A alebo 12 V / 7 A ▪▪ ▪▪ ▪▪ 2 Iba pri mikroprocesorovej nabíjačke LD 5.0 a LD 7.
Č. Označenie Funkcia 10 Full (nabitá) Zelená Svieti, keď je pripojená batéria nabitá. 11 Charge (nabíja sa) Oranžová Svieti počas procesu nabíjania. 12 Power (sieťové pripojenie) Zelená Svieti, keď je nabíjačka pripojená do 230 V sieťovej zásuvky.
SK 115 ▪▪Používajte ochranné okuliare a rukavice neprepúšťajúce kyselinu. ▪▪Zabezpečte dostatočné vetranie. ▪▪Uistite sa, že sú batériové póly čisté. Ak batéria disponuje odnímateľnými odvzdušňovacími uzávermi, naplňte každú bunku batérie až po hladinu odporúčanú výrobcom batérie destilovanou vodou. Nepreplňte bunky. Zapojenie prístroja 1. Zapojte potrebný pólový pripojovací kábel (s prstencovými prípojkami alebo svorkami) s komfortnou pripojovacou zástrčkou (3) na nabíjačke. 2.
Upozornenie: Ak ste zvolili nesprávny nabíjací modus, rozsvieti sa LED-kontrolka „Error“ (9). V tomto prípade odpojte nabíjačku, krátko počkajte a opäť ju zapojte. 2. Nabíjací proces začne automaticky. LED-kontrolka „Charge“ (11) svieti počas celého procesu nabíjania. 3. Batéria je plne nabitá vtedy, keď zasvieti LED-kontrolka „Full“ (10) a zhasne LED-kontrolka „Charge“ (11).
SK 117 Model LM 1.5 LM 4.0 Nabíjací prúd 1,5 A (max.) 2A 6 V/12 V 6 V Batériaveľkosť 200 Ah 173 h LD 5.0 4A 12 V 130 h 65 h LD 7.0 2A 6V 5A 12 V 3,5 A 7 A 6V 12 V 130 h 52 h 75 h 37 h Ukončenie procesu nabíjania a odpojenie nabíjačky 1. Vždy najskôr vytiahnite zástrčku zo siete s 230 V striedavým prúdom. 2. Odpojte čierny (-) pólový pripojovací kábel z negatívneho pólu batérie. 3. Odpojte červený (+) pólový pripojovací kábel z pozitívneho pólu batérie.
Napätie Funkcia 0 V až 1,5 V LED-kontrolka „Error“ (9) svieti. Poškodená batéria. 1,5 V až 12 V Spustený proces nabíjania. 12 V až 13 V Udržiavacie nabíjanie sa spúšťa. 14,6 V Batéria úplne nabitá. LED-kontrolka „Full“ (10) svieti. >15 V LED-kontrolka „Error“ (9) svieti. Krok č. 1: Kontrola stavu Nabíjačka skontroluje stav batérie a vypočíta potrebné nabíjacie parametre. Krok č.
SK 119 Krok č. 6: Absorpčné nabíjanie Batéria je pri konštantnom nabíjacom koncovom napätí nabíjaná, až kým neprúdi žiadny nabíjací prúd. Krok č. 7: Kolísavé nabíjanie Keď sa batéria celkom nabije, nabíjanie sa ukončí. Krok č. 8: Udržiavacie nabíjanie Nabíjačka monitoruje kapacitu batérie. Len čo napätie batérie poklesne pod 12,8 V, nabíjačka vydá impulz pre nabíjanie. Stav nabitia batérie sa tak udrží na maximálne možnej úrovni.
Analýza chýb Chyba/problém Možné príčiny Riešenie LED „Error“ (9) leuchtet Poškodená batéria: ▪▪Napätie batérie je nižšie ako 1,5 V a vyššie ako 0,5 V ▪▪Napätie v prípade 6 V-batérie je nižšie ako 5 V alebo 12 V-batérie nižšie ako 11 V aj vtedy, keď sa batéria nabíjala 4 minúty ▪▪Napätie je 2 minúty po úplnom nabití nižšie ako 6 V príp. 12 V ▪▪v priebehu 24 hod. nie je možné dosiahnuť stav plného nabitia Batériu nechajte skontrolovať v odbornej dielni.
SK 121 Chyba/problém Možné príčiny Riešenie Batériu nie je možné nabiť Nie je prítomné napätie, nabíjačka nie je pripojená v sieti. Zabezpečte, aby bola nabíjačka zapojená v 230 V sieťovej zásuvke a aby svietila LED-kontrolka „Power“ (12). Príp. i poškodená batéria. Dlhá doba nabíjania Pri veľmi nízkych teplotách (pod 0°C) sa nabíja len veľmi nepatrným nabíjacím prúdom. Doba nabíjania sa tým predlžuje. Ak sa batéria zohreje, nabíjací prúd sa primerane prispôsobí.
Čistenie, starostlivosť a údržba ▪▪Po každom ukončení nabíjacieho procesu vyčistite svorky. Aby ste predišli korózii, utrite každú batériovú tekutinu, ktorá sa môže eventuálne dostať do kontaktu so svorkami. ▪▪Keď prístroj skladujete, dôkladne navite kábel. Tým predídete prípadným poškodeniam kábla a prístroja. ▪▪Prístroj čistite mäkkou, suchou handričkou. ▪▪Prístroj skladujte na čistom, suchom mieste.
SK 123
SPA SystemPartner GmbH & Co. KG Benzstr. 1 ▪ D-76185 Karlsruhe SPA SystemPartner GmbH & Co. Industriestr. 31 ▪ CH-8112 Otelfingen SPA Systems s.r.o. Pod Višňovkou 1661/37 ▪ 140 00 Praha 4 - Krč, CZ www.aeg-automotive.