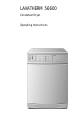
LAVATHERM 56600 Condenser Dryer Operating Instructions
Dear customer, Please read these operating instructions through carefully, before using the appliance. Please ensure you fully understand the safety instructions on the first pages of these operating instructions! Retain this instruction book for future reference, and pass on to any future owners. The warning triangle and/or the key words (Warning!, Caution!, Important!), emphasize information which is important for your safety or the correct functioning of the appliance.
Content Important Safety Information . . . . . . . . . . . . . . . . . . . . . . . . . . . . . . . . . . . . General Safety . . . . . . . . . . . . . . . . . . . . . . . . . . . . . . . . . . . . . . . . . . . . . . . . . . Installation . . . . . . . . . . . . . . . . . . . . . . . . . . . . . . . . . . . . . . . . . . . . . . . . . . . . . Child Safety . . . . . . . . . . . . . . . . . . . . . . . . . . . . . . . . . . . . . . . . . . . . . . . . . . . . 5 5 6 6 General Information . . . . . . . . . . .
Content Cleaning the drum . . . . . . . . . . . . . . . . . . . . . . . . . . . . . . . . . . . . . . . . . . . . . . . 23 Cleaning the panel and operating parts . . . . . . . . . . . . . . . . . . . . . . . . . . . . . 23 Cleaning the condenser . . . . . . . . . . . . . . . . . . . . . . . . . . . . . . . . . . . . . . . . . . 24 Something not working? . . . . . . . . . . . . . . . . . . . . . . . . . . . . . . . . . . . . . . . . 25 Replace the interior light . . . . . . . . . . . . . . . . . . . . . . .
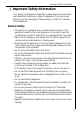
Important Safety Information Important Safety Information Your safety is of paramount importance, please ensure you read these warnings before installing or using the appliance. If you are unsure about any of the meanings of these warnings, contact the Customer Care Department. General Safety • This appliance is designed to dry normal domestic laundry. If the appliance is used for any other purpose or is incorrectly used, the manufacturer accepts no liability for any damages which may result.
Important Safety Information • Washing that is in poor condition (heavily worn) and items with loose fillings (cushions) that could break open must not be dried. There is a risk of fire! • Washing with rigid components (foot mats) will cover the air slots; the slots will also be covered if the drum is overfilled. Observe the maximum load of 5 kg. There is a risk of overheating which could cause a fire! • Only dry washing that does not contain any explosive objects (fire lighters, spray cans).
General Information General Information • To prevent creasing do not exceed the maximum load stated in the program table. • If using fabric conditioning sheets, we recommend the conditioning sheet is pinned (using a safety pin) to an article of laundry and placed in the tumble dryer. • When using fabric conditioning sheets or drying starched washing in the tumble dryer, it is important to clean the drum to prevent a build up of any residues/deposits on the sensors. See maintenance and cleaning section.
Disposal Disposal Packaging • Dispose of the packaging material correctly. All packaging materials are environmentally friendly and can be disposed of without any danger to the environment. • The external plastic covering and bags inside are made of Polyethylen (marking >PE<). • The padding is made of CFC free expanded polystyrene (marking >PS<). Tumble Dryer When disposing of the tumble dryer. • Cut off the mains cable and destroy the plug.
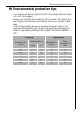
Environmental protection tips Environmental protection tips • Your laundry will become light and soft in the laundry drier even without a soft rinsing agent. • Loosen your laundry before loading it into the dryer. This helps to prevent lengthy running times and creasing. Ensure your laundry is well spun. In the following table we give an overview of specific electric consumption data depending on the spinning speed.
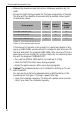
Environmental protection tips • Observe the maximum load instructions. Whenever possible, dry full loads. • Choose the right drying program for the type and quantity of laundry. The drier will then operate as economically as possible. Some typical consumption values: Fill weight in kg Duration in Minutes Power consumption in kWh COTTONS CUPBOARD DRY1 5 90 3.5 COTTONS HAND IRON1 5 70 2.8 2.5 35 1.
Description of the appliance Description of the appliance Front view Control panel Water Reservoir with handle flap Fluff filter Interior Light Rating plate Vent Feet (all height-adjustable) Condenser Unit behind Removable Plinth Reversable door 11
Description of the appliance Control panel A B C D A Program selector: To select the drying program B Program phase display: The current phase of the drying process is indicated.
Before using the appliance for the first The program selector positions • OFF: The tumble dryer is switched off. • LIGHT: The drum light switches on when the door is opened. • Program group COTTON: Programs for drying cotton and linen fabrics; maximum load 5 kg. • Program group EASY CARES: Programs for drying mixed fabrics and synthetics; maximum load 2.5 kg. • Time programs: For additional drying or for drying loads of less than 1 kg.
Brief operating instructions Brief operating instructions • Ensure the laundry is well spun before tumble drying. • Prepare the laundry. • Load the laundry. • Select the drying program on the program selector. – Press the SPECIAL CARE or AUDIBLE SIGNAL button if required? • Start the program. While the program is running you can open the door to take-out laundry or add more laundry. At the end of the program: • Remove the laundry. • Clean the fluff filter. • Switch-off the dryer.
Drying Drying Prepare the laundry • To prevent tangled bundles of laundry: Close zip fasteners; button-up bed linen and pillow cases; tie-together loose tapes, e.g. aprons. • Empty all pockets. • Remove all metal objects (i.e. paper clips, pins, etc.). • Turn clothing consisting of double-layer fabric inside out (such as cotton-lined anoraks with the cotton layer facing outwards). The fabrics will dry better. • Loosen the laundry.
Drying • AUDIBLE SIGNAL button During the crease-protection phase (immediately after the drying phase), an acoustic signal is sounded at intervals (see "End of drying process"). • SPECIAL CARE button This program operates with reduced heat. Press the SPECIAL CARE button for fabrics bearing the care symbol '. Gentle drying is advisable for heat-sensitive fabrics (such as acrylic and viscose). Start the drying program Press the START button. The drying program starts.
Drying Removing laundry or loading laundry when necessary You can interrupt the drying process at any time to remove some of the laundry or to add more laundry. Open the door. Caution! The laundry and the drum may be hot. Remove or add more laundry. Close the door. Press the START button to resume the drying process. End of the drying process The cooling phase starts shortly before the end of the drying process: The heater is switched-off during this phase.
Drying Empty the water reservoir Caution! The condensed water is not suitable for drinking or for use with foodstuffs. The water reservoir should be emptied after every drying programme. This avoids interruption of a programme when the water reservoir is full. Grasp the handle flap of the water reservoir and pull-out completely. Push the cover of the water reservoir to the side and pour-out the condensed water. Re-insert the water reservoir into the control panel.
Drying Clean the fluff filter To ensure efficient operation of the tumble dryer, clean the fluff filter after each drying program. Also check whether there are any remnants or fluff from the washing in the drum; remove immediately. Press the catch of the filter lid downwards. The filter lid will open. Take-out the fluff filter. Remove fluff out of the fluff filter, with a moistened hand. Re-insert the fluff filter. Press against the filter lid until it catches into the locking device.
Program tables Program tables Program group COTTONS care symbols &, %; maximum load 5 kg Program Laundry Type Examples for EXTRA DRY Heavy weight or mult-layered Towelling material, bath robes fabrics CUPBOARD DRY Fabrics of medium weight, articles not made up of mult- Towel laundry, hand towels layers DAMP Lightweight materials requiring ironing Cotton shirt and underwear HAND IRON Normal cotton and linen articles Sheets and pillowcases, tablecloths MACHINE IRON Cotton and linen articles, t
Program tables TIME programs care symbols &, '1, %; loads less than 1kg You can select 20, 40 and 60 minutes program duration for additional drying of individual pieces of laundry or to dry small quantities. 1) Press the SPECIAL CARE button! COOL AIR Program The laundry is treated for 10 minutes in cold air; for smoothing creased clothing.
A small glossary of textile information A small glossary of textile information Care symbols Ensure articles to be dried are suitable for tumble drying. If they are one of the following symbols should be present on the care label: % This fabric can be tumble dried. The fabric manufacturer does not stip- ulate if the piece of laundry should be dried on a normal or gentle program.
Cleaning and maintenance Cleaning and maintenance Cleaning the filter area Important! When the FILTER display lights, it is essential to clean the fluff filter. Otherwise your dryer might suffer damage. A small amount of fluff may reach the area around the filter in spite of the fluff filter. Therefore you should clean the entire filter area from time to time, or at least every three months. Remove the fluff filter.
Cleaning and maintenance Cleaning the condenser Important! The condenser unit must be cleaned after every thirty drying programs to ensure correct operation of the dryer and prevent any damage being caused. In addition energy consumption will be increased if the condenser unit is covered with fluff. Open the door. Press on the two tabs to unlatch and take off the removable plinth. Turn the two securing disks through a quarter turn each outwards.
Something not working? Something not working? If the tumble dryer is not working correctly please carry out the following checks before calling out an engineer.
Something not working? Symptom Possible cause Is the tumble dryer plugged in The drum illumination does not work Solution Plug in the tumble dryer The program selector is in Turn the program selector the OFF position dial to LIGHT The bulb needs replacing Replace bulb The condenser unit is covered with fluff Clean the condenser unit Fluff filter is clogged Clean the fluff filter The door cannot be closed Fluff filter has not been inserted correctly and/or the filter lid not closed Replace the fl
Something not working? Replace the interior light A replacement bulb can be purchased through your local AEG Service Force Centre (Part No: 647072580). Warning! Never use standard light bulbs in your Lavatherm. Isolate the appliance from the mains supply. Screw-off the bulb cover. (The bulb is located at the top behind the door; see Front view). Replace the defective bulb. Screw-on the bulb cover. Warning! For safety reasons the bulb cover must be screwed-on.
Door Reversal Instructions Door Reversal Instructions The door opening direction can be changed if required. Warning! Before reversing the door, isolate the appliance from the mains supply. Proceed as follows to reverse the door opening direction: ACB F E H D J G F E ACB Un-screw the screws A on the front panel of the appliance. Take-off the door by displacing it horizontally. Un-screw the screws B on the inside of the door and take-off the hinges C.
Door Reversal Instructions Take-out the latched catch covering J and pull-off the plug. Connect the door catch H and the catch covering J on the respective opposite side to the plug, insert into the break-out and screw-down or latch into position. Push the door with the hinges into the breakouts provided for them in the front panel of the appliance and firmly attach it with the screws. After changing-over the door, check that the DOOR button functions correctly.
Technical data Technical data Height x Width x Depth Depth with the door open Height adjustable from Empty weight Load (depending on the program) 85x60x60cm 117cm 1.0/–0.4cm approx. 46kg max. 5kg Power consumption in acc. with IEC 1121 s.e. 3.
Electrical Connection Electrical Connection Any electrical work required to install this appliance should be carried out by a qualified electrician or competent person. 1 WARNING - THIS APPLIANCE MUST BE EARTHED. The manufacturer declines any liability should these safety measures not be observed. Before switching on, make sure the electricity supply voltage is the same as that indicated on the appliance rating plate. The rating plate is located inside the door.
Electrical Connection • The wire coloured green and yellow must be connected to the terminal marked with the letter “E“ or by the earth symbol or coloured green and yellow • The wire coloured blue must be connected to the terminal “N“ or coloured black. • The wire coloured brown must be connected to the terminal marked “L“ or coloured red. • Upon completion there must be no cut, or stray strands of wire present and the cord clamp must be secure over the outer sheath.
Special accessories Special accessories You can obtain the following special accessories from your retailer. Drainage kit A drainage kit (E-No. 916 019 000) can be purchased to adapt the dryer to drain the condensed water into an existing drain, sink etc. This eliminates having to empty the condensed water reservoir, although the reservoir must still be inserted into the control panel of the machine.
Guarantee Conditions Guarantee Conditions AEG offer the following guarantee to the first purchaser of this appliance. 1. The guarantee is valid for 12 months commencing when the appliance is handed over to the first retail purchaser, which must be verified by purchase invoice or similar documentation. The guarantee does not cover commercial use. 2. The guarantee covers all parts or components which fail due to faulty workmanship or faulty materials.
Guarantee Conditions European Guarantee If you should move to another country within Europe then your guarantee moves with you to your new home subject to the following qualifications: – The guarantee starts from the date you first purchased your product. – The guarantee is for the same period and to the same extent for labour and parts as exist in the new country of use for this brand or range of products. – This guarantee relates to you and connot be transferred to another user.
Service & Spare Parts If after carrying out the necessary checks there is still a fault with your appliance please contact your local AEG Service Force Centre. In guarantee customers should ensure that the suggested checks have been made as the engineer will make a charge if the fault is not a mechanical or electrical breakdown. Please note that proof of purchase is required for in-guarantee service calls.
Index A Acrylate . . . . . . . . . . . . . . . . . . . . . . . . . . . . Acrylic . . . . . . . . . . . . . . . . . . . . . . . . . . . . . Anorak . . . . . . . . . . . . . . . . . . . . . . . . . . . . . AUDIBLE SIGNAL . . . . . . . . . . . . . . . . . . . . . AUDIBLE SIGNAL (button) . . . . . . . . . . . . . S 16 22 15 15 17 C Closing the fill-in door . . . . . . . . . . . . . . . . Condenser . . . . . . . . . . . . . . . . . . . . . . . . . . Connection . . . . . . . . . . . . . . . . . . . . . . . . .
AEG Hausgeräte GmbH Postfach 1036 D-90327 Nürnberg http://www.aeg.hausgeraete.