MC 4450 iP Bedienungsanleitung/Garantie Gebruiksaanwijzing • Mode d’emploi • Instrucciones de servicio Istruzioni per l’uso • Instruction Manual Musik-Center für iPhone/iPod Muziekcentrum voor iPhone/iPod • Station d‘accueil pour iPhone/iPod Centro de música para iPhone/iPod • Centro musicale per iPhone/iPod Music Center for iPhone/iPod iPhone und iPod sind Schutzmarken der Apple Inc., registriert in den USA und anderen Ländern. iPhone and iPod are trademarks of Apple Inc.
Inhalt Deutsch ESPAÑOL Inhalt Übersicht der Bedienelemente.................................... Seite Bedienungsanleitung...................................................... Seite Technische Daten.............................................................. Seite Garantie................................................................................ Seite Contenidos 3 4 11 11 NEDERLANDS Indicación de los elementos demanejo.................página Manual del usuario....................................
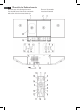
Übersicht der Bedienelemente Overzicht van de bedieningselementen Liste des différents éléments de commande Indicación de los elementos demanejo Elementi di comando Location of Controls
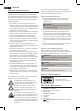
Deutsch Allgemeine Sicherheitshinweise Lesen Sie vor Inbetriebnahme dieses Gerätes die Bedienungsanleitung sehr sorgfältig durch und bewahren Sie diese inkl. Garantieschein, Kassenbon und nach Möglichkeit den Karton mit Innenverpackung gut auf. Falls Sie das Gerät an Dritte weitergeben, geben Sie auch die Bedienungsanleitung mit. • Um das Risiko von Feuer oder einem elektrischen Schlag zu vermeiden, sollten Sie das Gerät nicht Regen oder Feuchtigkeit aussetzen.
Deutsch 8 9 10 11 12 13 14 15 16 17 18 19 20 21 /STOP/MENU Taste PLAY/PAUSE/ENTER Taste (Wiedergabe/Pause/ Bestätigen) CD OPEN/CLOSE (öffnen/schließen) CD-Fach iPOD/MEM/C-ADJ. Taste (Speicher/Uhrzeit) PRESET/FOLDER Tasten (Radiosender/Ordner) REPEAT Taste (Wiederholen) VOLUME +/- (Lautstärke) Tasten FUNCTION Funktionswahltaste iPOD OPEN/CLOSE (öffnen/schließen) DockAnschluss-Fach STANDBY/ON Taste (Standby/Betrieb) ID3/MONO/ST.
Deutsch 4. Um die Minuten einzustellen, drücken Sie die / SKIP/TUNE SEARCH Tasten. 5. Drücken Sie erneut auf die iPOD/MEM/C-ADJ. Taste um die Uhrzeit abzuspeichern. Batterien der Fernbedienung einlegen/austauschen HINWEIS: Die Lithium-Zelle im Batteriefach der Fernbedienung wurde für den Transport ggf. mit einer Folie gesichert. Dies verlängert die Lebensdauer der Batterie. Vor der ersten Anwendung entfernen Sie bitte diese Folie, um die Fernbedienung betriebsbereit zu machen.
Deutsch Kopfhörerbuchse (19) Benutzen Sie für den Kopfhörerbetrieb einen Kopfhörer mit einem 3,5 mm Stereo-Klinkenstecker, den Sie in den Kopfhöreranschluss stecken. Die Lautsprecher werden abgeschaltet. Infrarot-Fernbedienung Zur kabellosen Bedienung aus einer Entfernung von bis zu 5 Metern. Lässt diese Reichweite nach, müssen die Batterien ausgetauscht werden. Achten Sie bei der Bedienung auf freie Sicht zwischen Fernbedienung und dem Sensor (2) am Gerät.
Deutsch Musik vom iPod/iPhone wiedergeben iPod/iPhone Ladefunktion (iPod/iPhone nicht im Lieferumfang enthalten) 1. Drücken Sie die FUNCTION Taste (15/1) so oft, bis im Display „IPOD“ erscheint. 2. Drücken Sie die iPOD OPEN/CLOSE (öffnen/schließen) Taste (16/3), um das Dock-Anschluss-Fach (21) zu öffnen. Das CD Fach fährt nach rechts auf. Haben Sie einen iPod/iPhone auf dem Dock Anschluss aufgesteckt, so wird der Akku des iPod/iPhone geladen. Hierfür muss das Gerät ans Stromnetz angeschlossen sein.
Deutsch Halten Sie den CD-Deckel stets geschlossen. HINWEIS: • Wenn eine Disk falsch herum eingelegt wird, bzw. keine Disk eingelegt ist, leuchtet die Meldung „READING“, und „NO DISC“ (keine Disk) erscheint auf dem Display. • Die Wiedergabe anwenderseitig erstellter CD kann durch die Vielzahl der verfügbaren Software und CDMedien nicht garantiert werden. Beschreibung der Bedientasten PLAY/PAUSE/ENTER (9/14) Sie können die Wiedergabe kurz unterbrechen und wieder starten.
Deutsch RANDOM (6 an der FB) Im Display erscheint die Anzeige „RANDOM“ und die erste Titelnummer, welche als erste gespielt wird. Alle Titel werden nacheinander in einer zufälligen Reihenfolge wiedergegeben. PRESET/FOLDER (12/5) Bei MP3 oder einer CD im MP3 Format: Drücken Sie diese Tasten, während der Wiedergabe, um einen Ordner nach oben bzw. nach unten zu wechseln. Die Anzeige, z.B. ALBUM 02, wird kurz angezeigt. Anschließend beginnt selbsttätig die Wiedergabe der MP3 CD.
Deutsch 7. Zum Löschen des Programms drücken Sie bitte 2x die STOP/MENU Taste. Die Anzeige MEMORY erlischt. Das Gerät stoppt automatisch, nachdem alle programmierten Titel wiedergegeben wurden. Die programmierte Reihenfolge bleibt im Speicher enthalten bis Sie in den anderen Modus wechseln, oder die CD aus dem CD Fach entnommen wird bzw. das Gerät ausgeschaltet wird. Sie haben die Möglichkeit die programmierten Titel mit der REPEAT-Funktion zu kombinieren.
Deutsch 2. Voraussetzung für unsere Garantieleistungen sind der Kauf des Geräts in Deutschland bei einem unserer Vertragshändler sowie die Übersendung einer Kopie des Kaufbelegs und dieses Garantiescheins an uns. Befindet sich das Gerät zum Zeitpunkt des Garantiefalls im Ausland, muss es auf Kosten des Käufers uns zur Erbringung der Garantieleistungen zur Verfügung gestellt werden. 3. Mängel müssen innerhalb von 14 Tagen nach Erkennbarkeit uns gegenüber schriftlich angezeigt werden.
NEDERLANDS Algemene veiligheidsrichtlijnen Lees deze gebruiksaanwijzing zorgvuldig door voordat u dit apparaat in gebruik neemt, en bewaar hem samen met het Garantiecertificaat, het aankoopbewijs en, indien mogelijk, de originele verpakking inclusief het materiaal in de doos. Als u het apparaat doorgeeft aan een derde persoon, geef de gebruiksaanwijzing dan ook door. • Stel het apparaat niet bloot aan regen of vocht, om het risico op elektrische schokken te vermijden.
9 10 11 12 13 14 15 16 17 18 19 20 21 NEDERLANDS PLAY/PAUSE/ENTER toets (afspelen/pauze/Enter) CD OPEN/CLOSE (openen/sluiten) CD-compartiment iPOD/MEM/C-ADJ. toets (geheugen/klok) PRESET/FOLDER toetsen (Voorinstelling/Folder) REPEAT toets (Herhaal) VOLUME +/- (volume) toetsen FUNCTION (functieschakelaar) iPOD OPEN/CLOSE (openen/sluiten) Docking poort compartiment STANDBY/ON Toets (slaapstand/aan) ID3/MONO/ST.
NEDERLANDS Batterij in de Afstandsbediening Plaatsen/Vervangen OPMERKING: De lithumcel in het batterijvak van de afstandsbediening wordt tijdens transport beschermd door een stukje folie. Hierdoor wordt de levensduur van de batterij verlengd. Verwijder dit stukje folie voordat u de afstandsbediening voor de eerste keer gebruikt. De batterij van de afstandsbediening is een lithumcelbatterij met extra lange levensduur.
NEDERLANDS Infrarood afstandsbediening Voor draadloze bediening tot een afstand van 5 meter. Als dit bereik kleiner wordt, vervang dan de batterijen. Zorg dat er zich tijdens het gebruik geen obstakels bevinden tussen de afstandsbediening en de sensor (2) op het apparaat. 4. Zie voor verdere functies het de gebruiksaanwijzing van het externe audiotoestel. USB poort Dit apparaat is ontworpen in overeenstemming met de meest recente stand der techniek voor USB-technologie.
NEDERLANDS LET OP: Zorg ervoor dat uw iPod/iPhone rechtop in de aansluiting gezet wordt. Zet de iPod/iPhone niet scheef in de aansluiting. Dit kan het dock en/of de iPod/ iPhone beschadigen. 6. Druk op de toets (20) om de docking poort te sluiten. 7. Afhankelijk van het iPod/iPhone model moet eerst de toetsenvergrendeling uitgeschakeld worden, en moet de weergave gestart worden met behulp van de PLAY/PAUSE/ENTER toets (9/14). 8.
NEDERLANDS U kunt de SKIP/TUNE SEARCH toets als volgt gebruiken: 1 x drukken = Ga terug naar het begin van het huidige nummer. 2 x drukken = Ga terug naar het vorige nummer. 3 x drukken = Ga terug naar het nummer daarvoor enz. Houd de toets ingedrukt om versneld achterwaarts te gaan in het huidige nummer (geluid wordt gedempt). In IPOD modus: • Druk eerst op de iPOD/MEM/C-ADJ toets om het iPodMenu te activeren. IPODMENU verschijnt op de display.
NEDERLANDS TIMER (7 op de afstandsbediening) U kunt het apparaat programmeren zodat het na een vooraf ingestelde tijd uit en weer aan gaat. 1. Gebruik de STANDBY/ON toets om naar de slaapstand te schakelen (de tijd wordt weergegeven). 2. Druk de TIMER toets totdat het scherm “ ON” weergeeft. • Gebruik de / SKIP/TUNE SEARCH toetsen (7/14) om vervolgens de inschakeluren, de uitschakeluren, de uitschakelminuten, de inschakelmodus en het inschakelvolume in te stellen. • Bevestig elke invoer met de TIMER toets.
NEDERLANDS Reiniging en onderhoud • Haal de stekker uit het stopcontact voor het reinigen. • U kunt vlekken op de buitenzijde afvegen met een vochtige doek zonder toevoegingen. Probleemoplossing Probleem Het apparaat kan niet worden gebruikt Oorzaak Het apparaat is geblokeerd en “hangt” Oplossing Trek de stekker uit het stopcontact en wacht minstends 5 seconden.
FRANÇAIS Indications générales de sécurité Avant d’utiliser cet appareil, lire attentivement ce manuel et le conserver avec le Certificat de Garantie, la facture et, si possible, l’emballage d’origine, y compris l’emballage interne. Si cet appareil est donné à une tierce personne, transmettre le manuel avec. • Pour éviter tout risque d‘incendie ou d‘électrocution, n‘exposez pas cet appareil à la pluie ou à l‘humidité. Ne le faites pas fonctionner à proximité de l‘eau (par ex.
12 13 14 15 16 17 18 19 20 21 FRANÇAIS Touches PRESET/FOLDER (Présélection/Fichier) Touche REPEAT (Répéter) VOLUME +/- Touches (volume) FUNCTION (Interrupteur Fonction) iPOD OPEN/CLOSE (ouvrir/fermer) Le compartiment de port d‘accueil Touche STANDBY/ON (Veille/Marche) Touche ID3/MONO/ST. Connexion LINE IN Prise casque Ouvrir/fermer le port d‘accueil Compartiment de port d‘accueil Montage mural Vous pouvez également installer l’appareil à un mur (accessoires de montage non-inclus).
FRANÇAIS Installation / remplacement de la pile de la télécommande NOTE : Dans certaines conditions, la pile au lithium dans le boîtier à pile de la télécommande a été fixée avec un film protecteur pour le transport. Ceci permet de prolonger sa durée de vie. Retirer ce film pour préparer la télécommande avant la première utilisation. La pile dans la télécommande est une pile-bouton au lithium à longue durée de vie.
FRANÇAIS Port USB Cet appareil a été conçu en conformité avec la technologie USB la plus récente. Compte tenu de la grande variété de supports de stockages USB existant sur le marché, il n’est pas possible de garantir une compatibilité totale avec tous les supports de stockage USB existants. Il peut arriver qu’à certaines rares occasions des erreurs se produisent lors de la lecture de supports de stockage USB. Il ne s’agit pas d’un disfonctionnement de ce lecteur. 1.
FRANÇAIS 5. Insérez votre iPod ou iPhone dans la station d’accueil. ATTENTION : Vérifier que l’iPod / iPhone est branché droit dans le port. Ne pas renverser ni incliner l’iPod / iPhone lorsqu’il est branché dans le port. Cela pourrait endommager la station ou l’iPod / iPhone. 6. Appuyez sur le bouton (20), pour fermer le port d‘accueil. 7. Selon le modèle d’iPod / iPhone, relâcher d’abord le verrouillage des touches et démarrer la lecture si nécessaire avec la touche PLAY/PAUSE/ENTER (9/14). 8.
FRANÇAIS / SKIP/TUNE SEARCH (7/14) Si un CD Audio, MP3, ou un CD fonctionne au format MP3 ou en mode IPOD : La touche SKIP/TUNE SEARCH vous permet de passer à la piste suivante ou bien à celle d’après, etc. Maintenez cette touche enfoncée pour parcourir rapidement les morceaux (le son sera coupé). Vous pouvez utiliser la touche SKIP/TUNE SEARCH de la façon suivante : Appuyez 1 fois = Reprend la lecture de la piste en cours, depuis son commencement. Appuyez 2 fois = Passe à la piste précédente.
FRANÇAIS SLEEP (8 sur la télécommande) Lorsque l’appareil est en marche, vous pouvez régler le temps au bout duquel il passera automatiquement en mode de veille; réglez le temps par intervalles de 10 minutes, entre 10 et 90 minutes. Appuyez plusieurs fois sur la touche jusqu’à ce que l’écran indique le temps désiré. Lorsque la fonction est activée, l’écran va afficher “. L’appareil va automatiquement s’éteindre le symbole “ au temps indiqué.
FRANÇAIS Lecture de fichiers musicaux au format MP3 Cet appareil permet la lecture de fichiers musicaux au format MP3. L’appareil supporte également les types de CD communs : CD, CD-RW et CD-R. Vous appareil peut lire les CD MP3. Il s’agit de CD au format compressé pouvant contenir jusqu’à 200 pistes. Votre appareil peut automatiquement reconnaître les disques MP3 (l’écran va indiquer le nombre total de pistes et de répertoires).
ESPAÑOL Normas generales de seguridad Antes de usar este dispositivo, lea cuidadosamente este manual del usuario y consérvelo junto con el certificado de garantía, el recibo de compra y, si es posible, el embalaje original, incluyendo el embalaje interno. Si entrega el dispositivo a terceros, incluya también el manual del usuario. • Para evitar riesgos de incendio o electrocución, no exponga el aparato a la lluvia o la humedad. No lo use cerca del agua (como en baños, piscinas ni sótanos húmedos).
ESPAÑOL 14 Botones VOLUME +/- (volumen) 15 FUNCTION (interruptor de función) 16 iPOD OPEN/CLOSE (abrir/cerrar) Compartimento de puerto de acoplamiento 17 Botón STANDBY/ON (espera/encendido) 18 Botón ID3/MONO/ST. 19 Conexión LINE IN Toma de auriculares Abrir/cerrar puerto de acoplamiento 20 21 Compartimento de puerto de acoplamiento ATENCIÓN: Antes de comenzar la instalación, cerciórese de que no haya ningún cable en la pared para evitar dañarlos.
ESPAÑOL Colocación y sustitución de las pilas del mando a distancia NOTA: En algunos casos, la celda de litio del compartimento de la batería del control remoto se ha cubierto con una lámina protectora para su transporte. Así se logra aumentar la duración de la batería. Antes del primer uso del control remoto, quite esta protección. La batería del control remoto es una celda de litio de larga duración.
ESPAÑOL Mando a distancia por infrarrojos Funcionamiento inalámbrido desde una distancia de hasta 5 metros. Si el alcance se reduce, cambie las baterías. Asegúrese de que no haya obstáculos entre el mando a distancia y el sensor (2) del dispositivo durante el funcionamiento. Puerto USB Este dispositivo se ha diseñado según las últimas características de la tecnología USB.
ESPAÑOL 3. Pulse el botón (20) para abrir el puerto de acoplamiento. 4. Si se proporciona un adaptador con el iPod, póngalo sobre el conector de la base de carga. Solamente podrá comprobar que el iPod se ajusta correctamente al puerto si el adaptador está conectado. 5. Coloque el iPod/iPhone en la base de carga. ATENCIÓN: Compruebe que el iPod/iPhone está conectado al puerto en la posición correcta. No tuerza ni incline el iPod/iPhone mientras esté conectado al puerto.
ESPAÑOL Descripción de los botones de control PLAY/PAUSE/ENTER (9/14) Puede detener temporalmente la reproducción y comenzar de nuevo. El tiempo de reproducción transcurrido parpadeará en la pantalla. Pulsando el botón de nuevo continuará la reproducción desde la misma posición. En modo IPOD: • En primer lugar, pulse el botón iPOD/MEM/C-ADJ para activar el Menú iPod. IPODMENU aparece en la pantalla.
ESPAÑOL 35 En modo radio: Selecciona una emisora de radio guardada. iPOD/MEM/C-ADJ. (11/4) Establecer el reloj, guardar emisoras y reproducción programada. SLEEP (8 en el mando) Cuando el dispositivo esté encendido, puede establecer el tiempo pasado el cual el dispositivo pasará a modo espera; establezca el tiempo en intervalos de 10 minutos, de 90 a 10 minutos. Pulse repetidamente este botón hasta que la pantalla muestre el tiempo deseado.
ESPAÑOL El dispositivo puede reproducir CD MP3. Son CD comprimidos que pueden guardar hasta 200 pistas. El dispositivo reconoce automáticamente discos MP3 (la pantalla mostrará el número total de pistas y carpetas). Consulte el capítulo “Reproducir CD/MP3” para reproducir estos CD. Puede programar pistas como se ha descrito en “Reproducción programada”.
ITALIANO Linee guida generali sulla sicurezza Prima di usare questo dispositivo, leggere attentamente il manuale dell‘utente e conservarlo con il Certificato di Garanzia, lo scontrino e, se possibile, la confezione originale. Se il dispositivo viene consegnato a terzi, consegnare anche il manuale dell‘utente. • Per evitare il pericolo di incendi o scosse elettriche, non esporre l’apparecchio a pioggia o umidità. Non far funzionare l’apparecchio vicino all’acqua (per es.
ITALIANO 14 15 16 17 18 19 Tasti VOLUME +/- (volume) FUNCTION commutatore di funzione iPOD OPEN/CLOSE (apri/chiudi) Vano porta docking Tasto STANDBY/ON (standby/alimentazione) Tasto ID3/MONO/ST.
ITALIANO Inserimento/Sostituzione della batteria nel telecomando NOTA: Ove necessario, la cella al litio nel vano batterie del telecomando è stata inserita con una pellicola protettiva per il trasporto. Questa consente di prolungare la durata della batteria. Al primo utilizzo rimuovere questa pellicola per preparare il telecomando all‘uso. La batteria nel telecomando è una cella litio a lunga durata.
ITALIANO Porta USB L’apparecchio è stato progettato secondo la più moderna tecnologia USB. In seguito alla presenza di un’ampia gamma di strumenti di memoria sul mercato, non è possibile assicurare compatibilità assoluta con tutti i dispositivi di memorizzazione USB. In alcuni rari casi possono quindi verificarsi errori durante le riproduzione con alcuni dispositivi di memorizzazione USB. Non si tratta di anomalie dell’apparecchio. 1. Aprire il coperchio (3) sopra il dispositivo. 2.
ITALIANO ATTENZIONE: Assicurarsi che l‘iPod/iPhone sia collegato nella porta in modo diritto. Non piegare o inclinare l‘iPod/iPhone mentre è connesso nella porta. In caso contrario, il dock o l’iPod/iPhone possono subire danni. 6. Premere il tasto (20) per chiudere la porta docking. 7. In base al modello dell’iPod/iPhone, rilasciare il blocco tasti e iniziare la riproduzione di musica se necessario con il tasto PLAY/PAUSE/ENTER (9/14). 8. Chiudere nuovamente il vano porta docking.
ITALIANO / SKIP/TUNE SEARCH (7/14) Se un CD audio, MP3, un CD è in riproduzione in formato MP3 o in modalità IPOD: Con il tasto SKIP/TUNE SEARCH è possibile saltare al brano successivo o a quello ancora successivo ecc. Tenere premuto il tasto per effettuare la ricerca rapida della musica (il suono viene silenziato). È possible azionare il tasto SKIP/TUNE SEARCH come segue: Premere 1 x = Riproduce nuovamente il brano attuale dall’inizio. Premere 2 x = Salta al brano precedente.
ITALIANO Per mostrare il tempo rimanente, premere il tasto SLEEP. È ancora possible ridurre il tempo oppure disattivare la funzione (OFF). TIMER (7 sul telecomando) È possible programmare l’apparecchio in modo che si spenga e si riaccenda dopo un periodo di tempo preimpostato. 1. Utilizzare il tasto STANDBY/ON per passare al modo standby (viene mostrato l’orario). 2. Premere il tasto TIMER finché il display non mostra “ ON“.
ITALIANO Nota: VI sono metodi di masterizzazione e compressione diversi, come diverse qualità di CD e CD masterizzati. Inoltre, il settore musicale non utilizza standard prefissati (protezione copia). Per questo motivo è possible, in rari casi, che insorgano errori durante la lettura di CD e MP3. Non si tratta di un’anomalia dell’apparecchio.
ENGLISH General Safety Guidelines Before using this device, carefully read this user manual and keep it together with the Warranty Certificate, cashier receipt and if possible, the original package inclusive its interior packing. If you hand on the device to any third person, include the user manual as well. • To avoid the risk of fire or electric shock, do not expose the device to rain or humidity. Do not operate near water (e.g. in bathrooms, swimming pools and wet basements).
ENGLISH 14 15 16 17 18 19 VOLUME +/- buttons FUNCTION (function switch) iPOD OPEN/CLOSE Docking port compartment STANDBY/ON button (standby/power) ID3/MONO/ST. button LINE IN connection headphone jack Open/close docking port 20 21 Docking port compartment CAUTION: Make sure beforehand whether there are cables in the wall which could be damaged! NOTE: Check the reach of the cable! To mount the device, make sure that an easily accessible plug outlet is available within reach of the power cable.
ENGLISH Insert/Replace Battery in Remote Control NOTE: Where necessary, the lithium cell in the battery compartment of the remote has been fitted with a protective foil for transport. This extends the lifetime of the battery. Before initial use please remove this foil to prepare the remote for use. The battery in the remote is a long-life lithium cell. Should the range of the remote shorten during use, follow the steps below: • Open the battery compartment on the underside of the remote.
ENGLISH USB port This device has been designed in accordance with the latest USB state of the art technology. Due to the large variety of different USB memory tools on the market it is not possible to provide complete compatibility with all USB storage devices. In some rare cases there might occur, for that reason, errors when playing USB storage devices. That is not a malfunction of this device. 1. Open the cover (3) on the top of the device. 2. Use the FUNCTION button (15/1) to select USB mode.
ENGLISH 8. Close the docking port compartment again. To do so, press the iPOD OPEN/CLOSE button again. 9. Follow your iPod/iPhone manual for further use of the controls. CAUTION: Stop playback before unplugging the iPod/iPhone from the port since the iPod/iPhone may otherwise be damaged. NOTE: If you have an incoming call when playing back music with the iPhone docked, then playback stops and you can hear the ring tone.
ENGLISH In IPOD mode: • First press the iPOD/MEM/C-ADJ button to activate the iPod-Menu. IPODMENU appears in the display. • Now press the / SKIP/TUNE SEARCH buttons to scroll up or down the iPod/iPhone menu. During radio mode: Tune the desired radio station. STOP/MENU (8/14) Pauses the CD or piece of music. In IPOD Mode: • First press the iPOD/MEM/C-ADJ button to activate the iPod menu. IPODMENU appears in the display.
ENGLISH NOTE: If no button is pressed within around 10 seconds, the device switches back to standby mode without saving the input. 3. After you have selected the turn-on volume, press the TIMER button again. The device will switch into standby mode. “ ” will be displayed and the timer is activated. After the set time has been reached, the device switches to the selected mode. The volume increases slowly to the selected volume. Press TIMER to deactivate the timer function. “ disappear from the display.
ENGLISH Technical Specifications Model:..................................................................................MC 4450 iP Voltage supply:...................................................230-240 V~ 50 Hz Output power:...............................................................100 W PMPO Power consumption:...................................................................23 W Protection class:....................................................................................
GARANTIE-KARTE Garantiebewijs • Carte de garantie Certificato di garanzia • Tarjeta de garantia Cartão de garantia • Guarantee card Garantikort • Karta gwarancyjna • Záruční list Garancia lap • Гарантийная карточка MC 4450 iP 24 Monate Garantie gemäß Garantie-Erklärung • 24 maanden garantie overeenkomstig schriftelijke garantie • 24 mois de garantie conformément à la déclaration de garantie • 24 meses de garantie según la declaratión de garantía • 24 meses de garantia, conforme a declaração de garantia • 2