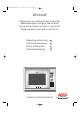
AG-91D-EU COVER 21/02/2005 16:20 Page A MCC4060E Microwave oven with grill and convection Mikrowellengerät mit grill und heissluft Four à micro-ondes avec gril et convection Magnetronoven met grill en hetelucht Operating instructions Gebrauchsanweisung Notice d’utilisation Gebruiksaanwijzing UK D F NL PERFEKT IN FORM UND FUNKTION
1. AG-91D-EU ENGLISH 21/02/2005 16:23 Page B Dear Customer, Thank you for buying an AEG-Electrolux microwave oven and putting your trust in the AEG-Electrolux brand name. Before using your AEG-Electrolux microwave oven for the first time, please read the instruction book thoroughly. This will enable you to take advantage of all the features that the appliance offers. It will also ensure trouble-free operation and minimize unnecessary service calls.
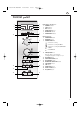
1. AG-91D-EU ENGLISH 21/02/2005 16:23 Page 1 UK Contents Important safety instructions . . . . . . . . . . . . . . . . . . . . . . . . . . . . . . . . . . . . . . . . . . . . . . . . . .2 - 3 Oven & accessories . . . . . . . . . . . . . . . . . . . . . . . . . . . . . . . . . . . . . . . . . . . . . . . . . . . . . . . . . . . . . .4 Control panel . . . . . . . . . . . . . . . . . . . . . . . . . . . . . . . . . . . . . . . . . . . . . . . . . . . . . . . . . . . . . . . . . . .5 Before operation . . .
1. AG-91D-EU ENGLISH 21/02/2005 16:23 Page 2 Important safety instructions IMPORTANT SAFETY INSTRUCTIONS: READ CAREFULLY AND KEEP FOR FUTURE REFERENCE To avoid the danger of fire The microwave oven should not be left unattended during operation. Power levels that are too high or cooking times that are too long may overheat foods resulting in a fire. The electrical outlet must be readily accessible so that the unit can be unplugged easily in an emergency.
1. AG-91D-EU ENGLISH 21/02/2005 16:23 Page 3 UK Important safety instructions To avoid the possibility of explosion and sudden boiling: WARNING: Liquids and other foods must not be heated in sealed containers since they are liable to explode. Never use sealed containers. Remove seals and lids before use. Sealed containers can explode due to a build up of pressure even after the oven has been turned off. Take care when microwaving liquids. Use a widemouthed container to allow bubbles to escape.
1.
1.
1. AG-91D-EU ENGLISH 21/02/2005 16:23 Page 6 Before operation Your oven has an energy save mode. 1. Plug in the oven. Nothing will appear on the display at this time. 2. Open the door. The oven display will show “SELECT LANGUAGE” in 6 languages. NOTE: Once you select the language using the LANGUAGE button, the display will show “ENERGY SAVE MODE TO GO OUT OF ENERGY SAVE MODE SET CLOCK” when you plug the oven in. 3. Close the door. 4. Select a language (See below).
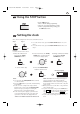
1. AG-91D-EU ENGLISH 21/02/2005 16:23 Page 7 UK Using the STOP button Use the STOP button to: 1. Erase a mistake during programming. 2. Stop the oven temporarily during cooking. 3. Cancel a programme during cooking, press the STOP button twice. Setting the clock There are two setting modes: 12 hour clock and 24 hour clock. Step 2 Step 1 x2 x1 1. To set the 12 hour clock, press the CLOCK SETTING button once as in Step 1. 2.
1. AG-91D-EU ENGLISH 21/02/2005 16:23 Page 8 Energy save mode Your oven comes set for the energy save mode. If you do nothing for 3 minutes after a preceding operation, i.e. closing the door or at the end of cooking, the power will go off automatically. To restore power on, open the door. To start energy save mode, follow the instructions below. Example: To start the energy save mode, (the current time is 23:35): 1. Make sure the correct time appears on the display. 2.
1. AG-91D-EU ENGLISH 21/02/2005 16:23 Page 9 UK What are microwaves? Like radio and television waves, microwaves are electromagnetic waves. Microwaves are produced by a magnetron inside the microwave oven, and these vibrate the molecules of water present in the food. The friction this causes produces heat, which ensures that the food is defrosted, heated or cooked through. The secret of the reduced cooking times is the fact that the microwaves penetrate the food from every direction.
1. AG-91D-EU ENGLISH 21/02/2005 16:23 Page 10 Microwave cooking Your oven can be programmed for up to 90 minutes. (90.00). The input unit of cooking (defrosting) time varies from 10 seconds to five minutes. It depends on the total length of the cooking (defrosting) time as shown on the table opposite: Cooking Time: 0-5 minutes 5-10 seconds 10-30 minutes 30-90 minutes Increasing unit: 10 seconds 30 seconds 1 minute 5 minutes Example: To heat soup for 2 minutes and 30 seconds on 630 W microwave power.
1. AG-91D-EU ENGLISH 21/02/2005 16:23 Page 11 UK Grill cooking The grill heating element at the top of the oven cavity has one power setting only. Example: To cook cheese on toast for 5 minutes (Place toast on the high rack.) 1. Rotate the COOKING MODE dial to the GRILL setting. 2. Enter the desired cooking time by rotating the TIMER/WEIGHT knob clockwise. 3. Press the START/QUICK button to start cooking. x1 Check the display. 1. The high or low racks are recommended when grilling. 2.
1. AG-91D-EU ENGLISH 21/02/2005 16:23 Page 12 Convection cooking Your oven can be used as a conventional oven using the convection facility and 10 pre-set oven temperatures. Press Convection 1 2 3 4 5 6 7 8 9 10 250 230 220 200 190 180 160 130 100 40 button Oven Temp (˚ C) Example 1: To cook with preheating To pre-heat to 180° C and cook for 20 minutes at 180° C. 1. Select the cooking mode by rotating the cooking mode dial to . 2.
1. AG-91D-EU ENGLISH 21/02/2005 16:23 Page 13 UK Convection cooking Example 2: To cook without preheating To cook at 250° C for 20 minutes. 1. Select the cooking mode by rotating the cooking mode dial to . 2. Use the TIMER/WEIGHT knob to input the cooking time (20 mins). 3. Select the desired cooking temperature. (250° C). x1 4. Press the START/ QUICK button. x1 Check the display. NOTES: 1. After cooking the oven will automatically cool and the display may show “NOW COOLING”. 2.
1. AG-91D-EU ENGLISH 21/02/2005 16:23 Page 14 Dual cooking Your oven has 2 DUAL cooking modes combining 1) Convection & microwave, 2) Grill with microwave. To select the DUAL cooking mode rotate the COOKING MODE dial to the desired setting, then choose the cooking time. Generally, dual cooking time shortens the total cooking time.
1. AG-91D-EU ENGLISH 21/02/2005 16:23 Page 15 UK Dual cooking Example 2: To cook for 20 minutes on DUAL 2 using 90 W microwave power and GRILL. 1. Select the cooking mode by rotating the cooking mode dial to . 2. Enter the desired cooking time (20 minutes). 3. Press the MICROWAVE POWER LEVEL button twice (90 W). x2 4. Press the START/ QUICK button. Check the display. x1 NOTE: After cooking, the oven will automatically cool and the display may show “NOW COOLING”.
1. AG-91D-EU ENGLISH 21/02/2005 16:23 Page 16 Other convenient functions 1. LESS ( ▼ ) / MORE ( ▲ ) button The LESS ( ▼ ) and MORE ( ▲ ) buttons allow you to decrease or increase programmed setting times easily, (for a less well or more well cooked result), when cooking in progress. a) Choosing Autocook with Less/More: Press the LESS ( ▼ ) and MORE ( ▲ ) button after entering weight and before pressing the START/QUICK button. (See cooking for menus that use Less and More.
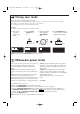
1. AG-91D-EU ENGLISH 21/02/2005 16:23 Page 17 UK Other convenient functions 2. START/QUICK FUNCTION The START/QUICK button allows you to operate the two following functions: a) 30 seconds cooking You can cook on your desired cooking mode for 30 seconds without entering the cooking time. Example: To cook for 30 seconds on 630 W microwave power. 3. Press the START/ 1. Select the cooking mode 2. Change the power QUICK button once to by rotating the COOKING by pressing the begin cooking.
1. AG-91D-EU ENGLISH 21/02/2005 16:23 Page 18 Other convenient functions 3. TO CHECK SETTINGS WHILE THE OVEN IS OPERATING You can check the power level and the actual oven temperatures ie: when pre-heating. TO CHECK THE POWER LEVEL: To check the microwave power level during cooking press the MICROWAVE POWER LEVEL button. The oven continues to count down, although the display shows the power level. As long as your finger is pressing the button, the power level will be displayed.
1. AG-91D-EU ENGLISH 21/02/2005 16:23 Page 19 UK Suitable ovenware Ovenware material Mode of operation Microwave Ovenproof glass and ceramic dishes (without any metal parts, e.g. Pyrex, oven-to-tableware, glass tray). Convection Grill Combination X X X X Non ovenproof glass and porcelain (e.g table crockery 1). X - - - Glass ceramic and vitroceramic made of fire / frostproof material (e,g. Arcoflam). X X X X Ovenproof earthware 2). X X - X Plastic heat-resistant up to 200 C 3).
1.
1.
1. AG-91D-EU ENGLISH 21/02/2005 16:23 Page 22 Recipes for glass tray & convection Cherry almond cake Ingredients 175 g margarine 175 g caster sugar 3 medium eggs 175 g plain flour 1 tsp baking powder 100 g glace cherries 75 g ground almonds 1 tsp almond essence 1 tbsp milk Red onion quiche Ingredients 500 g shotcrust pastry 45 g butter 300 g red onions, sliced 3 eggs 150 ml double cream 50 ml milk 100 g grated gouda 1/4 tsp dijon mustard black pepper 1/4 tsp salt 22 1. 2. 3. 4.
1.
1. AG-91D-EU ENGLISH 21/02/2005 16:23 Page 24 Automatic operations The AUTOMATIC OPERATIONS automatically work out the correct cooking mode and cooking time. You can choose from 5 AUTO COOK menus, 4 AUTO COOK FROM FROZEN menus and 7 AUTO DEFROST menus. Warning: For AUTO COOK and AUTO COOK FROM FROZEN: AUTOMATIC buttons The oven cavity, door, outer cabinet, turntable, racks and dishes will become very hot. Use thick oven gloves when removing food or the turntable from the oven to prevent burns.
1. AG-91D-EU ENGLISH 21/02/2005 16:23 Page 25 UK Automatic operations Example: To cook 300 g of Rice using AUTO COOK (AC-1) 1. Press the AUTO COOK button once to select Rice. 2. Enter the weight by rotating the TIMER/WEIGHT knob until the desired weight is displayed. 3. Press the START/QUICK button to start cooking. x1 x1 Check the display.
1. AG-91D-EU ENGLISH 21/02/2005 16:23 Page 26 Auto cook chart MENU NO.
1. AG-91D-EU ENGLISH 21/02/2005 16:23 Page 27 UK Auto cook from frozen chart MENU NO. ACF-1 Cook Frozen Ready Meals (initial temp -18° C) Stirrable type (e.g. Noodles Bolognese, Chinese Menus.) WEIGHT (Increasing Unit) / UTENSILS 0,3 - 1,0 kg* (100 g) Casserole dish & lid * If the manufacturer instructs to add water, please calculate the total amount for the program with additional liquid. PROCEDURE • • • • • Transfer meal to suitable casserole dish.
1. AG-91D-EU ENGLISH 21/02/2005 16:23 Page 28 Auto defrost chart MENU NO. AD-1 Defrost Steaks, Chops (initial temp -18° C) 28 WEIGHT (Increasing Unit) / UTENSILS 0,2 - 1,0 kg (100 g) (see note on page 29) PROCEDURE • Place the food on a plate in the centre of the turntable. • When the oven stops and the audible signals sound, turn the food over, rearrange and separate. Shield the thin parts and warm spots with aluminium foil.
1. AG-91D-EU ENGLISH 21/02/2005 16:23 Page 29 UK Auto defrost chart NOTES: 1. Steaks, Chops and Chicken legs should be frozen in one layer. 2. Minced meat should be frozen in the thin shape. 3. After turning over, shield the defrosted portions with small, flat pieces of aluminium foil. 4. The poultry should be processed immediately after defrosting. 5. Gateaux topped and coated with cream are very sensitive to microwave energy.
1. AG-91D-EU ENGLISH 21/02/2005 16:23 Page 30 Recipes for auto cook AC-4 Baked courgettes and pasta (This recipe makes approx. 1,5 kg). Ingredients 500 ml water 1/2 tsp oil salt 80 g Macaroni 400 g tinned tomatoes, chopped 3 onion (150 g), finely chopped basil, thyme salt & pepper 1 tbsp oil to grease the dish 450 g courgette, sliced 150 g sour cream 2 eggs 100g grated cheddar Baked broccoli and potato with mushrooms (The recipe makes approx. 1,5 kg.
1. AG-91D-EU ENGLISH 21/02/2005 16:23 Page 31 UK Recipes for auto cook AC-5 Carrot cake (This recipe makes approx. 1,1 kg) Ingredients 1 tsp butter or margarine to grease the dish 5 egg yolks 250 g sugar 250 g carrot, finely grated juice of one lemon 250 g ground almonds 80 g flour 1 tbsp baking powder 5 egg white Gugelhupf (Dough will weigh approx.
1. AG-91D-EU ENGLISH 21/02/2005 16:23 Page 32 Recipes for auto cook AC-5 Apple tart with calvados (This recipe makes approx. 1,3 kg) Ingredients 200 g flour 1 tsp baking powder 100 g sugar 1 Pck. vanilla sugar 1 pinch salt 1 egg 3-4 drop bitter almond oil 125 g butter 1 tsp butter or margarine to grease the dish 50 g ground hazelnuts 600 g apple (russets approx.
1. AG-91D-EU ENGLISH 21/02/2005 16:23 Page 33 UK Care & cleaning CAUTION: DO NOT USE COMMERCIAL OVEN CLEANERS, STEAM CLEANERS, ABRASIVE, HARSH CLEANERS, ANY THAT CONTAIN SODIUM HYDROXIDE OR SCOURING PADS ON ANY PART OF YOUR MICROWAVE OVEN. WARNING! After GRILL, DUAL, CONVECTION, AUTO COOK, AUTO COOK FROM FROZEN modes, the oven cavity, door, oven cabinet and accessories will become very hot. Before cleaning, make sure they are completely cool.
1. AG-91D-EU ENGLISH 21/02/2005 16:23 Page 34 What to do if... ... the microwave appliance is not working properly ? Check that - the fuses in the fuse box are working, - there has not been a power outage. - If the fuses continue to blow, please contact an authorised AEG-Electrolux service agent. ... the microwave mode is not working ? Check that - the door is properly closed, - the door seals and their surfaces are clean, - the START-button has been pressed ...
1. AG-91D-EU ENGLISH 21/02/2005 16:23 Page 35 UK Service & spare parts If you wish to purchase spare parts or require an engineer, contact your local authorised service agent. The telephone number can be obtained from the operator.
1. AG-91D-EU ENGLISH 21/02/2005 16:23 Page 36 Specifications : 230 V, 50 Hz, single phase AC Line Voltage Distribution line fuse/circuit breaker : Minimum 16 A AC Power required: : 1.5 kW : 2.8 kW : 2.8 kW : 2.8 kW : 2.
1. AG-91D-EU ENGLISH 21/02/2005 16:23 Page 37 UK Important information Ecologically responsible disposal of packaging materials and old appliances Packaging materials AEG-Electrolux microwave ovens require effective packaging to protect them during transportation. Only the minimum packaging necessary is used. Packaging materials (e.g. foil or styrofoam) can place children at risk. Danger of suffocation. Keep packaging material away from children.
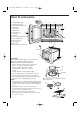
1. AG-91D-EU ENGLISH 21/02/2005 16:23 Page 38 Installation INSTALLING THE APPLIANCE Position B 20 mm Position C Chimney Cable clip Chimney Cable clip Position A Position B D Position C POSITION W 38 NICHE SIZE D H 65 mm 460 mm 5 mm Conventional oven The microwave can be fitted in position A, B or C: Conventional oven 450 mm 450 mm Position A min. 20 mm min. 20 mm 1. Remove all packaging and check carefully for any signs of damage. 2.
1. AG-91D-EU ENGLISH 21/02/2005 16:23 Page 39 UK Installation CONNECTING THE APPLIANCE TO THE POWER SUPPLY • The electrical outlet should be readily accessible so that the unit can be unplugged easily in an emergency. (A) • The socket should not be positioned behind the cupboard. • The best position is above the cupboard, see (A).
2. AG-91D-EU German 21/02/2005 16:22 Page 40 Sehr geehrte Kundin, sehr geehrter Kunde, Wir bedanken uns für den Kauf dieses Mikrowellengerätes und das damit der Marke AEG-ELECTROLUX entgegengebrachte Vertrauen. Zur Nutzung aller Vorteile dieses Gerätes lesen Sie bitte die Gebrauchsanweisung sorgfältig durch. Danach bewahren Sie diese bitte zum Nachlesen gut auf. Ihr neues Mikowellengerät belohnt Sie für diese kleine Mühe mit einer tadellosen Leistung. Ferner vermeiden Sie unnötige Servicekosten.
2. AG-91D-EU German 21/02/2005 16:22 Page 41 D Inhalt Wichtige Sicherheitshinweise . . . . . . . . . . . . . . . . . . . . . . . . . . . . . . . . . . . . . . . . . . . . . . . .42 - 44 Gerät & Zubehör . . . . . . . . . . . . . . . . . . . . . . . . . . . . . . . . . . . . . . . . . . . . . . . . . . . . . . . . . . . . . . .45 Bedienblende . . . . . . . . . . . . . . . . . . . . . . . . . . . . . . . . . . . . . . . . . . . . . . . . . . . . . . . . . . . . . . . . . .46 Vor Inbetriebnahme . . . . . .
2. AG-91D-EU German 21/02/2005 16:22 Page 42 Wichtige Sicherheitshinweise WICHTIG FÜR IHRE SICHERHEIT: LESEN SIE DIE FOLGENDEN HINWEISE AUFMERKSAM DURCH, UND BEWAHREN SIE DIE BEDIENUNGSANLEITUNG AUF Zur Vermeidung von Feuer Mikrowellengeräte sollten während des Betriebs nicht unbeaufsichtigt gelassen werden. Zu hohe Leistungsstufen oder zu lange Garzeiten können das Gargut überhitzen und Feuer verursachen.
2. AG-91D-EU German 21/02/2005 16:22 Page 43 D Wichtige Sicherheitshinweise Zur Vermeidung von elektrischem Schlag Unter keinen Umständen sollte das äußere Gehäuse entfernt werden. Niemals Flüssigkeiten in die Öffnungen der Türsicherheitsverriegelung oder Lüftungsöffnungen kommen lassen oder Gegenstände in diese Öffnungen stecken. Wenn größere Mengen Flüssigkeiten verschüttet werden, müssen Sie sofort das Gerät ausschalten, den Netzstecker ziehen und den AEGElectrolux-Kundendienst anfordern.
2. AG-91D-EU German 21/02/2005 16:22 Page 44 Wichtige Sicherheitshinweise Zur Vermeidung von Fehlbedienung durch Kinder WARNUNG: Kinder dürfen das Gerät nur unter Aufsicht benutzen oder wenn sie ausreichende Anweisungen zur sicheren Benutzung erhalten haben und die Gefahren eines unsachgemäßen Gebrauchs verstehen. Nicht an die Gerätetür lehnen oder an der Tür hängend schwingen. Das Mikrowellengerät ist kein Spielzeug! Kinder sollten mit allen wichtigen Sicherheitshinweisen vertraut gemacht werden: z.B.
2.
2.
2. AG-91D-EU German 21/02/2005 16:22 Page 47 D Vor Inbetriebnahme Ihr Gerät verfügt über einen Energiesparmodus. 1. Verbinden Sie das Gerät mit der Steckdose. Die Anzeige zeigt dabei noch nichts an. 2. Öffnen Sie die Tür. Auf der Anzeige erscheint "SPRACHE WÄHLEN" in 6 Sprachen. HINWEIS: Nach Wahl der Sprache mit Hilfe der SPRACHEN-Taste erscheint bei Einschalten des Herdes “ENERGIESPARMODUS UM DEN ENERGIESPARMODUS ZU VERLASSEN UHRZEIT EINSTELLEN” auf der Anzeige. 3. Schließen Sie die Tür. 4.
2. AG-91D-EU German 21/02/2005 16:22 Page 48 Verwendung der Stop-Taste Verwendung der STOP-Taste: 1. Löschen eines Eingabefehlers während des Programmierens. 2. Unterbrechen des Gerätes während des Betriebs. 3. Zum Löschen eines Programms während des Betriebs die STOP-Taste zweimal drücken. Einstellen der Uhr Die Uhr läuft im 12 Stunden- oder im 24 Stunden-Format. Schritt 2 Schritt 1 x1 1. Um die Uhr auf das 12 Stunden-Format einzustellen, die UHREINSTELLTaste entsprechend Schritt 1 einmal drücken.
2. AG-91D-EU German 21/02/2005 16:22 Page 49 D Energiesparmodus Das Gerät wird mit eingestelltem “Energiesparmodus” geliefert, d.h. die Stromversorgung wird abgeschaltet Falls Sie 3 Minuten nach einer vorangegangenen Bedienung, der Beendigung des Garvorgangs oder nach dem Anschließen des Mikrowellengerätes, nichts weiter unternehmen, schaltet das Gerät automatisch in den Energiesparmodus. Öffnen Sie die Tür, um das Gerät wieder in Betrieb zu nehmen.
2. AG-91D-EU German 21/02/2005 16:22 Page 50 Was sind Mikrowellen? Mikrowellen sind wie Radio- und Fernsehwellen, elektromagnetische Wellen. Mikrowellen werden im Mikrowellengerät vom Magnetron erzeugt und versetzen die Wassermoleküle im Lebensmittel in Schwingungen. Durch die verursachte Reibung entsteht Wärme, die dafür sorgt, dass die Speisen aufgetaut, erhitzt oder gegart werden. Das Geheimnis der kurzen Garzeiten liegt darin, dass die Mikrowellen von allen Seiten direkt in das Gargut eindringen.
2. AG-91D-EU German 21/02/2005 16:22 Page 51 D Garen mit der Mikrowelle Ihr Gerät lässt sich bis zu 90 Minuten programmieren. (90.00).
2. AG-91D-EU German 21/02/2005 16:22 Page 52 Grillbetrieb Die Leistung des oben an der Garraumdecke befindlichen Grillheizelements ist nicht regulierbar. Beispiel: So backen Sie Käsetoast in 5 Minuten (legen Sie das Toast auf den hohen Rost). 1. Stellen Sie den Drehknopf für die Wahl der BETRIEBSART in die Einstellung GRILL. 2. Geben Sie durch Drehen des ZEIT/GEWICHTS-Knopfes im Uhrzeigersinn die gewünschte Garzeit ein. 3. Drücken Sie die START/QUICKTaste, um den Garvorgang zu starten.
2. AG-91D-EU German 21/02/2005 16:22 Page 53 D Heissluftbetrieb Sie können Ihr Gerät mit Hilfe der Heißluftfunktion und den 10 voreingestellten Temperaturstufen wie einen konventionellen Herd benutzen. HEISSLUFT-Taste drücken Gerätetemperatur (° C) 1 2 3 4 5 6 7 8 9 10 250 230 220 200 190 180 160 130 100 40 Beispiel 1: Garen mit Vorheizen So heizen Sie auf 180° C vor und garen für 20 Minuten bei 180° C. 1. Stellen Sie den 2.
2. AG-91D-EU German 21/02/2005 16:22 Page 54 Heissluftbetrieb Beispiel 2: Garen ohne Vorheizen So garen Sie für 20 Minuten bei 250° C. 1. Stellen Sie den Drehknopf für die Wahl der BETRIEBSART in die Einstellung HEISSLUFT. 2. Mit dem ZEIT/ GEWICHTS-Knopf die Garzeit eingeben (20 Min.). 3. Die gewünschte Gartemperatur eingeben. (250° C). 4. Die START/QUICKTaste drücken. x1 x1 Überprüfen Sie das Display. HINWEISE: 1.
2. AG-91D-EU German 21/02/2005 16:22 Page 55 D Kombi-Betrieb Ihr Mikrowellengerät verfügt über 2 KOMBI-Betriebsarten, bei denen die Mikrowelle entweder mit der Heissluft oder mit dem Grill kombiniert werden. Um einen KOMBI-Betrieb zu wählen, drehen Sie zuerst den Drehknopf für die Wahl der BETRIEBSART in die gewünschte Einstellung und dann stellen Sie die Garzeit ein. Im allgemeinen verkürzt die KOMBI-Betriebsart die Gesamtgarzeit.
2. AG-91D-EU German 21/02/2005 16:22 Page 56 Kombi-Betrieb Beispiel 2: So garen Sie für 20 Minuten im KOMBIBETRIEB 2 mit 90 W Mikrowellenleistung und GRILL. 1. Stellen Sie den Drehknopf für die Wahl der BETRIEBSART in die Einstellung KOMBI 2. 2. Die gewünschte Garzeit eingeben (20 Minuten). 3. Drücken Sie die MIKROWELLENLEISTUNGSSTUFENTaste zweimal (90 W). x2 4. Die START/QUICK-Taste drücken. Überprüfen Sie das Display.
2. AG-91D-EU German 21/02/2005 16:22 Page 57 D Andere nützliche Funktionen 1. KÜRZER ( ▼ )/LÄNGER ( ▲ )-Taste Mit den KÜRZER ( ▼ ) und LÄNGER ( ▲ ) -Tasten können Sie die programmierten Zeiteinstellungen problemlos verkürzen oder verlängern (um die Speisen mehr oder weniger durchzugaren). a) Ändern der vorprogrammierten Zeiteinstellung: Drücken Sie die KÜRZER ( ▼ ) und LÄNGER ( ▲ )-Tasten nach Eingabe des Gewichts und vor dem Drücken der START/QUICK-Taste.
2. AG-91D-EU German 21/02/2005 16:22 Page 58 Andere nützliche Funktionen 2. START/QUICK FUNKTION Mit der START/QUICK-Taste können Sie die folgenden beiden Funktionen ausführen: a) 30 Sekunden kochen Sie können die gewünschte Betriebsart 30 Sekunden lang direkt einschalten, ohne die Garzeit einzugeben. Beispiel: So garen Sie für 30 Sekunden bei 630 W Mikrowellenleistung. 1. Drehen Sie den Drehknopf für die Wahl der BETRIEBSART in die Mikrowellen- Einstellung . 2.
2. AG-91D-EU German 21/02/2005 16:22 Page 59 D Andere nützliche Funktionen 3. ÜBERPRÜFEN DER EINSTELLUNG WÄHREND DES BETRIEBS Sie können die Leistungsstufe und die Gerätetemperatur überprüfen z.B. beim Vorheizen. ÜBERPRÜFEN DER LEISTUNGSSTUFE: Um während des Garvorgangs die Mikrowellenleistung zu überprüfen, drücken Sie die MIKROWELLENLEISTUNGSSTUFEN-Taste. Solange Sie die Taste mit dem Finger drücken, wird die Leistungsstufe angezeigt.
2. AG-91D-EU German 21/02/2005 16:22 Page 60 Geeignetes Geschirr Ofenfestes Material Betriebsart Mikrowelle Heißluft Grill Kombination X X X X Nicht-ofenfestes Glas und Porzellan (z.B. Tischgeschirr 1). X - - - Glaskeramik aus feuerfestem /kältebeständigem Material (z.B. Arcoflam). X X X X Ofenfestes Steingut 2). X X - X Kunststoff, hitzebeständig bis zu 200° C 3). X X 3) - X 3) Papier, Pappe X - - - Klarsichtfolie X - - - Mikrowellen-geeignete Bratbeutel 4).
2.
2.
2. AG-91D-EU German 21/02/2005 16:22 Page 63 D Rezepte für Glastablett & Heißluft Kirsch-Mandel-Kuchen Zutaten 175 g 175 g 3 175 g 1 TL 100g 75 g 1 TL 1 EL Margarine Zucker mittelgroße Eier weißes Mehl Backpulver kandierte Kirschen gemahlene Mandeln Mandelessenz Milch Zweibelquiche Zutaten 500 g 45 g 300 g 3 150 g 50 g 100 g 1/4 TL 1/4 TL Mürbeteig Butter rote Zwiebeln, in Scheiben mittelgroße Eier Double Cream (Sahne mit 48% Fettgehalt) Milch geriebenen Gouda Dijon-Senf Schwarzer Pfeffer Salz 1.
2.
2. AG-91D-EU German 21/02/2005 16:22 Page 65 D Automatik-Betrieb Bei Benutzung eines AUTOMATIKPROGRAMMS erfolgt die Einstellung der Leistungsstufe und Garzeit automatisch. Sie können 5 AUTO-GAREN Menüs, 4 AUTO-GAREN VON TK Menüs und 7 AUTO-AUFTAUEN-Menüs auswählen. Warnung: Für AUTO-GAREN und AUTO-GAREN VON TK: Garraum, Tür, Außenseiten, Drehteller, Roste und Geschirr werden besonders heiß.
2. AG-91D-EU German 21/02/2005 16:22 Page 66 Automatik-Betrieb Beispiel: So kochen Sie 300 g Reis mit der AUTO-GAREN (AC-1): 1. Drücken Sie die AUTO-GAREN-Taste einmal für Reis. x1 2. Geben Sie durch Drehen des ZEIT/GEWICHTS-Knopfes im Uhrzeigersinn die gewünschte Gewicht ein. 3. Drücken Sie die START/QUICKTaste, um mit dem Erhitzungsvorgang zu starten. x1 Überprüfen Sie das Display.
2. AG-91D-EU German 21/02/2005 16:22 Page 67 D Tabelle: Auto-Garen MENÜ Nr. AC-1 Reis (Ausgangstemp.: Reis 20° C) MENGE (Gewichtseinheit) / GESCHIRR VERFAHREN 0,1 - 0,3 kg (100 g) Große Schüssel mit Deckel • In eine große Schüssel geben und kochendes Wasser hinzufügen. • Mit einem Deckel abdecken. • Schüssel in die Mitte des Drehtellers stellen. • Wenn der Signalton ertönt, umrühren und wieder abdecken. • Wenn der Signalton wieder ertönt, umrühren und wieder abdecken. • Nach dem Garen ca.
2. AG-91D-EU German 21/02/2005 16:22 Page 68 Tabelle: Auto-Garen von TK MENÜ Nr. 68 MENGE (Gewichtseinheit) / GESCHIRR VERFAHREN 0,3 - 1,0 kg* (100 g) ACF-1 Garen Schüssel mit Deckel Tiefkühl* Wenn der Hersteller die Fertiggerichte (Ausgangstemp.: -18° C) Zugabe von Wasser empfiehlt, die Gesamtmenge für das Speisen zum Umrühren Programm unter Einbeziehung der zusätzlichen Flüssigkeit wie Nudeln Bolognese, berechnen. Chili con carne etc. • Die Speise in ein geeignetes Mikrowellen-Gefäß geben.
2. AG-91D-EU German 21/02/2005 16:22 Page 69 D Tabelle: Auto-Auftauen MENGE (Gewichtseinheit) VERFAHREN / GESCHIRR 0,2 - 1,0 kg (100 g) AD-1 Auftauen • Die Speise auf einem Teller in die Mitte des Drehtellers (Siehe HINWEIS Seite 70) Steaks und stellen. Koteletts • Wenn das Gerät stoppt und das Signal ertönt, die Speise (Ausgangstemp.: -18° C) wenden, neu anordnen und ggf. trennen. Decken Sie dünne Teile und warme Stellen mit Aluminiumfolie ab.
2. AG-91D-EU German 21/02/2005 16:22 Page 70 Tabelle: Auto-Auftauen HINWEIS: 1. Steaks, Koteletts und Hähnchenschenkel sollten nebeneinander (einlagig) eingefroren werden. 2. Hackfleisch sollte flach eingefroren werden. 3. Nach dem Wenden die aufgetauten Portionen mit dünnen Aluminiumstreifen abdecken. 4. Das Geflügel und das Hackfleisch sollten sofort nach dem Auftauen weiterverarbeitet werden. 5.
2. AG-91D-EU German 21/02/2005 16:22 Page 71 D Rezepte für Auto-Garen AC-4 Gebackene Zucchini und Nudeln (Dieses Rezept ergibt ca. 1,5 kg) Zutaten 500 ml Wasser 1/2 TL Öl Salz 80 g Makkaroni 400 g Dosentomaten, in Stücken 3 Zwiebeln (150 g), fein gewürfelt Basilikum, Thymian Salz & Pfeffer 1 TL Öl zum Einfetten der Form 450 g Zucchini, in Scheiben 150 g saure Sahne 2 Eier 100 g geriebenen Käse (Cheddar) Gebackener Broccoli und Kartoffeln mit Champignons (Dieses Rezept ergibt ca.
2. AG-91D-EU German 21/02/2005 16:22 Page 72 Rezepte für Auto-Garen AC-5 Möhrenkuchen (Dieses Rezept ergibt ca. 1,1 kg) Zutaten 1 TL Butter oder Margarine zum Einfetten der Form 5 Eigelb 250 g Zucker 250 g Mohrrüben, fein gerieben Saft einer Zitrone 250 g gemahlene Mandeln 80 g Mehl 1 EL Backpulver 5 Eiweiß Gugelhupf (Der Teig wiegt ca.
2. AG-91D-EU German 21/02/2005 16:22 Page 73 D Rezepte für Auto-Garen AC-5 Apfel-Tarte mit Calvados (Dieses Rezept ergibt ca. 1,3 kg) Zutaten 200 g Mehl 1 TL Backpulver 100 g Zucker 1 Päckchen Vanillezucker 1 Prise Salz 1 Ei 3-4 Tropfen Bittermandelöl 125 g Butter 1 TL Butter oder Margarine zum Einfetten der Form 50 g gemahlene Haselnüsse 600 g Äpfel (Boskop, ca.
2. AG-91D-EU German 21/02/2005 16:22 Page 74 Reinigung und Pflege VORSICHT: ZUR REINIGUNG DÜRFEN KEINESFALLS OFENREINIGER, DAMPFREINIGER, SCHEUERMITTEL, SCHARFE REINIGUNGSMITTEL, NATRIUMHYDROXID ENTHALTENDE REINIGUNGSMITTEL ODER SCHEUERSCHWÄMME VERWENDET WERDEN. DIES GILT FÜR ALLE TEILE DES GERÄTS. WARNUNG! Nach dem GRILL-, HEISSLUFT-, KOMBI-, AUTOGAREN und AUTO-GAREN VON TK werden der Garraum, die Tür, die Außenflächen und Zubehörteile sehr heiß. Vor dem Reinigen vollständig abkühlen lassen.
2. AG-91D-EU German 21/02/2005 16:22 Page 75 D Was tun, wenn… ... das Mikrowellengerät nicht arbeitet? Überprüfen Sie, ob – der Netzstecker eingesteckt ist, – die Sicherungen in der Installation in Ordnung sind, – eventuell der Strom ausgefallen ist, Sollten die Sicherungen mehrfach auslösen, rufen Sie bitte einen zugelassenen Elektroinstallateur. – die Kindersicherung programmiert ist. ...
2. AG-91D-EU German 21/02/2005 16:22 Page 76 Kundendienst Sehr geehrter Kunde, der Werkskundendienst von AEG-ELECTROLUX Hausgeräte ist ezentral organisiert. Damit bieten wir Ihnen überall einen zuverlässigen Service. Unter der für Sie kostengünstigen Rufnummer 0180 322 66 22 (EUR 0.09 /Minute) können Sie im Bedarfsfall einen unserer Spezialisten oder Service-Partner anfordern. Ihre Ersatzteil-Bestellung geben Sie bitte unter der zentralen Rufnummer 0180 5 00 10 76 auf. (EUR 0.
2. AG-91D-EU German 21/02/2005 16:22 Page 77 D Garantiebedingungen Der Endabnehmer dieses Gerätes (Verbraucher) hat bei einem Kauf dieses Gerätes von einem Unternehmer (Händler) in Deutschland im Rahmen der Vorschriften über den Verbrauchsgüterkauf gesetzliche Rechte, die durch diese Garantie nicht eingeschränkt werden. Diese Garantie räumt dem Verbraucher also zusätzliche Rechte ein.
2. AG-91D-EU German 21/02/2005 16:22 Page 78 Kundendienst & Ersatzteile (Belgien) Sollte das Gerät nicht richtig funktionieren, vor dem Anruf beim örtlichen Kundendienstzentrum folgende Punkte überprüfen: Wenn der Ofen nicht einsetzt: • Prüfen, ob das Gerät richtig angeschlossen ist. • Prüfen, ob der Ofenstecker richtig eingesteckt ist. • Gegebenenfalls die Stöpselsicherung durch eine andere der gleichen Stärke austauschen und prüfen, ob der Stecker richtig verkabelt wurde.
2. AG-91D-EU German 21/02/2005 16:22 Page 79 D Garantiebedingungen (Belgien) Unsere Geräte werden mit größter Sorgfalt hergestellt. Trotzdem kann es einmal zu einem Defekt kommen. Unser Kundendienst übernimmt auf Anfrage gerne die Reparatur, und zwar sowohl während des Garantiezeitraums als auch danach. So ist gewährleistet, dass ein Defekt nicht zu einer Verkürzung der Lebensdauer des Geräts führt.
2. AG-91D-EU German 21/02/2005 16:22 Page 80 Technische Daten Stromversorgung Sicherung/Sicherungsautomat Leistungsaufnahme: Leistungsabgabe: Mikrowellenfrequenz Außenabmessungen Garraumabmessungen Garrauminhalt Drehteller Gewicht Garraumlampe Mikrowelle Grill Grill/Mikrowelle Heißluftt Heißluft/Mikrowlle Mikrowelle Grill Heizelemente Heißluf : 230 V, 50 Hz, Einphasenstrom : Mindestens 16A : 1.5 kW : 2.8 kW : 2.8 kW : 2.8 kW : 2.
2. AG-91D-EU German 21/02/2005 16:22 Page 81 D Wichtige Hinweise Umweltfreundliche Entsorgung von Verpackung und Altgerät Verpackung Unsere Mikrowellengeräte benötigen für den Transportweg eine wirksame Schutzverpackung. Dabei beschränken wir uns auf das unbedingt Notwendige. Verpackungsteile (z.B. Folien, Styropor) können für Kinder gefährlich sein. Erstickungsgefahr! Verpackungsteile von Kindern fernhalten. Alle verwendeten Verpackungsmaterialien sind umweltverträglich und wiederverwertbar.
2. AG-91D-EU German 21/02/2005 16:22 Page 82 Aufstellanweisungen INSTALLIERUNG DES GERÄTES Position B 20 mm Position C Rauchabzug Kabelklemme Rauchabzug Kabelklemme Position A Position B D 82 65 mm 460 mm 5 mm Backofen Die Mikrowelle kann in Position A, B oder C gepaßt werden: Backofen 450 mm 450 mm Position A min. 20 mm min. 20 mm 1. Entfernen Sie das Verpackungsmaterial und überprüfen Sie das Gerät sorgfältig auf Beschädigungen. 2.
2. AG-91D-EU German 21/02/2005 16:22 Page 83 D Aufstellanweisungen NETZANSCHLUSS • Die Steckdose sollte sich in einer leicht zugänglichen Position (A) befinden, damit der Stecker des Geräts im Notfall leicht herausgezogen werden kann. • Die Steckdose sollte nicht hinter dem Einbauschrank angebracht sein. • Die beste Position ist über dem Schrank, siehe (A).
3. AG-91D-EU French 21/02/2005 16:21 Page 84 Lors de sa fabrication, cet appareil a été construit selon des normes. directives at/ou décrets pour une utilisation sur le territoire français. Pour la sécurité des biens et des personnes ainsi que pour le respect de l’environnement, vous devez d’abord lire impérativement les préconisations suivantes avant toute utilisation de votre appareil.
3. AG-91D-EU French 21/02/2005 16:21 Page 85 F Cher Client, Merci d’avoir acheté un four à micro-ondes AEG-Electrolux et d’avoir fait confiance à la marque AEG-Electrolux. Avant d’utiliser votre four à micro-ondes AEG-Electrolux pour la première fois, veuillez lire attentivement la notice d’utilisation. Cela vous permettra de profiter pleinement de tous les avantages offerts par votre appareil.
3. AG-91D-EU French 21/02/2005 16:21 Page 86 Sommaire Avertissements importants de sécurité . . . . . . . . . . . . . . . . . . . . . . . . . . . . . . . . . . . . . . . . .87 - 90 Four et accessoires . . . . . . . . . . . . . . . . . . . . . . . . . . . . . . . . . . . . . . . . . . . . . . . . . . . . . . . . . . . . . .91 Bandeau de commande . . . . . . . . . . . . . . . . . . . . . . . . . . . . . . . . . . . . . . . . . . . . . . . . . . . . . . . . .92 Avant la mise en service . . . . . . . . . .
3. AG-91D-EU French 21/02/2005 16:21 Page 87 F Avertissements importants de sécurité AVERTISSEMENTS DE SECURITE IMPORTANTS : LES LIRE ATTENTIVEMENT ET LES CONSERVER SOIGNEUSEMENT POUR CONSULTATIONS ULTERIEURES Pour éviter tout danger d’incendie Vous devez surveiller le four lorsqu’il est en fonctionnement. Un niveau de puissance trop élevé, ou un temps de cuisson trop long, peuvent entraîner une augmentation de la température des aliments conduisant à leur enflammation.
3. AG-91D-EU French 21/02/2005 16:21 Page 88 Avertissements importants de sécurité Si vous avez un STIMULATEUR CARDIAQUE, consultez votre médecin ou le fabricant du stimulateur afin de connaître les précautions que vous devez prendre lors de l’utilisation du four. Dans le cas de petites quantités (une saucisse, un croissant, etc.) posez un verre d’eau à côté de aliment. Pour éviter toute secousse électrique Dans aucun cas vous ne devez déposer la carrosserie extérieure du four.
3. AG-91D-EU French 21/02/2005 16:21 Page 89 F Avertissements importants de sécurité Ne touchez pas la porte du four, le compartiment extérieur, le compartiment arrière, la cavité du four, les ouvertures de ventilation, les accessoires et les plats en GRIL mode, CONVECTION, en mode COMBINEE, CUISSON AUTOMATIQUE ou en mode CUISSON DEPUIS L’ÉTAT CONGELÉ car ils s’échauffent. Avant nettoyage, s’assurer qu’ils ne soient pas chauds.
3. AG-91D-EU French 21/02/2005 16:21 Page 90 Avertissements importants de sécurité REMARQUES: Si vous avez des doutes quant à la manière de brancher le four, consulter un technicien qualifié. Ni le fabricant ni le distributeur ne peuvent être tenus pour responsable des dommages causés au four ou des blessures personnelles qui résulteraient de l’inobservation des consignes de branchement électrique.
3.
3.
3. AG-91D-EU French 21/02/2005 16:21 Page 93 F Avant la mise en service Le four dispose d'un mode d'économie d'énergie 1. Branchez le four, aucune donnée ne s'affiche. 2. Ouvrez la porte “CHOISIR LA LANGUE” clignote dans 6 langues. REMARQUE : une fois la langue sélectionnée à l’aide de la touche LANGUE, l’écran affichera le message “MODE D’ECONOMIE D’ENERGIE POUR SORTIR DU MODE D’ECONOMIE D’ENERGIE REGLER HORLOGE” lorsque vous brancherez le four sur la prise secteur. 3. Fermez la porte. 4.
3. AG-91D-EU French 21/02/2005 16:21 Page 94 Touche STOP (ARRET) Utilisez la touche STOP (ARRET) pour: 1. Effacer une erreur lors de la programmation. 2. Faire une pause en cours de cuisson. 3. Annuler un programme en cours de cuisson (appuyez sur la touche STOP (ARRET) deux fois). Réglage de l’horloge Il existe deux modes de réglage: horloge sur 12 heures et horloge sur 24 heures. Etape 2 Etape 1 x1 x2 1.
3. AG-91D-EU French 21/02/2005 16:21 Page 95 F Mode d’économie d’énergie Votre four est livré préréglé en mode d’économie d’énergie. Si vous n’utilisez pas le four pendant 3 minutes, par exemple après son branchement ou à la fin d’une cuisson, l’alimentation électrique est coupée automatiquement. Pour remettre le four sous tension, ouvrez la porte, puis refermez-la.
3. AG-91D-EU French 21/02/2005 16:21 Page 96 Que sont les micro-ondes? Les micro-ondes sont, tout comme les ondes radio et télévision, des ondes électromagnétiques. Dans le micro-ondes, les ondes sont générées par le magnéton et font vibrer les molécules d’eau des aliments. La friction qui en résulte dégage de la chaleur qui décongèle, réchauffe ou cuit les aliments. Le secret des temps de cuisson courts tient au fait que les micro-ondes pénètrent de tous les côtés dans les aliments.
3. AG-91D-EU French 21/02/2005 16:21 Page 97 F Fonctionnement manuel Le four peut être programmé pour un temps de cuisson maximal de 90 minutes. L’augmentation du temps de cuisson (décongélation) varie de 10 secondes à cinq minutes. Elle dépend de la durée totale de cuisson (décongélation) indiquée dans le tableau.
3. AG-91D-EU French 21/02/2005 16:21 Page 98 Cuisson au gril L’élément chauffant du gril situé en haut de la cavité du four ne comporte qu’un seul niveau de puissance. Exemple: Pour faire cuire du pain grillé au fromage pendant 5 minutes. Placez le pain sur le trépied haut. 1. Choisissez la fonction GRIL en tournant le bouton MODE CUISSON sur . 2. Entrez le temps de cuisson souhaité en tournant le bouton rotatif DUREE/POIDS dans le sens des aiguilles d’une montre. 3.
3. AG-91D-EU French 21/02/2005 16:21 Page 99 F Cuisson par convection Votre four peut être utilisé comme un four conventionnel à l’aide de la fonction de convection et des 10 températures de four préréglées. Touche CONVECTION Temperature du four (° C) 1 2 3 4 5 6 7 8 9 10 250 230 220 200 190 180 160 130 100 40 Exemple 1: Cuisson avec préchauffage Pour préchauffer à 18° C et cuire pendant 20 minutes à 180° C. 1.
3. AG-91D-EU French 21/02/2005 16:21 Page 100 Cuisson par convection Exemple 2: Cuisson sans préchauffage Pour faire cuire à 250° C pendant 20 minutes. 1. Sélectionnez le mode de cuisson en tournant le bouton MODE CUISSON sur . 2. Utilisez le bouton rotatif DUREE/POIDS pour entrer la durée de cuisson (20 min). 3. Sélectionnez la température de cuisson voulue (250° C). x1 4. Appuyez sur la touche START/QUICK. x1 Vérifiez l’affichage. REMARQUE: 1.
3. AG-91D-EU French 21/02/2005 16:21 Page 101 F Cuisson combinée Ce four dispose de 2 modes de cuisson COMBINEE (Convection et micro-ondes ou Gril et micro-ondes) pour une cuisson associant micro-ondes et gril ou micro-ondes et convection. Pour sélectionner le mode de cuisson COMBINEE, mettez le bouton rotatif MODE CUISSON sur le réglage voulu puis choisissez d’abord la durée de cuisson. En général, la cuisson combinée réduit le temps total de cuisson. MODE CUISSON COMB. 1 COMB.
3. AG-91D-EU French 21/02/2005 16:21 Page 102 Cuisson combinée Exemple 2: Pour faire cuire pendant 20 minutes à COMB. 2 l’aide de la puissance micro-ondes 90 W et GRIL. 1. Sélectionnez le mode de cuisson en tournant le bouton MODE CUISSON sur . 2. Sélectionnez la durée de cuisson voulue (20 min). 3. Appuyez deux fois sur la touche NIVEAU DE PUISSANCE MICROONDES (90 W). x2 4. Appuyez sur la touche START/QUICK. Vérifiez l’affichage.
3. AG-91D-EU French 21/02/2005 16:21 Page 103 F Autres fonctions pratiques 1. Touches MOINS ( ▼ )/ PLUS ( ▲ ) Les touches MOINS ( ▼ ) et PLUS ( ▲ ) vous permettent de diminuer ou d’augmenter facilement les réglages programmés (pour une cuisson plus ou moins avancée) en mode CUISSON ou en cours de cuisson. a) Modification de la durée des programmes automatiques Appuyez sur le Les touches MOINS ( ▼ ) et PLUS ( ▲ ) avant d’entrer le poids et d’appuyer sur le touche START/QUICK.
3. AG-91D-EU French 21/02/2005 16:21 Page 104 Autres fonctions pratiques 2. AJOUTER 30 SECONDES Le bouton START/QUICK permet d'activer les deux fonctions suivantes: a) Cuisson 30 secondes Vous pouvez faire cuire des aliments dans le mode de votre choix pendant 30 secondes sans définir de temps de cuisson. Exemple : Si vous dé sirez faire cuire des aliments pendant 30 secondes à 630 W en mode micro-ondes. 1. Sélectionnez le mode de cuisson en tournant le bouton MODE CUISSON sur . 2.
3. AG-91D-EU French 21/02/2005 16:21 Page 105 F Autres fonctions pratiques 3. VERIFICATION DES REGLAGES PENDANT LE FONCTIONNEMENT DU FOUR Vous pouvez vérifier le niveau de puissance, l’heure, la température du four. VERIFICATION DU NIVEAU DE PUISSANCE: Pour vérifier le niveau de puissance du micro-ondes pendant la cuisson, appuyez sur la touche NIVEAU DE PUISSANCE MICRO-ONDES. Le four continue le compte à rebours bien que l’affichage indique le niveau de puissance.
3. AG-91D-EU French 21/02/2005 16:21 Page 106 Bien choisir la vaissellle Ustensiles de cuisine Mode de fonctionnement Micro-ondes Convection Plats en céramique et allant au four (sans parties métalliques, par ex. Pyrex, plats à servir allant au four, plats en verre). Grill Combiné X X X X Verre ou faïence n’allant pas au four (par exemple, de la vaisselle de table 1). X - - - Céramique de verre et vitrocérame à base de matériau antifeu/ingélif (par ex. Arcoflam).
3.
3.
3.
3.
3. AG-91D-EU French 21/02/2005 16:21 Page 111 F Fonctionnement automatique En FONCTIONNEMENT AUTOMATIQUE le four détermine automatiquement le mode et le temps de cuisson. Il offre 5 programmes CUISSON AUTOMATIQUE, 4 programmes de CUISSON DEPUIS L’ÉTAT CONGELÉ et 7 programmes de DECONGELATION AUTOMATIQUE.
3. AG-91D-EU French 21/02/2005 16:21 Page 112 Fonctionnement automatique Exemple: Pour faire cuire du riz de 300 g avec CUISSON AUTOMATIQUE AC-1. 1. Pour le riz, appuyez une fois sur la touche CUISSON AUTOMATIQUE. 2. Entrez le poids en tournant le bouton rotatif DUREE/POIDS dans le sens des aiguilles d’une montre. 3. Appuyez sur la touche START/QUICK. x1 x1 Vérifiez l’affichage.
3. AG-91D-EU French 21/02/2005 16:21 Page 113 F Tableaux de cuisson automatique MENU NO. AC-1 Riz (Temp. initiale des aliments 20° C) Riz 100 g 200 g 300 g AC-2 Poulet rôti (Temp. initiale des aliments 5° C) QUANTITÉ / UTENSILES 0,1 - 0,3 kg (100 g) Grand bol et couvercle Eau 250 ml 450 ml 650 ml 0,9 - 2,0 kg (100 g) Trépied bas Ingrédients pour 1,2 kg de poulet grillé: Sel et poivre, 1 cuillère à café de paprika, 2 cuillères à soupe d’huile AC-3 Rôti de porc (Temp.
3. AG-91D-EU French 21/02/2005 16:21 Page 114 Tableaux de cuisson depuis l’état congelé MENU NO. QUANTITÉ / UTENSILES PROCEDURE ACF-1 Cuisson Plats préparés surgelés (Temp. initiale des aliments -18° C) Type remuable ex. Tortellini, Chili con carne 0,3 - 1,0 kg* (100 g) Bol et couvercle ACF-2 Cuisson Légumes surgelés (initial temp -18° C) ex. Choux Bruxelles, chou-fleur, petits pois, légumes variés, brocoli 0,1 - 0,8 kg (100 g) Bol et couvercle • Ajoutez 1 cuillère à soupe d’eau par 100 g.
3. AG-91D-EU French 21/02/2005 16:21 Page 115 F Tableaux de décongélation automatique MENU NO. QUANTITÉ / UTENSILES PROCÉDURE AD-1 Décongélation Steaks, Côtelettes (Temp. initiale des aliments -18° C) 0,2 - 1,0 kg (100 g) (Voir remarque à la page 116.) • Placez les aliments sur une assiette au centre du plateau tournant. • Quand le four s’arrête et que le signal sonore retentit, retournez les aliments, redisposez et séparez.
3. AG-91D-EU French 21/02/2005 16:21 Page 116 Tableaux de décongélation automatique MENU Nu. QUANTITÉ / UTENSILES PROCÉDURE AD-6 Décongélation Gâteau (Temp. initiale des aliments -18° C) 0,1 - 1,4 kg (100 g) Plat • Retirez l’emballage du gâteau. • Placez sur un plat au centre du plateau tournant. • Une fois la décongélation effectuée, coupez le gâteau en portions identiques que vous espacerez et laissez reposer pendant 15 à 30 minutes jusqu’à ce que le gâteau soit uniformément décongelé.
3. AG-91D-EU French 21/02/2005 16:21 Page 117 F Recettes pour cuisson automatique AC-4 Gratin de pâtes aux courgettes (Cette recette permet de confectionner un gratin d’environ 1,5 kg).
3.
3.
3. AG-91D-EU French 21/02/2005 16:21 Page 120 Entretien et nettoyage Ne procédez au nettoyage qu’après avoir débranché l’appareil.
3. AG-91D-EU French 21/02/2005 16:21 Page 121 F Que faire si... ... le four micro-ondes ne fonctionne pas correctement ? Vérifiez - que les fusibles de la boîte à fusibles n’ont pas sauté, - qu’il n’y a pas de coupure de courant. - Si les fusibles continuent de sauter, faites appel au service après vente de votre magasin vendeur. ... le four à micro-ondes ne s’éteint pas ? - Isolez l’appareil de la boîte à fusibles. - Contactez votre revendeur ou un service après vente AEG-Electrolux agréé. ...
3. AG-91D-EU French 21/02/2005 16:21 Page 122 Service et garantie (France) SERVICE APRÈS VENTE En cas d’anomalie de fonctionnement, reportez-vous à la rubrique « En cas d’anomalie de fonctionnement ». Si malgré toutes les vérifications, une intervention s’avère nécessaire, le vendeur de votre appareil est le premier habilité à intervenir.
3. AG-91D-EU French 21/02/2005 16:21 Page 123 F Service après-vente et pièces de rechange (Belgique) Si l’appareil ne fonctionne pas correctement, effectuez d’abord les vérifications suivantes avant de contacter le service après-vente local. Si le four ne démarre pas : • Vérifiez si l’appareil est branché correctement. • Vérifiez si la prise est correctement enfoncée.
3. AG-91D-EU French 21/02/2005 16:21 Page 124 Déclaration de conditions de garantie (Belgique) Nos appareils sont produits avec le plus grand soin. Malgré cela, un défaut peut toujours se présenter. Notre service clientèle se chargera de réparer ceci sur demande, pendant ou après la période de garantie. La durée de vie de l’appareil n’en sera pas pour autant amputée.
3. AG-91D-EU French 21/02/2005 16:21 Page 125 F Fiche technique Tension d’alimentation : 230 V, 50 Hz, monophasé Fusible/disjoncteur de protection : 16 A minimum Consommation électrique: Puissance: Micro-ondes : 1.5 kW Grill : 2.8 kW Grill/Micro-ondes : 2.8 kW Convection : 2.8 kW Convection/Micro-ondes : 2.
3. AG-91D-EU French 21/02/2005 16:21 Page 126 Information importante Elimination des matériaux d’emballages et des appareils usagés de façon écologique Matériaux d’emballage Les fours à micro-ondes AEG-Electrolux dépendent d’un emballage efficace pour leur protection pendant le transport. Seul l’emballage minimum nécessaire est utilisé. Les matériaux d’emballage (p. ex. film plastique ou polystyrène expansé) sont un danger pour les enfants. Risque d’asphyxie.
3. AG-91D-EU French 21/02/2005 16:21 Page 127 F Installation INSTALLATION DE L'APPAREIL Position A Position B 450 mm 450 mm min. 20 mm min. 20 mm 1. Retirez l'ensemble de l'emballage et vérifiez soigneusement que l'appareil n'a pas été endommagé durant le transport. 2. Si le four à micro-ondes doit être installé à la position C, veillez à respecter les jeux minimum indiqués sur le schéma. 3. Fixez les quatre blocs de maintien dans le placard, à l'aide du gabarit fourni (TMAPTA004URR0). 4.
3. AG-91D-EU French 21/02/2005 16:21 Page 128 Installation RELIER L'APPAREIL À L'ALIMENTATION D'ÉNERGIE • La prise électrique doit être facile d'accès pour que l'appareil puisse être (A) débranché rapidement en cas d'urgence. • La prise ne doit pas se trouver derrière le meuble. • La position idéale est au-dessus du placard, voir (A).
3. AG-91D-EU French 21/02/2005 16:21 Page 129 F Electrolux Home Products France S.A.S. au capital de 67 500 000 € - 552 042 285 RCS SENLIS AEG-ELECTROLUX Pour tenir nos engagements, nous écoutons les Consommateurs Info Conso Electrolux est le lien privilégié entre la marque et ses Consommateurs. Il assure en permanence une double mission : satisfaire au mieux vos exigences et tirer parti de cette proximité pour améliorer sans cesse les produits que nous vous proposons.
4. AG-91D-EU Dutch 21/02/2005 16:19 Page 130 Geachte klant Gefeliciteerd met de aankoop van deze AEG magnetron. Wij adviseren u deze gebruiksaanwijzing vóór het in gebruik nemen zorgvuldig door te lezen, zodat u alle voordelen van het apparaat leert kennen. Bewaar de gebruiksaanwijzing goed, zodat u nog eens iets kunt nalezen. De magnetron beloont u voor deze kleine moeite door onberispelijk te functioneren. Bovendien voorkomt u onnodige servicekosten.
4. AG-91D-EU Dutch 21/02/2005 16:19 Page 131 NL Inhoud Belangrijke aanwijzingen m.b.t. de veiligheid . . . . . . . . . . . . . . . . . . . . . . . . . . . . . . . . . . . . . .132 Apparaat en toebehoren . . . . . . . . . . . . . . . . . . . . . . . . . . . . . . . . . . . . . . . . . . . . . . . . . . . . . . . .135 Bedieningspaneel . . . . . . . . . . . . . . . . . . . . . . . . . . . . . . . . . . . . . . . . . . . . . . . . . . . . . . . . . . . . . .136 Vóór het in gebruik nemen . . . . . . . . . .
4. AG-91D-EU Dutch 21/02/2005 16:19 Page 132 Belangrijke aanwijzingen m.b.t. de veiligheid BELANGRIJK VOOR UW VEILIGHEID: LEES DE VOLGENDE AANWIJZINGEN GOED DOOR EN BEWAAR DEZE GEBRUIKSAANWIJZING. Om brand te voorkomen Magnetronovens mogen tijdens het gebruik niet zonder toezicht worden gelaten. Te hoge vermogens of te lange bereidingstijden kunnen de levensmiddelen oververhitten en brand veroorzaken.
4. AG-91D-EU Dutch 21/02/2005 16:19 Page 133 NL Belangrijke aanwijzingen m.b.t. de veiligheid Het aansluitsnoer en de stekker nooit in water of andere vloeistof leggen. Het aansluitsnoer mag niet over de scherpe rand van een tafel of werkblad geleid worden. Het aansluitsnoer uit de buurt houden van verwarmde oppervlakken, ook van de achterwand van het apparaat. In geen geval proberen om de ovenlamp zelf te vervangen. Dit mag alleen door vakmensen geschieden.
4. AG-91D-EU Dutch 21/02/2005 16:19 Page 134 Belangrijke aanwijzingen m.b.t. de veiligheid Overige aanwijzingen Breng op geen enkele wijze veranderingen aan het apparaat aan. Het apparaat tijdens het gebruik niet bewegen. Dit apparaat is alleen bedoeld voor huishoudelijk gebruik en mag alleen voor het bereiden van levensmiddelen worden gebruikt. Het is niet geschikt voor industriële doeleinden of voor gebruik in een laboratorium.
4. AG-91D-EU Dutch 21/02/2005 16:19 Page 135 NL Apparaat en toebehoren 1. 2. 3. 4. 5. 6. 7. 8. 9. 10. 11. 12. 13. 14. 15.
4. AG-91D-EU Dutch 21/02/2005 16:19 Page 136 Bedieningspaneel 3 4 2 5 1 6 19 8 Digitaal display en indicaties 1. indicatie IN WERKING 2. indicatie START 3. indicatie GRILL 4. indicatie HETELUCHT 5. indicatie MAGNETRON 6. indicatie INFORMATIE 7 9 Bedieningstoetsen: 7. toets INFORMATIE 8. toets TAAL 9. draaiknop voor het kiezen van de METHODE voor magnetron voor magnetron + grill voor magnetron + hetelucht voor grill voor hetelucht 10 11 12 13 18 14 17 16 136 15 10.
4. AG-91D-EU Dutch 21/02/2005 16:19 Page 137 NL Vóór het in gebruik nemen Dit apparaat beschikt over een energiespaarstand. 1. De stekker in het stopcontact steken. De indicatie geeft nog niets aan. 2. De deur openen. In de indicatie verschijnt "KIES TAAL " in 6 talen. AANWIJZING: nadat u met toets TAAL een taal hebt gekozen, verschijnt bij het instellen van de oven "SPAARSTAND OM SPAARSTAND TE VERLATEN STEL KLOK IN" in de indicatie. 3. De deur sluiten. 4. De gewenste taal kiezen (zie hieronder).
4. AG-91D-EU Dutch 21/02/2005 16:19 Page 138 Gebruik van toets STOP 1. Wissen van een invoerfout bij het programmeren. 2. Lopend proces even onderbreken. 3. Wissen van een programma tijdens het lopende proces door tweemaal indrukken. Instellen van de klok De klok kan als 12-uurs of als 24-uurs-klok worden ingesteld. Stap 2 Stap 1 1. Om de 12-uurs-klok in te stellen toets KLOK INSTELLEN 1 maal indrukken. 2. Om de 24-uurs-klok in te stellen toets KLOK INSTELLEN 2 maal indrukken.
4. AG-91D-EU Dutch 21/02/2005 16:19 Page 139 NL Energiespaarstand Het apparaat wordt geleverd met de energiespaarstand ingesteld. Als u 3 minuten na een voorafgaande bediening, beëindiging van het bereidingsproces of na het aansluiten van het apparaat verder niets onderneemt, schakelt het apparaat automatisch op de energiespaarstand. Open de deur om het apparaat weer in gebruik te nemen.
4. AG-91D-EU Dutch 21/02/2005 16:19 Page 140 Wat zijn microgolven? Net als radio- en televisiegolven zijn microgolven elektromagnetische golven. Microgolven worden in de oven door het magnetron opgewekt en brengen de watermoleculen in levensmiddelen in trilling. Door de veroorzaakte wrijving ontstaat warmte, die ervoor zorgt dat de gerechten ontdooid, verwarmd of gekookt worden. Het geheim van de kortere bereidingstijden is het feit dat de microgolven van alle kanten in de levensmiddelen doordringen.
4. AG-91D-EU Dutch 21/02/2005 16:19 Page 141 NL Magnetron solo U kunt een bereidingstijd van max. 90 minuten instellen. De tijdseenheid varieert van 10 seconden tot 5 minuten, afhankelijk van de totale bereidingstijd zoals aangegeven in de tabel. bereidingstijd 0-5 minuten 5-10 minuten 10-30 minuten 30-90 minuten tijdseenheden 10 seconden 30 seconden 1 minuut 5 minuten Voorbeeld: Soep verwarmen, 2 minuten en 30 seconden met 630 watt vermogen. 1. Draai knop METHODE op voor magnetron solo. 2.
4. AG-91D-EU Dutch 21/02/2005 16:19 Page 142 Grilleren Het vermogen van het grillelement dat zich in de bovenkant van de ovenruimte bevindt is niet regelbaar. Voorbeeld: toast met kaas 5 minuten grilleren (leg de toast op het hoge rooster). 1. Draai knop METHODE op voor grill. 2. Draai knop TIJD/GEWICHT rechtsom om de gewenste bereidingstijd in te stellen. 3. Druk toets START/QUICK in om het proces te starten 1x Controleer het display. AANWIJZINGEN 1.
4. AG-91D-EU Dutch 21/02/2005 16:19 Page 143 NL Hetelucht Met behulp van de heteluchtfunctie en de 10 voorgeprogrammeerde temperatuurstanden kunt u het apparaat als conventionele oven gebruiken. Toets HETELUCHT indrukken Oventemperatuur (°C) 1 2 3 4 5 6 7 8 9 10 250 230 220 200 190 180 160 130 100 40 Voorbeeld 1: bakken/braden met voorverwarmen Voorverwarmen op 180°C en 20 minuten bakken/braden op 180°C. 1. Draai knop METHODE op voor hetelucht. 2.
4. AG-91D-EU Dutch 21/02/2005 16:19 Page 144 Hetelucht Voorbeeld 2: bakken/braden zonder voorverwarmen 20 minuten bakken/braden op 250°C. 1. Draai knop METHODE op voor hetelucht. 2. Voer met knop TIJD/GEWICHT de bereidingstijd (20 minuten) in. 3. Voer de gewenste temperatuur in (250°C). 1x 4. Druk toets START/QUICK in. 1x Controleer het display. AANWIJZINGEN: 1. Na het bakken of braden koelt het apparaat automatisch af en op het display verschijnt "NU KOELEN". 2.
4. AG-91D-EU Dutch 21/02/2005 16:19 Page 145 NL Gecombineerd gebruik Het apparaat heeft twee soorten gecombineerd gebruik: magnetron + hetelucht of magnetron + grill. Om gecombineerd gebruik te kiezen, draait u eerst draaiknop METHODE op de gewenste instelling en dan stelt u de bereidingstijd in. In het algemeen verkort gecombineerd gebruik de totale bereidingstijd.
4. AG-91D-EU Dutch 21/02/2005 16:19 Page 146 Gecombineerd gebruik Voorbeeld 2: 20 minuten grilleren met 90 watt magnetronvermogen en grill. 1. Draai knop METHODE op voor COMBI 2 2. Voer de gewenste bereidingstijd in (20 minuten). 3. Druk toets VERMOGENSSTAND 2 maal in (90 watt). 2x 4. Druk toets START/QUICK in. Controleer het display. 1x Na het bereidingsproces koelt het apparaat automatisch af en op het display verschijnt "NU KOELEN".
4. AG-91D-EU Dutch 21/02/2005 16:19 Page 147 NL Andere nuttige functies 1. Toets MINDER ( ▼ ) / MEER ( ▲ ) Met de toetsen MINDER ( ▼ ) en MEER ( ▲ ) kunt u de geprogrammeerde tijdsinstellingen zonder problemen verkorten of verlengen (om de levensmiddelen minder of meer gaar te laten worden). a. Wijzigen van de voorgeprogrammeerde tijdsinstelling: Druk toets MINDER ( ▼ ) of MEER ( ▲ ) in na invoeren van het gewicht en voordat u toets START/QUICK indrukt. (Voor menu's met MINDER en MEER zie pag. 158-159.
4. AG-91D-EU Dutch 21/02/2005 16:19 Page 148 Andere nuttige functies 2. START/QUICKFUNCTIE Met toets START/QUICK kunt u de volgende functies bedienen. a. Direct starten U kunt direct 30 seconden lang de gewenste methode inschakelen, zonder een bereidingstijd in te voeren. Voorbeeld: 30 minuten 630 watt magnetronvermogen. 1. Draai knop METHODE 3. Druk toets 2. Druk toets op voor magnetron START/QUICK in om VERMOGENSSTAND 2 maal het proces te starten.
4. AG-91D-EU Dutch 21/02/2005 16:19 Page 149 NL Andere nuttige functies 3. TIJDENS HET GEBRUIK DE INSTELLING CONTROLEREN U kunt de vermogensstand en de temperatuur controleren, bijv. bij het voorverwarmen. VERMOGENSSTAND CONTROLEREN: Om tijdens het bereidingsproces de vermogensstand te controleren, drukt u toets VERMOGENSSTAND in. Zolang u met uw vinger deze toets aanraakt, wordt de vermogensstand aangegeven.
4. AG-91D-EU Dutch 21/02/2005 16:19 Page 150 Geschikt servies ovenvast materiaal methode magnetron hetelucht grill combinatie X X X X niet-ovenvast glas en porselein (bijv. tafelservies 1) X - - - glaskeramiek van vuurvast/koudebestendig materiaal (bijv.
4.
4.
4. AG-91D-EU Dutch 21/02/2005 16:19 Page 153 NL Recepten voor glasplateau en hetelucht Kersen-amandelcake ingrediënten 175 g margarine 175 g poedersuiker 3 middelgrote eieren 175 g bloem 1 tl bakpoeder 100 g gekonfijte kersen 75 g gemalen amandelen 1 tl amandelessence 1 el melk Uienquiche ingrediënten 500 g zandtaartdeeg 45 g boter 300 g rode uien, in plakken 3 middelgrote eieren 150 g dikke room (48% vetgehalte) 50 g melk 100 g geraspte kaas 1/4 tl mosterd zwarte peper 1/4 tl zout 1.
4.
4. AG-91D-EU Dutch 21/02/2005 16:19 Page 155 NL Automatische programma's De automatische programma's stellen zelf de vermogensstand en de bereidingstijd in. U kunt kiezen uit 5 automatische kookprogramma's, 4 automatische programma's voor koken van diepvriesproducten en 7 automatische ontdooiprogramma's.
4. AG-91D-EU Dutch 21/02/2005 16:19 Page 156 Automatische programma's Voorbeeld: 300 g rijst koken met AUTOMATISCH KOOKPROGRAMMA AC-1: 1. Druk toets AUTOMATISCH KOKEN 1 maal in 1x 2. Voer met knop TIJD/GEWICHT het gewenste gewicht in 3. Druk toets START/QUICK in om het proces te starten 1x Controleer het display.
4. AG-91D-EU Dutch 21/02/2005 16:19 Page 157 NL Tabel automatische kookprogramma's MENUNUMMER HOEVEELHEID (gewichtseenheid)/SERVIES AC-1 rijst (uitgangstemperatuur rijst 20° C) rijst 100 g 200 g 300 g 0,1 - 0,3 kg (100 g) grote schaal met deksel AC-2 gebraden kip (uitgangstemperatuur 5° C) 0,9 - 2,0 kg (100 g) laag rooster AC-3 varkensvlees (uitgangstemperatuur 5° C) 0,6 - 2,0 kg (100 g) laag rooster AC-4 ovenschotel (uitgangstemperatuur 20° C) bijv.
4. AG-91D-EU Dutch 21/02/2005 16:19 Page 158 Tabel diepvriesproducten koken MENUNUMMER ACF-1 koken diepgevroren gerechten (uitgangstemperatuur -18° C) bijv. spaghetti bolognese, chili con carne ACF-2 koken diepgevroren groente (uitgangstemperatuur -18° C) HOEVEELHEID (gewichtseenheid)/SERVIES 0,3 - 1,0 kg* (100 g) schaal met deksel * Als de fabrikant aangeeft dat water moet worden toegevoegd, de totale hoeveelheid voor het programma inclusief de extra vloeistof berekenen.
4. AG-91D-EU Dutch 21/02/2005 16:19 Page 159 NL Tabel automatische ontdooiprogramma's MENUNUMMER HOEVEELHEID (gewichtseenheid)/SERVIES TIPS AD-1 ontdooien biefstuk en karbonade (uitgangstemperatuur -18° C) 0,2 - 1,0 kg (100 g) (zie aanwijzing op pag. 160) • Op een bord in het midden van het draaiplateau zetten. • Als het akoestische signaal klinkt, vlees omkeren, evt. uit elkaar halen. Dunne delen en warme plekken afdekken met kleine stroken aluminiumfolie.
4. AG-91D-EU Dutch 21/02/2005 16:19 Page 160 Tabel automatische ontdooiprogramma's HOEVEELHEID (gewichtseenheid)/SERVIES MENUNUMMER AD-7 ontdooien brood (uitgangstemperatuur -18° C) 0,1 - 1,0 kg (100 g) plat bord TIPS • Op een plat bord in het midden van het draaiplateau zetten. • Als het akoestische signaal klinkt, sneetjes opnieuw rangschikken en ontdooide sneetjes uit de oven nemen. • Na het ontdooien alle sneetjes van elkaar losmaken en op een groot bord leggen.
4. AG-91D-EU Dutch 21/02/2005 16:19 Page 161 NL Recepten voor automatische kookprogramma's AC-4 Aubergine-macaronischotel (voor ca. 1,5 kg) ingrediënten 500 ml water 1/2 tl olie zout 80 g macaroni 400 g tomaten uit blik, in stukjes 3 uien (150 g) gesnipperd basilicum, tijm zout en peper 1 tl olie om de schaal in te vetten 450 g aubergines, in plakken 150 g zure room 2 eieren 100 g geraspte kaas (Cheddar) Broccoli-aardappelschotel (voor ca.
4. AG-91D-EU Dutch 21/02/2005 16:19 Page 162 Recepten voor automatische kookprogramma's AC-5 Worteltaart (voor ca. 1,1 kg) ingrediënten 1 tl boter of margarine om de vorm in te vetten 5 eidooiers 250 g suiker 250 g wortelen, fijngeraspt sap van 1 citroen 250 g gemalen amandelen 80 g bloem 1 el bakpoeder 5 eiwitten Tulband (Het beslag weegt ca.
4. AG-91D-EU Dutch 21/02/2005 16:19 Page 163 NL Recepten voor automatische kookprogramma's AC-5 Appeltaart met calvados (voor ca.
4. AG-91D-EU Dutch 21/02/2005 16:19 Page 164 Reiniging en onderhoud VOORZICHTIG: GEBRUIK GEEN OVENREINIGERS, STOOMREINIGERS, SCHUURMIDDELEN, MIDDELEN MET BIJTENDE SODA OF SCHUURSPONSJES OM DE MAGNETRON TE REINIGEN. DIT GELDT VOOR ALLE DELEN VAN HET APPARAAT. WAARSCHUWING! Bij het werken met GRILL, HETELUCHT, COMBI, AUTOMATISCHE KOOKPROGRAMMA'S en DIEPVRIESPRODUCTEN KOKEN worden de ovenruimte, de deur, de ommanteling en toebehoren zeer heet. Vóór het reinigen volledig laten afkoelen.
4. AG-91D-EU Dutch 21/02/2005 16:19 Page 165 NL Wat te doen als … … de magnetron niet goed functioneert? Controleer of - de stekker in het stopcontact zit, - de zekering in de huisinstallatie in orde is, - de stroom misschien uitgevallen is. Als de zekeringen in de huisinstallatie meermaals uitschakelen, neem dan contact op met een erkend elektro-installateur. - de kinderbeveiliging misschien geprogrammeerd is. ...
4. AG-91D-EU Dutch 21/02/2005 16:19 Page 166 Service In het hoofdstuk "Wat te doen als ... zijn enkele storingen beschreven die u zelf kunt opheffen. Lees in geval van storing eerst dit hoofdstuk. Als u daar geen aanwijzingen vindt, neemt u contact op met onze service-afdeling. Bereid het gesprek altijd goed voor. Zo vergemakkelijkt u de diagnose en de beslissing of bezoek van een servicetechnicus nodig is. Noteer modelnummer en serienummer. Deze nummers vindt u op het typeplaatje van het apparaat.
4. AG-91D-EU Dutch 21/02/2005 16:19 Page 167 NL Garantievoorwaarden NEDERLAND Onze producten worden met de grootst mogelijke zorgvuldigheid geproduceerd. Desondanks kan het voorkomen dat er een defect optreedt. Onze servicedienst zal dit op verzoek herstellen, zowel binnen als buiten de garantietermijn. De levensduur van het product wordt daardoor niet negatief beïnvloed. Onderstaande garantievoorwaarden zijn gestoeld op de EU Richtlijn 99/44/EG en het Burgerlijk Wetboek.
4. AG-91D-EU Dutch 21/02/2005 16:19 Page 168 Garantievoorwaarden NEDERLAND Reparatievoorwaarden Onze reparatievoorwaarden zijn conform de afspraak tussen de Consumentenbond en Vlehan*. Art. 1 Aan de consument zal na een melding van een storing zo mogelijk direct, doch uiterlijk binnen één werkdag worden medegedeeld op welke dag het bezoek van de technicus zal plaatsvinden. De reparatie zal als regel binnen zeven werkdagen na de melding zijn uitgevoerd. Art.
4. AG-91D-EU Dutch 21/02/2005 16:19 Page 169 NL Waarborgvoorwaarden BELGIË Onze toestellen worden met de grootst mogelijke zorgvuldigheid geproduceerd. Desondanks kan het voorkomen dat er een defect optreedt. Onze klantendienst zal dit op verzoek herstellen, zowel binnen als buiten de waarborgtermijn. De levensduur van het toestel wordt daardoor niet negatief beïnvloed. Onderstaande waarborgvoorwaarden zijn gestoeld op de EU Richtlijn 99/44/EG en het Burgerlijk Wetboek.
4. AG-91D-EU Dutch 21/02/2005 16:19 Page 170 Technische gegevens Aansluiting aan : 230 V, 50 Hz, één fase Zekering : min. 16 A Opgenomen vermogen: Nuttig vermogen: magnetron : 1.5 kW grill : 2.8 kW grill/magnetron : 2.8 kW hetelucht : 2.8 kW hetelucht/magnetron : 2.
4. AG-91D-EU Dutch 21/02/2005 16:19 Page 171 NL Belangrijke informatie Milieuvriendelijke afvalverwerking van verpakking en oude apparaten Verpakking Onze magnetrons moeten worden vervoerd en hebben daarom een effectieve beschermende verpakking nodig. Daarbij beperken wij ons tot het absoluut noodzakelijke. Delen van de verpakking (bijv. folie, styropor) kunnen gevaarlijk zijn voor kinderen. Verstikkingsgevaar! Houd de verpakking uit de buurt van kinderen.
4. AG-91D-EU Dutch 21/02/2005 16:19 Page 172 Installatie-aanwijzing INSTALLEREN VAN HET APPARAAT positie B conventionele 20 mm positie C rookafvoer snoerdrager rookafvoer snoerdrager positie A positie B D positie C oven positie 172 nismaat 65 mm 460 mm 5 mm oven De magnetron kan worden ingebouwd in positie A ,B of C: conventionele 450 mm 450 mm positie A min. 20 mm min. 20 mm 1. Verwijder de verpakking en controleer het apparaat op transportschade. 2.
4. AG-91D-EU Dutch 21/02/2005 16:19 Page 173 NL Installatie-aanwijzing AANSLUITING OP HET STROOMNET • Zorg ervoor dat de stekker makkelijk bereikbaar is, zodat hij in geval van nood snel uit het stopcontact kan worden getrokken. (A) • Plaats het stopcontact niet achter de kast. • De beste plek is boven de kast, zie (A). Verwijder bij inbouw in positie (A) de snoerdrager (punt 15. op pag. 135) achter op het apparaat en bevestig het snoer m.b.v. deze snoerdrager bovenop de inbouwkast (zie pag. 172).
AG-91D-EU COVER 21/02/2005 16:20 Page 174 From the Electrolux Group. The World’s No.1 choice. The Electrolux group is the world’s largest producer of powered appliances for the kitchen, cleaning and outdoor use. More than 55 million Electrolux Group products (such as refrigerators, cookers, washing machines, vacuum cleaners, chain saws and lawn mowers) are sold each year to a value of approx. USD 14 billion in more than 150 countries around the world.