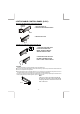
INSTRUCTION MANUAL CAR CD/MP3 PLAYER / RDS RECEIVER WITH USB INTERFACE, SD/MMC INTERFACE USB/MP3 PLAYER CS MP 530 IR SM-115MPR VOL B B AN D DISP MODE AUDIO A SSCANN A S 1 MENU 2 INT 3 RPT 4 RDM -1- 5 DN 6 UP AF TA PTY MP3 H RC S EA
1.HANDLING COMPACT DISCS MOISTURE CONDENSATION On a rainy day or in a very damp area, moisture may condense on the lenses inside the unit. Should this occur, the unit will not operate properly. In such a case, remove the disc and wait for about an hour until the moisture has evaporated. NOTES ON CDs NOTES ON DISCS 1. A dirty or defective disc may cause sound dropouts while playing. To enjoy optimum sound, handle the disc as follows. Handle the disc by its edge.
2.INSTALLATION Before finally installing the unit, connect the wiring temporarily and make sure it is all connected up properly and the unit and system work properly. Use only the parts included with the unit to ensure proper installation. The use of unauthorized parts can cause malfunctions. Consult with your nearest dealer if installation requires the drilling of holes or other modifications of the vehicle.
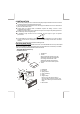
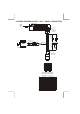
Removing the unit a. Frame b. Insert fingers into the groove in the front of frame and pull out to remove the frame. (When re-attaching the frame, point the side with a groove down wards and attach it.) c. Insert the levers supplied with the unit into the grooves at both sides of the unit as shown in figure until they click. Pulling the levers makes it possible to remove the unit from the dashboard.
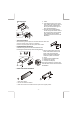
3.DETACHABLE CONTROL PANEL (D.C.P.) Removing The Detachable Control Panel (D.C.P.). RELEASE BUTTON 1. Turn the Power off. 2. Press the Panel Release Button. D.C.P. 3. Remove the D.C.P. Attaching the Detachable Control panel (D.C.P.) 1. 1. Insert the right side of the D.C.P. Into the main unit. NOTE: The D.C.P. Must be attached into the T-Joint. 2. 2. Press the D.C.P. On to the left side of middle of D.C.P. Until a “click” sound is heard. SH PU CAUTION DO NOT insert the D.C.P from the left side.
4.
WARNING: A) The pin arrangement for the ISO connectors depends on the type of vehicle you drive. Make sure to make the prope connection to prevent damage to the unit. B) Make sure all the connectors are properly & tightly plug in before installation. The default connection for wiring harness is as described in 1 below. If the ISO connectors pins are set as described in 2 or 3 ,please make the correct connection as illustrated in 2 or 3 .
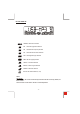
5.FUNCTION OF CONTROL(RDS & MP3 MODEL) A. FUNCTION OF PANEL USB/MP3 PLAYER CS MP 530 IR SM-115MPR VOL B B AN D DISP MODE AUDIO A SSCANN A S 1 MENU 2 INT 3 RPT 4 RDM 5 DN 6 UP AF TA 1. POWER BUTTON 2. ENCODER VOLUME BUTTON 3. DISPLAY BUTTON 4. AUDIO/MENU BUTTON / MP3 ENTER BUTTON 5. PANEL RELEASE BUTTON 6. TA BUTTON 7. AF BUTTON 8. LCD DISPLAY 9.AMS BUTTON / MP3 SEARCH BUTTON 10. PRESET MEMORY STATION BUTTONS 11. USB COVER /FLIP OPEN TO ACCESS TO USB SOCKET 12. PTY BUTTON 13.
B. LCD DISPLAY 1. STEREO : Radio stereo indication 2. TP : RDS Traffic programme indication 3. AF : RDS Alternative frequency indication 4. TA : RDS Traffic announcement indication 5. PTY : RDS Programme type indication 6. MP3 : MP3 disc playing indication 7. ARTIST : Artist name indication 8 . MUSIC : Music song title indication 9. ALBUM : Album title indication 10.
6.GENERAL OPERATION(RDS MODEL) 1) POWER BUTTON Press power button to turn on/off the unit. 4) MENU BUTTON You can operate the following function through MENU button. A. AUDIO OPERATION press MENU button for less than 1 second to open the Audio menu. press MENU repeatedly to navigate through the following functions: VOLUME (VOL) -> BASS (BAS) -> TREBLE (TRE) -> BALANCE (BAL) -> FADER (FAD) Rotate Volume Control to adjust desired level within 5 seconds.
- BEEP MODE (BEEP ON / OFF) BEEP OFF: disable audible beep tone when any function is accessed. BEEP ON: enable audible beep tone. - SEEK MODE (SEEK 1 / SEEK 2) You can choose from Seek tuning mode 1 & mode 2 by using Volume Control. While the desired Seek tuning mode is selected, the following operations can be performed: SEEK1: Press the Tuning Up / Down Button briefly to increase or decrease the frequency by 1 step size.
16) SCAN BUTTON(SCAN) Press this button, the radio will tune up to search stations, the available stations will blinking and stay on the display for a few seconds. 9) AUTO MEMORY STORE / PRESET SCAN BUTTON (AMS) PRESET SCAN: press AMS button for less than 1 second to scan all preset stations in the memories of the current band and stay on each memory stations for about 5 seconds. The memory location indicator on the LCD will flash during the process. To stop preset scan, press AMS button again.
6) TA BUTTON(TRAFFIC ANNOUNCEMENT) When pressed short, it is activated as TA mode on or off When TA mode is on and traffic announcement is transmittude - When the unit is in CD mode, it will switch to radio mode temporarily. - If the volume lever was under the threshold point, it will be raised to the threshold point. - When TP station is received, TP segment is turned on in LCD display.
7.CD OPERATIONS LOADING THE CD Press the Panel Fold Down Button to fold down the front panel, insert the disc through CD slot, the disc will be automatically loaded and playback will also start. CD EJECT BUTTON Press this button to eject the CD. Since this button is located behind the front panel, fold down the panel before accessing this button. ET RES M1) CD PLAY/PAUSE AND FIRST TRACK BUTTON Press this button briefly to pause CD play, press again to release pause.
PLEASE READ THIS INSTRUCTION CAREFULLY BEFORE OPERATING THE UNIT 8. USB DRIVE OPERATIONS COMPATIBILITY 1 Due to the fast changing technology world, this unit may or may not be compatible to all the USB drive / device available with all the future technology, especially those USB drive / device which require to install a driver. Always choose a compatible USB drive / device which is compatible with this unit. 2 NOTE: This unit is not compatible with portable Hard-Disk.
WARNING 1) Please never try to fold down the front panel when there is an USB drive / device is plugged in on the front panel. This will cause permanent & serious damage to the unit & USB drive / device. (P. 4) USB P.4 USB P.5 2) Please never intentionally or accidentally hit on the USB drive / device when it is plugged in. This will cause permanent & serious damage to the unit & USB drive / device.(P.
9. SD/MMC OPERATIONS PLAYING MP3 FILE FROM SD/MMC CARD 1) Press open button to fold down the front panel.(P.1) 2) The SD/MMC card slot is located on top of the front panel near the right side. 3) Insert the SD / MMC card into the card slot in the correct direction until a “CLICK” sound is heard. (P.2) 4) Close the front panel. P.1 5) The display will show “MEM-CARD” to indicate that the SD or MMC card is correctly inserted.
10.MP3 OPERATIONS(CD-R/CD-RW/SD/MMC/USB FILES) - An MP3 directory is shown in this manual as “Folder”, and an MP3 file is shown as “Track”. - Maximum length of track name : 16 characters - Maximum length of folder name : 16 characters - Maximum depth of folder levels : 8 - Maximum number of tracks per disc : 448 - Maximum number of folders per disc : 128 - Supported Bit Rates & Sampling Frequencies: Bit Rates: 32,40,48,56,64,80,96,112,128,160,192,224,256,320KHz Sampling Frequencies: MPEG1 32KHz/44.
4. Searching by character This model also has song name (character) search function for MP3 disc playback, Press MP3 search button three times until “CHAR SCH” is shown on display, then press Enter button once, character “A” blinks, use volume up or down to select desired character (1st letter), press Enter button to confirm your choice and second character “A” blinks to select other letters (max, 8 characters). After entering your song name, press Enter button more than 1 second to start the search.
11.STEERING WHEEL REMOTE 1. Replacing Battery In order to ensure proper functioning of the steering wheel remote control. Please make sure only use 2 x AAA type battery. If the device to be controlled no longer responds to any key press even under favourable circumstances or the device to be controlled indicates a weak battery, please replace the battery of the remote control. P 1. Remove the remote control from the steering wheel as show in P1 & P2.
12.SPECIFICATIONS CD PLAYER System Usable disc Sampling frequency No of quantization bits Frequency Number of channels S/N Ratio Compact disc audio system Compact disc 44.1KHz 1bit 5-20,000Hz 2 stereo 70dB RADIO SECTION FM Frequency Range Intermediate Frequency Usable Sensitivity Stereo Separation S/N Ratio 87.5 - 108 Mhz 10.
13.TROUBLE SHOOTING Before going through the check list, check wiring connection. If any of the problems persist after check list has been made, consult your nearest service dealer. Symptom No power Disc cannot be loaded or ejected Cause Solution The car ignition is not on. If the power supply is properly connected to the car accessory terminal, switch the ignition key to “ACC” The fuse is blown. Replace the fuse. Presence of CD disc inside the player.