
Operation Manual

English
31
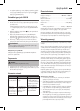
6 Display
7 AL2 (alarm function 2 activated)
8 Mood light
9 DC 5V USB CHARGING port
10 LINE IN jack
11 Fixed power adapter
12 Wire antenna (FM)
Control buttons
13
Reduce volume / set/activate/deactivate alarm 1
14
Turn mood light on/off
15
Display year/date / select temperature unit
16
Previous radio preset
17
Search next radio station / select summer time/normal time / “nap” function
18
Save radio station / next radio preset / display the temperature
19
Turn the light on/off
20
Increase light intensity
21
Decrease light intensity
22
Snooze function / sleep timer / display brightness
23
Turn device on/off
24
Increase volume / set/activate/deactivate alarm 2
Putting into function
• Select a proper place for the device such as a dry, and
even non slip area where you can easily operate the
device.
• Remove the protective lm, if any.
Inserting the Battery (Backup)
(Battery is not included with the device)
In case of a power cut or if the device is unplugged, with
backup battery inserted, the settings will be kept.
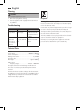
1. Open the battery compartment at the bottom. Remove
for this the screw of the battery compartment lid with a
Phillips screwdriver.
2. Insert one battery of the type CR2032, 3 V. Mind the cor-
rect polarity (+ must be at the top)!
3. Close the battery case. Secure the battery compartment
lid again with the screw.
If the device is not used for an extended period of time,
remove the Battery from the device to avoid any leaking of
battery acid.
WARNING:
The batteries shall not be exposed to excessive heat such
as sunshine, fire or the like. Danger of explosion!
CAUTION:
Batteries are not to be disposed of together with domestic
wastes. Dispose of the used batteries at the relevant collec-
tion bin or at your dealer’s.
Power supply
1. Make sure the grid voltage corresponds to the figures on
the rating plate.
2. Insert the grid plug into a properly installed power socket.
NOTE:
If no backup battery has been inserted, all stored radio
stations and clock settings will be deleted in the event of
power interruptions.
Switching the Unit On/Off
Press the
button (23) to switch the unit on or off.
Volume
Adjust the volume with the
(24) and (13).
Display Brightness (in standby)
Use the SNOOZE/SLEEP / DIMMER button (22) to adjust the
display brightness.
Reading light function
1. Press the
button (19) to turn on the function.
2. Use the
button (20) to increase the brightness. Use the
button (21) to reduce the brightness.
3. In order to turn off the function, press the
button
again.
Mood light
1. Press the
button (14) to turn on the mood light (8). The
light will alternate in different colors.
2. In order to turn off the mood light, press the button
again.