D NL F E I GB PL H Uhrenradio Klokradio Radio réveil Radio reloj Radio orologio Clock radio Radio z budzikiem Rádiós óra Bedienungsanleitung / Garantie Gebruiksaanwijzing Mode d’emploi Instrucciones de servicio Istruzioni per l’uso Instruction Manual Instrukcja obsługi / Gwarancja Használati utasítás D NL F E I GB UHRENRADIO MRC 4151 MRC4151_IM - Size 138x210mm 30.03.
Inhalt Deutsch Italiano Inhalt Contenuto Übersicht der Bedienelemente...............................Seite Bedienungsanleitung................................................Seite Technische Daten......................................................Seite Garantie........................................................................Seite Entsorgung..................................................................
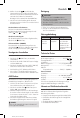
Übersicht der Bedienelemente Overzicht van de bedieningselementen Liste des différents éléments de commande Indicación de los elementos de manejo Elementi di comando MRC4151_IM - Size 138x210mm Overview of the Components Przegląd elementów obsługi A kezelő elemek áttekintése 30.03.
Deutsch Bedienungsanleitung Vielen Dank, dass Sie sich für unser Produkt entschieden haben. Wir wünschen Ihnen viel Freude mit dem Gerät. Symbole in dieser Bedienungsanleitung Wichtige Hinweise für Ihre Sicherheit sind besonders gekennzeichnet. Beachten Sie diese Hinweise unbedingt, um Unfälle und Schäden am Gerät zu vermeiden: WARNUNG: Warnt vor Gefahren für Ihre Gesundheit und zeigt mögliche Verletzungsrisiken auf. ACHTUNG: Weist auf mögliche Gefährdungen für das Gerät oder andere Gegenstände hin.
Deutsch Übersicht der Bedienelemente 1 2 3 4 5 6 7 8 9 10 Smartphone-Halterung SLEEP / TIMER SET Taste Taste Taste FUNC Taste SNOOZE / Taste VOL + Taste VOL − Taste ALARM Taste MEM / PRESET Taste Display A Radio-Modus B Weckzeit 1 C Weckzeit 2 D Schlummer aktiv 5 HINWEIS: • Sofern Sie keine Gangreserve-Batterie eingelegt haben, geht die Speicherung der Uhrzeit und der Sender verloren, sobald die Stromzufuhr unterbrochen wurde.
Deutsch Farbe vom Stimmungslicht ändern Während des Betriebs leuchtet das obere Gehäuse des Gerätes. Sie haben die Möglichkeit zwischen 7 verschiedenen Farbvarianten und einem automatischen Farbwechsel auszuwählen. 1. Drücken Sie wiederholt die SNOOZE / Taste, um die gewünschte Farbe auszuwählen. 2. Bei der 8. Farbwahl wechselt die Beleuchtung automatisch zwischen den 7 Farbvarianten. Sie können die Beleuchtung auch ausschalten: • Halten Sie die SNOOZE / Taste 3 Sekunden gedrückt.
Deutsch 8. Wählen Sie mit der Taste die Farbe des Stimmungslichtes aus. Sie haben die Möglichkeit zwischen 7 verschiedenen Farbvarianten und einem automatischen Farbwechsel auszuwählen. Bestätigen Sie Ihre Auswahl mit der ALARM Taste. 9. Nun können Sie die Einstellungen für die zweite Weckzeit vornehmen. Gehen Sie vor wie bei Punkt 3 bis 8 beschrieben. Reinigung Weckzeit aktivieren / deaktivieren Drücken Sie wiederholt die ALARM Taste. Bei aktivierter Weckzeit leuchtet das entsprechende Symbol „ “ bzw.
Deutsch Garantie Garantiebedingungen 1. Gegenüber Verbrauchern gewähren wir bei privater Nutzung des Geräts eine Garantie von 24 Monaten ab Kaufdatum. Ist das Gerät zur gewerblichen Nutzung geeignet, gewähren wir beim Kauf durch Unternehmer für das Gerät eine Garantie von 12 Monaten. Die Garantiezeit für Verbraucher reduziert sich auf 12 Monate, sofern sie ein zur gewerblichen Nutzung geeignetes Gerät – auch teilweise – gewerblich nutzen. 2.
Deutsch Entsorgung Bedeutung des Symbols „Mülltonne“ Schonen Sie unsere Umwelt, Elektrogeräte gehören nicht in den Hausmüll. Nutzen Sie die für die Entsorgung von Elektrogeräten vorgesehenen Sammelstellen und geben dort Ihre Elektrogeräte ab, die Sie nicht mehr benutzen werden. Sie helfen damit die potenziellen Auswirkungen, durch falsche Entsorgung, auf die Umwelt und die menschliche Gesundheit zu vermeiden.
Nederlands Gebruiksaanwijzing Dank u voor uw keuze van dit product. We hopen dat u er veel plezier van beleeft. Symbolen in deze gebruiksaanwijzing Belangrijke aanwijzingen voor uw veiligheid zijn speciaal gekenmerkt. Neem deze aanwijzingen strikt in acht om ongevallen en schade aan het apparaat te vermijden: WAARSCHUWING: Waarschuwt voor gezondheidsrisico’s en duidt op potentiaal verwondingsgevaar. LET OP: Wijst op mogelijke gevaren voor het apparaat of andere voorwerpen.
Nederlands Overzicht van de bedieningselementen 1 2 3 4 5 6 7 8 9 10 Smartphone-houder SLEEP / TIMER SET toets toets toets FUNC toets SNOOZE / toets VOL + toets VOL − toets ALARM toets MEM / PRESET toets Scherm A Radiomodus B Wektijd 1 C Wektijd 2 D Sluimerfunctie actief Achteraanzicht (geen afbeelding) Dipoolantenne Aansluitpunt vermogensadapter – DC 5 V AUX aansluiting Onderzijde (geen afbeelding) Batterijcompartiment Opstarten van het apparaat / Introductie • Kies een geschikte locatie voor het appara
Nederlands OPMERKING: Tijdens de vertoning van de temperatuur is geen geluid mogelijk. De kleur van de sfeerverlichting wijzigen Tijdens het gebruik wordt de bovenbehuizing van het apparaat verlicht. U kunt uit 7 verschillende kleurvariaties en automatische kleurverandering kiezen. 1. Druk herhaaldelijk op de SNOOZE / toets (sluimeren) om de gewenste kleur te selecteren. 2. Met de 8ste kleurselectie zal de verlichting automatisch tussen de 7 kleurvariaties veranderen.
Nederlands 8. Gebruik de toets om de kleur van de sfeerverlichting te selecteren. U kunt uit 7 verschillende kleurvariaties en automatische kleurverandering kiezen. Bevestig uw keuze met de ALARM toets. 9. Nu kunt u de instellingen voor het tweede alarm maken. Ga verder zoals beschreven in de stappen 3 tot en met 8. Reiniging De wektijd activeren / deactiveren Druk herhaaldelijk op de ALARM toets. Met de geactiveerde alarmtijd, zal het bijbehorende symbool “ “ of “ “ op de display oplichten.
Nederlands Verwijdering Betekenis van het “vuilnisbak”-symbool Houd rekening met het milieu, gooi elektrische apparaten niet weg bij het huishoudafval. Breng overbodige of defecte elektrische apparaten naar gemeentelijke inzamelpunten. Help potentiële milieu- en gezondheidsgevaren door onverantwoordelijk wegwerpen te voorkomen. Draag bij aan hergebruik en ander opnieuw gebruik van oude elektrische en elektronische apparaten. Uw gemeente kan u informatie geven over inzamelingspunten.
Français Mode d’emploi Merci d’avoir choisi notre produit. Nous espérons que vous saurez profiter votre appareil. Symboles de ce mode d’emploi Les informations importantes pour votre sécurité sont particulièrement indiquées. Veillez à bien respecter ces indications afin d’éviter tout risque d’accident ou d’endommagement de l’appareil : AVERTISSEMENT : Prévient des risques pour votre santé et des risques éventuels de blessure. ATTENTION : Indique les risques pour l’appareil ou tout autre appareil.
Français Liste des différents éléments de commande 1 2 3 4 5 6 7 8 9 10 Station d’accueil pour smartphone Bouton SLEEP / TIMER SET Bouton Bouton Bouton FUNC Bouton SNOOZE / Bouton VOL + Bouton VOL − Bouton ALARM Bouton MEM / PRESET Écran A Mode radio B Heure d’alarme 1 C Heure d’alarme 2 D Rappel d’alarme actif Arrière (non illustré) Antenne dipolaire Prise pour l’adaptateur électrique – DC 5 V Prise AUX Dessous (non illustré) Compartiment à piles Mise en marche de l’appareil / Introduction • Choisi
Français Changer la couleur de la lumière d’ambiance Le boîtier de l’appareil s’illumine lorsqu’il est allumé. Vous pouvez choisir entre 7 variations de couleurs ou activer un cycle automatique de changement de la couleur. 1. Appuyez sur le bouton SNOOZE / de manière répétée pour sélectionner la couleur désirée. 2. La huitième sélection active le cycle automatique entre les 7 variations de couleurs disponibles.
Français 8. Appuyez sur pour sélectionner la couleur de l’éclairage d’ambiance. Vous pouvez choisir entre 7 variations de couleurs ou activer un cycle automatique de changement de la couleur. Confirmez la sélection en appuyant sur le bouton ALARM. 9. Vous pouvez modifier les paramètres de la seconde heure d’alarme. Suivez les étapes décrites dans les étapes 3 à 8. Activer / désactiver l’heure d’alarme Appuyez sur le bouton ALARM de manière répétée.
Français Élimination Signification du symbole “Élimination” Prendre soin de l’environnement, ne pas jeter des appareils électriques avec les ordures ménagères. Porter les appareils électriques obsolètes ou défectueux dans les centres de récupération municipaux. Aider à éviter les impacts potentiels sur l’environnement et la santé en luttant contre les déchets sauvages. Vous contribuerez ainsi au recyclage et autres formes de réutilisation des appareils électriques usagés.
Español Instrucciones de servicio Le agradecemos la confianza depositada en este producto y esperamos que disfrute de su uso. Símbolos en este manual del usuario Advertencias importantes para su seguridad están señaladas en especial. Siga estas advertencias incondicionalmente, para evitar accidentes y daños en el aparato: AVISO: Advierte de riesgos para su salud, e indica riesgo potencial de heridas. ATENCIÓN: Indica peligros potenciales para el dispositivo u otros objetos.
Español Indicación de los elementos de manejo 1 2 3 4 5 6 7 8 9 10 Soporte para teléfono Botón SLEEP / TIMER SET Botón Botón Botón FUNC Botón SNOOZE / Botón VOL + Botón VOL − Botón ALARM Botón MEM / PRESET Pantalla A Modo radio B Hora de alarma 1 C Hora de alarma 2 D Descanso activo Vista trasera (sin ilustración) Antena dipolar Toma de adaptador de alimentación – DC 5 V Clavija de entrada auxiliar (AUX) Inferior (sin ilustración) Compartimiento de batería Arranque del dispositivo / Introducción • Selecc
Español Cambiar el color de la luz ambiental Durante el funcionamiento el chasis superior del dispositivo se ilumina. Puede elegir entre 7 variaciones de color y cambio de color automático. 1. Pulse repetidamente el botón SNOOZE / para seleccionar el color deseado. 2. Con la 8ª selección de color la iluminación cambia automáticamente entre las 7 variaciones de color. También puede apagar la iluminación: • Pulse el botón SNOOZE / durante 3 segundos.
Español Apagar la señal de alarma Para apagar la alarma hasta el día siguiente, pulse el botón FUNC. Función de descanso (SNOOZE) La señal de alarma establecida automáticamente puede apagarse aprox. 9 minutos con el botón SNOOZE / . Aparecerá el símbolo “ ” en pantalla. Resolución de problemas Problema Causa La unidad no El dispositivo funciona falla y se “cuelga”. Apagado con retraso ¿Quiere dormirse con la música de la radio? 1. Pulse el botón FUNC para encender la radio. 2.
Italiano Istruzioni per l’uso Grazie per aver scelto il nostro prodotto. Vi auguriamo un buon utilizzo del dispositivo. Simboli per questo manuale di istruzioni per’uso Le indicazioni importanti per la propria sicurezza sono indicati appropriatamente. Osservare assolutamente queste indicazioni, per evitare incidenti e danni all’apparecchio: AVVISO: Avvertimenti di pericoli alla salute e indica rischi potenziali di lesioni. ATTENZIONE: Indica pericoli potenziali per il dispositivo e altri oggetti.
Italiano 7 8 9 10 Tasto Tasto Tasto Tasto VOL + VOL − ALARM MEM / PRESET Display A Modalità radio B Ora sveglia 1 C Ora sveglia 2 D Snooze attivo Vista posteriore (senza figura) Antenna bipolare Presa dell’adattatore di corrente – DC 5 V Spinotto AUX Base (senza figura) Vano della batteria Avvio del dispositivo / Introduzione 25 1. Aprire il coperchio del vano batterie presente sul lato inferiore. 2. Inserire 2 batterie R 03 “AAA” da 1,5 V.
Italiano ATTENZIONE: Non è possibile sostituire le lampadine LED. Impostazione dell’orario 1. Spegnere il dispositivo. 2. Premere e tenere premuto il tasto SLEEP / TIME SET per ca. 3 secondi. Le ore iniziano a lampeggiare. e Tper regolare le ore. 3. Usare il tasto 4. Premere il tasto SLEEP / TIME SET per confermare. 5. Impostare i minuti con il tasto o . 6. Confermare la scelta con il tasto SLEEP / TIME SET .
Italiano 27 Spegnimento del display Dati tecnici Si desidera addormentarsi con la musica della radio? Modello:....................................................................MRC 4151 Alimentazione rete:........................................DC 5 V Consumo di energia:.......................................................3,5 W Classe di protezione:............................................................. Batteria di riserva:.............................2 x 1,5 V, type AAA, R 03 Peso netto:.....
English Instruction Manual Thank you for choosing our product. We hope you will enjoy using the appliance. Symbols in these Instructions for Use Important information for your safety is specially marked. It is essential to comply with these instructions in order to avoid accidents and prevent damage to the machine: WARNING: Warns of dangers for your health and indicates potential risks of injury. CAUTION: Indicates potential dangers for the device or other objects.
English 7 8 9 10 VOL + button VOL − button ALARM button MEM / PRESET button Display A Radio mode B Alarm time 1 C Alarm time 2 D Snooze active Rear view (without illustration) Dipole antenna Power adapter socket – DC 5 V AUX jack Bottom (without illustration) Battery compartment Start-up of the device / Introduction • Choose a suitable location for the device. Suitable would be a dry, level, non-slip surface. • Sensitive surfaces such as the display may be protected by plastic foil. Remove this foil.
English Setting the Clock 1. Turn off the device. 2. Press and hold the SLEEP / TIME SET button for approx. 3 seconds. The hours start flashing. 3. Use the or button to adjust the hours. 4. Press the SLEEP / TIME SET button to confirm. 5. Set the minutes with the or the button. 6. Confirm the input with the SLEEP / TIME SET button. NOTE: The input is stored automatically within approximately 10 seconds when no button is pressed. Listening to the radio Scanning stations 1.
English • The “OFF” setting will deactivate the function. • To display the still remaining time, briefly press the SLEEP / TIME SET button. AUX jack For connecting to external players, e.g. MP3 player, smartphone, tablet PC etc. 1. Connect the external device to the AUX jack with a 3.5 mm stereo jack. 2. Press the FUNC repeatedly until “AU” is shown on the display. 3. You can listen to the audio playback from an external device through the speaker. Adjust the volume on the external device.
Język polski Instrukcja obsługi Dziękujemy za wybór naszego produktu. Mamy nadzieję, że korzystanie z urządzenia sprawi Państwu radość. Symbole użyte w tej instrukcji obsługi Ważne informacje dotyczące bezpieczeństwa użytkownika są specjalnie wyróżnione. Koniecznie stosuj się do tych wskazówek, aby uniknąć wypadków i uszkodzenia urządzenia: OSTRZEŻENIE: Niebezpieczeństwo dla zdrowia oraz potencjalne ryzyko obrażeń ciała. UWAGA: Oznacza potencjalne zagrożenie urządzenia lub innych obiektów.
Język polski Przegląd elementów obsługi 1 2 3 4 5 6 7 8 9 10 Miejsce na smartfon Przycisk SLEEP / TIMER SET Przycisk Przycisk Przycisk FUNC Przycisk SNOOZE / Przycisk VOL + Przycisk VOL − Przycisk ALARM Przycisk MEM / PRESET Wyświetlacz A Tryb radia B Czas alarmu 1 C Czas alarmu 2 D Aktywna drzemka Widok od tyłu (brak rysunku) Antena dipolowa Gniazdo zasilacza – DC 5 V Gniazdo AUX Spód (brak rysunku) Wnęka na baterie Rozruch urządzenia / wstęp • Wybrać odpowiednią lokalizację dla urządzenia.
Język polski Zmiana koloru podświetlenia nastrojowego Podczas pracy, górna część obudowy urządzenia jest podświetlona. Można wybrać 7 różnych wariantów kolorystycznych i automatyczną zmianę koloru. 1. Naciskaj przycisk SNOOZE / , aż wybierzesz żądany kolor. 2. Po wybraniu 8 opcji, podświetlenie automatycznie przełącza się pomiędzy 7 wariantami kolorystycznymi. Można również wyłączyć podświetlenie: • Naciśnij przycisk SNOOZE / na 3 sekundy.
Język polski Wyłączanie sygnału alarmu Aby wyłączyć alarm do następnego dnia, naciśnij przycisk FUNC. Funkcja drzemki (SNOOZE) Automatycznie ustawiony sygnał alarmu będzie wyłączony na ok. 9 minut za pomocą przycisku SNOOZE / . Symbol „ ” pojawi się na wyświetlaczu. Opóźnione wyłączanie Czy chcesz zasypiać przy muzyce radiowej? 1. Nacisnąć przycisk FUNC, aby włączyć radio. 2. Naciśnij przycisk SLEEP / TIME SET . Na wyświetlaczu pojawi się 90 (minut). 3.
Język polski na wolne od wad lub, jeśli wymiana jest niemożliwa, zwrotu gotówki tylko po dostarczeniu do punktu zakupu kompletnego urządzenia z oryginalnymi akcesoriami, instrukcją obsługi i w oryginalnym opakowaniu wraz z dowodem zakupu i prawidłowo wypełnioną kartą gwarancyjną (pieczątka sklepu, data sprzedaży urządzenia). Gwarancja oraz zawarte w niej warunki obowiązują na terenie Rzeczpospolitej Polskiej.
Magyarul Használati utasítás Köszönjük, hogy a termékünket választotta. Reméljük, elégedetten használja majd a készüléket. A használati útmutatóban található szimbólumok Az Ön biztonságára vonatkozó utasítások kifejezetten meg vannak különböztetve. Kérjük, mindenképpen ügyeljen ezekre annak érdekében, hogy elkerülje a baleseteket és a készülék károsodását: FIGYELMEZTETÉS: Egészségét károsító veszélyforrásokra figyelmeztet, és jelzi a lehetséges sérülésveszélyeket.
Magyarul A kezelőelemek áttekintése 1 2 3 4 5 6 7 8 9 10 Okostelefon-tartó SLEEP / TIMER SET gomb gomb gomb FUNC gomb SNOOZE / gomb VOL + gomb VOL − gomb ALARM gomb MEM / PRESET gomb Kijelző A Rádió mód B Ébresztési idő 1 C Ébresztési idő 2 D Szundi bekapcsolva Hátoldali nézet (ábra nélkül) Kétpólusú antenna Hálózati adapter csatlakozó– DC 5 V AUX csatlakozó Alsó rész (ábra nélkül) Akku tartó rekesz A készülék bekapcsolása / Bevezetés • Válasszon megfelelő helyet a készüléknek.
Magyarul Hangulatvilágítás színének módosítása Üzem közben az eszköz házának felső része világít. 7 különböző színváltozat és az automatikus színváltás közül választhat. 1. A kívánt szín kiválasztásához nyomogassa a SNOOZE / gombot. 2. A 8. szín kiválasztásával a világítás automatikusan váltakozik a 7 színváltozat között. A világítást ki is kapcsolhatja: • Nyomja a SNOOZE / gombot 3 másodpercig. • A világítás ismételt bekapcsolásához nyomja újra a SNOOZE / gombot 3 másodpercig.
Magyarul Az ébresztési jel lekapcsolása Az ébresztés következő napig kikapcsolásához nyomja meg a FUNC gombot. Szundi funkció (SNOOZE) Az automatikusan beállított ébresztési jelet leállíthatja körülbelül 9 percig a SNOOZE / gombbal. A „ ” szimbólum megjelenik a kijelzőn. Hibaelhárítás Probléma A készülék nem működtethető Ok A készülék blokkolva van és „lefagyott” Megoldás Húzza ki a tápkábelt kb. 5 másodpercre. Majd csatlakoztassa újra a készüléket.
Stand 03 / 2016 MRC 4151 Elektro-technische Vertriebsges. mbH www.etv.de MRC4151_IM - Size 138x210mm 30.03.