DE4003020 EN User manual
www.aeg.com CONTENTS 1. 2. 3. 4. 5. 6. 7. 8. 9. 10. 11. 12. 13. SAFETY INFORMATION . . . . . . . . . . . . . . . . . . . . . . . . . . . . . . . . . . . . . . . . . . . . . . . . . . . . . . 3 SAFETY INSTRUCTIONS . . . . . . . . . . . . . . . . . . . . . . . . . . . . . . . . . . . . . . . . . . . . . . . . . . . . . . 4 PRODUCT DESCRIPTION . . . . . . . . . . . . . . . . . . . . . . . . . . . . . . . . . . . . . . . . . . . . . . . . . . . . . 6 BEFORE FIRST USE . . . . . . . . . . . . . . . . . . . .
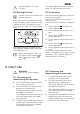
ENGLISH 3 1. SAFETY INFORMATION Before the installation and use of the appliance, carefully read the supplied instructions. The manufacturer is not responsible if an incorrect installation and use causes injuries and damages. Always keep the instructions with the appliance for future reference. 1.1 Children and vulnerable people safety WARNING! Risk of suffocation, injury or permanent disability.
www.aeg.com • Do not use harsh abrasive cleaners or sharp metal scrapers to clean the glass door since they can scratch the surface, which may result in shattering of the glass. • To remove the shelf supports first pull the front of the shelf support and then the rear end away from the side walls. Install the shelf supports in the opposite sequence. • Ensure that the appliance is switched off before replacing the lamp to avoid the possibility of electric shock. 2. SAFETY INSTRUCTIONS 2.
ENGLISH • Use only correct isolation devices: line protecting cut-outs, fuses (screw type fuses removed from the holder), earth leakage trips and contactors. • The electrical installation must have an isolation device which lets you disconnect the appliance from the mains at all poles. The isolation device must have a contact opening width of minimum 3 mm. 2.2 Use WARNING! Risk of injury, burns or electric shock or explosion. • Use this appliance in a household environment.
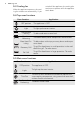
www.aeg.com 2.4 Internal light 2.5 Disposal • The type of light bulb or halogen lamp used for this appliance, is only for household appliances. Do not use it for house lighting. WARNING! Risk of electrical shock. • Before replacing the lamp, disconnect the appliance from the power supply. • Only use lamps with the same specifications. WARNING! Risk of injury or suffocation. • Disconnect the appliance from the mains supply. • Cut off the mains cable and discard it.
ENGLISH Refer to chapter "Care and Cleaning". 4.2 Setting the time You must set the time before you operate the oven. When you connect the appliance to the electrical supply or after a power cut, the indicator for the Time function flashes. Press the + or - button to set the correct time. 7 To use the appliance, push the control knob. The control knob comes out. 4.3 Preheating Preheat the empty appliance to burn off the remaining grease. Preheat the two ovens. Heat up one oven at a time.
www.aeg.com 5.3 Cooling fan When the appliance operates, the cooling fan switches on automatically. If you switch off the appliance, the cooling fan continues to operate until the appliance cools down. 5.4 Top oven functions Oven function OFF position Light Conventional Cooking Top Heat Browning Application The appliance is OFF. To light up the oven interior. To bake and roast on one level Tor brown bread, cakes and pastries and for bakes.
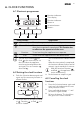
ENGLISH 9 6. CLOCK FUNCTIONS 6.1 Electronic programmer 1 2 3 1 Function indicators 2 Time display 3 Function indicators 4 Button + 5 Selection button 6 Button - 6 5 4 Clock function Time of day Minute Minder Duration End Application To set, change or check the time of day. To set a countdown time. An acoustic signal sounds after the time period is completed. This function has no effect on the operation of the oven. To set how long the appliance must operate.
www.aeg.com 7. USING THE ACCESSORIES WARNING! Refer to the Safety chapters. 7.1 Inserting the oven accessories The deep roasting pan and the wire shelf have side edges. These edges and the shape of the guide-bars are a special device to prevent the cookware from slipping. Put in the slide-in accessories so that the double side edges are at the back of the oven and point down to the bottom. Push the slide-in accessories between the guide-bars of one of the oven levels.
ENGLISH 11 To grill flat dishes in large quantities and to toast: 1. Put the roasting pan grid in the deep roasting pan. The supports of the roasting pan grid must point down. 2. Put the deep roasting pan in the appliance and on the necessary shelf level. 8. HELPFUL HINTS AND TIPS WARNING! Refer to the Safety chapters. The temperature and baking times in the tables are guidelines only. They depend on the recipes, quality and quantity of the ingredients used.
www.aeg.
ENGLISH Temperature [°C] Approx Cook Time (mins) Shelf Position - Victoria Sandwich 160 - 170 18 - 25 1 - Madeira 140 - 150 75 - 90 1 - Rich Fruit 140 - 150 120 - 150 1 - Gingerbread 140 - 150 75 - 90 1 - Meringues 90 - 100 150 - 180 1 - Flapjack 160 - 170 25 - 30 1 - Shortbread 130 - 150 45 - 65 1 - Beef/Lamb 150 - 170 150 - 180 1 - Chicken 160 - 180 75 - 90 1 Food Casseroles: Convenience Foods Follow manufacturer´s instructions.
www.aeg.com Temperature [°C] Approx Cook Time (mins) Shelf Position 180 - 190 60- 90 1 - Large 200 - 210 25 - 40 1 - Individual 210 - 220 15 - 25 1 Food - Roast Potatoes Yorkshire Pudding: Roasting Meat, Poultry See roasting chart. 8.6 Main oven 8.7 Baking Shelf Positions are not critical but ensure that oven shelves are evenly spaced when more than one is used (e.g.
ENGLISH Food Roasting: Meat and Poultry Temperature [°C] Approx Cook Time (mins) 160 - 180 see Roasting Chart 8.8 Roasting Roasting dishes • Use heat-resistant ovenware to roast (please read the instructions of the manufacturer). • Large roasting joints can be roasted directly in the deep roasting pan or on the oven shelf above the deep roasting pan. (If present) 15 • Roast lean meats in a roasting tin with a lid. This well keep the meat more succulent.
www.aeg.com Always pre-heat the empty oven with the grill functions for 5 minutes. • Set the shelf in the shelf level as recommended in the grilling table. • Always set the pan to collect the fat into the first shelf level. • Grill only flat pieces of meat or fish. Food Bacon Rashers 8.
ENGLISH • Clean stubborn dirt with a special oven cleaner. • Clean all oven accessories (with a soft cloth with warm water and cleaning agent) after each use and let them dry. • If you have nonstick accessories, do not clean them using an aggressive agents, sharp edged objects or dishwasher. It can destroy nonstick coating! 17 9.1 Shelf supports You can remove the shelf supports to clean the side walls. Stainless steel or aluminium appliances: Clean the oven door with a wet sponge only.
www.aeg.com WARNING! Before you fold down the heating element switch off the appliance. Make sure that the appliance is cold. There is a risk of burns! Folding down the heating element Remove the shelf support rails. Hold the heating element with the two hands at the front 3. Pull it forwards against the spring pressure and out along the support on both sides. 4. The heating element folds down. The oven ceiling is ready to clean. 1. 2. Installing the heating element 1.
ENGLISH 19 Removing and cleaning the door glasses 2 The door has 2, 3 or 4 panels of glass (the number depends on the model). B CAUTION! Rough handling of the glass, especially around the edges of the front panel, can cause the glass to break. 1 1. Hold the door trim (B) on the top edge of the door at the two sides and push inwards to release the clip seal. 2. Pull the door trim to the front to remove it. 3.
www.aeg.com Problem Possible cause Remedy The oven does not heat up. The clock is not set. Set the clock. The oven does not heat up. The necessary settings are not set. Make sure that the settings are correct. The oven does not heat up. The fuse in the fuse box is released. Do a check of the fuse. If the fuse is released more than one time, contact a qualified electrician. The oven lamp does not operate. The oven lamp is defective. Replace the oven lamp. The display shows 12.
ENGLISH min. 600 min. 550 538 min. 560 max. 570 min. 2000 min. 907 20 888 866 min.
www.aeg.com 90 0 2x 3,5x25 11.1 Electrical installation WARNING! Only a qualified and competent person must do the electrical installation. The manufacturer is not responsible if you do not follow safety precautions from the Safety chapters. This appliance is supplied without a main plug and a main cable. Applicable cable types : H07 RN-F, H05 RN-F, H05 RRF, H05 VV-F, H05 V2V2-F (T90), H05 BB-F 11.
ENGLISH switch off the appliance in case of an emergency. • To protect the hands, wear gloves when lifting the oven into its housing. HOUSE CIRCUIT Earth leakage and continuity tests must be carried out before the appliance is connected to the mains supply and re-checked after fitting. 23 ing switch with at least 3 mm contact separation in all poles and neutral. c) If you wish to connect an oven and a hob to a cooker point you can by connecting the oven and hob separately to the cooker point.
www.aeg.com Exclusions • Damage, calls resulting from transport, improper use, neglect, light bulbs, removable parts of glass, plastic. • Costs for calls to put right appliance which is improperly installed, calls to appliances outside United Kingdom. • Appliances found to be in use within a commercial environment, plus those which are subject to rental agreements. • Products of Electrolux manufacturer that are not marketed by Electrolux Service and Spare Parts.
ENGLISH 25 The provisions of this European Guarantee do not affect any of the rights granted to you by law. 14. WWW.ELECTROLUX.COM Albania +355 4 261 450 Rruga “Kavajës”, ish-parku autobuzëve, Tiranë Belgique/België/Belgien +32 2 7162444 Raketstraat 40, 1130 Brussel/ Bruxelles Česká Republika +420 261 302 261 Budějovická 3, Praha 4, 140 21 Danmark +45 70 11 74 00 Strevelinsvej 38-40, 7000 Fredericia Deutschland +49 180 32 26 622 Fürther Str.
www.aeg.com Polska +48 22 43 47 300 ul. Kolejowa 5/7, 01–217 Wars‐ zawa Portugal +35 12 14 40 39 39 Quinta da Fonte - Edifício Gonçalves Zarco - Q 35 -2774-518 Paço de Arcos Romania +40 21 451 20 30 Str. Garii Progresului 2, S4, 040671 RO Schweiz - Suisse Svizzera 0848 848 111 Industriestrasse 10, CH-5506 Mägenwil Slovenija +38 61 24 25 731 Gerbičeva ulica 110, 1000 Ljubl‐ jana Slovensko +421 2 32 14 13 34-5 Electrolux Slovakia s.r.o.
ENGLISH 27
892957106-E-092013 www.aeg.