Multifunktionsnähmaschine Bedienungsanleitung
Bitte befolgen Sie die Sicherheitsanweisungen, einschließlich der Betriebsanleitung, bevor Sie die Nähmaschine in Betrieb nehmen. Gefahr – Um die Gefahr eines Stromschlags zu minimieren: 1. Die Nähmaschine ist von der Steckdose zu trennen, wenn sie unbeaufsichtigt sein sollte. Nach dem Gebrauch und vor der Reinigung ist die Nähmaschine von der Steckdose zu trennen. Warnung – Um die Gefahr eines Stromschlags zu minimieren: 1. Diese Nähmaschine darf nicht als Spielzeug verwendet werden.
Vielen Dank, dass Sie sich für unser Produkt entschieden haben. Diese Nähmaschine ist eine der neuesten Haushaltsnähmaschinen. Um alle Funktionen nutzen zu können, raten wir Ihnen, diese Anweisungen vor dem Gebrauch der Nähmaschine durchzulesen. Hinweise für einen sicheren Betrieb 1. 3. Konzentrieren Sie sich während des Nähens auf die Nadel und berühren Sie nicht das Handrad, den Fadenhebel oder andere bewegliche Teile.
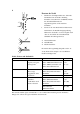
Abschnitt I Übersicht der Nähmaschine Übersicht………………………………………………………………………. 1 Mitgeliefertes Zubehör………………………………………………………… 1 Abschnitt II Vorbereitung Stromanschluss ………………………………………………………………… 2 Rückwärtsnähen ………………………………………………………………… 2 Nähfußhebel …………………………………………………………………….. 2 Ersetzen des Nähfußes …………………………………………………………. 3 Umbau zum Freiarm-Nähen …………………………………………………... 3 Stich-Wahlscheibe und Anzeige ………………………………………………..
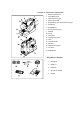
1 Abschnitt I Übersicht der Nähmaschine 1. Rückwärtsstichhebel 2. Stich-Wahlscheibe 3. Spulenspindelstopper 4. Spulenspindelstift 5. Fadenführung zum Aufwickeln der Spule 6. Fadenhebel 7. Fadenführung 8. Fadenspannungsregler 9. Nähfuß 10. Nadel 11. Stichplatte 12. Verlängerungsstück 13. Griff 14. Garnrollenhalter 15. Handrad 16. Haupt-/Lichtschalter 17. Anschluss 18. Nähfußhebel Mitgeliefertes Zubehör 1. Fadenspule 2. Nahtlöser 3. Filz-Pads 4. Knopfloch-Nähfuß 5.
2 Abschnitt II Vorbereitung Stromanschluss Netzstecker Hauptschalter Stromanschluss Nähmaschinenstecker Bevor Sie die Maschine an die Stromversorgung anschließen, prüfen Sie, ob die auf der Maschine angegebene Spannung mit der Netzspannung übereinstimmt. 1. Schalten Sie den Hauptschalter auf „OFF“. 2. Stecken Sie den Stecker in den Nähmaschinenanschluss. 3. Stecken Sie den Netzstecker in eine Steckdose. 4. Schalten Sie den Betriebsschalter ein.
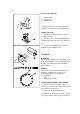
3 Ersetzen des Nähfußes Fußlösehebel Aussparung Fußhalteraster Achten Sie darauf, dass die Nadel vollständig angehoben ist. Heben Sie den Nähfußhebel an. Nähfuß einrasten 1. Heben Sie den Fußlösehebel an, um den Nähfuß zu entfernen. 2. Setzen Sie den gewünschten Nähfuß auf die Stichplatte und richten Sie ihn auf die Nadelösen aus. 3. Senken Sie den Nähfußhebel, damit die Fußhalterung am Nähfuß einrastet. Zusatzfach Entnahme Ziehen Sie das Zusatzfach, wie abgebildet, nach links aus der Maschine.
4 Ersetzen der Nadel 1. Schalten Sie den Hauptschalter aus, drehen Sie das Handrad, um die Nadel vollständig anzuheben, und senken Sie den Nähfuß. Drehen Sie die Nadelstellschraube im Gegenuhrzeigersinn, um die Nadel zu entnehmen. Setzen Sie die neue Nadel mit der flachen Seite nach hinten in die Nadelbefestigungsöffnung, drücken Sie die Nadel so weit wie möglich nach oben ein, und drehen Sie die Stellschraube schließlich im Uhrzeigersinn fest. 2.
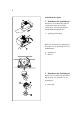
5 Aufwickeln der Spule 1. Entnehmen der Spulenkapsel Nehmen Sie das Verlängerungsstück aus der Maschine. Heben Sie die Nadel vollständig an, indem Sie das Handrad manuell in Ihre Richtung drehen. Spulenkapselabdeckung Halten Sie den Drücker der Spulenkapsel und nehmen Sie die Spulenkapsel aus der Schiffchenbahn. Spulenkapsel Drücker 2. Entnehmen der Spulenkapsel Nachdem Sie den Drücker geöffnet haben, fällt die Spule, wie abgebildet, aus der Spulenkapsel.
6 3. Aufwickeln der Spule 1. Nachdem Sie das Handrad herausgezogen und damit die Kupplung gelöst haben, wird sich die Nadel während des Aufwickelns der Spule nicht bewegen. Ziehen Sie die Garnrollenhalterung an der Rückseite der Maschine heraus, setzen Sie die Filz-Pads auf und die Doppelspindel auf die Garnrollenhalterung, mit der Fadenrichtung wie abgebildet. Garnrollenhalter Filz-Pads Garnknäuel Handrad Fadenführung 2.
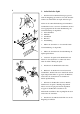
7 Einsetzen der Spule in die Spulenkapsel 1. Halten Sie die Spule mit der rechten Hand, wobei der Faden im Uhrzeigersinn verläuft. 2. Setzen Sie die Spule in die Spulenkapsel, wobei ca. 10 cm des Fadens aus der Kapsel heraushängen. 3. Ziehen Sie den Faden durch den Schlitz in der Kapsel und anschließend unter die flache Spannungsfeder hindurch. Dort rastet der Faden ein. Flache Spannungsfeder 4. Halten Sie den Drücker auf, wobei der Stift nach oben zeigt.
8 Einfädeln des Oberfadens 1. Setzen Sie den Oberfaden auf die Garnrollenhalterung, mit Ausrichtung wie abgebildet. Drehen Sie das Handrad, um den Fadennehmer vollständig anzuheben. Heben Sie den Nähfuß an. 2. Führen Sie den Oberfaden um den Kreuzfadenhalter. Kreuzfadenhalter 3. Führen Sie den Oberfaden nach unten um die rechte Kerbe des Fadenhalters, ziehen Sie ihn nach oben und führen Sie ihn um den Fadenhalter herum. Ziehen Sie den Faden nach oben durch die linke Kerbe des Fadenhalters. 4.
9 Aufnahme des Spulenfadens 1. Heben Sie den Nähfußhebel an. Halten Sie den Nadelfaden lose mit der linken Hand und drehen Sie das Handrad mit rechts in Ihre Richtung, bis die Nadel vollständig angehoben ist. Oberfaden 2. Ziehen Sie den Oberfaden leicht nach oben und nehmen Sie den Spulenfaden auf, der durch den Schlitz in der Stichplatte erscheint. Spulenfaden 3. Ziehen Sie sowohl den Ober- als auch den Spulenfaden gemeinsam nach hinten unter dem Nähfuß aus der Maschine und lassen Sie ca.
10 Einstellen der Oberfadenspannung 1. Ausgleichen der Oberfadenspannung Die Spannung ist ausgeglichen, wenn diese beiden Fäden sich beim Nähen in der Mitte der Stoffschicht ineinander verhaken. Oberfaden Spulenfaden Oberseite des Nähguts Unterseite des Nähguts Drehen Sie den Fadenspannungsregler, um die Oberfadenspannung einzustellen. Spannung verringern Spannung erhöhen Stellen Sie die Oberfadenspannung ein, abhängig von: 1. Dicke und Dichte des Stoffes 2. Stoffschichten 3. Stich 2.
11 Abschnitt III Basisstich Gerader Stich Stichauswahl A, B, C Fadenspannungsregler 2-6 Nähfuß Z-Nähfuß Nähen Heben Sie den Nähfuß an, setzen Sie das Nähgut unter den Nähfuß und richten Sie es an der Führung auf der Stichplatte aus. Bringen Sie die Nadel in die Ausgangsposition, ziehen Sie den Ober- und den Unterfaden nach hinten weg, senken Sie den Nähfuß, betätigen Sie die Fußsteuerung und beginnen Sie mit dem Nähen entlang der Führung.
12 Z-Basisstich Stichauswahl Fadenspannungsregler Nähfuß D, E, F 2-5 Z-Nähfuß Der Z-Stich ist ein gewöhnlicher Stich und wird zum Nähen von Knöpfen, zum Steppnähen von Knopflöchern, für Overlock- und Dekorstiche verwendet. Overlockstich Stichauswahl Fadenspannungsregler Nähfuß E 1-4 Z-Nähfuß Verwenden Sie diesen Stich, um jedes beliebige Nähgut abzugrenzen und einen vorläufigen Abschluss zu schaffen.
13 Blindnaht Stichauswahl L oder M Fadenspannungsregler 1-4 Nähfuß Z-Nähfuß Bei einem leichten, dicken Stoff bearbeiten Sie den groben Rand mit einem Overlockstich, wie abgebildet, falten Sie den Stoff zusammen und lassen Sie 0,7 cm Rand. Legen Sie das Nähgut auf die Maschine und senken Sie die Nadel links neben dem gefalteten Teil des Nähguts leicht in den Stoff. Drücken Sie den Stoff nach dem Nähen zusammen, um die Blindnaht auf der Vorderseite sichtbar zu machen.
14 Abschnitt V Knopflochstich Knopflochstich Stichauswahl Fadenspannungsregler Knopfloch-Nähfuß Knopfloch-Nähfuß Nähen 1. Bringen Sie den Knopfloch-Nähfuß an, markieren Sie die Knopflochlänge auf dem Nähgut, legen Sie den Stoff mit der Knopflochmarkierung zu Ihnen hin unter den Nähfuß, bewegen Sie Schieber A auf dem Nähfuß in Ihre Richtung, richten Sie die Markierung C auf der Oberseite des Schiebers auf die Anfangsmarkierung B aus, und senken Sie den Nähfuß. 2.
15 Abschnitt VI Pflege Ihrer Maschine Hinweis: Bevor Sie folgende Schritte durchführen, ziehen Sie bitte den Netzstecker aus der Steckdose. 1. Reinigen des Transporteurs Entnehmen Sie die Nadel und den Nähfuß, entfernen Sie die Schrauben mit einem Schraubendreher von der Stichplatte und entnehmen Sie die Stichplatte. Bürsten Sie Staub und Fusseln vom Transporteur und setzen Sie die Stichplatte wieder ein. 2.
16 Ersetzen der Glühbirne Hinweis: Berühren Sie die Glühbirne erst nach dem Abkühlen, um Verbrennungen der Hand zu vermeiden. Entfernen Sie die Lampenabdeckung, nachdem Sie die Schrauben gelöst haben. Entnehmen Sie die alte Glühbirne, setzen Sie eine neue Glühbirne des gleichen Typs (15 W) ein und schrauben Sie sie fest. Lamp cover = Lampenabdeckung Hinweis: Stellen Sie die Maschine nicht in einer feuchten Umgebung, in der Nähe einer Wärmequelle oder in direktem Sonnenlicht auf.
17 Fehlerbehebung Störung Oberfaden reißt Ursache Fehlerbehebung 1. Der Oberfaden ist falsch eingefädelt. Prüfen Sie den Oberfaden oder fädeln 2. Die Oberfadenspannung ist zu stark. Sie ihn erneut ein. 3. Stumpfe oder verschließene Nadel. Prüfen oder ersetzen Sie die Nadel. 4. Die Nadel ist nicht richtig montiert. 5. Zu Beginn des Nähvorgangs sind der Ober- und der Unterfaden nicht richtig unter dem Nähfuß fixiert. 6. Am Ende des Nähvorgangs ist der Faden nicht nach hinten gefädelt. 7.