
Operating Instructions and Installation Instructions


14
Installation - for contractors
8. Appliance description
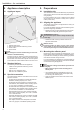
8.1 Appliance layout
26_07_30_0004
1
3
2
4
1 Natural stone panel
2 Wall mounting brackets with xing screws
3 Power cable
4 Spacer studs
Note
The hexagon screws for wall mounting are not inclu-
ded in the standard delivery.
A heating conductor, featuring 2 safety temperature limi-
ters with automatic reset, is laid in a duct system milled
into the back of the natural stone panels. The duct system
is then lled with marble adhesive which acts as a cover.
8.2 Standard delivery
The following are delivered with the appliance:
◦ 3 Wall mounting brackets with xing screws
◦ 1 Spacer stud
◦ NSH 35-115: 1 Reector panel
◦ NSH 145-165: 2 Reector panels
8.3 Special accessories
The natural stone heater is controlled via the room tem-
perature controller.
◦ RT 600: Room temperature controller with thermal
feedback, breaking capacity 10 A / 230 V
◦ RT 601 SN: Room temperature controller with ther-
mal feedback, with ON/OFF switch, breaking capaci-
ty 10 A / 230 V, installation on nished walls
◦ RT 5050 SN: Room temperature controller with ther-
mal feedback, with ON/OFF switch, breaking capaci-
ty 10 A / 230 V, installation on unnished walls
◦ RTE 900 SN: Electronic 2-point controller with ON/
OFF switch, breaking capacity 16 A / 230 V, installa-
tion on nished walls
◦ RTE 5050 SN: Electronic 2-point controller with ON/
OFF switch, breaking capacity 16 A / 230 V, installa-
tion on unnished walls
◦ RTF: Digital, wireless room temperature controller
with 7-day program, 5 available operating modes
9. Preparations
9.1 Installation site
The natural stone heater is intended solely for permanent
wall mounting. Ensure the wall offers adequate load-be-
aring capacity.
It can be installed in any room. In bathrooms, the natural
stone heater can be mounted in safety zone 2 (not the
mains junction box).
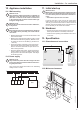
9.2 Aligning the appliance
The natural stone heater is congured at the factory for
horizontal installation.
If you want to install it vertically, make the following chan-
ges before beginning installation:
» Replace the wall mounting bracket above the power
cable with the diagonally positioned spacer stud.
WARNING Electrocution
Ensure that the power cable is always located at the
lower edge.
» Rotate both wall mounting brackets with the slot
apertures downwards.
!
Material losses
Carefully tighten the xing screws in the natural
stone heater, as otherwise the rawl plugs in the na-
tural stone panel may over-rotate and become loose.
9.3 Mounting the reector panel
Depending on size, the appliance is delivered with 1-2 re-
ector panels made from aluminium-coated EPS. Reec-
tor panels have insulating as well as reecting properties
and reduce heat loss through the wall.
If you are installing your appliance on an external wall, we
recommend mounting the reector panel at the installati-
on site before tting the appliance.
Note
The aluminium coating of the reector panel will rub
off slightly.
» Wear protective gloves when mounting the re-
ector panel.
» Use a suitable adhesive (wall adhesive) and a not-
ched trowel with medium sized notches (B2 or B3)
for mounting the reector panel.
» Apply the adhesive to the entire rear surface of the
reector panel.