
User manual


3
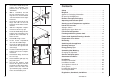
Contents
Safety . . . . . . . . . . . . . . . . . . . . . . . . . . . . . . . . . . . . . . . . . .4
Disposal . . . . . . . . . . . . . . . . . . . . . . . . . . . . . . . . . . . . . . . .5
Appliance Packaging Information . . . . . . . . . . . . . . . . . . . . . .5
Disposal of old Appliances . . . . . . . . . . . . . . . . . . . . . . . . . . .5
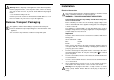
Remove Transport Packaging . . . . . . . . . . . . . . . . . . . . . . .6
Operating and indicator panel . . . . . . . . . . . . . . . . . . . . . . .7
Starting up and Temperature regulation . . . . . . . . . . . . . . .7
Interior Accessories . . . . . . . . . . . . . . . . . . . . . . . . . . . . . . .8
Storage shelves . . . . . . . . . . . . . . . . . . . . . . . . . . . . . . . . . . .8
Adjusting the upper door rack . . . . . . . . . . . . . . . . . . . . . . . . .9
Fresh food refrigeration . . . . . . . . . . . . . . . . . . . . . . . . . . . .9
Freezing and Storing frozen food . . . . . . . . . . . . . . . . . . .10
Frozen food Symbols/Freezing calendar . . . . . . . . . . . . . .11
Preparation of Ice Cubes . . . . . . . . . . . . . . . . . . . . . . . . . .11
Defrosting . . . . . . . . . . . . . . . . . . . . . . . . . . . . . . . . . . . . . .11
Switching off the appliance . . . . . . . . . . . . . . . . . . . . . . .12
Cleaning and Care . . . . . . . . . . . . . . . . . . . . . . . . . . . . . . .13
Energy Saving Tips . . . . . . . . . . . . . . . . . . . . . . . . . . . . . .14
Something Not Working . . . . . . . . . . . . . . . . . . . . . . . . . . .14
Changing the light bulb . . . . . . . . . . . . . . . . . . . . . . . . . . . . .16
Service and Spare parts . . . . . . . . . . . . . . . . . . . . . . . . . . .17
Guarantee Conditions . . . . . . . . . . . . . . . . . . . . . . . . . . . .17
Installation . . . . . . . . . . . . . . . . . . . . . . . . . . . . . . . . . . . . .19
Electrical Connection . . . . . . . . . . . . . . . . . . . . . . . . . . . . . .19
Installation Location . . . . . . . . . . . . . . . . . . . . . . . . . . . . . . .20
Your appliance needs air . . . . . . . . . . . . . . . . . . . . . . . . . . .20
Rear spacers . . . . . . . . . . . . . . . . . . . . . . . . . . . . . . . . . . . .21
Levelling the appliance . . . . . . . . . . . . . . . . . . . . . . . . . . . .21
Reversing the door . . . . . . . . . . . . . . . . . . . . . . . . . . . . . . . .21
Regulations, Standards, Guidelines . . . . . . . . . . . . . . . . .23
2222 006-64
22
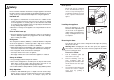
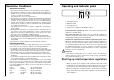
4. Unscrew the middle hinge and
remove the refrigerator com-
partment door by pulling it
downwards.
5. With a screwdriver, unscrew
the two masking plugs cove-
ring the holes on the left-hand
side and refit them on the right-
hand side.
6. Unscrew the pin from the top
hinge and refit it on the left-
hand side. Remember to fit the
washers.
7. Slide the refrigerator compart-
ment door onto the top pin.
8. Insert the middle hinge into the
bottom of the refrigerator com-
partment door. Remember to
fit the washers.
9. Refit middle hinge screws.
10. Fit the freezer compartment
door onto the middle hinge.
11. Unscrew the bottom hinge pin
and refit it on the opposite side
of the hinge
12. Insert the bottom hinge into the
bottom of the freezer compart-
ment door.
13. Refit bottom hinge and insert
the cover (G).
14. Refit ventilation grille (D) clip-
ping it into place.
15. Unscrew the handles. Refit
them on the opposite side after
having pierced the plugs with a
punch. Cover the holes left
open with the plugs contained
in the documentation pack.
PR228
D
D590
H