…KO-SANTO 2642-6 KG Kyl-/frys Fridge-freezer Bruksanvisning Instructions for use
Dear customer, Before placing your new refrigerator/freezer into operation please read these operating instructions carefully. They contain important information for safe use, for installation and for care of the appliance. Please keep these operating instructions for future reference. Pass them on to possible new owners of the appliance.
Contents Safety . . . . . . . . . . . . . . . . . . . . . . . . . . . . . . . . . . . . . . . . . . . Disposal . . . . . . . . . . . . . . . . . . . . . . . . . . . . . . . . . . . . . . . . . Appliance Packaging Information . . . . . . . . . . . . . . . . . . . . . . . Disposal of old Appliances . . . . . . . . . . . . . . . . . . . . . . . . . . . . Remove transport safeguard . . . . . . . . . . . . . . . . . . . . . . . . . Installation . . . . . . . . . . . . . . . . . . . . . . . . . . . . . . . . . .
Safety The safety aspects of our refrigerators/freezers comply with accepted technical standards and the German Appliance Safety Law. Nevertheless, we consider it our obligation to make you aware of the following safety information: Intended use ¥ The refrigerator is intended for use in the home. It is suitable for the cooling, freezing and storing of frozen food, as well as for making ice.
catches, if fitted. By doing this you ensure that children cannot lock themselves in the fridge when playing (there is risk of suffocation!)or get themselves into other dangerous situations. ¥ Often children cannot recognise the hazards present in household appliances. It is therefore important that you ensure adequate supervision and never let children play with the appliance! Daily Operation ¥ Containers with flammable gases or liquids can leak at low temperatures.
Disposal Appliance Packaging Information All materials are environmentally sound! They can be dumped or burned at an incinerating plant without danger! About the materials: The plastics can be recycled and are identified as follows: >PE< for polyethylene, e.g. the outer covering and the bags in the interior. >PS< for polystyrene foam, e.g. the pads, which are all free of chlorofluorocarbon.
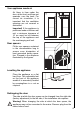
Installation Installation Location The appliance should be set up in a well ventilated, dry room. Energy use is affected by the ambiààent temperature. The appliance should therefore Ð not be exposed to direct sunlight; Ð not be installed next to radiators, cookers or other sources of heat; Ð only be installed at a location whose ambient temperature corresponds to the climate classification, for which the appliance is designed.
Your appliance needs air Air flows in from under the door, at the front, and flows out upwards, over the back. For correct air circulation, it is important that the ventilation openings are not covered or obstructed. Important! If the appliance is positioned under a kitchen wall unit, a minimum clearance of 10 cm must be left between the top of the appliance and the overhanging wall unit.
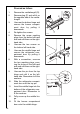
Procced as follow: 1. Remove the ventilationgrill (D). 2. Remove plug (F) and refit it on the opposite side of the ventilationgrill. 3. Unscrew the bottom hinge and remove the freezer compartment door by pulling it downwards. 4. Re-tighten the screws. 5. Remove the screw masking plugs from the bottm left-hand side and refit them on the righthand side. 6. Unscrew the two screws on the bottom left-hand side. 7.
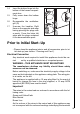
14. Insert the bottom hinge into the bottom of the freezer compartment door. 15. Fully screw down the bottom hinge. 16. Re-assemble the ventilationgrill (D) 17. Unscrew the handles. Refit them on the opposite side after having piercing the plugs with a punch. Cover the holes left open with the plugs contained in the documentation pack. PR228 Prior to Initial StartÐUp ¥ Please clean the appliance interior and all accessories prior to initial start-up (see section: ÒCleaning and CareÓ).
in your plug, proceed as follows: 1. The wire coloured green and yellow must be connected to the terminal marked with the letter ãEÒ or by the earth symbol or coloured green and yellow. 2. The wire coloured blue must be connected to the terminal ãNÒ or coloured black. 3. The wire coloured brown must be connected to the terminal marked ãLÒ or coloured red. 4. Upon completion there must be not cut, or stray strands of wire present and the cord clamp must be secure over the outer sheat.
Starting up and temperature regulation ¥ Insert the plug of the connection lead into the plug socket with protective earth contact. Setting ã0Ò means: Off. Setting ã1Ò means: Hightest temperature, (warmest setting). Setting ã4Ò (end-stop) means: Lowest temperature, (coldest setting).
¥ To do this pull the storage shelf forward until it can be swivelledupwards or downwards and removed. ¥ Please do the same in reverse to insert the shelf at a different height.Slide the front half of the Vario storage shelf in another level to the rear. By this means you will gain space to place tall items on the storage shelf below. D338 Adjusting the upper door rack ¥ Depending on the food stored, the upper door racks can be changed to other holders or removed.
tainers or wapped in aluminium foil or polythene bags to exclude as much air as possible. Milk bootles: these should have a cap and should be stored in the bottle rack on the door. Bananas, potatoes, onions and garlic, if not packed, must not be kept in the refrigerator. Freezing and storing frozen food You can use your freezer for freezing fresh food yourself. Important! ¥ The temperature in the freezer compartment must be Ð18 ¡C or colder before freezing food.
1. To achieve faster freezing of food or to freeze the maximum allowed quantity, depress the ambient switch 12 hours before loading the food without modifying the thermostat setting. 2. Place the food to be frozen in the top drawer. 3. Not open the door frequently or leave it open longer than absolutely necessary. Ice pack There is an ice pack in one drawer of the freezer.
Defrosting Refrigerator Frost is automatically eliminated from the evaporator of the refrigerator compartment every time the motor compressor stops, during normal use. The defrost water drains out through a trough into a special container at the back of the appliance, over the motor compressor, where it evaporates. Freezer The freezer compartment, however, will become progrssively covered with frost.
Switching off the appliance If the appliance is not going to be used for an extended period: 1. Remove all refrigerated and deep-frozen packages as well as ice trays. 2. Switch off the appliance by turning the temperature regulator to position "0". 3. Remove the mains plug or switch off or turn out the circuit breaker or fuse. 4. Defrost freezer compartment and clean thoroughly (see section: ÒCleaning and CareÓ). 5. Leave the door open to avoid the build up of odours.
2. Defrost the freezer compartment prior to cleaning (see "Defrosting" section). 3. Switch the appliance off and remove the plug from the mains, or switch off or turn out the circuit breaker or fuse. 4. Clean the appliance and the interior accessories with a cloth and lukewarm water. Commercially available dish washing detergents may also be used. 5. After cleaning wipe with fresh water and rub dry. Accumulation of dust at the condenser increases energy consumption.
What to do if ... Correcting Malfunctions A malfunction may be caused by only a minor fault that you can rectify yourself using the following instructions. Do not perform any other work on the appliance if the following information does not provide assistance in your specific case. Warning! Repairs to refrigerators/freezers may only be performed by qualified service engineers. Improper repairs can give rise to significant hazards for the user.
Heavy build up of frost, pos- Door seal is not air tight sibly also on the door seal. (possibly after changing over the hinges). Carefully warm the leaking sections of the door seal with a hair dryer (not hotter than approx. 50 ¡C). At the same time shape the warmed door seal by hand such that it sits correctly. Unusual noises. Appliance is not level. Readjust the feet. The appliance is touching the wall or other objects. Move the appliance slightly. A component, e.g.
Customer Service If you cannot find the remedy for a malfunction in these operating instructions, please contact your dealer or our customer service department. Addresses and telephone numbers are listed in the accompanying booklet "Guarantee Conditions/Customer Service Locations". Selective ordering of replacement parts can save unnecessary travel and costs.
AEG HausgerŠte GmbH Postfach 1036 D-90327 NŸrnberg http://www.aeg.hausgeraete.