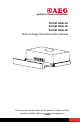
perfekt in form und funktion Perfekt Glide-24 Perfekt Glide-30 Perfekt Glide-36 Built-in Range Hood Instruction Manual Thank you for the purchase of this product. Please read the g the appliance.
Contents Safety Precautions 2-5 Accessories 5 Features 6 Installation Preparation 6 Selecting Venting Direction 7 Cabinet Preparation for Hood Support Preparation for Duct Connection 8-9 9 Hood Installation 10 Controls 11 Specifications 11 Use and Care 12 Trouble Shooting 13-14 Installation Diagram 15 Warranty Information 16 1|Page
Safety Precautions READ AND SAVE THESE INSTRUCTIONS WARNING to reduce risk of fire, electrical shock, or injury, observe the following: o o o o o o o o o o o o o Read all instructions before using the appliance Use this appliance only for its intended purpose as described in this user manual Do not use any accessories not recommended by the manufacturer This unit must be grounded Do not use this appliance for commercial use Do not use with any solid-state speed control device Installation work and elec
WARNING ʹ to reduce risk of cooktop grease fire: o o o o Never leave cooking unattended at high settings. Boilovers cause smoking and greasy spillovers may ignite. Heat oils slowly on low or medium settings Always turn the hood on when cooking at high heat or when cooking flaming food (i.e. Crepes Suzette, Cherries Jubilee, Flambés) Clean ventilation fans frequently.
CAUTION! Important ʹ observe all governing codes and ordinances. o o o o o For general ventilation use only. Do not use this appliance to exhaust hazardous or explosive materials and vapors To reduce the risk of fire, use only metal duct work To avoid damage to motor or other components, keep drywall spray, construction dust, etc. off the power unit Please read the specification label on product for further information and requirements To reduce risk of fire and exhaust air, be sure to duct air outside.
CAUTION! o o Do not operate any fan with a damaged cord or plug. Discard fan or return to an authorized service facility for examin on and/or repair Do not run cord under carpe ng. Do not cover cord with throw rugs, runners, or similar coverings. Do not route cord under furniture or appliances. Arrange cord away c area and where it will not be tripped over.
Features o o This appliance is manufactured from top quality materials, and oīĞƌs superb streamlined eīects With high ƐƵĐƟon power and low noise, it is designed to remove cooking fumes from your kitchen quietly and ĞīĞcƟvely InstallaƟon WƌĞƉĂƌĂƟŽŶ Note: this procedure will require 2 people for easier inƐƚĂůůĂƟon General PreparaƟon o Remove range from packaging and lay upside down on table covered with cardboard or paper to prevent scratching of the hood or table o Be sure the power switch is set to OFF dŽ
6
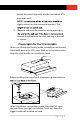
Cabinet Prepara on for Hood Support The range hood should be mounted at a distance of 24 ” from an electric or indu on cooktop, and 30” above a gas cooktop for safety and op mum performance. If you install the hood with a duct, you will need to provide a hole for the duct. Please use the template provided to locate the hole.
Fasten the wood strips with wood screws about 3” in from each end. NOTE: slightly more than the recessed dimension. The 2. Measure and mark the electrical wiring opening in also mark and measure the duct opening in the wall or cabinet.
Hood Installa on L the hood to the proper po on in the cabinet x the selftapping screw with washers. Follow the middle four holes on the top shelf inside oft he hood. Do not damage the parts inside the hood. Connect the ductwork on the hood, using duct tape to make Power cord ient if Your new range hood will operate at the highest the number of elbows and the length of the duct are kept to a minimum. WARNING: TO REDUCE THE RISK OF FIRE, USE ONLY METAL DUCTWORK AND DUCT CONNECTION DEVICE.
110-120V~ 72W 2 x 1W 70W 260 CFM 6” 110-120V~ 72W 2 x 1W 70W 260 CFM 6” Perfekt Glide-36 110-120V~ 72W 2 x 1W 70W 260 CFM 6”
Use and Care Filter For highest efficiency, this filter should be removed and cleaned periodically. Soak the filter in hot water and mild soap or detergent. Rinse thoroughly and repeat if necessary. The filter may be cleaned in the dishwasher. Heavy grease buildup may not be cleaned easily, thus the filter may need to be replaced. Charcoal Filter Inspect this filter periodically. This filter cannot be cleaned and must be replaced. Light Bulb This model specifies 2 x 1W LED light bulbs.
Trouble Shooting If any problem occurs, please detach the plug from the socket and contact Euro-Parts or a similarly qualified person in order to avoid a hazard. Fan does not turn on (but light turns on). This is probably due to either a defective fan switch or a burned out fan motor. Both can be replaced without removing the range hood from the wall or cabinet. Use an ohm meter to determine which component is not working.
Light does not turn on (but fan turns on). This could be because the bulb has burned out. Try replacing the light bulb. If the light still does not work, either the light switch or the lamp-holder socket is defective. Both can be replaced without removing the range from the wall or cabinet. Range hood does not turn on at all. Check for a tripped circuit breaker or a blown fuse, since the range hood is wired directly to your household electrical system.
Installa on Diagram Perfekt Glide-24 11” 6” 19 4” 8 15” 6170” 5 23 1” 18” 2 Perfekt Glide-30 11” 6” 26 1” 10 8 51” 6170” 30” 18” Perfekt Glide-36 11” 6” 31 3” 5 2 18” 15 | P a g e 8 51” 6170” 35 1”
Warranty AEG Appliances are imported and distributed in North America by Euro-Line Appliances Inc. For more information visit www.euro-line-appliances.com or contact: 871 Cranberry Court, Oakville, Ontario. L6L6J7 Canada Tel 905-829.3980 1-800-421-6332 – Euro-Line Appliances Inc. 1-800-ELA-WEST – Euro-Line Appliances West marketing@euro-line-appliances.com All AEG Appliances are backed by a comprehensive 2-year part and labour warranty.