RMB46211NX RMB56111NX RMB76121NX RMB66111NX RMB86111NX RMB86111NW RMB96122NM RMB96111NM USER MANUAL EN User Manual Fridge Freezer
CONTENTS SAFETY INFORMATION...........................................................................................3 SAFETY INSTRUCTIONS.........................................................................................4 PRODUCT DESCRIPTION........................................................................................6 CONTROL PANEL ....................................................................................................9 BEFORE FIRST USE......................................
SAFETY INFORMATION Before the installation and use of the appliance, carefully read the supplied instructions. The manufacturer is not responsible if an incorrect installation and use causes injuries and damages. Always keep the instructions with the appliance for future reference.
• If the supply cord is damaged, it must be replaced by the manufacturer, its service agent or similarly qualified persons in order to avoid a hazard. • If the appliance is equipped with an Ice maker or a water dispenser, fill them with potable water only. • If the appliance requires a water connection, connect it to potable water supply only.
• Do not change the specification of this appliance. • Do not put electrical appliances (e.g. ice cream makers) in the appliance unless they are stated applicable by the manufacturer. • Be careful not to cause damage to the refrigerant circuit. It contains isobutane (R600a), a natural gas with a high level of environmental compatibility. This gas is flammable. • If damage occurs to the refrigerant circuit, make sure that there are no flames and sources of ignition in the room. Ventilate the room.
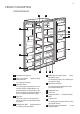
PRODUCT DESCRIPTION DISPENSER MODEL 1 2 3 12 4 5 6 14 7 13 12 11 1 Ice Maker and Storage 2 3 4 5 Xpress Can Chiller (quick cooling compartment) For storing beverages. Multi Plus Zone For storing general medicines or cosmetic products. Safekeeping is not guaranteed for products such as academic sampling or medicine which require a specific temperature range. Egg Case Do not use this case for storing ice cubes nor place it in the freezer compartment.
For short-term storage of food and icecream. 13 Door Storage Compartment For storing frozen food. 14 Freezer Shelf (tempered glass) For storing frozen foods such as meat, fish, ice-cream. NON DISPENSER MODEL 1 2 3 11 4 5 12 6 11 10 9 1 Ice Cube Tray (quick cooling 2 Xpress Can Chiller compartment) For storing beverages. 3 Multi Plus Zone For storing general medicines or cosmetic products.
For short-term storage of food and icecream. 11 Door Storage Compartment For storing frozen food. 12 Freezer Shelf (tempered glass) For storing frozen foods such as meat, fish, ice-cream.
CONTROL PANEL DISPENSER MODEL A 1 6 5 B H C G F D E 2 4 3 4 Selection button for Ice Dispensing 1 and Lock for Ice Maker Selection button for freezer compartment temperature 2 5 Selection button for Water Dispensing . 6 Selection button for refrigerator compartment temperature. 3 Press this button to prevent settings from being accidently changed. To release the button, press it for longer than 3 seconds. The display switches off. Indicators (A-H) LIGHT/FILTER button: 1.
Refrigerator temperature indicator D. E. Lock for Ice Maker indicator F. Ice Dispensing indicator G. Water Dispensing indicator H. Filter Exchange display After 6 months of the first power input, the icon will flicker. NON DISPENSER MODEL 1 A B C D E 2 3 1 Selection button for freezer compartment temperature 2 Selection button for refrigerator compartment temperature Lock button Press this button to prevent settings from being accidently changed.
BEFORE FIRST USE INSTALLING WATER LINE 1. For models with Automatic Ice Maker –– The water pressure should be 2.0~12.5 kgf/cm2 or more to run the Automatic Ice Maker. –– Check your tap water pressure. If a cup of 180 cc is full within 10 seconds, the pressure is appropriate. –– If the water pressure is not high enough to run the Automatic Ice Maker, call the local plumber to get an additional water pressure pump. 2. When installing the water tubes, ensure they are not close to any hot surfaces. 3.
DAILY USE TEMPERATURE CONTROL When the appliance is plugged in for a first time, the temperature mode is set to Middle. DISPENSER MODEL Freezer Compartment For temperature setting push button, until desired value displays. button For Faster Freezing function hold until super LED turns on. To stop this function, just push the button again. Refrigerator Compartment For temperature setting push button, until desired value displays. button For Faster Cooling function hold until super LED turns on.
Even though normal operation of the appliance is restored and inner temperature reaches a normal range, the display still flashes and the highest temperature reached is indicated. When you press Lock button , high temperature mode is terminated and the display shows adjusted temperature value.
OPTIONS When you plug the appliance for a first time FRESH LED is ON. For changing settings step by step use SELECT button. MAGIC COOL ZONE Step Display Target Temperature 1. FRESH +5°C to +6°C. 2. VEGETABLE +3°C to +4°C. 3. FISH –1°C to +0°C. 4. MEAT DISPENSER Select WATER or ICE button and smoothly push the lever with you cup, after 2 seconds: t If you pressed WATER button, icon will light up –3°C to –2°C.
CAUTION! In case of power failure ice cubes may melt and flow down to the floor. If you expect such situation to last for long hours, pull out the case and remove the ice cubes from it, then replace it back.
HELPFUL HINTS AND TIPS HINTS FOR STORING FOOD t Wash foods before storing. t Divide and separate foods into smaller pieces. t Place watery foods or foods with much moisture in front of shelves (close to the door side). If they are placed close to the cold air spout, they can be frozen. t Warm or hot foods should be cooled down enough before storing to reduce power consumption and to enhance refrigeration performance.
CARE AND CLEANING CLEANING OF THE INTERIOR PARTS Use cloth with water and mild (neutral) detergent to clean. 1. Dispenser Water Shelf Remove the spill grill and clean the water shelf regularly (the spill shelf is not self-draining). 2. Ice Cube Storage Case – Removing: pull up the case assembly forward to remove. – Replacing: fit to the side grooves and insert to the end.
An assembly method is the opposite of a disassembling sequence. CHANGING THE INTERIOR LED LIGHT CAUTION! LED light should be replaced only by a service agent or similarly qualified person. CAUTION! Be sure to unplug the appliance first! Freezer and refrigerator LED changing 1. Separate a back side of a LED cover using a screwdriver. 2. Separate the LED cover and loosen 2 fixing screws for a LED plate. x2 3. Disconnect a harness of the LED plate and change LED.
WHAT TO DO IF… Please check up the following troubleshooting tips before you call for service! Problem Checkup Point Solution It never gets cold inside. Freezing and refrigerating is not sufficient. t Is the appliance unplugged? t Is temperature set to LOW mode? t Is the appliance under a direct sunlight or is any heat appliance placed near it ? t Is the space between the back of the appliance and the wall too small? t Plug in the appliance. t Set temperature mode to MIDDLE or HIGH .
Odour or disgusting smell from the inside . t Is the food stored uncovered or unwrapped? t Are the shelves and pockets stained with food stuff? t Is the food stored for too long? t Be sure to cover and wrap the foods. t Clean the interior parts of the appliance regularly. Once smell gets soaked to those parts, it is not easy to remove. t Do not store foods for too long. t The appliance is neither a perfect nor a permanent food keeper. Door do not open easily.
20 . . . . . . . . . . . . / . . . (... ... ) 32+ 10+ SN 32+ 16+ N 38+ 16+ ST 43+ 16+ T .
19 ... ! . ( ( ) MIDDLE .(HIGH) . . ) LOW . ) ( 10 . LOW ( ) MIDDLE ( ) ( . ) STRONG . 5 . 5 . . . . . ) : .( .
18 . LIGHT LED ! LED . ! ! .1 LED . .2 LED .LED .3 LED .
17 ( ) . .1 ) .( .4 . .2 : . .5 : . – – . . . .( – ) ( ) . .3 .
16 . . ) .( . . . . . . . .
15 ! . .
14 .( ) LED FRESH .( 6+ ) SELECT ( 5+ 4+ 3+ 0+ 1+ 2- ( .1 ) FRESH ) VEGETABLE .2 ) FISH .3 ) MEAT .4 ( 3- ( ! ( . ! ( ) ICE ( : ) WATER ) WATER . . . 14 10 . 15 . . ( ) ICE . . . . . . ! . . .
13 . . " " 10 : 5 LED WATER . ( ) ICE ( – ) LED – . ) :( – – " ."— —" LED " – . – " . ( " 5 . 5 ) .
12 .( ) Middle . . . ! . . 5 . Super . : ( ) . Super . . ( - ) . . . ( . . ) WATER : / . . .
11 .1 2 0 – 12 5 . . – 10 180 . – . .2 . . " .3 " . .4 . . 6 .( ) ( ) WATER .
10 . . . . . 6 . 1 2 3 1 . .
9 1 2 6 5 4 3 4 . 1 5 2 6 : . / 3 .1 . .2 . . . 3 . 3 . ( ) . ( ) . ) ( .1 .2 .
8 11 . ( ) .
7 ( ) 14 13 . . 1 2 3 11 4 5 12 6 11 10 9 ( ) 8 7 1 5 . ( ) 2 . 6 3 . . 7 8 . 9 4 . .( . ) 10 .
6 1 2 3 12 4 5 6 14 7 13 12 11 ( ) 10 9 8 6 1 ( . ) 2 . 7 3 . . 8 ( ) 4 10 11 . .( ) . . 9 12 . ( ) .
اإلنجليزية •ال تغير مواصفات هذا الجهاز. •ال تضعي األجهزة الكهربائية (مثل صانع اآليس كريم) في الجهاز إال إذا ذكر المصنع أن ذلك ممكن. •كوني حذرة لكي ال تتلفي دائرة الثالجة .يحتوي الجهاز على اآليزوبيوتان ( ،)R600aالغاز الطبيعي بمستوى عال من التوافق البيئي .هذا الغاز سريع االشتعال. •إذا وقع تلف في دائرة الثالجة ،تأكد أنه ال توجد ألسنة لهب ومصادر لالشتعال في الغرفة .قم بتهوية الغرفة. •ال تدعي األشياء الساخنة تالمس األجزاء البالستيكية من الجهاز.
4 •إذا كان الجهاز مزود بصانع ثلج أو بموزع ماء ،امألهما بماء الشرب فقط. •إذا احتاج الجهاز إلى التوصيل بمصدر الماء ،صله بمصدر ماء شرب فقط. •يجب أن يكون ضغط الماء الخاص بالسحب (الحد األقصى واألدنى) بين 1بار ( 0,1ميجا باسكال) و 10بار ( 1ميجا باسكال) تعليمات السالمة التركيب تحذير! ال يجب تركيب هذا الجهاز إال بمعرفة شخص مؤهل. أزل جميع األغلفة. • ِ •ال تقومي بتركيب جهاز تالف أو استخدامه. •التزمي بتعليمات التركيب الواردة مع الجهاز.
اإلنجليزية 3 معلومات السالمة قبل تركيب الجهاز واستخدامه ،يرجى قراءة التعليمات الواردة بعناية .المص ِّنع ليس مسؤوالً إذا كان التركيب قد تم بشكل غير صحيح وتسبب االستخدام في ً إصابات وأضرار .احتفظ دائمًا بالتعليمات الواردة مع الجهاز للرجوع إليها الحقا.
2 المحتويات معلومات السالمة 3............................................................................................................... تعليمات السالمة 4................................................................................................................ وصف المنتج 6................................................................................................................... 9 لوحة التحكم8........................................................................
RMB46211NX RMB56111NX RMB76121NX RMB66111NX RMB86111NX RMB86111NW RMB96122NM RMB96111NM USER MANUAL AR