S32500KSW1 S32500KSS1 NL Gebruiksaanwijzing EN User manual FR Notice d'utilisation DE Benutzerinformation 2 18 34 50
www.aeg.com INHOUD 1. 2. 3. 4. 5. 6. 7. 8. 9. 10. 11. 12. VEILIGHEIDSVOORSCHRIFTEN . . . . . . . . . . . . . . . . . . . . . . . . . . . . . . . . . . . . . . . . . . . . . . . . 3 BESCHRIJVING VAN HET PRODUCT . . . . . . . . . . . . . . . . . . . . . . . . . . . . . . . . . . . . . . . . . . . 5 BEDIENING . . . . . . . . . . . . . . . . . . . . . . . . . . . . . . . . . . . . . . . . . . . . . . . . . . . . . . . . . . . . . . . . 6 HET EERSTE GEBRUIK . . . . . . . . . . . . . . . . . . . . . . . . .
NEDERLANDS 1. 3 VEILIGHEIDSVOORSCHRIFTEN In het belang van uw veiligheid en om een correct gebruik te kunnen waarborgen is het van belang dat u, alvorens het apparaat te installeren en in gebruik te nemen, deze gebruiksaanwijzing, inclusief de tips en waarschuwingen, grondig doorleest. Om onnodige vergissingen en ongevallen te voorkomen is het belangrijk ervoor te zorgen dat alle mensen die het apparaat gebruiken, volledig bekend zijn met de werking ervan en de veiligheidsvoorzieningen.
www.aeg.com – de ruimte waar het apparaat zich bevindt grondig ventileren • Het is gevaarlijk om wijzigingen aan te brengen in de specificaties of dit product op enigerlei wijze te modificeren. Een beschadigd netsnoer kan kortsluiting, brand en/of een elektrische schok veroorzaken. WAARSCHUWING! Alle elektrische onderdelen (netsnoer, stekker, compressor) mogen om gevaar te voorkomen uitsluitend worden vervangen door een erkende onderhoudsdienst of gekwalificeerd onderhoudspersoneel.
NEDERLANDS • Verzeker u ervan dat de stekker bereikbaar is nadat het apparaat geïnstalleerd is. • Aansluiten op de drinkwatervoorziening (indien voorzien van een wateraansluiting). digen, niet in het koelcircuit en evenmin in de isolatiematerialen. Het apparaat mag niet worden weggegooid bij het normale huishoudelijke afval. Het isolatieschuim bevat ontvlambare gassen: het apparaat moet weggegooid worden conform de van toepassing zijnde regels die u bij de lokale overheidsinstanties kunt verkrijgen.
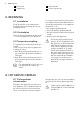
www.aeg.com 4 Flessenrek 6 Groentelade 5 Typeplaatje 7 Glazen legroosters 3. BEDIENING 3.1 Inschakelen Steek de stekker in het stopcontact. Draai de thermostaatknop op een gemiddelde stand. 3.2 Uitschakelen Draai de thermostaatknop op de stand "O" om het apparaat uit te schakelen. 3.3 Temperatuurregeling De temperatuur wordt automatisch geregeld. Ga als volgt te werk om het apparaat in werking te stellen: • draai de thermostaatknop op een lagere stand om de minimale koude te verkrijgen.
NEDERLANDS 7 5. DAGELIJKS GEBRUIK 5.1 Verplaatsbare schappen De wanden van de koelkast zijn voorzien van een aantal geleiders zodat de schappen op de gewenste plaats gezet kunnen worden. 1.1 Het plaatsen van de deurschappen Om het bewaren van voedselpakketten van verschillende afmetingen mogelijk te maken, kunnen de schappen op verschillende hoogtes worden geplaatst.
www.aeg.com 6.3 Tips voor het koelen van vers voedsel Om de beste prestatie te verkrijgen: • Zet geen warm voedsel of verdampende vloeistoffen in de koelkast • dek het voedsel af of verpak het, in het bijzonder als het een sterke geur heeft • plaats het voedsel zodanig dat de lucht er vrijelijk omheen kan circuleren 6.4 Nuttige tips voor het koelen Nuttige tips: Vlees (alle soorten) in plastic zakken verpakken en op het glazen schap leggen, boven de groentelade.
NEDERLANDS 9 met warm water met een beetje afwasmiddel. Steek, na het schoonmaken van het apparaat, de stekker weer in het stopcontact. koelvak regelmatig schoon te maken om te voorkomen dat het water overloopt en op het voedsel in de koelkast gaat druppelen. Gebruik daarvoor de speciale reiniger, die al in het afvoergaatje zit. 7.2 Het ontdooien van de koelkast 7.
www.aeg.com Probleem Het lampje werkt niet. De compressor werkt continu. Mogelijke oorzaak Oplossing De stekker zit niet goed in het stopcontact. Steek de stekker goed in het stopcontact. Het apparaat krijgt geen stroom. Er staat geen spanning op het stopcontact. Sluit een ander elektrisch apparaat aan op het stopcontact. Neem contact op met een gekwalificeerd elektricien. Het lampje staat in stand- Sluit en open de deur. by. Het lampje is stuk. Zie 'Het lampje vervangen'.
NEDERLANDS Probleem De temperatuur in de koelkast is te hoog. 11 Mogelijke oorzaak Oplossing De temperatuur van het product is te hoog. Laat het product afkoelen tot kamertemperatuur voordat u het opbergt. Er zijn veel producten tegelijk opgeborgen. Berg minder producten tegelijk op. Er is geen koude luchtcirculatie in het apparaat. Zorg ervoor dat er koude luchtcirculatie in het apparaat is. 8.1 Het lampje vervangen 1. 2. 3. 4. 5. 6. 7. 8. 8.
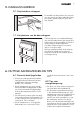
www.aeg.com Klimaatklasse Omgevingstemperatuur SN +10°C tot + 32°C N +16°C tot + 32°C ST +16°C tot + 38°C T +16°C tot + 43°C 9.2 Afstandsstukken achterkant 2 1 45° A 45° 2 In het zakje met de handleiding zitten twee afstandhouders die gemonteerd moeten worden zoals te zien is in de afbeelding. 1. Plaats de afstandhouders in de openingen. Zorg er voor dat de pijl (A) is gepositioneerd, zoals in de afbeelding te zien is 2.
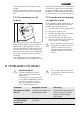
NEDERLANDS 13 9.4 Plaats 100 mm 15 mm 15 mm Het apparaat moet ver van hittebronnen, zoals radiatoren, boilers, direct zonlicht enz., vandaan worden geïnstalleerd. Zorg er voor dat lucht vrij kan circuleren aan de achterkant van het keukenkastje. Als het apparaat onder een wandkast wordt geplaatst, moet de minimale afstand tussen de bovenkant van de kast en de wandkast ten minste 100 mm bedragen om optimale prestaties te garanderen.
www.aeg.com • Duw de bovenplaat naar achteren en til hem op. • Schroef het linkervoetje los. • Draai de schroeven van het onderste deurscharnier los. Verwijder het scharnier. Verplaats de deurscharnierpen in de richting van de pijl. • Draai de schroef los en monteer deze aan de andere kant. • Monteer het scharnier aan de andere kant. • Schroef het rechtervoetje vast. 1 3 2 • Draai de schroeven van het bovenste deurscharnier los. • Verwijder het scharnier.
NEDERLANDS • • • • 15 Draai het scharnier vast. Leg de bovenplaat weer op zijn plaats. Schuif de bovenplaat naar voren. Draai de schroeven aan de achterkant weer vast. • Verwijder en installeer de handgreep (indien van toepassing) aan de andere kant • Zet het apparaat op zijn plaats, zet het waterpas, wacht minstens vier uur en steek dan de stekker in het stopcontact. 1 2 3 Voer een eindcontrole uit en verzeker u ervan dat: • Alle schroeven zijn aangedraaid. • De deur goed open en dicht gaat.
www.aeg.com 10. LAWAAI Tijdens normaal gebruik hoort u geluiden (compressor, koelmiddelcirculatie).
NEDERLANDS BLUBB! BLUBB! CRACK! CRACK! 11. TECHNISCHE GEGEVENS Afmetingen In hoogte 1250 mm Breedte 550 mm Diepte 612 mm Spanning 230V Tijd 50 Hz De technische gegevens staan op het typeplaatje aan de linker binnenkant van het apparaat en op het energielabel. 12. MILIEUBESCHERMING Recycle de materialen met het symbool . Gooi de verpakking in een geschikte verzamelcontainer om het te recyclen.
www.aeg.com CONTENTS 1. 2. 3. 4. 5. 6. 7. 8. 9. 10. 11. 12. SAFETY INSTRUCTIONS . . . . . . . . . . . . . . . . . . . . . . . . . . . . . . . . . . . . . . . . . . . . . . . . . . . . . PRODUCT DESCRIPTION . . . . . . . . . . . . . . . . . . . . . . . . . . . . . . . . . . . . . . . . . . . . . . . . . . . . OPERATION . . . . . . . . . . . . . . . . . . . . . . . . . . . . . . . . . . . . . . . . . . . . . . . . . . . . . . . . . . . . . . . FIRST USE . . . . . . . . . . . . . . . . . . . . . . . . . .
ENGLISH 1. 19 SAFETY INSTRUCTIONS In the interest of your safety and to ensure the correct use, before installing and first using the appliance, read this user manual carefully, including its hints and warnings. To avoid unnecessary mistakes and accidents, it is important to ensure that all people using the appliance are thoroughly familiar with its operation and safety features.
www.aeg.com WARNING! Any electrical component (power cord, plug, compressor) must be replaced by a certified service agent or qualified service personnel to avoid hazard. 1. • • • • Power cord must not be lengthened. 2. Make sure that the power plug is not squashed or damaged by the back of the appliance. A squashed or damaged power plug may overheat and cause a fire. 3. Make sure that you can come to the mains plug of the appliance. 4. Do not pull the mains cable. 5.
ENGLISH 21 gases: the appliance shall be disposed according to the applicable regulations to obtain from your local authorities. Avoid damaging the cooling unit, especially at the rear near the heat exchanger. The materials used on this appliance marked by the are recyclable. symbol 1.7 Environment Protection This appliance does not contain gasses which could damage the ozone layer, in either its refrigerant circuit or insulation materials.
www.aeg.com 3.3 Temperature regulation The temperature is automatically regulated. To operate the appliance, proceed as follows: • turn the Temperature regulator toward lower settings to obtain the minimum coldness. • turn the Temperature regulator toward higher settings to obtain the maximum coldness. A medium setting is generally the most suitable. • • • • room temperature how often the door is opened the quantity of food stored the location of the appliance.
ENGLISH 23 1.1 Positioning the door shelves To permit storage of food packages of various sizes, the door shelves can be placed at different heights. To make these adjustments proceed as follows: gradually pull the shelf in the direction of the arrows until it comes free, then reposition as required. 6. HELPFUL HINTS AND TIPS 6.1 Normal Operating Sounds • You may hear a faint gurgling and a bubbling sound when the refrigerant is pumped through the coils or tubing. This is correct.
www.aeg.com Milk bottles: these should have a cap and should be stored in the bottle rack on the door. Bananas, potatoes, onions and garlic, if not packed, must not be kept in the refrigerator. 7. CARE AND CLEANING CAUTION! Unplug the appliance before carrying out any maintenance operation. This appliance contains hydrocarbons in its cooling unit; maintenance and recharging must therefore only be carried out by authorized technicians. After cleaning, reconnect the equipment to the mains supply. 7.
ENGLISH 25 If the cabinet will be kept on, ask somebody to check it once in a while to prevent the food inside from spoiling in case of a power failure. 8. WHAT TO DO IF… WARNING! Before troubleshooting, disconnect the mains plug from the mains socket. Only a qualified electrician or competent person must do the troubleshooting that is not in this manual. There are some sounds during normal use (compressor, refrigerant circulation).
www.aeg.com Problem Possible cause Solution The product temperature is too high. Let the product temperature decrease to room temperature before storage. The room temperature is too high. Decrease the room temperature. Water flows on the rear plate of the refrigerator. During the automatic defrosting process, frost defrosts on the rear plate. This is correct. Water flows into the refrigerator. The water outlet is clogged. Clean the water outlet.
ENGLISH 27 8.1 Replacing the lamp 1. 2. 3. 4. 5. 6. 7. 8. 8.2 Closing the door 1. 2. Disconnect the mains plug from the mains socket. Remove the screw from the lamp cover. Remove the lamp cover (refer to the illustration). Replace the used lamp with a new lamp of the same power and specifically designed for household appliances. (the maximum power is shown on the lamp cover). Install the lamp cover. Tighten the screw to the lamp cover. Connect the mains plug to the mains socket. Open the door.
www.aeg.com 9.2 Rear spacers 2 1 45° A 45° 2 In the bag with the documentation, there are two spacers which must be fitted as shown in the figure. 1. Fit the spacers into the holes. Make sure that the arrow (A) is positioned as shown in the picture 2. Turn counter-clockwise the spacers through 45° until they lock into place. 9.3 Levelling When placing the appliance ensure that it stands level. This can be achieved by two adjustable feet at the bottom in front.
ENGLISH 29 9.4 Location 100 mm 15 mm 15 mm The appliance should be installed well away from sources of heat such as radiators, boilers, direct sunlight etc. Ensure that air can circulate freely around the back of the cabinet.To ensure best performance, if the appliance is positioned below an overhanging wall unit, the minimum distance between the top of the cabinet and the wall unit must be at least 100 mm . Ideally, however, the appliance should not be positioned below overhanging wall units.
www.aeg.com • Push back the top and lift it. • Unscrew the left foot. • Unscrew the screws of the door bottom hinge. Remove the hinge. Put over the pin in the direction of the arrow. • Unscrew and install the screw on the opposite side. • Install the hinge on the opposite side. • Screw the right foot. 1 3 2 • Unscrew the screws of the door top hinge. • Remove the hinge. Put over the pin in the direction of the arrow. Install the hinge on the opposite side.
ENGLISH • • • • 31 Tighten the hinge. Put the top in position. Push front the top. Screw both screws on the rear side. • Remove and install the handle (if foreseen) on the opposite side • Reposition, level the appliance, wait for at least four hours and then connect it to the power socket. 1 2 3 Do a final check to make sure that: • All screws are tightened. • The door opens and closes correctly. If the ambient temperature is cold (i.e. in Winter), the gasket may not fit perfectly to the cabinet.
www.aeg.com 10. NOISE There are some sounds during normal running (compressor, refrigerant circulation).
ENGLISH BLUBB! BLUBB! CRACK! CRACK! 11. TECHNICAL DATA Dimension Height 1250 mm Width 550 mm Depth 612 mm Voltage 230 V Frequency 50 Hz The technical information are situated in the rating plate on the internal left side of the appliance and in the energy label. 12. ENVIRONMENT CONCERNS Recycle the materials with the symbol . Put the packaging in applicable containers to recycle it.
www.aeg.com SOMMAIRE 1. 2. 3. 4. 5. 6. 7. 8. 9. 10. 11. 12. INSTRUCTIONS DE SÉCURITÉ . . . . . . . . . . . . . . . . . . . . . . . . . . . . . . . . . . . . . . . . . . . . . . . . DESCRIPTION DE L'APPAREIL . . . . . . . . . . . . . . . . . . . . . . . . . . . . . . . . . . . . . . . . . . . . . . . . FONCTIONNEMENT . . . . . . . . . . . . . . . . . . . . . . . . . . . . . . . . . . . . . . . . . . . . . . . . . . . . . . . PREMIÈRE UTILISATION . . . . . . . . . . . . . . . . . . . . . . . . . . . . .
FRANÇAIS 1. 35 INSTRUCTIONS DE SÉCURITÉ Pour votre sécurité et garantir une utilisation correcte de l'appareil, lisez attentivement cette notice, y compris les conseils et avertissements, avant d'installer et d'utiliser l'appareil pour la première fois. Pour éviter toute erreur ou accident, veillez à ce que toute personne qui utilise l'appareil connaisse bien son fonctionnement et ses fonctions de sécurité. Conservez cette notice avec l'appareil.
www.aeg.com Si le circuit frigorifique est endommagé : – évitez les flammes vives et toute autre source d'allumage – aérez soigneusement la pièce où se trouve l'appareil • Ne modifiez pas les spécifications de l'appareil. Si le câble d'alimentation est endommagé, il peut causer un court circuit, un incendie et/ou une électrocution. 1.
FRANÇAIS • Assurez-vous que la prise murale reste accessible après l'installation de l'appareil. • Branchez à l'alimentation en eau potable uniquement. (Si un branchement sur le réseau d'eau est prévu.) tiennent pas de C.F.C. contribuant ainsi à préserver l'environnement. L'appareil ne doit pas être mis au rebut avec les ordures ménagères et les déchets urbains.
www.aeg.com 3. FONCTIONNEMENT 3.1 Mise en fonctionnement Branchez l'appareil sur une prise murale. Tournez le bouton du thermostat dans le sens des aiguilles d'une montre sur une position moyenne. 3.2 Mise à l'arrêt Pour mettre à l'arrêt l'appareil, tournez le bouton du thermostat sur la position "O". 3.3 Réglage de la température La température est réglée automatiquement.
FRANÇAIS 39 5. UTILISATION QUOTIDIENNE 5.1 Clayettes amovibles Plusieurs glissières ont été installées sur les parois du réfrigérateur pour vous permettre de placer les clayettes comme vous le souhaitez. 1.1 Positionner les étagères des portes En fonction de la taille des emballages des aliments conservés, les balconnets de la porte peuvent être positionnés à différentes hauteurs.
www.aeg.com périodes d'arrêt du compresseur et ainsi permettre un dégivrage automatique, d'où des économies d'énergie. 6.3 Conseils pour la réfrigération de denrées fraîches Pour obtenir les meilleures performances possibles : • N'introduisez pas d'aliments encore chauds ou de liquides en évaporation dans le réfrigérateur. • Couvrez ou enveloppez soigneusement les aliments, surtout s'ils sont aromatiques. • Placez les aliments pour que l'air puisse circuler librement autour. 6.
FRANÇAIS née d'un peu de savon liquide pour nettoyer la carrosserie de l'appareil. Après le nettoyage, rebranchez l'appareil. 7.2 Dégivrage du réfrigérateur 41 tuée au milieu du compartiment réfrigérateur pour empêcher l'eau de déborder et de couler à l'intérieur de l'appareil. Nettoyez l'orifice d'écoulement de l'eau de dégivrage avec le bâtonnet spécial se trouvant déjà dans l'orifice. 7.
www.aeg.com Symptôme Cause possible Solution Le courant n'arrive pas à l'appareil. La prise de courant n'est pas alimentée. Branchez un autre appareil électrique dans la prise de courant. Faites appel à un électricien qualifié. L'ampoule est en mode veille. Fermez puis ouvrez la porte. L'ampoule est défectueuse. Reportez-vous au chapitre « Remplacement de l'ampoule ». La température n'est pas réglée correctement. Modifiez la position du thermostat pour obtenir moins de froid.
FRANÇAIS Symptôme La température du compartiment réfrigérateur est trop élevée. 43 Cause possible Solution La porte n'est pas correctement fermé. Reportez-vous au paragraphe « Fermeture de la porte ». La température du produit est trop élevée. Laissez le produit revenir à température ambiante avant de le placer dans l'appareil. Trop de produits sont conservés en même temps. Conservez moins de produits en même temps. L'air froid ne circule pas dans l'appareil.
www.aeg.com tique) pour lequel il est prévu. Au delà de ces températures, ses performances peuvent s'en trouver diminuées : les différentes classes climatiques existantes et les températures ambiantes correspondantes en fonction du modèle de l'appareil sont les suivantes : Classe Température ambiante climatique SN +10 °C à +32 °C N +16 °C à +32 °C ST +16 °C à +38 °C T +16 °C à +43 °C 9.
FRANÇAIS 45 9.4 Emplacement 100 mm 15 mm 15 mm L'appareil doit être installé à bonne distance des sources de chaleur telles que les radiateurs, les chaudières, les rayons directs du soleil, etc. Assurez-vous que l'air circule librement à l'arrière de l'appareil. Pour assurer des performances optimales, si l'appareil est placé sous un meuble en surplomb, la distance minimale entre le haut de l'appareil et ce meuble doit être d'au moins 100 mm.
www.aeg.com • Repoussez le panneau supérieur et soulevez-le. • Dévissez le pied gauche. • Dévissez les vis de la charnière inférieure de la porte. Retirez la charnière. Placez la goupille dans le sens de la flèche. • Dévissez et installez la vis sur le côté opposé. • Mettez en place la charnière sur le côté opposé. • Vissez le pied droit. 1 3 2 • Dévissez les vis de la charnière supérieure de la porte. • Retirez la charnière. Placez la goupille dans le sens de la flèche.
FRANÇAIS • • • • 47 Serrez la charnière. Mettez le panneau supérieur en place. Appuyez sur l'avant du panneau. Vissez les deux vis sur l'arrière. • Démontez et mettez en place la poignée (si présente) sur le côté opposé • Remettez l'appareil en place, mettezle de niveau, attendez au moins quatre heures puis branchez-le à la prise de courant. 1 2 3 Faites une dernière vérification pour vous assurer que : • Toutes les vis sont bien serrées. • La porte s'ouvre et se ferme correctement.
www.aeg.com 10. BRUITS L'appareil émet certains bruits pendant son fonctionnement (compresseur, circuit frigorifique).
FRANÇAIS BLUBB! BLUBB! CRACK! 49 CRACK! 11. CARACTÉRISTIQUES TECHNIQUES Dimensions Hauteur 1250 mm Largeur 550 mm Profondeur 612 mm Tension Fréquence Les caractéristiques techniques figurent sur la plaque signalétique située sur le 230 V 50 Hz côté gauche à l'intérieur de l'appareil et sur l'étiquette énergétique. 12. EN MATIÈRE DE PROTECTION DE L'ENVIRONNEMENT Recyclez les matériaux portant le symbole . Déposez les emballages dans les conteneurs prévus à cet effet.
www.aeg.com INHALT 1. 2. 3. 4. 5. 6. 7. 8. 9. 10. 11. 12. SICHERHEITSHINWEISE . . . . . . . . . . . . . . . . . . . . . . . . . . . . . . . . . . . . . . . . . . . . . . . . . . . . . GERÄTEBESCHREIBUNG . . . . . . . . . . . . . . . . . . . . . . . . . . . . . . . . . . . . . . . . . . . . . . . . . . . . BETRIEB . . . . . . . . . . . . . . . . . . . . . . . . . . . . . . . . . . . . . . . . . . . . . . . . . . . . . . . . . . . . . . . . . . ERSTE INBETRIEBNAHME . . . . . . . . . . . . . . . . . . . .
DEUTSCH 1. 51 SICHERHEITSHINWEISE Lesen Sie zu Ihrer Sicherheit und für die optimale Geräteanwendung vor der Installation und dem Gebrauch des Gerätes die vorliegende Benutzerinformation aufmerksam durch, einschließlich der Ratschläge und Warnungen. Es ist wichtig, dass zur Vermeidung von Fehlern und Unfällen alle Personen, die das Gerät benutzen, mit der Bedienung und den Sicherheitsvorschriften vertraut sind.
www.aeg.com Bei einer eventuellen Beschädigung des Kältekreislaufs: – Offene Flammen und Zündfunken vermeiden – Den Raum, in dem das Gerät installiert ist, gut lüften • Technische und anderweitige Änderungen am Gerät sind gefährlich. Ein defektes Netzkabel kann Kurzschlüsse und einen Brand verursachen und/ oder zu Stromschlägen führen. WARNUNG! Elektrische Bauteile (Netzkabel, Stecker, Kompressor) dürfen zur Vermeidung von Gefahren nur vom Kundendienst oder einer Fachkraft ausgewechselt werden.
DEUTSCH • Das Gerät darf nicht in der Nähe von Heizkörpern oder Kochern installiert werden. • Vergewissern Sie sich, dass der Netzstecker des Gerätes nach der Installation frei zugänglich ist. • Wenn ein Wasseranschluss vorgesehen ist, verbinden Sie das Gerät nur mit dem Trinkwasseranschluss. 1.7 Umweltschutz Das Gerät enthält im Kältekreis oder in dem Isoliermaterial keine ozonschädigenden Gase. Das Gerät darf nicht wie normaler Hausmüll entsorgt werden.
www.aeg.com 3. BETRIEB 3.1 Einschalten des Geräts Stecken Sie den Stecker in die Wandsteckdose. Drehen Sie den Temperaturregler im Uhrzeigersinn auf eine mittlere Einstellung. 3.2 Ausschalten des Geräts Drehen Sie den Temperaturregler zum Ausschalten des Geräts in die Position "O". 3.3 Temperaturregelung Die Temperatur wird automatisch geregelt. Bedienen Sie das Gerät wie folgt: • drehen Sie den Temperaturregler auf eine niedrigere Einstellung, um die minimal mögliche Kühlung zu erreichen.
DEUTSCH 55 5. TÄGLICHER GEBRAUCH 5.1 Verstellbare Ablagen Die Wände des Kühlschranks sind mit einer Reihe von Führungsschienen ausgestattet, die verschiedene Möglichkeiten für das Einsetzen der Ablagen bieten. 1.1 Positionierung der Türeinsätze Die Türablagen können in unterschiedlicher Höhe positioniert werden, womit das Lagern verschieden großer Lebensmittelpackungen ermöglicht wird.
www.aeg.com ein, die ein automatisches Abtauen und damit auch einen niedrigeren Energieverbrauch ermöglicht. 6.3 Hinweise für die Kühlung frischer Lebensmittel So erzielen Sie die besten Ergebnisse: • Legen Sie bitte keine warmen Lebensmittel oder dampfenden Flüssigkeiten in den Kühlschrank. • Decken Sie die Lebensmittel ab oder verpacken Sie diese entsprechend, besonders wenn sie stark riechen. • Legen Sie die Lebensmittel so hinein, dass um sie Luft frei zirkulieren kann. 6.
DEUTSCH verwendeten Kunststoff angreifen können. Aus diesem Grund ist es empfehlenswert, das Gerät außen nur mit warmem Wasser und etwas flüssigem Tellerspülmittel zu reinigen. Schließen Sie das Gerät nach der Reinigung wieder an die Netzversorgung an. 7.2 Abtauen des Kühlschranks 57 rinne an der Kühlraumrückwand, damit das Tauwasser nicht überfließt und auf die gelagerten Lebensmittel tropft. Benutzen Sie dazu bitte das mitgelieferte Reinigungswerkzeug, das sich bereits in der Abflussöffnung befindet.
www.aeg.com Störung Mögliche Ursache Das Gerät funktioDas Gerät ist abgeschalniert nicht. Die Lam- tet. pe funktioniert nicht. Abhilfe Gerät einschalten. Der Netzstecker steckt nicht richtig in der Steckdose. Stecken Sie den Netzstecker richtig in die Steckdose. Das Gerät bekommt keinen Strom. Es liegt keine Spannung an der Netzsteckdose an. Testen Sie bitte, ob ein anderes Gerät an dieser Steckdose funktioniert. Kontaktieren Sie gegebenenfalls einen qualifizierten Elektriker.
DEUTSCH 59 Störung Mögliche Ursache Abhilfe Die Temperatur im Gerät ist zu niedrig. Die Temperatur ist nicht richtig eingestellt. Stellen Sie eine höhere Temperatur ein. Die Temperatur im Gerät ist zu hoch. Die Temperatur ist nicht richtig eingestellt. Stellen Sie eine niedrigere Temperatur ein. Die Tür ist nicht richtig geschlossen. Siehe hierzu „Schließen der Tür“. Die Temperatur der zu kühlenden Lebensmittel ist zu hoch.
www.aeg.com 9. MONTAGE WARNUNG! Lesen Sie bitte die "Sicherheitshinweise" sorgfältig vor der Aufstellung des Geräts durch, um Gefahren für Sie selbst zu vermeiden und einen korrekten Betrieb des Geräts zu gewährleisten. 9.
DEUTSCH 61 9.4 Standort 100 mm 15 mm 15 mm Das Gerät sollte in ausreichendem Abstand von Wärmequellen wie Heizungen, Boilern, direkter Sonneneinstrahlung, usw. aufgestellt werden. Vergewissern Sie sich, dass Luft an der Rückseite des Gehäuses frei zirkulieren kann. Wenn das Gerät unter einem Hängeschrank installiert wird, muss der Abstand zwischen der Geräteoberseite und dem Hängeschrank mindestens 100 mm betragen, um die bestmögliche Leistung zu garantieren.
www.aeg.com • Schieben Sie die Arbeitsplatte nach hinten und heben Sie sie an. • Schrauben Sie den linken Standfuß ab. • Lösen Sie die Schrauben des unteren Türscharniers. Nehmen Sie das Scharnier ab. Stecken Sie es in Pfeilrichtung auf den Stift. • Lösen Sie die Schraube und bringen Sie sie an der gegenüberliegenden Seite wieder an. • Befestigen Sie das Scharnier an der gegenüberliegenden Seite. • Schrauben Sie den rechten Standfuß an. 1 3 2 • Lösen Sie die Schrauben am oberen Türscharnier.
DEUTSCH 63 • Ziehen Sie das Scharnier fest. • Platzieren Sie die Arbeitsplatte an der vorgesehenen Position. • Schieben Sie diese nach vorn. • Schrauben Sie die beiden Schrauben an der Rückseite wieder fest. 1 2 • Entfernen Sie den Griff (je nach Ausstattung) und bringen Sie ihn an der gegenüberliegenden Seite an. • Rücken Sie das Gerät wieder an die richtige Stelle und richten Sie es waagerecht aus. Warten Sie mindestens vier Stunden, bevor Sie es wieder an die Stromversorgung anschließen.
www.aeg.com 10. GERÄUSCH Während das Gerät in Betrieb ist, entstehen bestimmte Geräusche (Kompressor und Kühlkreislauf).
DEUTSCH BLUBB! BLUBB! CRACK! CRACK! 11. TECHNISCHE DATEN Abmessungen Höhe 1250 mm Breite 550 mm Tiefe 612 mm Spannung 230 V Frequenz 50 Hz Die technischen Daten befinden sich auf dem Typenschild innen links im Gerät sowie auf der Energieplakette. 12. UMWELTTIPPS Recyceln Sie Materialien mit dem Symbol . Entsorgen Sie die Verpackung in den entsprechenden Recyclingbehältern. Recyceln Sie zum Umwelt- und Gesundheitsschutz elektrische und 65 elektronische Geräte.
www.aeg.
DEUTSCH 67
212000027-A-272012 www.aeg.