S53400CSS0 S53400CSW0 NL Gebruiksaanwijzing EN User manual FR Notice d'utilisation DE Benutzerinformation 2 18 34 51
www.aeg.com INHOUD 1. 2. 3. 4. 5. 6. 7. 8. 9. VEILIGHEIDSVOORSCHRIFTEN . . . . . . . . . . . . . . . . . . . . . . . . . . . . . . . . . . . . . . . . . . . . . . . . 3 BESCHRIJVING VAN HET PRODUCT . . . . . . . . . . . . . . . . . . . . . . . . . . . . . . . . . . . . . . . . . . . 6 BEDIENING . . . . . . . . . . . . . . . . . . . . . . . . . . . . . . . . . . . . . . . . . . . . . . . . . . . . . . . . . . . . . . . . 6 DAGELIJKS GEBRUIK . . . . . . . . . . . . . . . . . . . . . . . . . . . . . . . .
NEDERLANDS 1. 3 VEILIGHEIDSVOORSCHRIFTEN In het belang van uw veiligheid en om een correct gebruik te kunnen waarborgen is het van belang dat u, alvorens het apparaat te installeren en in gebruik te nemen, deze gebruiksaanwijzing, inclusief de tips en waarschuwingen, grondig doorleest. Om onnodige vergissingen en ongevallen te voorkomen is het belangrijk ervoor te zorgen dat alle mensen die het apparaat gebruiken, volledig bekend zijn met de werking ervan en de veiligheidsvoorzieningen.
www.aeg.com – de ruimte waar het apparaat zich bevindt grondig ventileren • Het is gevaarlijk om wijzigingen aan te brengen in de specificaties of dit product op enigerlei wijze te modificeren. Een beschadigd netsnoer kan kortsluiting, brand en/of een elektrische schok veroorzaken. WAARSCHUWING! Alle elektrische onderdelen (netsnoer, stekker, compressor) mogen om gevaar te voorkomen uitsluitend worden vervangen door een erkende onderhoudsdienst of gekwalificeerd onderhoudspersoneel.
NEDERLANDS • • • • • • paraat gekocht heeft. Gooi in dat geval de verpakking niet weg. Wij adviseren u om 4 uur te wachten voordat u het apparaat aansluit, dan kan de olie terugvloeien in de compressor. Rond het apparaat dient adequate luchtcirculatie te zijn, anders kan dit tot oververhitting leiden. Om voldoende ventilatie te verkrijgen de instructies met betrekking tot de installatie opvolgen.
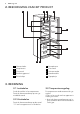
www.aeg.com 2. BESCHRIJVING VAN HET PRODUCT 1 2 3 4 5 6 7 8 10 9 1 Groentelades 6 Deurplateaus 2 Kastplateaus 3 Flessenrek 7 Flessenrek 4 Bedieningspaneel 9 Koudemodule 10 Typeplaatje 5 Zuivelschap 8 Vriezermanden 3. BEDIENING 3.1 Inschakelen 3.3 Temperatuurregeling Steek de stekker in het stopcontact. Draai de thermostaatknop op een gemiddelde stand. De temperatuur wordt automatisch geregeld.
NEDERLANDS • draai de thermostaatknop op een hogere stand om de maximale koude te verkrijgen. Een gemiddelde instelling is over het algemeen het meest geschikt. De exacte instelling moet echter gekozen worden rekening houdend met het feit dat de temperatuur in het apparaat afhankelijk is van: • de omgevingstemperatuur • hoe vaak de deur geopend wordt • de hoeveelheid voedsel die bewaard wordt 7 • plaatsing van het apparaat.
www.aeg.com Om deze aanpassingen uit te voeren, gaat u als volgt te werk: trek het schap geleidelijk in de richting van de pijlen totdat het los komt en plaats het schap op een andere gewenste hoogte terug. 1 4.5 Flessenrek Plaats de flessen (met de openingen naar voren gericht) in het voorgeplaatste schap. Als het schap horizontaal geplaatst is, mogen alleen afgesloten flessen worden neergezet. Dit schap voor een flessenhouder kan worden gekanteld om vooraf geopende flessen te bewaren.
NEDERLANDS zult u een zoemend en kloppend geluid van de compressor horen. Dat is normaal. • De thermische uitzetting kan een plotseling krakend geluid veroorzaken. Dit is een natuurlijk, niet gevaarlijk fysisch verschijnsel. Dat is normaal. • Als de compressor in- of uitgeschakeld wordt, zult u een zacht "klikje" van de thermostaat horen. Dat is normaal. 5.2 Tips voor energiebesparing • De deur niet vaker openen of open laten staan dan strikt noodzakelijk.
www.aeg.com 5.
NEDERLANDS 11 6.3 Het ontdooien van de koelkast Ontdooi de vriezer wanneer de rijplaag een dikte van ongeveer 3-5 mm bereikt heeft. Rijp wordt elke keer als de compressormotor tijdens normale werking stopt, automatisch van de verdamper van het koelvak verwijderd. Het dooiwater loopt via een afvoergaatje in een speciale opvangbak aan de achterkant van het apparaat, boven de compressormotor, waar het verdampt.
www.aeg.com 7. PROBLEEMOPLOSSING LET OP! Voordat u storingen opspoort, de stekker uit het stopcontact trekken. Het opsporen van storingen die niet in deze handleiding vermeld zijn, dient te worden verricht door een gekwalificeerd technicus of deskundig persoon. Bij de werking van het apparaat zijn bepaalde geluiden te horen die heel normaal zijn (compressor- en circulatiegeluid). Probleem Mogelijke oorzaak Oplossing Het apparaat maakt lawaai. Het apparaat wordt niet goed ondersteund.
NEDERLANDS 13 Probleem Mogelijke oorzaak De temperatuur in het apparaat is te laag. De thermostaatknop staat Stel een hogere temperamisschien niet goed. tuur in. Oplossing De temperatuur in het apparaat is te hoog. De thermostaatknop staat Stel een lagere temperamisschien niet goed. tuur in. De deur is niet goed gesloten. Zie 'De deur sluiten'. De temperatuur van het product is te hoog. Laat het product afkoelen tot kamertemperatuur voordat u het opbergt.
www.aeg.com 2. 2 1 Stel de deur, indien nodig, af. Raadpleeg "Montage". 3. Vervang, indien nodig, de defecte deurafdichtingen. Neem contact op met de klantenservice. 7.2 De deur sluiten 1. Maak de afdichtingen van de deur schoon. 8.
NEDERLANDS snoerstekker is voorzien van een contact voor dit doel Als het stopcontact niet geaard is, sluit het apparaat dan aan op een afzonderlijk aardepunt, in overeenstemming met de geldende regels, raadpleeg hiervoor een gekwalificeerd elektricien De fabrikant kan niet aansprakelijk gesteld worden als bovenstaande veiligheidsvoorschriften niet opgevolgd worden. Dit apparaat voldoet aan de EU-richtlijnen. 8.4 Nivellering Zorg ervoor dat het apparaat waterpas staat wanneer u het plaatst.
www.aeg.com Om de volgende handelingen uit te voeren, raden we aan dit te doen met de hulp van een tweede persoon die de deuren van het apparaat tijdens de werkzaamheden stevig vasthoudt. • Verwijder het afstandsstuk (A) en verplaats ze naar de andere kant van het scharnier (B). • Verwijder de deuren. • Verwijder de linkerpen van het deksel van het middelste scharnier (C, D) en verplaats deze naar de andere kant. • Monteer de pen van het middelste scharnier (B) in het linkergat van de onderste deur.
NEDERLANDS B C A Voer een eindcontrole uit en verzeker u ervan dat: • Alle schroeven zijn aangedraaid. • De magnetische afdichtstrip vast zit aan de kast. • De deur goed open en dicht gaat. Als de omgevingstemperatuur laag is (bijv. in de winter), kan het zijn dat het deurrubber niet precies op de kast past. Wacht in dat geval tot de afdichting zich op een natuurlijke wijze zet. Als u bovenstaande handelingen liever niet zelf uitvoert, neem dan contact op met de dichtstbijzijnde klantenservice.
www.aeg.com CONTENTS 1. 2. 3. 4. 5. 6. 7. 8. 9. SAFETY INSTRUCTIONS . . . . . . . . . . . . . . . . . . . . . . . . . . . . . . . . . . . . . . . . . . . . . . . . . . . . . PRODUCT DESCRIPTION . . . . . . . . . . . . . . . . . . . . . . . . . . . . . . . . . . . . . . . . . . . . . . . . . . . . OPERATION . . . . . . . . . . . . . . . . . . . . . . . . . . . . . . . . . . . . . . . . . . . . . . . . . . . . . . . . . . . . . . . DAILY USE . . . . . . . . . . . . . . . . . . . . . . . . . . . . . . . .
ENGLISH 1. 19 SAFETY INSTRUCTIONS In the interest of your safety and to ensure the correct use, before installing and first using the appliance, read this user manual carefully, including its hints and warnings. To avoid unnecessary mistakes and accidents, it is important to ensure that all people using the appliance are thoroughly familiar with its operation and safety features.
www.aeg.com WARNING! Any electrical component (power cord, plug, compressor) must be replaced by a certified service agent or qualified service personnel to avoid hazard. 1. • • • • Power cord must not be lengthened. 2. Make sure that the power plug is not squashed or damaged by the back of the appliance. A squashed or damaged power plug may overheat and cause a fire. 3. Make sure that you can come to the mains plug of the appliance. 4. Do not pull the mains cable. 5.
ENGLISH • The appliance must not be located close to radiators or cookers. • Make sure that the mains plug is accessible after the installation of the appliance. • Connect to potable water supply only (If a water connection is foreseen). 1.6 Service • Any electrical work required to do the servicing of the appliance should be carried out by a qualified electrician or competent person. • This product must be serviced by an authorized Service Centre, and only genuine spare parts must be used. 1.
www.aeg.com 2. PRODUCT DESCRIPTION 1 2 3 4 5 6 7 8 10 9 1 Vegetable drawers 6 Door shelves 2 Cabinet shelves 3 Bottle rack 7 Bottle shelf 4 Control panel 9 Cold module 10 Rating plate 5 Dairy shelf 8 Freezer baskets 3. OPERATION 3.1 Switching on 3.3 Temperature regulation Insert the plug into the wall socket. Turn the Temperature regulator clockwise to a medium setting. The temperature is automatically regulated.
ENGLISH • turn the Temperature regulator toward higher settings to obtain the maximum coldness. A medium setting is generally the most suitable. However, the exact setting should be chosen keeping in mind that the temperature inside the appliance depends on: • room temperature • how often the door is opened • the quantity of food stored 23 • the location of the appliance.
www.aeg.com 4.5 Bottle rack Place the bottles (with the opening facing front) in the pre-positioned shelf. If the shelf is positioned horizontally, place only closed bottles. This bottle holder shelf can be tilted in order to store previously opened bottles. To obtain this result, pull the shelf up so it can rotate upwards and be placed on the next higher level. 4.7 Removal of freezing baskets from the freezer The freezing baskets have a limit stop to prevent their accidental removal or falling out.
ENGLISH 25 5. HELPFUL HINTS AND TIPS 5.1 Normal Operating Sounds • You may hear a faint gurgling and a bubbling sound when the refrigerant is pumped through the coils or tubing. This is correct. • When the compressor is on, the refrigerant is being pumped around and you will hear a whirring sound and a pulsating noise from the compressor. This is correct. • The thermic dilatation might cause a sudden cracking noise. It is natural, not dangerous physical phenomenon. This is correct.
www.aeg.com partment, can possibly cause the skin to be freeze burnt; • it is advisable to show the freezing in date on each individual pack to enable you to keep tab of the storage time. 5.
ENGLISH of the appliance, over the motor compressor, where it evaporates. It is important to periodically clean the defrost water drain hole in the middle of the refrigerator compartment channel to prevent the water overflowing and dripping onto the food inside. Use the special cleaner provided, which you will find already inserted into the drain hole. 6.4 Defrosting the freezer A certain amount of frost will always form on the freezer shelves and around the top compartment.
www.aeg.com 7. TROUBLESHOOTING CAUTION! Before troubleshooting, disconnect the power supply. Only a qualified electrician or competent person must do the troubleshooting that is not in this manual. There are some sounds during normal use (compressor, refrigerant circulation). Problem Possible cause Solution The appliance is noisy. The appliance is not supported properly. Check if the appliance stands stable (all the four feet should be on the floor). The compressor operates continually.
ENGLISH 29 Problem Possible cause The temperature in the appliance is too low. The Temperature regula- Set a higher temperature. tor may be set incorrectly. Solution The temperature in the appliance is too high. The Temperature regula- Set a lower temperature. tor may be set incorrectly. The door is not closed correctly. Refer to "Closing the door". The product temperature is too high. Let the product temperature decrease to room temperature before storage.
www.aeg.com 2. 2 1 If necessary, adjust the door. Refer to "Installation". 3. If necessary, replace the defective door gaskets. Contact the Service Center. 7.2 Closing the door 1. Clean the door gaskets. WARNING! Read the "Safety Information" carefully for your safety and correct operation of the appliance before installing the appliance. 100 mm min 8. INSTALLATION 8.
ENGLISH This appliance complies with the E.E.C. Directives. 31 A 8.4 Levelling When placing the appliance ensure that it stands level. This can be achieved by two adjustable feet at the bottom in front. B C 8.7 Door reversibility 8.5 Rear spacers You can find the two spacers in the bag with documentation. Do these steps to install the spacers: 1. Release the screw. 2. Engage the spacer below the screw. 3. Turn the spacer to the right position. 4. Tighten again the screws.
www.aeg.com the spacer (C) and place them on the opposite side. A 2 B C • Re-insert the cover (1) on the opposite side. 1 • Remove the plugs on the upper side of both doors and move them to the other side • Re-insert the lower door on the lower hinge pivot . • Insert the middle hinge into the left drill of the lower door. • Unscrew the upper hinge pivot and place it on the opposite side. • Fit the upper door on the upper door pivot.
ENGLISH 9. TECHNICAL DATA Dimension Height 1750 mm Width 595 mm Depth 658 mm Rising Time 20 h Voltage 230 V Frequency 50 Hz The technical information are situated in the rating plate on the internal left side of the appliance and in the energy label. 10. ENVIRONMENT CONCERNS Recycle the materials with the symbol . Put the packaging in applicable containers to recycle it. Help protect the environment and human health and to recycle waste of electrical and electronic appliances.
www.aeg.com SOMMAIRE 1. 2. 3. 4. 5. 6. 7. 8. 9. INSTRUCTIONS DE SÉCURITÉ . . . . . . . . . . . . . . . . . . . . . . . . . . . . . . . . . . . . . . . . . . . . . . . . DESCRIPTION DE L'APPAREIL . . . . . . . . . . . . . . . . . . . . . . . . . . . . . . . . . . . . . . . . . . . . . . . . FONCTIONNEMENT . . . . . . . . . . . . . . . . . . . . . . . . . . . . . . . . . . . . . . . . . . . . . . . . . . . . . . . UTILISATION QUOTIDIENNE . . . . . . . . . . . . . . . . . . . . . . . . . . . . . . . . . .
FRANÇAIS 1. 35 INSTRUCTIONS DE SÉCURITÉ Pour votre sécurité et garantir une utilisation correcte de l'appareil, lisez attentivement cette notice, y compris les conseils et avertissements, avant d'installer et d'utiliser l'appareil pour la première fois. Pour éviter toute erreur ou accident, veillez à ce que toute personne qui utilise l'appareil connaisse bien son fonctionnement et ses fonctions de sécurité. Conservez cette notice avec l'appareil.
www.aeg.com Si le circuit frigorifique est endommagé : – évitez les flammes vives et toute autre source d'allumage – aérez soigneusement la pièce où se trouve l'appareil • Ne modifiez pas les spécifications de l'appareil. Si le câble d'alimentation est endommagé, il peut causer un court circuit, un incendie et/ou une électrocution.
FRANÇAIS • Déballez l'appareil et vérifiez qu'il n'est pas endommagé. Ne branchez pas l'appareil s'il est endommagé. Signalez immédiatement au revendeur de l'appareil les dommages constatés. Dans ce cas, gardez l'emballage. • Il est conseillé d'attendre au moins quatre heures avant de brancher l'appareil pour que le circuit frigorifique soit stabilisé. • Veillez à ce que l'air circule librement autour de l'appareil pour éviter qu'il ne surchauffe.
www.aeg.com 2. DESCRIPTION DE L'APPAREIL 1 2 3 4 5 6 7 8 10 9 1 Bacs à légumes 6 Balconnets de porte 2 Clayettes 3 Porte-bouteilles 7 Compartiment à bouteilles 4 Bandeau de commande 9 Module de refroidissement 10 Plaque signalétique 5 Compartiment à produits laitiers 8 Paniers de congélation 3. FONCTIONNEMENT 3.1 Mise en fonctionnement 3.3 Réglage de la température Branchez l'appareil sur une prise murale.
FRANÇAIS • tournez le bouton du thermostat vers le haut pour obtenir un réglage de froid maximum. Une position moyenne est la plus indiquée. Toutefois, le réglage doit être choisi en tenant compte du fait que la température à l'intérieur de l'appareil dépend de plusieurs facteurs : • la température ambiante • la fréquence d'ouverture de la porte • la quantité de denrées stockées • l'emplacement de l'appareil.
www.aeg.com 4.4 Clayettes amovibles Les parois du réfrigérateur sont équipées d'une série de glissières afin que les clayettes puissent être positionnées comme vous le souhaitez. de la porte peuvent être positionnés à différentes hauteurs. Pour les ajuster, procédez comme suit : tirez progressivement sur le balconnet dans le sens des flèches pour le dégager, puis repositionnez-le selon vos besoins. 1 2 3 4.
FRANÇAIS 41 5. CONSEILS UTILES 5.1 Bruits de fonctionnement normaux • Placez les aliments pour que l'air puisse circuler librement autour. • Le liquide de refroidissement qui passe dans le circuit d'évaporation peut produire un bruit de gargouillis ou de bouillonnement. Ce phénomène est normal. • Le compresseur peut produire un ronronnement aigu ou un bruit de pulsation. Ce phénomène est normal. • La dilatation thermique peut provoquer un soudain, léger bruit de craquement.
www.aeg.com • préparez la nourriture en petits paquets pour une congélation rapide et uniforme, adaptés à l'importance de la consommation. • enveloppez les aliments dans des feuilles d'aluminium ou de polyéthylène et assurez-vous que les emballages sont étanches ; • ne laissez pas des aliments frais, non congelés, toucher des aliments déjà congelés pour éviter une remontée en température de ces derniers.
FRANÇAIS Cette opération améliore les performances de l'appareil et permet des économies d'énergie. 43 6.4 Dégivrage du congélateur Attention à ne pas endommager le système de réfrigération. De nombreux détergents pour la cuisine recommandés par les fabricants contiennent des produits chimiques qui peuvent attaquer/endommager les pièces en plastique utilisées dans cet appareil.
www.aeg.com N'utilisez en aucun cas d'objets métalliques ou tranchants pour gratter la couche de givre sur l'évaporateur, car vous risqueriez de le détériorer. N'utilisez aucun dispositif mécanique ou autre moyen artificiel pour accélérer le processus de dégivrage hormis ceux recommandés dans cette notice d'utilisation. Une élévation de la température des denrées congelées, pendant le dégivrage, peut réduire leur durée de conservation. 7.
FRANÇAIS Anomalie 45 Cause possible Solution Des produits empêchent que l'eau coule dans le réservoir d'eau. Assurez-vous que les produits ne touchent pas la plaque arrière. De l'eau coule sur le sol. L'eau de dégivrage ne coule pas dans le plateau d'évaporation situé au dessus du compresseur. Fixez le tuyau de sortie de l'eau au plateau d'évaporation. Il y a trop de givre. Les produits ne sont pas bien enveloppés. Enveloppez mieux les produits. La porte n'est pas bien fermée.
www.aeg.com Anomalie Cause possible Solution L'ampoule est défectueuse. Consultez le paragraphe « Remplacement de l'ampoule ». En cas d'anomalie de fonctionnement et si malgré toutes les vérifications une intervention s'avère nécessaire, contactez le service après-vente de votre magasin vendeur. 7.1 Remplacement de l'éclairage L'appareil est équipé d'un éclairage à DEL longue durée. 1. Débranchez l'appareil. 2. Poussez la pièce amovible pour décrocher le diffuseur (1). 3. Enlevez le diffuseur (2).
FRANÇAIS 47 100 mm min être d'au moins 100 mm. Si possible, évitez de placer l'appareil sous des éléments suspendus. La mise de niveau se fait à l'aide d'un ou de plusieurs pieds réglables à la base de l'appareil. B 20 mm A AVERTISSEMENT L'appareil doit pouvoir être débranché à tout moment ; il est donc nécessaire que la prise reste accessible après l'installation. 8.5 Entretoises arrière Vous trouverez deux entretoises dans le même sachet que la notice d'utilisation.
www.aeg.com • Retirez le cache (A) à l'aide d'un outil. Dévissez le gond de la charnière inférieure (B) et l'entretoise (C) et placezles du côté opposé. A A B B C C • Réinsérez le cache (1) du côté opposé 1 8.7 Réversibilité de la porte AVERTISSEMENT Avant toute opération, débranchez la fiche de la prise de courant. Pour effectuer les opérations suivantes, il est conseillé de se faire aider par une autre personne pour maintenir fermement les portes lors de toute manipulation de l'appareil.
FRANÇAIS 2 1 • Retirez les caches (B). Retirez les goupilles du cache (A). • Dévissez les poignées (C) et remontezles sur le côté opposé. • Réinsérez les goupilles du cache (A) sur le côté opposé. 49 Faites une dernière vérification pour vous assurer que : • Toutes les vis sont bien serrées. • Le joint magnétique adhère bien à l'appareil. • La porte s'ouvre et se ferme correctement. Si la température ambiante est basse (par exemple, en hiver), il se peut que le joint n'adhère pas parfaitement.
www.aeg.com Les caractéristiques techniques figurent sur la plaque signalétique située sur le côté gauche à l'intérieur de l'appareil et sur l'étiquette énergétique. 10. EN MATIÈRE DE PROTECTION DE L'ENVIRONNEMENT Recyclez les matériaux portant le symbole . Déposez les emballages dans les conteneurs prévus à cet effet. Contribuez à la protection de l'environnement et à votre sécurité, recyclez vos produits électriques et électroniques.
DEUTSCH 51 INHALT 1. 2. 3. 4. 5. 6. 7. 8. 9. SICHERHEITSHINWEISE . . . . . . . . . . . . . . . . . . . . . . . . . . . . . . . . . . . . . . . . . . . . . . . . . . . . . GERÄTEBESCHREIBUNG . . . . . . . . . . . . . . . . . . . . . . . . . . . . . . . . . . . . . . . . . . . . . . . . . . . . BETRIEB . . . . . . . . . . . . . . . . . . . . . . . . . . . . . . . . . . . . . . . . . . . . . . . . . . . . . . . . . . . . . . . . . . TÄGLICHER GEBRAUCH . . . . . . . . . . . . . . . . . . . . . . . . . . . .
www.aeg.com 1. SICHERHEITSHINWEISE Lesen Sie zu Ihrer Sicherheit und für eine optimale Nutzung des Geräts vor der Montage und dem ersten Gebrauch das vorliegende Benutzerhandbuch einschließlich der Ratschläge und Warnungen aufmerksam durch. Es ist wichtig, dass zur Vermeidung von Fehlern und Unfällen alle Personen, die das Gerät benutzen, mit der Bedienung und den Sicherheitsvorschriften vertraut sind.
DEUTSCH Bei einer eventuellen Beschädigung des Kältekreislaufs: – Offene Flammen und Zündfunken vermeiden – Den Raum, in dem das Gerät installiert ist, gut lüften • Technische und anderweitige Änderungen am Gerät sind gefährlich. Ein defektes Netzkabel kann Kurzschlüsse und einen Brand verursachen und/ oder zu Stromschlägen führen. WARNUNG! Elektrische Bauteile (Netzkabel, Stecker, Kompressor) dürfen zur Vermeidung von Gefahren nur vom Kundendienst oder einer Fachkraft ausgewechselt werden.
www.aeg.com • Kontrollieren Sie nach dem Auspacken das Gerät auf eventuelle Beschädigungen. Nehmen Sie das Gerät nicht in Betrieb, wenn es beschädigt ist. Melden Sie die Schäden umgehend dem Händler, bei dem Sie es erworben haben. Bewahren Sie in diesem Fall die Verpackung auf. • Lassen Sie das Gerät mindestens vier Stunden stehen, bevor Sie es elektrisch anschließen, damit das Öl in den Kompressor zurückfließen kann.
DEUTSCH 55 2. GERÄTEBESCHREIBUNG 1 2 3 4 5 6 7 8 10 9 1 Obst- und Gemüseschubladen 6 Türablagen 2 Kühlschrankablagen 3 Flaschenhalter 7 Flaschenablage 4 Bedienfeld 9 Kältemodul 10 Typenschild 5 Ablage für Milchprodukte 8 Gefrierkörbe 3. BETRIEB 3.1 Einschalten des Geräts 3.2 Ausschalten des Geräts Stecken Sie den Stecker in die Wandsteckdose. Drehen Sie den Temperaturregler im Uhrzeigersinn auf eine mittlere Einstellung.
www.aeg.com • drehen Sie den Temperaturregler auf eine niedrigere Einstellung, um die minimal mögliche Kühlung zu erreichen. • drehen Sie den Temperaturregler auf eine höhere Einstellung, um die maximal mögliche Kühlung zu erreichen. eine mittlere Einstellung ist im Allgemeinen am besten geeignet.
DEUTSCH 4.4 Verstellbare Ablagen Die Wände des Kühlschranks sind mit einer Reihe von Führungsschienen ausgestattet, die verschiedene Möglichkeiten für das Einsetzen der Ablagen bieten. 57 Gehen Sie dazu wie folgt vor: Ziehen Sie die Ablage langsam in Pfeilrichtung, bis sie sich herausheben lässt, und setzen Sie sie dann in gewünschter Höhe wieder ein. 1 2 3 4.5 Flaschenhalter Im voreingestellten Flaschenhalter können Flaschen (mit der Öffnung nach vorn) gelagert werden.
www.aeg.com 5. PRAKTISCHE TIPPS UND HINWEISE 5.1 Normale Betriebsgeräusche • Unter Umständen ist ein leichtes Gurgeln und Blubbern zu hören, wenn das Kältemittel durch die Leitungen gepumpt wird. Das ist normal. • Bei eingeschaltetem Kompressor wird das Kältemittel umgewälzt und Sie hören ein Surren und ein pulsierendes Geräusch vom Kompressor. Das ist normal. • Die thermische Ausdehnung kann ein plötzliches Krachen verursachen. Das ist eine natürliche und nicht gefährliche physikalische Erscheinung.
DEUTSCH • • • • • nur die Menge auftauen müssen, die Sie gerade benötigen; die einzufrierenden Lebensmittelportionen sollten stets luftdicht in Aluminiumfolie oder in lebensmittelechte Gefrierbeutel verpackt werden, um so wenig Luft wie möglich in der Verpackung zu haben; achten Sie beim Hineinlegen von frischen, noch ungefrorenen Lebensmitteln darauf, dass diese keinen Kontakt mit Gefriergut bekommen, da dieses sonst antauen kann; weniger fetthaltige Lebensmittel lassen sich besser lagern als fetthal
www.aeg.com Ziehen Sie nicht an Leitungen und/oder Kabeln im Innern des Kühlschranks und achten Sie darauf, diese nicht zu verschieben oder zu beschädigen. Benutzen Sie zur Reinigung des Innenraums keinesfalls Putzmittel, Scheuerpulver, stark parfümierte Reinigungsmittel oder Wachspolituren, da diese die Oberfläche des Innenraums beschädigen und einen starken Eigengeruch hinterlassen können. Reinigen Sie den Kondensator (schwarzes Gitter) und den Kompressor auf der Geräterückseite mit einer Bürste.
DEUTSCH • Lösen Sie den Ablaufkanal unten im Gerät aus seiner Halterung und drücken Sie ihn wie in der Abbildung ersichtlich nach innen. Stellen Sie eine Schüssel unter den Auslass, um das Wasser aufzufangen. • Es ist möglich, die Eisschicht vorsichtig mit dem Eiskratzer zu entfernen, wenn sie anzutauen beginnt. Verwenden Sie einen Schaber aus Holz oder Kunststoff. • Wischen Sie das Gerät aus, wenn das Eis komplett abgetaut ist.
www.aeg.com Störung Mögliche Ursache Abhilfe Die Produkttemperatur ist Lassen Sie die Produktzu hoch. temperatur auf Raumtemperatur abkühlen, bevor Sie die Produkte einlagern. Die Raumtemperatur ist zu hoch. Senken Sie die Raumtemperatur. Wasser fließt auf die hintere Platte des Kühlschranks. Beim automatischen Abtauen schmilzt der Frost auf der hinteren Platte. Das ist normal. Wasser fließt in den Kühlschrank. Der Wasserabflusskanal ist verstopft. Reinigen Sie den Wasserabflusskanal.
DEUTSCH 63 Störung Mögliche Ursache Die Temperatur im Gefrierschrank ist zu hoch. Die einzufrierenden Pack- Stellen Sie sicher, dass die ungen liegen zu dicht an- Kaltluft im Gerät zirkuliert einander. und die Produkte dies nicht verhindern. Das Gerät funktioniert nicht. Das Gerät ist abgeschaltet. Schalten Sie das Gerät ein. Der Netzstecker ist nicht richtig in die Steckdose gesteckt. Stecken Sie den Netzstecker richtig in die Steckdose. Das Gerät bekommt keinen Strom.
www.aeg.com 8.1 Aufstellung Installieren Sie dieses Gerät an einem Ort, an dem die Umgebungstemperatur mit der Klimaklasse übereinstimmt, die auf dem Typschild des Geräts angegeben ist: Klimaklasse Umgebungstemperatur SN +10°C bis + 32°C N +16°C bis + 32°C ST +16°C bis + 38°C T +16°C bis + 43°C 8.2 Standort Das Gerät sollte in ausreichendem Abstand von Wärmequellen wie Heizungen, Boilern, direkter Sonneneinstrahlung etc. aufgestellt werden.
DEUTSCH 65 A B 8.5 Hintere Distanzstücke Die beiden Distanzstücke befinden sich im Beutel mit den Unterlagen. Gehen Sie wie folgt vor, um die Distanzstücke anzubringen: 1. Lösen Sie die Schraube. 2. Setzen Sie das Distanzstück unter dem Schraubenkopf ein. 3. Drehen Sie das Distanzstück in die richtige Position. 4. Ziehen Sie die Schrauben wieder fest. 2 1 4 3 8.
www.aeg.com A E • Hängen Sie die obere Tür wieder in den Haltestift des mittleren Scharniers ein. Dabei beide Türen leicht neigen. • Schrauben Sie das mittlere Scharnier wieder fest. Das Kunststoff-Distanzstück nicht vergessen. B F C D 2 • Entfernen Sie die Abdeckung (A) mit einem geeigneten Werkzeug. Lösen Sie den Haltestift (B) des unteren Scharniers, entfernen Sie das Distanzstück (C) und montieren Sie sie an der gegenüberliegenden Seite. A B C 1 • Nehmen Sie die Abdeckungen (B) ab.
DEUTSCH Wenden Sie sich an den Kundendienst, wenn Sie bei den oben beschriebenen Schritten Unterstützung benötigen. Der 67 Servicetechniker wird dann den Türanschlag auf Ihre Kosten wechseln. 9. TECHNISCHE DATEN Abmessungen Höhe 1750 mm Breite 595 mm Tiefe 658 mm Lagerzeit bei Störung 20 Std. Spannung 230 V Frequenz Die technischen Daten befinden sich auf dem Typenschild im Innern des Gerätes 50 Hz auf der linken Seite sowie auf der Energieplakette. 10.
280152211-A-292013 www.aeg.