S53400CSS0 S53400CSW0 NL Gebruiksaanwijzing EN User manual FR Notice d'utilisation DE Benutzerinformation 2 22 41 61
www.aeg.com INHOUD 1. 2. 3. 4. 5. 6. 7. 8. 9. 10. VEILIGHEIDSVOORSCHRIFTEN . . . . . . . . . . . . . . . . . . . . . . . . . . . . . . . . . . . . . . . . . . . . . . . . 3 BESCHRIJVING VAN HET PRODUCT . . . . . . . . . . . . . . . . . . . . . . . . . . . . . . . . . . . . . . . . . . . 6 BEDIENING . . . . . . . . . . . . . . . . . . . . . . . . . . . . . . . . . . . . . . . . . . . . . . . . . . . . . . . . . . . . . . . . 6 DAGELIJKS GEBRUIK . . . . . . . . . . . . . . . . . . . . . . . . . . . . . .
NEDERLANDS 1. 3 VEILIGHEIDSVOORSCHRIFTEN In het belang van uw veiligheid en om een correct gebruik te kunnen waarborgen is het van belang dat u, alvorens het apparaat te installeren en in gebruik te nemen, deze gebruiksaanwijzing, inclusief de tips en waarschuwingen, grondig doorleest. Om onnodige vergissingen en ongevallen te voorkomen is het belangrijk ervoor te zorgen dat alle mensen die het apparaat gebruiken, volledig bekend zijn met de werking ervan en de veiligheidsvoorzieningen.
www.aeg.com WAARSCHUWING! Alle elektrische onderdelen (netsnoer, stekker, compressor) mogen om gevaar te voorkomen uitsluitend worden vervangen door een erkende onderhoudsdienst of gekwalificeerd onderhoudspersoneel. Het netsnoer mag niet verlengd worden. 2. Verzeker u ervan dat de stekker niet platgedrukt of beschadigd wordt door de achterkant van het apparaat. Een platgedrukte of beschadigde stekker kan oververhit raken en brand veroorzaken. 3.
NEDERLANDS • • • • ties met betrekking tot de installatie opvolgen. De achterkant dient zo mogelijk tegen een muur geplaatst te worden, teneinde te voorkomen dat hete onderdelen (compressor, condensator) aangeraakt kunnen worden en brandwonden veroorzaken. Het apparaat mag niet vlakbij radiatoren of kooktoestellen geplaatst worden. Verzeker u ervan dat de stekker bereikbaar is nadat het apparaat geïnstalleerd is. Aansluiten op de drinkwatervoorziening (indien voorzien van een wateraansluiting). 1.
www.aeg.com 2. BESCHRIJVING VAN HET PRODUCT 1 2 3 4 5 6 7 8 9 10 11 16 15 14 13 12 1 Fruitlades 9 Deurrooster 2 Glazen plateau 10 Deurrooster 3 Glazen plateau 11 Flessenrek 4 Glazen plateau 12 Vrieskorf 5 Flessenrek 6 Glazen plateau 13 Vrieskorf 7 Thermostaat 15 Koudemodule 8 Boterschap 16 Typeplaatje 14 Vrieskorf 3. BEDIENING 3.1 Inschakelen 3.2 Uitschakelen Steek de stekker in het stopcontact. Draai de thermostaatknop op een gemiddelde stand.
NEDERLANDS 3.3 Temperatuurregeling De temperatuur wordt automatisch geregeld. Ga als volgt te werk om het apparaat in werking te stellen: • draai de thermostaatknop op een lagere stand om de minimale koude te verkrijgen. • draai de thermostaatknop op een hogere stand om de maximale koude te verkrijgen. Een gemiddelde instelling is over het algemeen het meest geschikt.
www.aeg.com nog bevroren zijn: in dat geval zal de bereiding iets langer duren. 4.4 Verplaatsbare schappen De wanden van de koelkast zijn voorzien van een aantal glijschoenen zodat de legrekken op de gewenste plaats gezet kunnen worden. 4.5 Flessenrek Plaats de flessen (met de openingen naar voren gericht) in het voorgeplaatste schap. Als het schap horizontaal geplaatst is, mogen alleen afgesloten flessen worden neergezet.
NEDERLANDS 9 4.7 Vriesmandjes uit de vriezer verwijderen 2 1 De vriesmandjes hebben een limietstop om te voorkomen dat ze per ongeluk verschuiven of vallen. Trek de korf naar u toe om het uit de vriezer te halen, tot het niet verder kan, verwijder de korf door de voorkant naar boven te kantelen. Bij het terugzetten tilt u de voorkant van de korf een beetje op en schuift u hem gekanteld in de vriezer. Zodra het mandje over de eindpunten heen is, kunt u hem terug op zijn plaats schuiven. 5.
www.aeg.com Boter en kaas: dit moet in speciale luchtdichte bakjes gelegd of in aluminiumfolie of plastic zakjes gewikkeld worden om zoveel mogelijk lucht buiten te sluiten. Melkflessen: deze moeten een afdekdop hebben en opgeslagen worden in het flessenrek in de deur. Bananen, aardappelen, uien en knoflook, indien niet verpakt, mogen niet in de koelkast bewaard worden. 5.
NEDERLANDS 6.2 Periodieke reiniging Het apparaat moet regelmatig worden schoongemaakt: • maak de binnenkant en de accessoires schoon met lauw water en wat neutrale zeep. • controleer de afdichtingen regelmatig en wrijf ze schoon om u ervan te verzekeren dat ze schoon zijn en vrij van restjes zijn. • spoel ze af en maak ze grondig droog. Trek niet aan leidingen en/of kabels aan de binnenkant van de kast en verplaats of beschadig ze niet.
www.aeg.com 6.4 De vriezer ontdooien Een zekere hoeveelheid rijp zal zich altijd vormen op de schappen van de vriezer en rond het bovenste vak. Ontdooi de vriezer wanneer de rijplaag een dikte van ongeveer 3-5 mm bereikt heeft. • Maak het afvoerkanaal aan de onderkant van het apparaat uit de ruststand los, duw het volgens de afbeelding en plaats het in de onderste vrieslade zodat u het water kunt opvangen • schraap het ijs voorzichtig los als dit begint te dooien.
NEDERLANDS 13 Probleem Mogelijke oorzaak De compressor werkt continu. De thermostaatknop staat Stel een hogere temperamisschien niet goed. tuur in. Oplossing De deur is niet goed gesloten. Zie 'De deur sluiten'. De deur is te vaak open gedaan. Laat de deur niet langer open staan dan noodzakelijk. De temperatuur van het product is te hoog. Laat het product afkoelen tot kamertemperatuur voordat u het opbergt. De kamertemperatuur is te hoog. Verlaag de kamertemperatuur.
www.aeg.com Probleem Mogelijke oorzaak Oplossing De temperatuur in de koelkast is te hoog. Er is geen koude luchtcirculatie in het apparaat. Zorg ervoor dat er koude luchtcirculatie in het apparaat is. De temperatuur in het vriesvak is te hoog. Producten liggen te dicht op elkaar. Berg de producten zodanig op dat er koude lucht kan circuleren. Het apparaat werkt niet. Het apparaat is uitgeschakeld. Schakel het apparaat in. De stekker zit niet goed in het stopcontact.
NEDERLANDS 3. 15 Vervang, indien nodig, de defecte deurafdichtingen. Neem contact op met de klantenservice. 8. MONTAGE WAARSCHUWING! Lees voor uw eigen veiligheid en correcte werking van het apparaat eerst de "veiligheidsinformatie" aandachtig door, alvorens het apparaat te installeren. Klimaatklasse Omgevingstemperatuur SN +10°C tot + 32°C N +16°C tot + 32°C 8.
www.aeg.com Dit apparaat voldoet aan de EU. richtlijnen. 8.4 Nivellering Zorg ervoor dat het apparaat waterpas staat wanneer u het plaatst. Deze stand kan bereikt worden met de twee afstelbare voetjes die aan de voorkant en onderkant van het apparaat bevestigd zijn 8.5 Afstandhouders achterkant 2 1 3 4 U vindt de twee afstandhouders in de zak van de gebruikershandleiding. Volg deze stappen om de afstandhouders te installeren: 1. Draai de schroef los. 2. Plaats de afstandhouder onder de schroef. 3.
NEDERLANDS 17 8.7 Omkeerbaarheid van de deur A E WAARSCHUWING! Voordat werkzaamheden worden uitgevoerd, moet u zich ervan verzekeren dat de stekker uit het stopcontact is getrokken. B Om de volgende handelingen uit te voeren, raden we aan dit te doen met de hulp van iemand anders die de deuren van het apparaat tijdens de werkzaamheden stevig vasthoudt. F C D • Verwijder het afstandsstuk (A) en verplaats ze naar de andere kant van het scharnier (B). • Verwijder de deuren.
www.aeg.com • Verwijder de pluggen aan de bovenzijde van beide deuren en verplaats deze naar de andere kant • Zet de onderste deur terug op het onderste scharnier. • Breng het middelste scharnier aan in de linkeropening van de onderste deur. • Schroef het onderste scharnier los en monteer het aan de andere kant. • Bevestig de bovenste deur op het bovenste scharnier. • Plaats de bovenste deur weer op het middelste scharnier en kantel beide deuren enigszins. • Schroef het middelste scharnier terug vast.
NEDERLANDS SSS RRR ! HISSS! OK CLICK! BRRR! BLUBB! K! IC CL BRRR! ! BB U BL 19 CR AC K! CLICK! BRRR! BLUBB!
www.aeg.com HISSS! HISSS! SSSRRR! SSSRRR! CRACK! CRACK! 9.
NEDERLANDS De technische gegevens staan op het typeplaatje aan de linker binnenkant van het apparaat en op het energielabel. 10. MILIEUBESCHERMING Recycle de materialen met het symbool . Gooi de verpakking in een geschikte verzamelcontainer om het te recyclen. Help om het milieu en de volksgezondheid te beschermen en recycle het afval van elektrische en elektronische apparaten. Gooi apparaten gemarkeerd met het symbool niet weg met het huishoudelijk afval.
www.aeg.com CONTENTS 1. 2. 3. 4. 5. 6. 7. 8. 9. 10. SAFETY INSTRUCTIONS . . . . . . . . . . . . . . . . . . . . . . . . . . . . . . . . . . . . . . . . . . . . . . . . . . . . . PRODUCT DESCRIPTION . . . . . . . . . . . . . . . . . . . . . . . . . . . . . . . . . . . . . . . . . . . . . . . . . . . . OPERATION . . . . . . . . . . . . . . . . . . . . . . . . . . . . . . . . . . . . . . . . . . . . . . . . . . . . . . . . . . . . . . . DAILY USE . . . . . . . . . . . . . . . . . . . . . . . . . . . . . .
ENGLISH 1. 23 SAFETY INSTRUCTIONS In the interest of your safety and to ensure the correct use, before installing and first using the appliance, read this user manual carefully, including its hints and warnings. To avoid unnecessary mistakes and accidents, it is important to ensure that all people using the appliance are thoroughly familiar with its operation and safety features.
www.aeg.com 2. • • • • Make sure that the power plug is not squashed or damaged by the back of the appliance. A squashed or damaged power plug may overheat and cause a fire. 3. Make sure that you can come to the mains plug of the appliance. 4. Do not pull the mains cable. 5. If the power plug socket is loose, do not insert the power plug. There is a risk of electric shock or fire. 6. You must not operate the appliance without the lamp cover (if foreseen) of interior lighting. This appliance is heavy.
ENGLISH ant circuit or insulation materials. The appliance shall not be discarded together with the urban refuse and rubbish. The insulation foam contains flammable gases: the appliance shall be disposed according to the applicable regulations to obtain from your local authorities. Avoid damaging the cooling unit, especially at the rear near the heat exchanger. The materials used on this appliance marked by the are recyclable. symbol 1.
www.aeg.com 9 Door shelf 13 Freezer basket 10 Door shelf 11 Bottle shelf 14 Freezer basket 12 Freezer basket 16 Rating plate 15 Cold module 3. OPERATION 3.1 Switching on Insert the plug into the wall socket. Turn the Temperature regulator clockwise to a medium setting. 3.2 Switching off To turn off the appliance, turn the Temperature regulator to the "O" position. 3.3 Temperature regulation The temperature is automatically regulated.
ENGLISH food that protrude until 15 mm from the door. In the event of accidental defrosting, for example due to a power failure, if the power has been off for longer that the value shown in the technical characteristics chart under "rising time", the defrosted food must be consumed quickly or cooked immediately and then re-frozen (after cooling). 27 4.
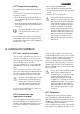
www.aeg.com 4.7 Removal of freezing baskets from the freezer 2 1 The freezing baskets have a limit stop to prevent their accidental removal or falling out. At the time of its removal from the freezer, pull the basket towards yourself and, upon reaching the end point, remove the basket by tilting its front upwards. At the time of putting it back, slightly lift the front of the basket to insert it into the freezer. Once you are over the end points, push the baskets back in their position. 5.
ENGLISH Bananas, potatoes, onions and garlic, if not packed, must not be kept in the refrigerator. 5.5 Hints for freezing To help you make the most of the freezing process, here are some important hints: • the maximum quantity of food which can be frozen in 24 hrs. is shown on the rating plate; • the freezing process takes 24 hours.
www.aeg.com Do not pull, move or damage any pipes and/or cables inside the cabinet. Never use detergents, abrasive powders, highly perfumed cleaning products or wax polishes to clean the interior as this will damage the surface and leave a strong odour. Clean the condenser (black grill) and the compressor at the back of the appliance with a brush. This operation will improve the performance of the appliance and save electricity consumption. Take care of not to damage the cooling system.
ENGLISH • when all the ice has melted, clean and wipe the cabinet dry, then put the drainage channel back in place. • switch on the cabinet and replace the frozen foodstuff. It is recommended to operate the appliance at the highest position of the thermostatic control for some hours so that it can reach the sufficient storing temperature as soon as possible. 31 Never use sharp metal tools to scrape off frost from the evaporator as you could damage it.
www.aeg.com Problem Possible cause Water flows on the ground. The melting water outlet Attach the melting water does not flow in the evap- outlet to the evaporative orative tray above the tray. compressor. There is too much frost and ice. Products are not wrapped Wrap the products better. properly. The door is not closed correctly. Solution Refer to "Closing the door". The Temperature regula- Set a higher temperature. tor may be set incorrectly. The temperature in the appliance is too low.
ENGLISH 33 If your appliance is still not working properly after making the above checks, contact the After Sales Centre. 7.1 Replacing the lamp 1 2 7.2 Closing the door 1. 2. The appliance is equipped with a longlife LED interior light. 1. Disconnect the appliance. 2. Push the movable part to unhook the lamp cover (1). 3. Remove the lamp cover (2). 4. If needed replace the lamp with a light of similar characteristic and power. It is suggested to use Osram PARATHOM SPECIAL T26 0.8 Watts. 5.
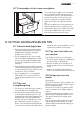
www.aeg.com 100 mm min 8.2 Location B 20 mm A The appliance should be installed well away from sources of heat such as radiators, boilers, direct sunlight etc. Ensure that air can circulate freely around the back of the cabinet. To ensure best performance, if the appliance is positioned below an overhanging wall unit, the minimum distance between the top of the cabinet and the wall unit must be at least 100 mm . Ideally, however, the appliance should not be positioned below overhanging wall units.
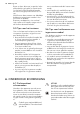
ENGLISH 35 8.5 Rear spacers 2 1 3 4 You can find the two spacers in the bag with documentation. Do these steps to install the spacers: 1. Release the screw. 2. Engage the spacer below the screw. 3. Turn the spacer to the right position. 4. Tighten again the screws. 8.6 Removing the shelf holders A B C Your appliance is equipped with shelf retainers that make it possible to secure the shelves during transportation. To remove them proceed as follows: 1.
www.aeg.com 8.7 Door reversibility A E WARNING! Before carrying out any operations, remove the plug from the power socket. B To carry out the following operations, we suggest that this be made with another person that will keep a firm hold on the doors of the appliance during the operations. F C D • Remove the spacer (A) and move to the other side of the hinge pivot (B). • Remove the doors. • Remove the left-hand cover pin of the middle hinge (C,D) and move to the other side.
ENGLISH 37 • Remove the plugs on the upper side of both doors and move them to the other side • Re-insert the lower door on the lower hinge pivot . • Insert the middle hinge into the left drill of the lower door. • Unscrew the upper hinge pivot and place it on the opposite side. • Fit the upper door on the upper door pivot. • Re-insert the upper door on the middle hinge pivot slightly tilting both doors. • Re-screw the middle hinge . Do not forget the plastic spacer .
www.aeg.
ENGLISH SSSRRR! SSSRRR! CRACK! CRACK! 9. TECHNICAL DATA Dimension Height 1750 mm Width 595 mm Depth 658 mm Rising Time 20 h Voltage 230 V Frequency 50 Hz The technical information are situated in the rating plate on the internal left side of the appliance and in the energy label. 10. ENVIRONMENT CONCERNS Recycle the materials with the symbol . Put the packaging in applicable containers to recycle it.
www.aeg.com facility or contact your municipal office.
FRANÇAIS 41 SOMMAIRE 1. 2. 3. 4. 5. 6. 7. 8. 9. 10. INSTRUCTIONS DE SÉCURITÉ . . . . . . . . . . . . . . . . . . . . . . . . . . . . . . . . . . . . . . . . . . . . . . . . DESCRIPTION DE L'APPAREIL . . . . . . . . . . . . . . . . . . . . . . . . . . . . . . . . . . . . . . . . . . . . . . . . CONSEILS UTILES . . . . . . . . . . . . . . . . . . . . . . . . . . . . . . . . . . . . . . . . . . . . . . . . . . . . . . . . . . UTILISATION QUOTIDIENNE . . . . . . . . . . . . . . . . . . . . . . . . . . . . .
www.aeg.com 1. INSTRUCTIONS DE SÉCURITÉ Pour votre sécurité et garantir une utilisation correcte de l'appareil, lisez attentivement cette notice, y compris les conseils et avertissements, avant d'installer et d'utiliser l'appareil pour la première fois. Pour éviter toute erreur ou accident, veillez à ce que toute personne qui utilise l'appareil connaisse bien son fonctionnement et ses fonctions de sécurité. Conservez cette notice avec l'appareil.
FRANÇAIS AVERTISSEMENT Les éventuelles réparations ou interventions sur votre appareil, ainsi que le remplacement du câble d'alimentation, ne doivent être effectuées que par un professionnel qualifié. 1. • • • • Ne branchez pas le cordon d'alimentation à une rallonge. 2. Assurez-vous que la prise n'est pas écrasée ou endommagée par l'arrière de l'appareil. Une prise de courant écrasée ou endommagée peut s'échauffer et causer un incendie. 3. Vérifiez que la prise murale de l'appareil est accessible. 4.
www.aeg.com • Veillez à ce que l'air circule librement autour de l'appareil pour éviter qu'il ne surchauffe. Pour assurer une ventilation suffisante, respectez les instructions de la notice (chapitre Installation). • Placez l'appareil dos au mur pour éviter tout contact avec le compresseur et le condenseur (risque de brûlure). • Placez de préférence votre appareil loin d'une source de chaleur (chauffage, cuisson ou rayons solaires trop intenses).
FRANÇAIS 45 2. DESCRIPTION DE L'APPAREIL 1 2 3 4 5 6 7 8 9 10 11 16 15 14 13 12 1 Bacs à fruits 9 Balconnet de porte 2 Clayette en verre 10 Balconnet de porte 3 Clayette en verre 11 Compartiment à bouteilles 4 Clayette en verre 12 Panier de congélation 5 Porte-bouteilles 6 Clayette en verre 13 Panier de congélation 7 Thermostat 15 Module de refroidissement 8 Compartiment à beurre 16 Plaque signalétique 14 Panier de congélation 3. CONSEILS UTILES 3.1 Mise en fonctionnement 3.
www.aeg.com 3.3 Réglage de la température La température est réglée automatiquement. Pour faire fonctionner l'appareil, procédez comme suit : • tournez le bouton du thermostat vers le bas pour obtenir un réglage de froid minimum. • tournez le bouton du thermostat vers le haut pour obtenir un réglage de froid maximum. Une position moyenne est la plus indiquée.
FRANÇAIS ou à température ambiante en fonction du temps disponible pour cette opération. Les petites portions peuvent même être cuites sans décongélation préalable (la 47 cuisson sera cependant un peu plus longue). 4.4 Clayettes amovibles Les parois du réfrigérateur sont équipées d'une série de glissières pour que les clayettes puissent être placées en fonction des besoins. 4.5 Compartiment à bouteilles Placez les bouteilles (ouverture vers l'avant) sur la clayette prévue à cet effet.
www.aeg.com 4.7 Retrait des bacs de congélation du congélateur 2 1 Certains bacs de congélation sont équipés d'une butée afin d'empêcher leur retrait accidentel ou leur chute. Pour retirer le bac du congélateur, tirez-le vers vous et, lorsque vous atteignez la butée, retirez-le en inclinant la partie avant vers le haut. Pour le remettre, relevez légèrement l'avant du bac et insérez-le dans le congélateur. Dès que vous avez dépassé la butée, poussez le bac dans la bonne position. 5. CONSEILS UTILES 5.
FRANÇAIS Fruits et légumes : placez-les une fois nettoyés dans le(s) bac(s) à légumes fourni(s). Beurre et fromage : placez-les dans des récipients étanches spéciaux ou enveloppez-les soigneusement dans des feuilles d'aluminium ou de polyéthylène, pour emmagasiner le moins d'air possible. Lait en bouteille : bouchez-le et placezle dans le balconnet de la contreporte réservé aux bouteilles.
www.aeg.com Cet appareil contient des hydrocarbures dans son circuit réfrigérant : l'entretien et la recharge ne doivent donc être effectués que par du personnel autorisé. 6.2 Nettoyage périodique Cet appareil doit être nettoyé régulièrement : • Nettoyez l'intérieur et tous les accessoires avec de l'eau tiède savonneuse. • Vérifiez régulièrement les joints de porte et nettoyez-les en les essuyant pour éviter toute accumulation de déchets. • Rincez et séchez soigneusement.
FRANÇAIS 6.4 Dégivrage du congélateur Une certaine quantité de givre se forme toujours sur les clayettes du congélateur et autour du compartiment supérieur. Dégivrez le congélateur lorsque l'épaisseur de la couche de givre est comprise entre 3 et 5 mm. 51 • Dégagez la gouttière d'évacuation de son emplacement, introduisez-la comme indiqué sur l'illustration et recueillez l'eau dans le tiroir inférieur du congélateur. • retirez soigneusement le givre lorsqu'il commence à fondre.
www.aeg.com Anomalie Cause possible Solution Le compresseur fonctionne en continu. Le bouton du thermostat n'est peut-être pas bien réglé. Choisissez une température plus élevée. La porte n'est pas bien fermée. Consultez le paragraphe "Fermeture de la porte". La porte a été ouverte trop souvent. Ne laissez pas la porte ouverte plus longtemps que nécessaire. La température du produit est trop élevée. Laissez la température du produit rejoindre la température ambiante avant de le stocker.
FRANÇAIS Anomalie 53 Cause possible Solution Trop de produits ont été introduits ensemble. Introduisez moins de produits en même temps. La température du réfrigérateur est trop élevée. Il n'y a aucune circulation d'air froid dans l'appareil. Assurez-vous qu'il y ait une circulation d'air froid dans l'appareil. La température du congélateur est trop élevée. Les produits sont trop près les uns des autres. Stockez les produits de façon à permettre la circulation de l'air froid.
www.aeg.com 3. Si nécessaire, remplacez les joints de porte défectueux. Contactez votre service après-vente. 8. INSTALLATION AVERTISSEMENT Pour votre sécurité et le bon fonctionnement de l'appareil, veuillez lire attentivement les "Consignes de sécurité" avant d'installer l'appareil. Classe Température ambiante climatique SN +10 à + 32 °C N +16 à + 32 °C 8.
FRANÇAIS 55 8.4 Mise de niveau Lorsque vous installez l'appareil, veillez à le placer de niveau. Servez-vous des deux pieds réglables se trouvant à l’avant de l’appareil. 8.5 Entretoises arrière 2 1 3 4 Vous trouverez deux entretoises dans le même sachet que la notice d'utilisation. Pour installer les entretoises, procédez comme suit : 1. Desserrez la vis. 2. Faites glisser l'entretoise sous la vis. 3. Tournez l'entretoise en position correcte. 4. Resserrez la vis. 8.
www.aeg.com 8.7 Réversibilité de la porte A E AVERTISSEMENT Avant toute opération, débranchez la fiche de la prise de courant. B Pour effectuer les opérations suivantes, il est conseillé de se faire aider par une autre personne pour maintenir fermement les portes lors de toute manipulation de l'appareil. F C D • Retirez l'entretoise (A) et placez-la de l'autre côté du gond de charnière (B). • Enlevez les portes.
FRANÇAIS 57 • Enlevez les caches situés sur l'arête supérieure des deux portes et placez-les sur le côté opposé • Replacez la porte inférieure sur le gond de la charnière inférieure. • Insérez la charnière centrale dans le trou gauche de la porte inférieure. • Dévissez le gond de la charnière supérieure et placez-le sur le côté opposé. • Installez la porte supérieure sur le gond supérieur. • Replacez la porte supérieure sur le gond de la charnière centrale en inclinant légèrement les deux portes.
www.aeg.
FRANÇAIS HISSS! HISSS! SSSRRR! SSSRRR! CRACK! CRACK! 9.
www.aeg.com Les caractéristiques techniques figurent sur la plaque signalétique située sur le côté gauche à l'intérieur de l'appareil et sur l'étiquette énergétique. 10. EN MATIÈRE DE PROTECTION DE L'ENVIRONNEMENT Recyclez les matériaux portant le symbole . Déposez les emballages dans les conteneurs prévus à cet effet. Contribuez à la protection de l'environnement et à votre sécurité, recyclez vos produits électriques et électroniques.
DEUTSCH 61 INHALT 1. 2. 3. 4. 5. 6. 7. 8. 9. 10. SICHERHEITSHINWEISE . . . . . . . . . . . . . . . . . . . . . . . . . . . . . . . . . . . . . . . . . . . . . . . . . . . . . GERÄTEBESCHREIBUNG . . . . . . . . . . . . . . . . . . . . . . . . . . . . . . . . . . . . . . . . . . . . . . . . . . . . BETRIEB . . . . . . . . . . . . . . . . . . . . . . . . . . . . . . . . . . . . . . . . . . . . . . . . . . . . . . . . . . . . . . . . . . TÄGLICHER GEBRAUCH . . . . . . . . . . . . . . . . . . . . . . . . . .
www.aeg.com 1. SICHERHEITSHINWEISE Lesen Sie zu Ihrer Sicherheit und für die optimale Geräteanwendung vor der Installation und dem Gebrauch des Gerätes die vorliegende Benutzerinformation aufmerksam durch, einschließlich der Ratschläge und Warnungen. Es ist wichtig, dass zur Vermeidung von Fehlern und Unfällen alle Personen, die das Gerät benutzen, mit der Bedienung und den Sicherheitsvorschriften vertraut sind.
DEUTSCH WARNUNG! Elektrische Bauteile (Netzkabel, Stecker, Kompressor) dürfen zur Vermeidung von Gefahren nur vom Kundendienst oder einer Fachkraft ausgewechselt werden. 1. • • • • Das Netzkabel darf nicht verlängert werden. 2. Vergewissern Sie sich, dass der Netzstecker nicht von der Geräterückseite geklemmt oder beschädigt wird. Ein geklemmter oder beschädigter Netzstecker überhitzt und kann einen Brand verursachen. 3. Vergewissern Sie sich, dass der Netzstecker des Geräts frei zugänglich ist. 4.
www.aeg.com • • • • falls besteht Überhitzungsgefahr. Halten Sie sich für die Belüftung an die Installationsanweisungen. Das Gerät sollte zur Vermeidung von Verbrennungen durch Berührung von heißen Bauteilen (Kompressor, Kondensator) möglichst mit der Rückseite gegen eine Wand aufgestellt werden. Das Gerät darf nicht in der Nähe von Heizkörpern oder Kochern installiert werden. Vergewissern Sie sich, dass der Netzstecker des Gerätes nach der Installation frei zugänglich ist.
DEUTSCH 65 2. GERÄTEBESCHREIBUNG 1 2 3 4 5 6 7 8 9 10 11 16 15 14 13 12 1 Obst- und Gemüseschubladen 9 Türablage 2 Glasablage 10 Türablage 3 Glasablage 11 Flaschenhalter 4 Glasablage 12 Gefrierkorb 5 Flaschenhalter 6 Glasablage 13 Gefrierkorb 7 Thermostat 15 Kältemodul 8 Butterfach 16 Typenschild 14 Gefrierkorb 3. BETRIEB 3.1 Einschalten des Geräts 3.2 Ausschalten des Geräts Stecken Sie den Stecker in die Wandsteckdose.
www.aeg.com 3.3 Temperaturregelung Die Temperatur wird automatisch geregelt. Bedienen Sie das Gerät wie folgt: • drehen Sie den Temperaturregler auf eine niedrigere Einstellung, um die minimal mögliche Kühlung zu erreichen. • drehen Sie den Temperaturregler auf eine höhere Einstellung, um die maximal mögliche Kühlung zu erreichen. eine mittlere Einstellung ist im Allgemeinen am besten geeignet.
DEUTSCH nach der zur Verfügung stehenden Zeit im Kühlschrank oder bei Raumtemperatur aufgetaut werden. Kleinere Teile können sogar direkt aus dem Gefrierraum entnommen und an- 67 schließend sofort gekocht werden. In diesem Fall dauert der Garvorgang etwas länger. 4.4 Verstellbare Ablagen/Einsätze Die Wände des Kühlschranks sind mit einer Reihe von Führungsschienen ausgestattet, die verschiedene Möglichkeiten für das Einsetzen der Ablagen bieten. 4.
www.aeg.com 4.7 Entnahme von Gefrierkörben aus dem Gefrierschrank 2 1 Die Gefrierkörbe sind mit einem Anschlag ausgestattet, der die versehentliche Entnahme oder ein Herausfallen verhindert. Um einen Gefrierkorb aus dem Gefrierschrank zu nehmen, ziehen Sie den Korb zu sich, bis er den Anschlag erreicht. Dann kippen Sie den Korb mit der Vorderseite nach oben, bis er sich herausnehmen lässt.
DEUTSCH Bitte lagern Sie Fleisch aus Sicherheitsgründen nur einen oder maximal zwei Tage auf diese Weise. Gekochte Lebensmittel, kalte Gerichte usw.: diese können abgedeckt auf eine Ablage gelegt werden. Obst und Gemüse: bitte waschen Sie Obst und Gemüse gründlich und legen Sie es in die speziell dafür vorgesehene(n) Schublade(n). Butter und Käse: diese sollten stets in speziellen luftdichten Behältern verpackt sein oder in Aluminiumfolie bzw.
www.aeg.com Verwenden Sie keine aggressiven Reinigungsmittel oder Scheuerpulver, die die Oberfläche beschädigen. VORSICHT! Ziehen Sie bitte vor jeder Reinigungsarbeit immer den Netzstecker aus der Steckdose. Der Kältekreis des Gerätes enthält Kohlenwasserstoffe; Wartungsarbeiten und Nachfüllen von Kältemittel dürfen daher nur durch vom Hersteller autorisiertes Fachpersonal ausgeführt werden. 6.
DEUTSCH 6.4 Abtauen des Gefriergeräts Auf den Ablagen des Gefriergeräts und im Innern des oberen Fachs bildet sich stets etwas Reif. Tauen Sie das Gefriergerät ab, wenn die Reifschicht eine Stärke von etwa 3 bis 5 mm erreicht hat. Entfernen Sie den Reif wie nachstehend erläutert: • Ziehen Sie zur Unterbrechung der Stromversorgung den Netzstecker aus der Wandsteckdose oder schalten Sie das Gerät aus.
www.aeg.com Störung Mögliche Ursache Abhilfe Das Gerät ist zu laut. Das Gerät ist nicht korrekt Prüfen Sie, ob das Gerät abgestützt. stabil steht (alle vier Füße müssen fest auf dem Boden stehen). Der Kompressor arbeitet ständig. Der Temperaturregler kann falsch eingestellt sein. Stellen Sie eine wärmere Temperatur ein. Die Tür ist nicht richtig geschlossen. Siehe hierzu "Schließen der Tür". Die Tür wurde zu häufig geöffnet. Lassen Sie die Tür nicht länger als unbedingt erforderlich offen.
DEUTSCH Störung Mögliche Ursache 73 Abhilfe Die Produkttemperatur ist Lassen Sie die Produktzu hoch. temperatur auf Raumtemperatur abkühlen, bevor Sie die Produkte einlagern. Es wurden gleichzeitig zu viele Produkte zum Eingefrieren eingelegt. Legen Sie gleichzeitig weniger Produkte zum Eingefrieren ein. Die Temperatur im Kühlschrank ist zu hoch. Es zirkuliert keine Kaltluft im Innern des Gerätes. Stellen Sie sicher, dass die Kaltluft im Gerät zirkuliert.
www.aeg.com 7.1 Austauschen der Lampe 2 1 7.2 Schließen der Tür 1. 2. Das Gerät ist mit einer langlebigen LEDInnenbeleuchtung ausgestattet. 1. Schalten Sie das Gerät aus. 2. Drücken Sie das bewegliche Teil, um die Lampenabdeckung auszuhängen (1). 3. Nehmen Sie die Lampenabdeckung ab (2). 4. Ersetzen Sie die Lampe durch eine mit gleichwertigen Eigenschaften und derselben Leistung. Es wird empfohlen Osram PARATHOM SPECIAL T26 0,8 Watt zu verwenden. 5. Bringen Sie die Lampenabdeckung an. 6.
DEUTSCH 75 100 mm min 8.2 Aufstellort B 20 mm A Das Gerät sollte in ausreichendem Abstand von Wärmequellen wie Heizungen, Boilern, direkter Sonneneinstrahlung etc. aufgestellt werden. Vergewissern Sie sich, dass Luft an der Rückseite des Gehäuses frei zirkulieren kann. Um einwandfreien Betrieb sicherzustellen, sollte der Abstand zwischen der Oberseite des Gehäuses und dem Hängeschrank mindestens 100 mm betragen, wenn das Gerät unter einem Hängeschrank aufgestellt wurde.
www.aeg.com 8.5 Hintere Distanzstücke 2 1 3 4 Die beiden Distanzstücke befinden sich im Beutel mit den Unterlagen. Gehen Sie wie folgt vor, um die Distanzstücke anzubringen: 1. Lösen Sie die Schraube. 2. Setzen Sie das Distanzstück unter dem Schraubenkopf ein. 3. Drehen Sie das Distanzstück in die richtige Position. 4. Ziehen Sie die Schrauben wieder fest. 8.
DEUTSCH 77 8.7 Wechseln des Türanschlags A E WARNUNG! Vor der Durchführung von Arbeiten am Gerät ist stets der Netzstecker aus der Steckdose zu ziehen. B Die nachfolgend beschriebenen Schritte sollten von mindestens zwei Personen durchgeführt werden, um ein Herunterfallen der Türen zu vermeiden. F C D • Entfernen Sie das Distanzstück (A), und befestigen Sie es an der anderen Seite des Scharnierhaltestifts (B). • Entfernen Sie die Türen.
www.aeg.com • Entfernen Sie die Kappen an der Oberseite beider Türen, und befestigen Sie diese an der anderen Seite. • Hängen Sie die untere Tür wieder am unteren Scharnier ein. • Setzen Sie das mittlere Scharnier in die linke Bohrung der unteren Tür ein. • Lösen Sie den Haltestift des oberen Scharniers, und montieren Sie ihn an der gegenüberliegenden Seite. • Setzen Sie die obere Tür in den Haltestift des oberen Scharniers ein.
DEUTSCH SSS RRR ! HISSS! OK CLICK! BRRR! BLUBB! K! IC CL BRRR! ! BB U BL 79 CR AC K! CLICK! BRRR! BLUBB!
www.aeg.com HISSS! HISSS! SSSRRR! SSSRRR! CRACK! CRACK! 9. TECHNISCHE DATEN Abmessungen Höhe 1750 mm Breite 595 mm Tiefe 658 mm Lagerzeit bei Störung 20 Std.
DEUTSCH Die technischen Daten befinden sich auf dem Typenschild im Innern des Gerätes auf der linken Seite sowie auf der Energieplakette. 10. UMWELTTIPPS Recyceln Sie Materialien mit dem Symbol . Entsorgen Sie die Verpackung in den entsprechenden Recyclingbehältern. Recyceln Sie zum Umwelt- und Gesundheitsschutz elektrische und 81 elektronische Geräte. Entsorgen Sie Geräte mit diesem Symbol nicht mit dem Hausmüll.
www.aeg.
DEUTSCH 83
280150758-A-242012 www.aeg.