EN User Manual Fridge Freezer S53420CMW2
www.aeg.com CONTENTS 1. SAFETY INFORMATION.................................................................................................3 2. SAFETY INSTRUCTIONS................................................................................................ 4 3. PRODUCT DESCRIPTION.............................................................................................. 6 4. OPERATION...................................................................................................................
ENGLISH 1. 3 SAFETY INFORMATION Before the installation and use of the appliance, carefully read the supplied instructions. The manufacturer is not responsible if an incorrect installation and use causes injuries and damages. Always keep the instructions with the appliance for future reference. 1.
www.aeg.com • • • • Do not use water spray and steam to clean the appliance. Clean the appliance with a moist soft cloth. Only use neutral detergents. Do not use abrasive products, abrasive cleaning pads, solvents or metal objects. Do not store explosive substances such as aerosol cans with a flammable propellant in this appliance. If the supply cord is damaged, it must be replaced by the manufacturer, its service agent or similarly qualified persons in order to avoid a hazard. 2.
ENGLISH 2.3 Use WARNING! Risk of injury, burns, electrical shock or fire. • Do not change the specification of this appliance. • Do not put electrical appliances (e.g. ice cream makers) in the appliance unless they are stated applicable by the manufacturer. • Be careful not to cause damage to the refrigerant circuit. It contains isobutane (R600a), a natural gas with a high level of environmental compatibility. This gas is flammable.
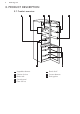
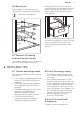
www.aeg.com 3. PRODUCT DESCRIPTION 3.
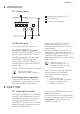
ENGLISH 7 4. OPERATION 4.1 Control panel 1 1 Temperature indicators LED 2 FROSTMATIC 3 Temperature regulator 3 2 4.2 Switching on Insert the plug into the wall socket. 4.3 FROSTMATIC function You can activate FROSTMATIC function by pressing the FROSTMATIC button. The LED corresponding to the symbol FROSTMATIC indicator lights up. You can deactivate FROSTMATIC function by pressing the FROSTMATIC button again. The FROSTMATIC indicator will light off. This function stops automatically after 52 hours.
www.aeg.com The freezing process lasts 24 hours: during this period do not add other food to be frozen. When the freezing process is completed, return to the required temperature (see "FROSTMATIC Function"). In this condition, the refrigerator compartment temperature might drop below 0°C. If this occurs reset the temperature regulator to a warmer setting. 5.4 Positioning the door shelves To permit storage of food packages of various sizes, the door shelves can be placed at different heights.
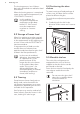
ENGLISH 5.6 Bottle rack Place the bottles (with the opening facing front) in the pre-positioned shelf. Place only closed bottles. 9 falling out. At the time of its removal from the freezer, pull the basket towards yourself and, upon reaching the end point, remove the basket by tilting its front upwards. 2 1 At the time of putting it back, slightly lift the front of the basket to insert it into the freezer. Once you are over the end points, push the baskets back in their position. 5.
www.aeg.com • do not store warm food or evaporating liquids in the refrigerator • do cover or wrap the food, particularly if it has a strong flavour • position food so that air can circulate freely around it 6.4 Hints for refrigeration Useful hints: • Meat (all types) : wrap in polythene bags and place on the glass shelf above the vegetable drawer. • For safety, store in this way only one or two days at the most. • Cooked foods, cold dishes, etc..
ENGLISH This appliance contains hydrocarbons in its cooling unit; maintenance and recharging must therefore only be carried out by authorized technicians. The accessories and parts of the appliance are not suitable for washing in a dishwasher. 7.2 Initial power on CAUTION! Before inserting the power plug in to the outlet and switching on the cabinet for the first time, leave the appliance standing upright for at least 4 hours.
www.aeg.com The absence of frost is due to the continuous circulation of cold air inside the compartment, driven by an automatically controlled fan. 7.7 Periods of non-operation WARNING! If the cabinet will be kept on, ask somebody to check it once in a while to prevent the food inside from spoiling in case of a power failure. When the appliance is not in use for long periods, take the following precautions: 1. Disconnect the appliance from electricity supply. 2. Remove all food. 3.
ENGLISH Problem 13 Possible cause Solution Food products placed in the appliance were too warm. Allow food products to cool to room temperature before storing. The door is not closed cor- Refer to "Closing the door". rectly. The FROSTMATIC function Refer to "FROSTMATIC funcis switched on. tion". There is too much frost and ice. The door is not closed cor- Refer to "Closing the door". rectly or the gasket is deformed/dirty.
www.aeg.com Problem Possible cause Solution The food products' temperature is too high. Let the food products temperature decrease to room temperature before storage. Many food products are stored at the same time. Store less food products at the same time. The door has been opened often. Open the door only if necessary. The FROSTMATIC function Refer to "FROSTMATIC funcis switched on. tion". There is no cold air circula- Make sure that there is cold air tion in the appliance.
ENGLISH 9.2 Location 9.3 Electrical Connection It must be possible to disconnect the appliance from the mains power supply; the plug must therefore be easily accessible after installation. 100 mm min The appliance should be installed well away from sources of heat such as radiators, boilers, direct sunlight etc. Ensure that air can circulate freely around the back of the cabinet.
www.aeg.com symbol or coloured green and yellow. 2. Connect the wire coloured blue to the terminal either marked with the letter “N“ or coloured black. 3. Connect the wire coloured brown to the terminal either marked with the “L“ or coloured red. 4. Check that no cut, or stray strands of wire is present and the cord clamp (E) is secure over the outer sheath. Make sure the electricity supply voltage is the same as that indicated on the appliance rating plate. 5. Switch on the appliance.
ENGLISH 17 7 3 4 8. Screw off the pivot of the lower hinge (5) and screw the lower hinge pivot (6) into the left drill of the lower hinge. 8 12. Place the lower door on the lower hinge pivot (9). 13. Screw off the middle cover plugs and screw them into the hole on the opposite side (10). 14. Put the middle hinge on the opposite side and fix it with the screws (11). 10 6 180 5 o 11 9 9. Screw off the screws of the lower hinge and remove the hinge (8). 10.
www.aeg.com Do a final check to make sure that: • All screws are tightened. • The magnetic seal adheres to the cabinet. • The door opens and closes correctly. If the ambient temperature is cold (i.e. in Winter), the gasket may not fit perfectly to the cabinet. In that case, wait for the natural fitting of the gasket. In case you do not want to carry out the above mentioned operations, contact the nearest After Sales Service Force.
ENGLISH 11. ENVIRONMENTAL CONCERNS Recycle the materials with the symbol . Put the packaging in applicable containers to recycle it. Help protect the environment and human health and to recycle waste of electrical and electronic appliances. Do not dispose appliances marked with the symbol with the household waste. Return the product to your local recycling facility or contact your municipal office.
280153423-A-212014 www.aeg.