S53600CSW0 IT Istruzioni per l’uso EN User manual 2 19
www.aeg.com INDICE 1. 2. 3. 4. 5. 6. 7. 8. 9. ISTRUZIONI DI SICUREZZA . . . . . . . . . . . . . . . . . . . . . . . . . . . . . . . . . . . . . . . . . . . . . . . . . . . . 3 DESCRIZIONE DEL PRODOTTO . . . . . . . . . . . . . . . . . . . . . . . . . . . . . . . . . . . . . . . . . . . . . . . 6 USO DELL'APPARECCHIO . . . . . . . . . . . . . . . . . . . . . . . . . . . . . . . . . . . . . . . . . . . . . . . . . . . . 6 UTILIZZO QUOTIDIANO . . . . . . . . . . . . . . . . . . . . . . . . . . . . . . . .
ITALIANO 1. 3 ISTRUZIONI DI SICUREZZA Per garantire un impiego corretto e sicuro dell'apparecchio, prima dell'installazione e del primo utilizzo leggere con attenzione il libretto istruzioni, inclusi i suggerimenti e le avvertenze. Per evitare errori e incidenti, è importante garantire che tutte le persone che utilizzano l'apparecchio ne conoscano il funzionamento e le caratteristiche di sicurezza.
www.aeg.com AVVERTENZA! Tutti i componenti elettrici (cavo di alimentazione, spina, compressore) devono essere sostituiti da un tecnico certificato o da personale d'assistenza qualificato al fine di evitare di correre rischi. 1. • • • • Non collegare prolunghe al cavo di alimentazione. 2. Evitare che il lato posteriore dell'apparecchiatura possa schiacciare o danneggiare la spina, causandone il surriscaldamento con un conseguente rischio di incendio. 3.
ITALIANO • Attorno all'apparecchio vi deve essere un'adeguata circolazione dell'aria, altrimenti si può surriscaldare. Per ottenere una ventilazione sufficiente seguire le istruzioni di installazione. • Se possibile il retro dell'apparecchio dovrebbe essere posizionato contro una parete per evitare di toccare le parti calde o di rimanervi impigliati (compressore, condensatore), evitando così possibili scottature. • L'apparecchio non deve essere posto vicino a radiatori o piani di cottura a gas.
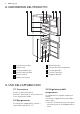
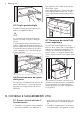
www.aeg.com 2. DESCRIZIONE DEL PRODOTTO 1 2 3 11 10 4 9 5 6 7 8 1 Cassetti per verdura 7 Ripiano bottiglie 2 Ripiani unità 8 Cestello del vano congelatore 3 Griglia portabottiglie 4 Pannello dei comandi 9 Cestello Maxi Box 10 Cestello Frostmatic 5 Ripiano latticini 11 Targhetta dei dati 6 Ripiano sulla porta 3. USO DELL'APPARECCHIO 3.1 Accensione Inserire la spina nella presa. Ruotare il termostato in senso orario fino a una regolazione media. 3.
ITALIANO • ruotare il termostato verso una regolazione alta per un raffreddamento massimo. Una regolazione media è in genere la più adatta. Tuttavia la regolazione esatta dovrebbe essere scelta tenendo a mente che la temperatura all'interno dell'apparecchio dipende da: • temperatura ambiente • frequenza di apertura della porta • quantità di cibo conservato 7 • posizione dell'apparecchio.
www.aeg.com Per regolare l'altezza dei ripiani, procedere come segue: tirare delicatamente il ripiano nella direzione indicata dalle frecce fino a sganciarlo, quindi riposizionarlo dove necessario. 1 4.5 Griglia portabottiglie Disporre le bottiglie (con l'apertura in avanti) sull'apposito ripiano. Se il ripiano è posizionato orizzontalmente, utilizzarlo solo per le bottiglie chiuse. Il ripiano può essere inclinato per consentire l'appoggio di bottiglie aperte.
ITALIANO sentire un ronzio e un rumore pulsante dal compressore. Non si tratta di un'anomalia. • La dilatazione termica potrebbe provocare uno schiocco improvviso. È un fenomeno naturale, non pericoloso. Non si tratta di un'anomalia. • Quando il compressore si accende o si spegne, si sente un lieve scatto del regolatore della temperatura. Non si tratta di un'anomalia. 5.
www.aeg.com 5.6 Consigli per la conservazione dei surgelati I cestelli del congelatore consentono di individuare rapidamente e facilmente la confezione di alimenti desiderata. Se occorre conservare grandi quantità di cibo, si consiglia di rimuovere tutti i cassetti ad eccezione del cestello inferiore, la cui presenza è necessaria per assicurare la buona circolazione dell'aria.
ITALIANO 6.3 Sbrinamento del vano frigorifero Durante l'uso normale, la brina viene eliminata automaticamente dall'evaporatore del vano frigorifero ogni volta che il motocompressore si arresta. L'acqua di sbrinamento giunge attraverso un foro di scarico in un apposito recipiente posto sul retro dell'apparecchiatura, sopra il motocompressore, dove evapora.
www.aeg.com 7. RISOLUZIONE DEI PROBLEMI ATTENZIONE Prima della ricerca guasti, estrarre la spina dalla presa. Le operazioni di ricerca guasti non descritte nel presente manuale devono essere eseguite esclusivamente da elettricisti qualificati o da personale competente. Durante l'uso, alcuni rumori di funzionamento (come quelli del compressore o del circuito refrigerante) sono da considerarsi normali. Problema Possibile causa Soluzione L'apparecchio è rumoroso.
ITALIANO Problema 13 Possibile causa Soluzione Il regolatore di temperatura non è impostato correttamente. Impostare una temperatura superiore. La temperatura all'interno dell'apparecchio è troppo bassa. Il regolatore di temperatura non è impostato correttamente. Impostare una temperatura superiore. La temperatura all'interno dell'apparecchio è troppo alta. Il regolatore di temperatura non è impostato correttamente. Impostare una temperatura inferiore.
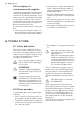
www.aeg.com 2. 3. 4. 5. 6. 7. 1 Esercitare pressione sulla parte mobile per sganciare il coprilampada (1). Rimuovere il coprilampada (2). Se necessario sostituire la lampadina con una dalle caratteristiche e potenza simili. E' consigliabile l'uso di Osram PARATHOM SPECIAL T26 0,8 Watt. Installare il coprilampada. Collegare l’apparecchiatura alla rete elettrica. Apire la porta. Controllare che la lampadina si accenda. 7.2 Chiusura della porta Pulire le guarnizioni della porta.
ITALIANO 15 100 mm min 2 1 B 4 8.5 Livellamento 20 mm A 3 AVVERTENZA! L'apparecchiatura deve poter essere scollegabile dalla presa di corrente; pertanto, al termine dell'installazione, la spina deve essere facilmente accessibile. L'apparecchiatura deve trovarsi perfettamente in piano. Per correggere gli eventuali dislivelli è possibile regolare in altezza i due piedini anteriori. 8.
www.aeg.com • Rimuovere il tappo (A) usando un utensile adatto. Svitare il perno della cerniera inferiore (B) e il distanziatore (C) e applicarli sul lato opposto. A A B B C C • Reinserire la copertura (1) sul lato opposto. 8.7 Possibilità di invertire la porta 1 AVVERTENZA! Prima di eseguire le operazioni descritte, estrarre la spina dalla presa di corrente.
ITALIANO 2 1 17 • La porta si apra e si chiuda correttamente. Se la temperatura ambiente è bassa (ad esempio in inverno), è possibile che la guarnizione non aderisca perfettamente all'apparecchiatura. In tal caso, attendere che aderisca naturalmente. Per chi preferisce non eseguire direttamente le operazioni sopra descritte, rivolgersi al servizio post-vendita più vicino. L'intervento di inversione delle porte, eseguito dai tecnici del servizio postvendita, sarà a carico dell'utente.
www.aeg.com elettriche ed elettroniche. Non smaltire le apparecchiature che riportano il simbolo insieme ai normali rifiuti domestici. Portare il prodotto al punto di riciclaggio più vicino o contattare il comune di residenza. Informazioni: Dove portare gli apparecchi fuori uso? In qualsiasi negozio che vende apparecchi nuovi oppure si restituiscono ai centri di raccolta ufficiali della SENS oppure ai riciclatori ufficiali della SENS.
ENGLISH 19 CONTENTS 1. 2. 3. 4. 5. 6. 7. 8. 9. 10. SAFETY INSTRUCTIONS . . . . . . . . . . . . . . . . . . . . . . . . . . . . . . . . . . . . . . . . . . . . . . . . . . . . . PRODUCT DESCRIPTION . . . . . . . . . . . . . . . . . . . . . . . . . . . . . . . . . . . . . . . . . . . . . . . . . . . . OPERATION . . . . . . . . . . . . . . . . . . . . . . . . . . . . . . . . . . . . . . . . . . . . . . . . . . . . . . . . . . . . . . . DAILY USE . . . . . . . . . . . . . . . . . . . . . . . . . . . . . . .
www.aeg.com 1. SAFETY INSTRUCTIONS In the interest of your safety and to ensure the correct use, before installing and first using the appliance, read this user manual carefully, including its hints and warnings. To avoid unnecessary mistakes and accidents, it is important to ensure that all people using the appliance are thoroughly familiar with its operation and safety features.
ENGLISH WARNING! Any electrical component (power cord, plug, compressor) must be replaced by a certified service agent or qualified service personnel to avoid hazard. 1. • • • • Power cord must not be lengthened. 2. Make sure that the power plug is not squashed or damaged by the back of the appliance. A squashed or damaged power plug may overheat and cause a fire. 3. Make sure that you can come to the mains plug of the appliance. 4. Do not pull the mains cable. 5.
www.aeg.com • The appliance must not be located close to radiators or cookers. • Make sure that the mains plug is accessible after the installation of the appliance. • Connect to potable water supply only (If a water connection is foreseen). 1.6 Service • Any electrical work required to do the servicing of the appliance should be carried out by a qualified electrician or competent person. • This product must be serviced by an authorized Service Centre, and only genuine spare parts must be used. 1.
ENGLISH 23 2. PRODUCT DESCRIPTION 1 2 3 11 10 4 9 5 6 7 8 1 Vegetable drawers 7 Bottle shelf 2 Cabinet shelves 8 Freezer basket 3 Bottle rack 4 Control panel 9 Maxibox basket 10 Frostmatic basket 5 Dairy shelf 11 Rating plate 6 Door shelf 3. OPERATION 3.1 Switching on 3.3 Temperature regulation Insert the plug into the wall socket. Turn the Temperature regulator clockwise to a medium setting. The temperature is automatically regulated.
www.aeg.com • turn the Temperature regulator toward higher settings to obtain the maximum coldness. A medium setting is generally the most suitable. However, the exact setting should be chosen keeping in mind that the temperature inside the appliance depends on: • room temperature • how often the door is opened • the quantity of food stored • the location of the appliance.
ENGLISH 4.5 Bottle rack Place the bottles (with the opening facing front) in the pre-positioned shelf. If the shelf is positioned horizontally, place only closed bottles. This bottle holder shelf can be tilted in order to store previously opened bottles. To obtain this result, pull the shelf up so it can rotate upwards and be placed on the next higher level. 25 4.7 Removal of freezing baskets from the freezer The freezing baskets have a limit stop to prevent their accidental removal or falling out.
www.aeg.com 5. HELPFUL HINTS AND TIPS 5.1 Normal Operating Sounds • You may hear a faint gurgling and a bubbling sound when the refrigerant is pumped through the coils or tubing. This is correct. • When the compressor is on, the refrigerant is being pumped around and you will hear a whirring sound and a pulsating noise from the compressor. This is correct. • The thermic dilatation might cause a sudden cracking noise. It is natural, not dangerous physical phenomenon. This is correct.
ENGLISH partment, can possibly cause the skin to be freeze burnt; • it is advisable to show the freezing in date on each individual pack to enable you to keep tab of the storage time. 5.6 Hints for storage of frozen food The freezer baskets ensure that it is quick and easy to find the food package you want. If large quantities of food are to be stored, remove all drawers except for the bottom basket which needs to be in place to provide good air circulation.
www.aeg.com partment every time the motor compressor stops, during normal use. The defrost water drains out through a drain hole into a special container at the back of the appliance, over the motor compressor, where it evaporates. It is important to periodically clean the defrost water drain hole in the middle of the refrigerator compartment channel to prevent the water overflowing and dripping onto the food inside.
ENGLISH 29 7. TROUBLESHOOTING CAUTION! Before troubleshooting, disconnect the power supply. Only a qualified electrician or competent person must do the troubleshooting that is not in this manual. There are some sounds during normal use (compressor, refrigerant circulation). Problem Possible cause Solution The appliance is noisy. The appliance is not supported properly. Check if the appliance stands stable (all the four feet should be on the floor). The compressor operates continually.
www.aeg.com Problem Possible cause The temperature in the appliance is too low. The Temperature regula- Set a higher temperature. tor may be set incorrectly. Solution The temperature in the appliance is too high. The Temperature regula- Set a lower temperature. tor may be set incorrectly. The door is not closed correctly. Refer to "Closing the door". The product temperature is too high. Let the product temperature decrease to room temperature before storage.
ENGLISH 31 2. 2 1 If necessary, adjust the door. Refer to "Installation". 3. If necessary, replace the defective door gaskets. Contact the Service Center. 7.2 Closing the door 1. Clean the door gaskets. WARNING! Read the "Safety Information" carefully for your safety and correct operation of the appliance before installing the appliance. 100 mm min 8. INSTALLATION 8.
www.aeg.com This appliance complies with the E.E.C. Directives. A 8.4 Rear spacers You can find the two spacers in the bag with documentation. Do these steps to install the spacers: 1. Release the screw. 2. Engage the spacer below the screw. 3. Turn the spacer to the right position. 4. Tighten again the screws. B C 2 1 4 3 8.5 Levelling When placing the appliance ensure that it stands level. This can be achieved by two adjustable feet at the bottom in front. 8.
ENGLISH 33 the spacer (C) and place them on the opposite side. A 2 B C • Re-insert the cover (1) on the opposite side. 1 • Remove the plugs on the upper side of both doors and move them to the other side • Re-insert the lower door on the lower hinge pivot . • Insert the middle hinge into the left drill of the lower door. • Unscrew the upper hinge pivot and place it on the opposite side. • Fit the upper door on the upper door pivot.
www.aeg.com 9. TECHNICAL DATA Dimension Height 1850 mm Width 595 mm Depth 658 mm Rising Time 20 h Voltage 230-240 V Frequency 50 Hz The technical information are situated in the rating plate on the internal left side of the appliance and in the energy label. 10. CH GARANTIE, GARANZIA, GUARANTEE 10.
ENGLISH Garantie Nous octroyons sur chaque produit 2 ans de garantie à partir de la date de livraison ou de la mise en service au consommateur (documenté au moyen d’une facture, d’un bon de garantie ou d’un justificatif d’achat). Notre garantie couvre les frais de mains d’œuvres et de déplacement, ainsi que les pièces de rechange.
280152259-A-302013 www.aeg.