S71709TSW0 NL Gebruiksaanwijzing EN User manual FR Notice d'utilisation DE Benutzerinformation 2 19 35 51
www.aeg.com INHOUD 1. 2. 3. 4. 5. 6. 7. 8. 9. 10. VEILIGHEIDSVOORSCHRIFTEN . . . . . . . . . . . . . . . . . . . . . . . . . . . . . . . . . . . . . . . . . . . . . . . . 3 BEDIENING . . . . . . . . . . . . . . . . . . . . . . . . . . . . . . . . . . . . . . . . . . . . . . . . . . . . . . . . . . . . . . . . 5 HET EERSTE GEBRUIK . . . . . . . . . . . . . . . . . . . . . . . . . . . . . . . . . . . . . . . . . . . . . . . . . . . . . . . 6 DAGELIJKS GEBRUIK . . . . . . . . . . . . . . . . . . . . . . .
NEDERLANDS 1. 3 VEILIGHEIDSVOORSCHRIFTEN In het belang van uw veiligheid en om een correct gebruik te kunnen waarborgen is het van belang dat u, alvorens het apparaat te installeren en in gebruik te nemen, deze gebruiksaanwijzing, inclusief de tips en waarschuwingen, grondig doorleest. Om onnodige vergissingen en ongevallen te voorkomen is het belangrijk ervoor te zorgen dat alle mensen die het apparaat gebruiken, volledig bekend zijn met de werking ervan en de veiligheidsvoorzieningen.
www.aeg.com – de ruimte waar het apparaat zich bevindt grondig ventileren • Het is gevaarlijk om wijzigingen aan te brengen in de specificaties of dit product op enigerlei wijze te modificeren. Een beschadigd netsnoer kan kortsluiting, brand en/of een elektrische schok veroorzaken. WAARSCHUWING! Alle elektrische onderdelen (netsnoer, stekker, compressor) mogen om gevaar te voorkomen uitsluitend worden vervangen door een erkende onderhoudsdienst of gekwalificeerd onderhoudspersoneel.
NEDERLANDS • Verzeker u ervan dat de stekker bereikbaar is nadat het apparaat geïnstalleerd is. • Aansluiten op de drinkwatervoorziening (indien voorzien van een wateraansluiting). 1.6 Onderhoud • Alle elektrotechnische werkzaamheden die noodzakelijk zijn voor het uitvoeren van onderhoud aan het apparaat, dienen uitgevoerd te worden door een gekwalificeerd elektricien of competent persoon.
www.aeg.com Als de omgevingstemperatuur hoog is of als het apparaat volledig gevuld is en de thermostaatknop op de koudste instelling staat, kan het apparaat continu werken waardoor er ijs op de achterwand gevormd wordt. In dat geval moet de knop op een hogere temperatuur gezet worden om automatische ontdooiing mogelijk te maken en zodoende het energieverbruik te beperken. 3. HET EERSTE GEBRUIK 3.
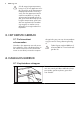
NEDERLANDS 7 4.2 Vochtigheidsregeling De glasplaat omvat een constructie met inkepingen (afstelbaar door middel van een schuifhendel), waarmee u de temperatuur in de groentelade(s) kunt regelen. Wanneer de ventilatieopeningen gesloten zijn: wordt het natuurlijke vochtgehalte van het voedsel in de fruit- en groentelades langer behouden. Als de ventilatieopeningen geopend zijn: heeft meer luchtcirculatie een lagere luchtvochtigheidsgehalte tot gevolg in de fruit- en groentelades. 4.
www.aeg.com de verdamper ontstaat. Als dit gebeurt, zet u de thermostaatknop naar een warmere instelling om de koelkast automatisch te laten ontdooien en zo elektriciteitsverbruik te besparen. 5.3 Tips voor het koelen van vers voedsel Om de beste prestatie te verkrijgen: • Zet geen warm voedsel of verdampende vloeistoffen in de koelkast • dek het voedsel af of verpak het, in het bijzonder als het een sterke geur heeft • plaats het voedsel zodanig dat de lucht er vrijelijk omheen kan circuleren 5.
NEDERLANDS kunnen aantasten/beschadigen. Daarom wordt het aanbevolen de buitenkant van dit apparaat alleen schoon te maken met warm water met een beetje afwasmiddel. Steek, na het schoonmaken van het apparaat, de stekker weer in het stopcontact. 6.2 Het ontdooien van de koelkast 9 Het is belangrijk om het afvoergaatje van het dooiwater in het midden van het koelvak regelmatig schoon te maken om te voorkomen dat het water overloopt en op het voedsel in de koelkast gaat druppelen.
www.aeg.com Probleem Het lampje werkt niet. De compressor werkt continu. Mogelijke oorzaak Oplossing De stekker zit niet goed in het stopcontact. Steek de stekker goed in het stopcontact. Het apparaat krijgt geen stroom. Er staat geen spanning op het stopcontact. Sluit een ander elektrisch apparaat aan op het stopcontact. Neem contact op met een gekwalificeerd elektricien. Het lampje staat in stand- Sluit en open de deur. by. Het lampje is stuk. Zie 'Het lampje vervangen'.
NEDERLANDS Probleem De temperatuur in de koelkast is te hoog. 11 Mogelijke oorzaak Oplossing De temperatuur van het product is te hoog. Laat het product afkoelen tot kamertemperatuur voordat u het opbergt. Er zijn veel producten tegelijk opgeborgen. Berg minder producten tegelijk op. Er is geen koude luchtcirculatie in het apparaat. Zorg ervoor dat er koude luchtcirculatie in het apparaat is. 7.1 Het lampje vervangen 1. 2. 3. 4. 5. 6. 7. 8. 7.
www.aeg.com 8. TECHNISCHE GEGEVENS Afmeting Hoogte 850 mm Breedte 595 mm Diepte 635 mm Voltage 230V Frequentie 50 Hz De technische gegevens staan op het typeplaatje aan de linker binnenkant in het apparaat en op het energielabel. 9. MONTAGE WAARSCHUWING! Lees voor uw eigen veiligheid en correcte werking van het apparaat eerst de "veiligheidsinformatie" aandachtig door, alvorens het apparaat te installeren. eenkomt met de klimaatklasse die staat aangegeven op het typeplaatje van het apparaat.
NEDERLANDS 13 9.3 Plaats 100 mm 15 mm 15 mm Het apparaat moet ver van hittebronnen, zoals radiatoren, boilers, direct zonlicht enz., vandaan worden geïnstalleerd. Zorg er voor dat lucht vrij kan circuleren aan de achterkant van het keukenkastje. Als het apparaat onder een wandkast wordt geplaatst, moet de minimale afstand tussen de bovenkant van de kast en de wandkast ten minste 100 mm bedragen om optimale prestaties te garanderen.
www.aeg.com 9.5 Het werkblad losmaken 2 Ga als volgt te werk om het werkblad te verwijderen: • Schroef de schroeven links en rechts aan de achterzijde los. • Duw het werkblad naar achteren en til het op. • Bewaar de schroeven samen met het werkblad op een veilige plaats. 1 3 9.6 Plaatsing en montage aan doorlopend werkblad Alvorens ze te plaatsen, wijzig de richting van de deuropening, indien nodig (zie: Omkeerbaarheid van de deur). • Duw het apparaat voorzichtig in de opening.
NEDERLANDS 15 9.7 Omkeerbaarheid van de deur Om de volgende handelingen uit te voeren, raden we aan dit te doen met de hulp van een tweede persoon die de deuren van het apparaat tijdens de werkzaamheden stevig vasthoudt. Om de draairichting van de deur te veranderen, gaat u als volgt te werk: • Trek de stekker uit het stopcontact. • Kantel het apparaat voorzichtig naar achteren, zodat de compressor de vloer niet kan raken. • Schroef het linkervoetje los.
www.aeg.com Als de omgevingstemperatuur laag is (bijv. in de winter), kan het zijn dat het deurrubber niet precies op de kast past. Wacht in dat geval tot de afdichting zich op een natuurlijke wijze zet. Als u bovenstaande handelingen liever niet zelf uitvoert, neem dan contact op met de dichtstbijzijnde klantenservice. Een vakman van de klantenservice zal de draairichting van de deuren op uw kosten veranderen. 9.8 Stopcontact voor stekker LET OP! Zorg ervoor dat het aansluitsnoer niet klem zit.
NEDERLANDS SSS RRR ! HISSS! OK BL SSSRRR! HISSS! BLUBB! SSSRRR! HISSS! BLUBB! UB B! CLICK! BRRR! CRACK! IC CL 17 K! BRRR! CR AC K! CLICK! BRRR! CRACK!
www.aeg.com 11. MILIEUBESCHERMING Recycle de materialen met het symbool . Gooi de verpakking in een geschikte verzamelcontainer om het te recyclen. Help om het milieu en de volksgezondheid te beschermen en recycle het afval van elektrische en elektronische apparaten. Gooi apparaten gemarkeerd met het symbool niet weg met het huishoudelijk afval. Breng het product naar het milieustation bij u in de buurt of neem contact op met de gemeente.
ENGLISH 19 CONTENTS 1. 2. 3. 4. 5. 6. 7. 8. 9. 10. SAFETY INSTRUCTIONS . . . . . . . . . . . . . . . . . . . . . . . . . . . . . . . . . . . . . . . . . . . . . . . . . . . . . OPERATION . . . . . . . . . . . . . . . . . . . . . . . . . . . . . . . . . . . . . . . . . . . . . . . . . . . . . . . . . . . . . . . FIRST USE . . . . . . . . . . . . . . . . . . . . . . . . . . . . . . . . . . . . . . . . . . . . . . . . . . . . . . . . . . . . . . . . . DAILY USE . . . . . . . . . . . . . . . . . . . . . . .
www.aeg.com 1. SAFETY INSTRUCTIONS In the interest of your safety and to ensure the correct use, before installing and first using the appliance, read this user manual carefully, including its hints and warnings. To avoid unnecessary mistakes and accidents, it is important to ensure that all people using the appliance are thoroughly familiar with its operation and safety features.
ENGLISH WARNING! Any electrical component (power cord, plug, compressor) must be replaced by a certified service agent or qualified service personnel to avoid hazard. 1. • • • • Power cord must not be lengthened. 2. Make sure that the power plug is not squashed or damaged by the back of the appliance. A squashed or damaged power plug may overheat and cause a fire. 3. Make sure that you can come to the mains plug of the appliance. 4. Do not pull the mains cable. 5.
www.aeg.com 1.7 Environment Protection This appliance does not contain gasses which could damage the ozone layer, in either its refrigerant circuit or insulation materials. The appliance shall not be discarded together with the urban refuse and rubbish. The insulation foam contains flammable gases: the appliance shall be disposed according to the applicable regulations to obtain from your local authorities. Avoid damaging the cooling unit, especially at the rear near the heat exchanger.
ENGLISH 23 4. DAILY USE 4.1 Movable shelves The walls of the refrigerator are equipped with a series of runners so that the shelves can be positioned as desired. 4.2 Humidity control The glass shelf incorporates a device with slits (adjustable by means of a sliding lever), which makes it possible to regulate the temperature in the vegetable drawer(s). When the ventilation slots are closed: the natural moisture content of the food in the fruit and vegetable compartments is preserved for longer.
www.aeg.com 5. HELPFUL HINTS AND TIPS 5.1 Normal Operating Sounds • You may hear a faint gurgling and a bubbling sound when the refrigerant is pumped through the coils or tubing. This is correct. • When the compressor is on, the refrigerant is being pumped around and you will hear a whirring sound and a pulsating noise from the compressor. This is correct. • The thermic dilatation might cause a sudden cracking noise. It is natural, not dangerous physical phenomenon. This is correct.
ENGLISH • clean the inside and accessories with lukewarm water and some neutral soap. • regularly check the door seals and wipe clean to ensure they are clean and free from debris. • rinse and dry thoroughly. Do not pull, move or damage any pipes and/or cables inside the cabinet. Never use detergents, abrasive powders, highly perfumed cleaning products or wax polishes to clean the interior as this will damage the surface and leave a strong odour.
www.aeg.com 7. WHAT TO DO IF… WARNING! Before troubleshooting, disconnect the mains plug from the mains socket. Only a qualified electrician or competent person must do the troubleshooting that is not in this manual. There are some sounds during normal use (compressor, refrigerant circulation).
ENGLISH Problem Possible cause Solution Water flows into the refrigerator. The water outlet is clogged. Clean the water outlet. 27 Products prevent that wa- Make sure that products ter flows into the water do not touch the rear collector. plate. Water flows on the ground. The melting water outlet Attach the melting water does not flow in the evap- outlet to the evaporative orative tray above the tray. compressor. The temperature in the appliance is too low.
www.aeg.com 3. 7.2 Closing the door 1. 2. Clean the door gaskets. If necessary, adjust the door. Refer to "Installation". If necessary, replace the defective door gaskets. Contact the Service Center. 8. TECHNICAL DATA Dimension Height 850 mm Width 595 mm Depth 635 mm Voltage 230 V Frequency 50 Hz The technical information are situated in the rating plate on the internal left side of the appliance and in the energy label. 9.
ENGLISH 29 9.2 Levelling When placing the appliance ensure that it stands level. This can be achieved by two adjustable feet at the bottom in front. 9.3 Location 100 mm 15 mm 15 mm The appliance should be installed well away from sources of heat such as radiators, boilers, direct sunlight etc. Ensure that air can circulate freely around the back of the cabinet.
www.aeg.com 9.4 Installing under a continuous worktop 200 cm 2 93-103 mm A 105 mm 570 mm 550 mm min. 820 mm If your refrigerator is installed under a continuous worktop, an air outlet opening of at least 200cm2 and a ventilation grille matching the worktop design should be installed at the rear of the worktop. The cut surfaces of the worktop should be varnished to avoid swelling due to penetration of moisture.
ENGLISH 31 9.6 Fitting and mounting to continuous worktop Before fitting, change the door opening direction if necessary (see: Door reversibility). • Push the appliance carefully into the niche. • Take care that the mains cable is not jammed in. • Check distance from wall (see: Installing under a continuous worktop). • Level the appliance by screwing the two adjustable feet at the front in or out, thus ensuring a stable position.
www.aeg.com • Unscrew the top door hinge pin of the appliance then screw it back on the other side. • Remove the lower hinge. Put over the pin in the direction of the arrow. • Fit the appliance door on the upper door hinge pin. • Unscrew and install the screw on the opposite side. • Install the lower hinge on the opposite side leaving the position of the door unchanged. • Screw in the one screw in the place set free on the other side as well as the right foot.
ENGLISH 9.9 Electrical connection Before plugging in, ensure that the voltage and frequency shown on the rating plate correspond to your domestic power supply. The appliance must be earthed. The power supply cable plug is provided with a contact for this purpose. If the do- 33 mestic power supply socket is not earthed, connect the appliance to a separate earth in compliance with current regulations, consulting a qualified electrician.
www.aeg.com HISSS! BLUBB! HISSS! BLUBB! BRRR! CRACK! BRRR! CRACK! 11. ENVIRONMENT CONCERNS Recycle the materials with the symbol . Put the packaging in applicable containers to recycle it. Help protect the environment and human health and to recycle waste of electrical and electronic appliances. Do not dispose appliances marked with the symbol with the household waste. Return the product to your local recycling facility or contact your municipal office.
FRANÇAIS 35 SOMMAIRE 1. 2. 3. 4. 5. 6. 7. 8. 9. 10. INSTRUCTIONS DE SÉCURITÉ . . . . . . . . . . . . . . . . . . . . . . . . . . . . . . . . . . . . . . . . . . . . . . . . FONCTIONNEMENT . . . . . . . . . . . . . . . . . . . . . . . . . . . . . . . . . . . . . . . . . . . . . . . . . . . . . . . PREMIÈRE UTILISATION . . . . . . . . . . . . . . . . . . . . . . . . . . . . . . . . . . . . . . . . . . . . . . . . . . . . . UTILISATION QUOTIDIENNE . . . . . . . . . . . . . . . . . . . . . . . . . . . . . .
www.aeg.com 1. INSTRUCTIONS DE SÉCURITÉ Pour votre sécurité et garantir une utilisation correcte de l'appareil, lisez attentivement cette notice, y compris les conseils et avertissements, avant d'installer et d'utiliser l'appareil pour la première fois. Pour éviter toute erreur ou accident, veillez à ce que toute personne qui utilise l'appareil connaisse bien son fonctionnement et ses fonctions de sécurité. Conservez cette notice avec l'appareil.
FRANÇAIS Si le circuit frigorifique est endommagé : – évitez les flammes vives et toute autre source d'allumage – aérez soigneusement la pièce où se trouve l'appareil • Ne modifiez pas les spécifications de l'appareil. Si le câble d'alimentation est endommagé, il peut causer un court circuit, un incendie et/ou une électrocution. 1.
www.aeg.com • Assurez-vous que la prise murale reste accessible après l'installation de l'appareil. • Branchez à l'alimentation en eau potable uniquement. (Si un branchement sur le réseau d'eau est prévu.) 1.6 Maintenance • Les branchements électriques nécessaires à l'entretien de l'appareil doivent être réalisés par un électricien qualifié ou une personne compétente. • Cet appareil ne doit être entretenu et réparé que par un Service après-vente autorisé, exclusivement avec des pièces d'origine.
FRANÇAIS 39 3. PREMIÈRE UTILISATION 3.1 Nettoyage intérieur Avant d'utiliser l'appareil pour la première fois, nettoyez l'intérieur et tous les accessoires internes avec de l'eau tiède savonneuse pour supprimer l'odeur caractéristique du "neuf" puis séchez soigneusement. N'utilisez pas de produits abrasifs, poudre à récurer, éponge métallique pour ne pas abîmer la finition. 4. UTILISATION QUOTIDIENNE 4.
www.aeg.com 4.3 Positionner les étagères des portes En fonction de la taille des emballages des aliments conservés, les balconnets de la porte peuvent être positionnés à différentes hauteurs. Pour les ajuster, procédez comme suit : tirez progressivement sur le balconnet dans le sens des flèches pour le dégager, puis repositionnez-le selon vos besoins. 5. CONSEILS UTILES 5.
FRANÇAIS La période de conservation est de 1 à 2 jours au maximum. Aliments cuits, plats froids, etc. : placezles bien couverts sur une clayette. Fruits et légumes : placez-les une fois nettoyés dans le(s) bac(s) à légumes fourni(s). Beurre et fromage : placez-les dans des récipients étanches spéciaux ou enveloppez-les soigneusement dans des 41 feuilles d'aluminium ou de polyéthylène, pour emmagasiner le moins d'air possible.
www.aeg.com 6.3 En cas d'absence prolongée ou de nonutilisation Prenez les précautions suivantes : 1. débranchez l'appareil 2. retirez tous les aliments 3. dégivrez et nettoyez l'appareil et tous les accessoires 4. laissez la porte/les portes ouverte(s) pour prévenir la formation d'odeurs désagréables.
FRANÇAIS Symptôme 43 Cause possible Solution La porte n'est pas correctement fermée. Reportez-vous au paragraphe « Fermeture de la porte ». La porte a été ouverte trop souvent. Ne laissez pas la porte ouverte plus longtemps que nécessaire. La température du produit est trop élevée. Laissez le produit revenir à température ambiante avant de le placer dans l'appareil. La température ambiante est trop élevée. Réduisez la température ambiante.
www.aeg.com 7.1 Remplacement de l'ampoule d'éclairage 1. 2. 3. 4. 5. 6. 7. 8. 7.2 Fermeture de la porte 1. 2. Nettoyez les joints de la porte. Si nécessaire, ajustez la porte. Reportez-vous au chapitre « Installation ». 3. Débranchez l'appareil de la prise secteur. Retirez la vis du diffuseur. Retirez le diffuseur (voir l'illustration). Remplacez l'ampoule défectueuse par une ampoule neuve de puissance identique, spécifiquement conçue pour les appareils électroménagers.
FRANÇAIS vant la classe climatique (indiquée sur la plaque signalétique) pour laquelle il est prévu. Au delà de ces températures, ses performances peuvent s'en trouver diminuées. 45 Classe Température ambiante climatique SN +10 °C to +32 °C N +16 °C to +32 °C ST +16 °C to +38 °C T +16 °C to +43 °C 9.2 Mise à niveau Lorsque vous installez l'appareil, veillez à le placer de niveau. Servez-vous des deux pieds réglables se trouvant à l’avant de l’appareil. 9.
www.aeg.com 9.4 Encastrement sous un plan de travail continu 200 cm 2 93-103 mm A 105 mm 570 mm 550 mm min. 820 mm 500/550/600 mm Si votre réfrigérateur est installé sous un plan de travail continu, une ouverture de sortie d'air d'au moins 200 cm2 et une grille de ventilation correspondant à la conception du plan de travail doivent être installées à l'arrière du plan de travail. La surface de coupe du plan de travail doit être vernie pour éviter tout gonflement dû à la pénétration de l'humidité.
FRANÇAIS 47 9.6 Installation et fixation à un plan de travail continu Avant le montage, modifiez le sens d'ouverture de la porte au besoin (consultez la section Réversibilité de la porte). • Encastrez l'appareil dans la niche. • Assurez-vous que le câble d'alimentation n'est pas coincé. • Vérifiez la distance du mur (voir : Installation sous un plan de travail continu).
www.aeg.com • Dévissez la goupille de la charnière de porte supérieure de l'appareil puis revissez-la de l'autre côté. • Retirez la charnière inférieure. Placez la goupille dans le sens de la flèche. • Installez la porte de l'appareil sur la goupille de la charnière de porte supérieure. • Dévissez et installez la vis sur le côté opposé. • Installez la charnière inférieure du côté opposé sans changer la position de la porte. • Vissez la vis à l'emplacement libéré de l'autre côté, ainsi que le pied droit.
FRANÇAIS 49 9.8 Prise de courant ATTENTION Assurez-vous que le câble d'alimentation n'est pas coincé. La prise de courant nécessaire pour le branchement de votre appareil à l'alimentation électrique doit être positionnée de sorte qu'il est possible de retirer la fiche de l'appareil. Si votre appareil est installé sous un plan de travail continu, la prise de courant doit être disponible comme indiqué. 9.
www.aeg.com SSSRRR! HISSS! BLUBB! SSSRRR! HISSS! BLUBB! CLICK! BRRR! CRACK! CLICK! BRRR! CRACK! 11. EN MATIÈRE DE PROTECTION DE L'ENVIRONNEMENT Recyclez les matériaux portant le symbole . Déposez les emballages dans les conteneurs prévus à cet effet. Contribuez à la protection de l'environnement et à votre sécurité, recyclez vos produits électriques et électroniques. Ne jetez pas les appareils portant le symbole avec les ordures ménagères.
DEUTSCH 51 INHALT 1. 2. 3. 4. 5. 6. 7. 8. 9. 10. SICHERHEITSHINWEISE . . . . . . . . . . . . . . . . . . . . . . . . . . . . . . . . . . . . . . . . . . . . . . . . . . . . . BETRIEB . . . . . . . . . . . . . . . . . . . . . . . . . . . . . . . . . . . . . . . . . . . . . . . . . . . . . . . . . . . . . . . . . . ERSTE INBETRIEBNAHME . . . . . . . . . . . . . . . . . . . . . . . . . . . . . . . . . . . . . . . . . . . . . . . . . . . TÄGLICHER GEBRAUCH . . . . . . . . . . . . . . . . . . . . . . . . . .
www.aeg.com 1. SICHERHEITSHINWEISE Lesen Sie zu Ihrer Sicherheit und für eine optimale Nutzung des Geräts vor der Montage und dem ersten Gebrauch das vorliegende Benutzerhandbuch einschließlich der Ratschläge und Warnungen aufmerksam durch. Es ist wichtig, dass zur Vermeidung von Fehlern und Unfällen alle Personen, die das Gerät benutzen, mit der Bedienung und den Sicherheitsvorschriften vertraut sind.
DEUTSCH Bei einer eventuellen Beschädigung des Kältekreislaufs: – Offene Flammen und Zündfunken vermeiden – Den Raum, in dem das Gerät installiert ist, gut lüften • Technische und anderweitige Änderungen am Gerät sind gefährlich. Ein defektes Netzkabel kann Kurzschlüsse und einen Brand verursachen und/ oder zu Stromschlägen führen. WARNUNG! Elektrische Bauteile (Netzkabel, Stecker, Kompressor) dürfen zur Vermeidung von Gefahren nur vom Kundendienst oder einer Fachkraft ausgewechselt werden.
www.aeg.com • Das Gerät darf nicht in der Nähe von Heizkörpern oder Kochern installiert werden. • Vergewissern Sie sich, dass der Netzstecker des Gerätes nach der Installation frei zugänglich ist. • Wenn ein Wasseranschluss vorgesehen ist, verbinden Sie das Gerät nur mit dem Trinkwasseranschluss. 1.6 Kundendienst • Sollte die Wartung des Gerätes elektrische Arbeiten verlangen, so dürfen diese nur von einem qualifizierten Elektriker oder einem Elektro-Fachmann durchgeführt werden.
DEUTSCH 55 3. ERSTE INBETRIEBNAHME 3.1 Reinigung des Innenraums Bevor Sie das Gerät in Betrieb nehmen, beseitigen Sie den typischen „Neugeruch“ am besten durch Reinigen der Innenteile mit lauwarmem Wasser und einer neutralen Seife. Sorgfältig nachtrocknen. Verwenden Sie keine aggressiven Reinigungsmittel oder Scheuerpulver, die die Oberfläche beschädigen. 4. TÄGLICHER GEBRAUCH 4.
www.aeg.com 4.3 Positionierung der Türeinsätze Die Türablagen können in unterschiedlicher Höhe positioniert werden, womit das Lagern verschieden großer Lebensmittelpackungen ermöglicht wird. Gehen Sie dazu wie folgt vor: Ziehen Sie die Ablage langsam in Pfeilrichtung, bis sie sich herausheben lässt, und setzen Sie sie dann nach Wunsch wieder ein. 5. PRAKTISCHE TIPPS UND HINWEISE 5.
DEUTSCH Gekochte Lebensmittel, kalte Gerichte usw.: diese können abgedeckt auf eine Ablage gelegt werden. Obst und Gemüse: bitte waschen Sie Obst und Gemüse gründlich und legen Sie es in die speziell dafür vorgesehene(n) Schublade(n). Butter und Käse: diese sollten stets in speziellen luftdichten Behältern verpackt sein oder in Aluminiumfolie bzw. in le- 57 bensmittelechte Tüten eingepackt werden, um so wenig Luft wie möglich in der Verpackung zu haben.
www.aeg.com rinne an der Kühlraumrückwand, damit das Tauwasser nicht überfließt und auf die gelagerten Lebensmittel tropft. Benutzen Sie dazu bitte das mitgelieferte Reinigungswerkzeug, das sich bereits in der Abflussöffnung befindet. 4. Lassen Sie die Türen offen, um das Entstehen unangenehmer Gerüche zu vermeiden. 6.3 Stillstandzeiten Bei längerem Stillstand des Geräts müssen Sie folgendermaßen vorgehen: 1. Trennen Sie das Gerät von der Netzversorgung. 2. Entnehmen Sie alle Lebensmittel. 3.
DEUTSCH 59 Störung Mögliche Ursache Abhilfe Die Lampe funktioniert nicht. Die Lampe befindet sich im Standby-Modus. Schließen und öffnen Sie die Tür. Die Lampe ist defekt. Siehe hierzu „Austauschen der Lampe“. Die Temperatur ist nicht richtig eingestellt. Stellen Sie eine höhere Temperatur ein. Die Tür ist nicht richtig geschlossen. Siehe hierzu „Schließen der Tür“. Die Tür wurde zu häufig geöffnet. Lassen Sie die Tür nicht länger als erforderlich offen.
www.aeg.com Störung Mögliche Ursache Abhilfe Die Temperatur im Kühlschrank ist zu hoch. Die Kaltluft kann nicht im Gerät zirkulieren. Stellen Sie sicher, dass die Kaltluft im Gerät zirkulieren kann. 7.1 Ersetzen der Lampe 1. 2. 3. 4. 5. 6. 7. 8. 3. 7.2 Schließen der Tür 1. 2. Reinigen Sie die Türdichtungen. Stellen Sie die Tür nach Bedarf ein. Siehe hierzu „Montage“. Ziehen Sie den Netzstecker aus der Netzsteckdose. Lösen Sie die Schraube an der Lampenabdeckung.
DEUTSCH 61 9. MONTAGE WARNUNG! Lesen Sie bitte die "Sicherheitshinweise" sorgfältig vor der Aufstellung des Geräts durch, um Gefahren für Sie selbst zu vermeiden und einen korrekten Betrieb des Geräts zu gewährleisten. 9.
www.aeg.com 9.3 Standort 100 mm 15 mm 15 mm Das Gerät sollte in ausreichendem Abstand von Wärmequellen wie Heizungen, Boilern, direkter Sonneneinstrahlung, usw. aufgestellt werden. Vergewissern Sie sich, dass Luft an der Rückseite des Gehäuses frei zirkulieren kann. Wenn das Gerät unter einem Hängeschrank installiert wird, muss der Abstand zwischen der Geräteoberseite und dem Hängeschrank mindestens 100 mm betragen, um die bestmögliche Leistung zu garantieren.
DEUTSCH 63 9.5 Abnehmen der Arbeitsplatte 2 1 3 Zum Abbau der Arbeitsplatte sind folgende Schritte erforderlich: • Lösen Sie die linken und rechten Schrauben auf der Rückseite. • Schieben Sie die Arbeitsplatte nach hinten und heben Sie sie an. • Bewahren Sie die Schrauben zusammen mit der Arbeitsplatte an einem sicheren Ort auf. 9.6 Einbau und Montage unter einer durchgehenden Arbeitsplatte Wechseln Sie vor dem Aufstellen den Türanschlag bei Bedarf (siehe hierzu: Wechsel des Türanschlags).
www.aeg.com 9.7 Wechsel des Türanschlags Die nachfolgend beschriebenen Tätigkeiten müssen mit Hilfe einer zweiten Person durchgeführt werden, um ein Herunterfallen der Türen zu vermeiden. Beim Wechsel des Türanschlags muss wie folgt vorgegangen werden: • Ziehen Sie den Stecker aus der Steckdose. • Neigen Sie das Gerät vorsichtig nach hinten, so dass der Kompressor nicht den Boden berühren kann. • Schrauben Sie den linken Standfuß ab. • Lösen Sie die Schrauben des unteren Türscharniers.
DEUTSCH 65 Bei niedrigen Umgebungstemperaturen (z.B. im Winter) kann es sein, dass die Türdichtung nicht richtig am Gerät anliegt. Warten Sie in diesem Fall auf die natürliche Anpassung der Dichtung. Wenden Sie sich bitte an den Kundendienst, falls Sie die oben beschriebenen Tätigkeiten nicht selbst durchführen möchten. Ein Kundendiensttechniker wird die Türen dann auf Ihre Kosten umbauen. 9.8 Steckdose VORSICHT! Vergewissern Sie sich, dass sich das Netzkabel des Geräts frei bewegen lässt.
www.aeg.
DEUTSCH 11. UMWELTTIPPS Recyceln Sie Materialien mit dem Symbol . Entsorgen Sie die Verpackung in den entsprechenden Recyclingbehältern. Recyceln Sie zum Umwelt- und Gesundheitsschutz elektrische und elektronische Geräte. Entsorgen Sie Geräte mit diesem Symbol nicht mit dem Hausmüll. Bringen Sie das Gerät zu Ihrer örtlichen Sammelstelle oder wenden Sie sich an Ihr Gemeindeamt.
212000090-B-512012 www.aeg.