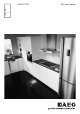
S83400CTM0 EN User manual
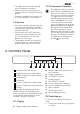
www.aeg.com CONTENTS 1. 2. 3. 4. 5. 6. 7. 8. 9. 10. SAFETY INSTRUCTIONS . . . . . . . . . . . . . . . . . . . . . . . . . . . . . . . . . . . . . . . . . . . . . . . . . . . . . . 3 CONTROL PANEL . . . . . . . . . . . . . . . . . . . . . . . . . . . . . . . . . . . . . . . . . . . . . . . . . . . . . . . . . . . 5 FIRST USE . . . . . . . . . . . . . . . . . . . . . . . . . . . . . . . . . . . . . . . . . . . . . . . . . . . . . . . . . . . . . . . . . . 8 DAILY USE . . . . . . . . . . . . . . . . . . .
ENGLISH 1. 3 SAFETY INSTRUCTIONS In the interest of your safety and to ensure the correct use, before installing and first using the appliance, read this user manual carefully, including its hints and warnings. To avoid unnecessary mistakes and accidents, it is important to ensure that all people using the appliance are thoroughly familiar with its operation and safety features.
www.aeg.com WARNING! Any electrical component (power cord, plug, compressor) must be replaced by a certified service agent or qualified service personnel to avoid hazard. 1. • • • • Power cord must not be lengthened. 2. Make sure that the power plug is not squashed or damaged by the back of the appliance. A squashed or damaged power plug may overheat and cause a fire. 3. Make sure that you can come to the mains plug of the appliance. 4. Do not pull the mains cable. 5.
ENGLISH • The appliance must not be located close to radiators or cookers. • Make sure that the mains plug is accessible after the installation of the appliance. • Connect to potable water supply only (If a water connection is foreseen). 5 1.7 Environment Protection This appliance does not contain gasses which could damage the ozone layer, in either its refrigerant circuit or insulation materials. The appliance shall not be discarded together with the urban refuse and rubbish.
www.aeg.com 2. Press the appliance ON/OFF button if the display is off. 3. The alarm buzzer may sound after a few seconds. To reset the alarm refer to "High temperature alarm". 4. If "dEMo" appears on the display, the appliance is in demonstration mode. Refer to "Troubleshooting...". 5. The temperature indicators show the set default temperature. To select a different set temperature refer to "Temperature regulation". 2.3 Switching off To switch off the appliance do these steps: 1.
ENGLISH 3. The Minute Minder indicator goes off. It is possible to change the time during the countdown and at the end by pressing the Fridge Temperature colder button or the Fridge Temperature warmer button. 2.8 Child Lock function To lock the buttons on the display unit, activate the Child Lock function. To switch on the function: • Press the fridge and freezer compartment buttons until the child lock icon is lit. To deactivate, use the same key combination. 2.
www.aeg.com The function switches off by selecting a different fridge set temperature. 2.13 DYNAMICAIR function To switch on the function: 1. Press the Mode button until the corresponding icon appears. The DYNAMICAIR indicator flashes. 2. Press the OK button to confirm. The DYNAMICAIR indicator is shown. To switch off the function: 1. Press the Mode button until the DYNAMICAIR indicator flashes. 2. Press the OK button to confirm. 3. The DYNAMICAIR indicator goes off.
ENGLISH 4.2 Thawing Deep-frozen or frozen food, prior to being used, can be thawed in the refrigerator compartment or at room temperature, depending on the time available for this operation. Small pieces may even be cooked still frozen, directly from the freezer: in this case, cooking will take longer. 4.3 DYNAMICAIR The refrigerator compartment is equipped with a device that allows for rapid cooling of foods and more uniform temperature in the compartment.
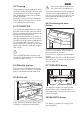
www.aeg.com 4.9 Removal of freezing baskets from the freezer 2 1 The freezing baskets have a limit stop to prevent their accidental removal or falling out. At the time of its removal from the freezer, pull the basket towards yourself and, upon reaching the end point, remove the basket by tilting its front upwards. At the time of putting it back, slightly lift the front of the basket to insert it into the freezer. Once you are over the end points, push the baskets back in their position. 5.
ENGLISH 5.5 Hints for freezing To help you make the most of the freezing process, here are some important hints: • the maximum quantity of food which can be frozen in 24 hrs. is shown on the rating plate; • the freezing process takes 24 hours.
www.aeg.com that the outer casing of this appliance is only cleaned with warm water with a little washing-up liquid added. After cleaning, reconnect the equipment to the mains supply. the refrigerator compartment channel to prevent the water overflowing and dripping onto the food inside. Use the special cleaner provided, which you will find already inserted into the drain hole. 6.2 Defrosting of the refrigerator 6.
ENGLISH Problem Possible cause Solution The FROSTMATIC function is switched on. Refer to "FROSTMATIC function". The COOLMATIC function is switched on. Refer to "COOLMATIC function". Water flows on the rear plate of the refrigerator. During the automatic defrosting process, frost defrosts on the rear plate. This is correct. Water flows into the refrigerator. The water outlet is clogged. Clean the water outlet.
www.aeg.com Problem Possible cause Solution The appliance has no power. There is no voltage in the mains socket. Connect a different electrical appliance to the mains socket. Contact a qualified electrician. The lamp does not work. The lamp is in stand-by. Close and open the door. "dEMo" appears on the display. The appliance is in demonstration mode.
ENGLISH Climate class Ambient temperature SN +10°C to + 32°C N +16°C to + 32°C ST +16°C to + 38°C T +16°C to + 43°C 15 WARNING! This appliance must be earthed. The manufacturer declines any liability should these safety measures not be observed. A B 100 mm min 9.2 Location B D The wires in the mains lead are coloured in accordance with the following code: 20 mm A C E The appliance should be installed well away from sources of heat such as radiators, boilers, direct sunlight etc.
www.aeg.com 6. Switch on the appliance. The appliance is supplied with a 13 amp plug fitted B. In the event of having to change the fuse in the plug supplied, a 13 amp ASTA approved (BS 1362) fuse must be used. 9.6 Removing the shelf holders A WARNING! A cut off plug inserted into a 13 amp socket is a serious safety (shock) hazard. Ensure that it is disposed of safely. B 9.4 Rear spacers 2 C 1 4 3 You can find the two spacers in the bag with documentation.
ENGLISH 17 1 m1 m5 m2 m6 9. m3 Remove the handle. Unscrew the top handle bracket from the handle rod (h1). Unscrew the bottom handle bracket from the door (h2) m4 h1 2. 3. 4. 5. 6. Remove the spacer (m6) and move to the other side of the hinge pivot (m5). Remove the doors. Remove the left-hand cover pin of the middle hinge (m3,m4) and move to the other side. Fit the pin of the middle hinge (m5) into the left-hand hole of the lower door. Remove using a tool the cover (b1).
www.aeg.com 16. Re-screw the middle hinge (m2). Do t1 14. Fit the upper door on the upper door pivot. 15. Re-insert the upper door on the mid- dle hinge pivot (m5) slightly tilting both doors. not forget the plastic spacer (m1). Do a final check to make sure that: • All screws are tightened. • The magnetic seal adheres to the cabinet. • The door opens and closes correctly. If the ambient temperature is cold (i.e. in Winter), the gasket may not fit perfectly to the cabinet.
ENGLISH 19
280152305-A-282013 www.aeg.