S94400CTM0 HR Upute za uporabu LT Naudojimo instrukcija PL Instrukcja obsługi 2 21 40
www.aeg.com SADRŽAJ 1. 2. 3. 4. 5. 6. 7. 8. 9. 10. SIGURNOSNE UPUTE . . . . . . . . . . . . . . . . . . . . . . . . . . . . . . . . . . . . . . . . . . . . . . . . . . . 3 UPRAVLJAČKA PLOČA . . . . . . . . . . . . . . . . . . . . . . . . . . . . . . . . . . . . . . . . . . . . . . . . . . 5 SVAKODNEVNA UPORABA . . . . . . . . . . . . . . . . . . . . . . . . . . . . . . . . . . . . . . . . . . . . . . . 8 KORISNI SAVJETI I PREPORUKE . . . . . . . . . . . . . . . . . . . . . . . . . . . . . . . . . . . .
HRVATSKI 1. 3 SIGURNOSNE UPUTE U interesu vaše sigurnosti i radi osigura‐ vanja ispravne uporabe, prije po‐ stavljanja i prve uporabe uređaja, proči‐ tajte pozorno upute sadržane u ovom priručniku, uključujući savjete i upozo‐ renja. Kako bi se izbjegle nepotrebne greške i nezgode, važno je osigurati da su sve osobe koje koriste uređaj dobro upoznate s njegovim načinom rada i si‐ gurnosnim pitanjima.
www.aeg.com Ne povlačite kabel napajanja. Ako utičnica nije dobro pričvršće‐ na, ne umećite utikač. Postoji opasnost od strujnog udara ili po‐ žara. 6. Ne smijete upotrebljavati uređaj ako na unutarnjem svjetlu nema pokrova (ako je predviđen). Ovaj je uređaj vrlo težak. Pažljivo ga pomičite. Ne vadite i ne dirajte dijelove iz odjeljka zamrzivača ako su vam ruke vlažne/mokre jer to može uzrokovati ogrebotine ili smrzotine. Izbjegavajte produljeno izlaganje ure‐ đaja izravnom sunčevom svjetlu.
HRVATSKI 1.7 Zaštita okoliša 5 s važećim propisima koje možete dobiti od lokalnih vlasti. Pazite da ne oštetite rashladnu jedinicu, naročito stražnji dio pored izmjenjivača topline. Materijali korišteni na ovom uređaju koji su mogu se označeni simbolom reciklirati. Uređaj ne sadrži plinove koji bi mogli oštetiti ozonski sloj, ni u rashladnom krugu niti u mate‐ rijalu koji služi za izolaciju. Uređaj se ne smije zbrinjavati zajedno s urbanim otpadom.
www.aeg.com Za poništavanje alarma pogledajte „Alarm za visoku temperaturu“. 4. Ako se "dEMo"pojavi na zaslonu, uređaj je u demonstracijskom načinu rada. Pogledajte poglavlje „Rješa‐ vanje problema“. 5. Indikatori temperature prikazuju po‐ stavljenu zadanu temperaturu. Za odabir drugačije postavke temperatu‐ re pogledajte „Regulacija temperature“. 2.3 Isključivanje Za isključivanje uređaja učinite sljedeće: 1. Držite tipku ON/OFF uređaja pritis‐ nutom 5 sekundi. 2. Zaslon se isključuje. 3.
HRVATSKI 3. Isključuje se indikator godišnjeg odmora. Funkcija se isključuje odabirom drugačije postavke temperature hladnjaka. 2.9 COOLMATIC funkcija Ako morate staviti veliku količinu toplih namirnica, na primjer, nakon obavljene kupovine, predlažemo vam aktiviranje funkcije COOLMATIC radi bržeg hlađenja proizvoda i kako bi izbjegli za‐ grijavanje namirnica koje su već u hladnjaku. Za uključivanje funkcije: 1. Pritišćite tipku Mode dok se ne prikaže odgovarajući simbol. Treperi indikator COOLMATIC. 2.
www.aeg.com Indikator alarma nastavlja treperiti sve dok se ne obnove normalni uvjeti. Kada se alarm vratio, indikator alarma se isključuje. 4. 2.13 Alarm otvorenih vrata Ako vrata ostanu otvorena nekoliko minuta oglasit će se zvučni alarm. Alarm za otvorena vrata prikazuje se na sljede‐ ći način: • treperenjem indikatora alarma • oglašavanjem zvučnog signala Alarm se zaustavlja nakon što se uspo‐ stave normalni uvjeti (zatvorena vrata).
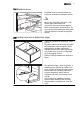
HRVATSKI 9 3.4 Stalak za boce Postavite boce (s otvorom prema na‐ prijed) na prethodno postavljenu policu. Ako police postavite vodoravno, u njih stavite samo zatvorene boce. Ovaj držač za boce može se nagnuti kako bi se spremile i otvorene boce. Za to povucite police prema gore kako biste ih mogli okrenuti i postaviti na sljedeću razinu. 3.5 Ladica za povrće s kontrolom vlage Ladica je prikladna za spremanje voća i povrća.
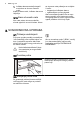
www.aeg.com 3.6 Hlađenje zraka DAC ventilator (Dynamic Air Cooling) omogućuje brzo hlađenje namirnica i ravnomjerniju temperaturu u pretincu. Pritisnite prekidač prikazan na slici kako biste uključili ventilator. Uključuje se zeleno svjetlo. B Ventilator uključite kada temperatura okoline premaši 25 °C. 3.7 Zamrzavanje svježih namirnica Odjeljak zamrzivača je prikladan za du‐ gotrajno zamrzavanje svježih namirnica i čuvanje zamrznutih i duboko zamrznutih namirnica.
HRVATSKI 11 3.9 Proizvodnja kockica leda Ovaj je uređaj opremljen s jednom ili više posuda za proizvodnju kockica leda. One su umetnute na bočnim stranama gornje ladice zamrzivača. Izvucite gornju ladicu zamrzivača. Izvucite posudu za led. Povucite traku. Napunite posudu s vo‐ dom do ograničenja naznačenog „MAX“. Ponovno postavite traku i umetnite posu‐ du na odgovarajuće mjesto. Za uklanjanje ledenih kockica okrenite posudu s ledenim iglicama okrenutim prema gore i udarite na krutu površinu.
www.aeg.com 4.3 Savjeti za hlađenje Korisni savjeti: Meso (svih vrsta) : umotajte u polie‐ tilenske vrećice i stavite na staklenu policu iznad ladice za povrće. Radi sigurnosti, čuvajte hranu na taj na‐ čin najdulje dan-dva. Skuhana hrana, hladna jela i sl.: potreb‐ no ih je pokriti i mogu se staviti na bilo koju policu. Voće i povrće: potrebno ih je dobro oči‐ stiti i staviti u specijalnu ladicu/ladice.
HRVATSKI 13 Nemojte povlačiti, pomicati ili oštetiti cijevi i/ili kablove unutar elementa. Nikada nemojte koristiti deter‐ džente, abrazivna sredstva, sred‐ stva za čišćenje vrlo intenzivnih mirisa ili polituru s voskom jer bi mogli oštetiti površinu i ostaviti jak miris. plastične dijelove ovoga uređaja. Zbog toga preporučujemo da čistite vanjski dio kućišta uređaja samo toplom vodom s malo tekućeg deterdženta za pranje su‐ đa. Po završetku čišćenja, ponovno priključi‐ te uređaj na električnu mrežu.
www.aeg.com 5.3 Odmrzavanje hladnjaka Inje se automatski uklanja s isparivača pretinca hladnjaka svaki put kada se zaustavi motor kompresora tijekom normalne uporabe. Otopljena voda se ispušta u poseban spremnik u stražnjem dijelu uređaja, preko motora kompreso‐ ra, gdje isparava. Povremeno očistite otvor za ispuštanje otopljene vode u sredini kanala odjeljka hladnjaka kako bi se spriječilo da ga vo‐ da preplavi te iscuri na hranu u unu‐ trašnjosti.
HRVATSKI Problem Žarulja ne radi. Kompresor neprekid‐ no radi. 15 Mogući uzrok Rješenje Uređaj nema napajanja. Nema napona u utičnici mrežnog napajanja. Priključite drugi električni uređaj na utičnicu mrežnog napajanja. Obratite se ovlaštenom serviseru. Žarulja je u stanju priprav‐ Zatvorite i otvorite vrata. nosti. Svjetlo je neispravno. Pogledajte poglavlje „Zamjena žarulje“. Temperatura nije pravilno postavljena. Podesite višu temperaturu. Vrata nisu pravilno zatvo‐ rena.
www.aeg.com Problem Mogući uzrok Rješenje U uređaj ste odjednom stavili mnogo namirnica. Stavljajte manje namirnica istovremeno. Temperatura u hladnjaku je previ‐ soka. Nema cirkulacije hladnog zraka u uređaju. Provjerite kruži li hladni zrak unutar uređaja. Temperatura u zamrzivaču je previ‐ soka. Namirnice su postavljene preblizu jedne do drugih. Spremite namirnice tako da omogućite kruženje hladnog zraka.
HRVATSKI 17 7. POSTAVLJANJE UPOZORENJE Pozorno pročitajte "Informacije o sigurnosti" za siguran i ispravan rad uređaja prije postavljanja uređaja. 7.1 Pozicioniranje Postavite uređaj na mjesto gdje sobna temperatura odgovara klimatskoj klasi označenoj na nazivnoj pločici uređaja: Klimats Temperatura okoline ka klasa SN od +10°C do + 32°C N od +16°C do + 32°C ST od +16°C do + 38°C T od +16°C do + 43°C 7.
www.aeg.com 7.4 Stražnji odstojnici Unutar uređaja pronaći ćete dva od‐ stojnika koja treba postaviti kao što je prikazano na slici. Olabavite vijke i stavite odstojnik ispod glave vijka, zatim ponovno zategnite vijke. 7.5 Promjena smjera otvaranja vrata Nije moguća promjena smjera otvaranja vrata. 8. ZVUKOVI Tijekom normalnog rada čuju se razni zvukovi (kompresor, kruženje rashlad‐ nog sredstva).
HRVATSKI HISSS! BLUBB! HISSS! BLUBB! BRRR! BRRR! CRACK! 9. TEHNIČKI PODACI Dimenzije prostora Visina 1950 mm Širina 695 mm Dubina 669 mm Vrijeme odgovora 20 h Napon 230-240 V Frekvencija 50 Hz Tehničke informacije nalaze se na naziv‐ noj pločici na unutrašnjoj lijevoj strani uređaja i na energetskom natpisu.
www.aeg.com 10. BRIGA ZA OKOLIŠ Reciklirajte materijale sa simbolom . Ambalažu za recikliranje odložite u prikladne spremnike. Pomozite u zaštiti okoliša i ljudskog zdravlja, kao i u recikliranju otpada od električnih i elektroničkih uređaja. Uređaje označene simbolom ne bacajte zajedno s kućnim otpadom. Proizvod odnesite na lokalno reciklažno mjesto ili kontaktiraje nadležnu službu.
LIETUVIŲ 21 TURINYS 1. 2. 3. 4. 5. 6. 7. 8. 9. 10. SAUGOS INSTRUKCIJA . . . . . . . . . . . . . . . . . . . . . . . . . . . . . . . . . . . . . . . . . . . . . . . . . VALDYMO SKYDELIS . . . . . . . . . . . . . . . . . . . . . . . . . . . . . . . . . . . . . . . . . . . . . . . . . . . KASDIENIS NAUDOJIMAS . . . . . . . . . . . . . . . . . . . . . . . . . . . . . . . . . . . . . . . . . . . . . . . NAUDINGA INFORMACIJA IR PATARIMAI. . . . . . . . . . . . . . . . . . . . . . . . . . . . . . . . . . .
www.aeg.com 1. SAUGOS INSTRUKCIJA Norėdami užtikrinti savo saugumą ir tai, kad prietaisas būtų naudojamas pagal paskirtį, prieš jį įrengdami ir įjungdami pirmą kartą, atidžiai perskaitykite šį va‐ dovą, jame esančius patarimus ir įspėji‐ mus. Siekiant išvengti apmaudžių klaidų ir nelaimingų atsitikimų itin svarbu, kad visi šio prietaiso naudotojai atidžiai susi‐ pažintų su prietaiso veikimo ir saugos funkcijomis.
LIETUVIŲ Pasirūpinkite, kad prietaiso galinė dalis nesulaužytų ar kitaip nepa‐ žeistų elektros kištuko. Sulaužytas arba kitaip pažeistas elektros kiš‐ tukas gali perkaisti ir sukelti gais‐ rą. 3. Pasirūpinkite, kad bet kada galėtu‐ mėte pasiekti prietaiso maitinimo laido kištuką. 4. Netraukite suėmę už maitinimo lai‐ do. 5. Jei elektros kištuko lizdas blogai priveržtas, į jį maitinimo laido kiš‐ tuko nekiškite. Galite patirti elek‐ tros smūgį arba kilti gaisras. 6.
www.aeg.com 1.6 Techninė priežiūra nei izoliacinėse medžiagose - nė‐ ra dujų, galinčių pažeisti ozono sluoksnį. Prietaisą draudžiama išmesti kartu su buitinėmis šiukš‐ lėmis ir atliekomis. Izoliacinėje putoje yra degių dujų: prietaisą reikia išmesti paisant galiojančių reglamentų - juos sužinosite vie‐ tos valdžios institucijose. Nepa‐ žeiskite aušinamojo įtaiso, ypač galinėje dalyje greta šilumokai‐ čio. Šiame prietaise naudojamas medžiagas, pažymėtas simboliu , galima perdirbti.
LIETUVIŲ Jeigu ekranas neįjungtas, paspaus‐ kite prietaiso ON/OFF mygtuką. 3. Po kelių sekundžių gali įsijungti įspė‐ jimo signalas. Kaip atkurti įspėjimo signalą, žr. sky‐ rių „Įspėjimo signalas dėl aukštos temperatūros“. 4. Jeigu ekrane rodomas "dEMo" sim‐ bolis, prietaisas veikia demonstraci‐ niu režimu. Žr. skyrių „Ką daryti, jei‐ gu...“. 5. Temperatūros indikatoriai rodo nus‐ tatytą numatytąją temperatūrą. Kaip parinkti kitą nustatytą temperatūros reikšmę, žr. skyriuje „Temperatūros re‐ guliavimas“.
www.aeg.com Funkcijos įjungimas: 1. Spaudykite Mode mygtuką, kol pasi‐ rodys atitinkama piktograma. Mirksi atostogų funkcijos indikato‐ rius. Šaldytuvo temperatūros indikatorius rodo nustatytą temperatūrą. 2. Paspauskite OK mygtuką, kad pa‐ tvirtintumėte. Rodomas atostogų funkcijos indika‐ torius. Funkcijos išjungimas: 1. Paspauskite Mode mygtuką, kol mirksi atostogų funkcijos indikato‐ rius. 2. Paspauskite OK mygtuką, kad pa‐ tvirtintumėte. 3. Atostogų funkcijos indikatorius už‐ gęsta.
LIETUVIŲ Ši funkcija išsijungia, pasirinkus kitą nustatytą šaldiklio temperatū‐ ros reikšmę. 2.12 Aukštos temperatūros įspėjimo signalas Temperatūros didėjimą (pavyzdžiui, dėl anksčiau įvykusio elektros maitinimo per‐ trūkio) šaldiklio skyriuje rodo: • mirksintys perspėjamasis ir šaldiklio temperatūros indikatoriai; • veikiantis perspėjamasis signalas. Perspėjamojo signalo išjungimas: 1. Paspauskite bet kurį mygtuką. 2. Perspėjamasis signalas išsijungia. 3.
www.aeg.com 3.4 Lentyna buteliams Butelius (kakleliu į priekį) dėkite į iš anks‐ to įrengtą lentyną. Jei ta lentyna yra įdėta horizontaliai, bu‐ teliai turi būti užkimšti. Ši butelių lentyna gali būti pakreipiama taip, kad joje būtų galima laikyti atkimš‐ tus butelius. Norėdami ją pakreipti, truk‐ telėkite lentyną aukštyn ir pasukite, o ta‐ da įtvirtinkite aukštesniame lygyje. 3.5 Stalčius daržovėms su drėgmės valdikliu Stalčius tinka vaisiams ir daržovėms lai‐ kyti.
LIETUVIŲ 29 3.6 Oro vėsinimas Dinaminis oro vėsinimo (DOV) ventiliato‐ rius gali greitai atvėsinti maistą ir užtikri‐ na vienodesnę temperatūrą skyriuje. Paspauskite paveikslėlyje parodytą jun‐ giklį, kad įjungtumėte ventiliatorių. Užsi‐ degs žalia lemputė. B Įjunkite ventiliatorių, kai aplinkos tempe‐ ratūra viršija 25 °C. 3.7 Šviežių maisto produktų užšaldymas Šaldiklio skyriuje galima užšaldyti švie‐ žius maisto produktus ir juos užšaldytus arba visiškai užšaldytus laikyti ilgą laiką.
www.aeg.com 3.9 Ledo kubelių gamyba Šiame prietaise yra vienas arba keli dė‐ klai ledo kubeliams gaminti. Jie įkišti viršutinio šaldiklio stalčiaus šo‐ nuose. Ištraukite viršutinį šaldiklio stalčių. Ištraukite ledo dėklą. Ištraukite čiaupą. Iki žymos „MAX“ pripil‐ kite vandens. Įdėkite čiaupą ir dėklą į jam skirtą vietą. Norėdami išimti ledo kubelius, dėklą ap‐ verskite, kad ledo kubelių apačia būtų nukreipta aukštyn, ir patrankykite dėklą į kietą paviršių.
LIETUVIŲ • maisto produktus uždenkite arba įvy‐ niokite, ypač jei jie pasižymi stipriu kvapu • maisto produktus išdėstykite taip, kad aplink juos galėtų laisvai cirkuliuoti oras 4.3 Šaldymo patarimai Naudingi patarimai: Mėsa (visų rūšių) : įvyniokite į polietileno maišelius ir dėkite ant stiklinės lentynos virš daržovių stalčiaus. Taip laikyti ją galima ne ilgiau negu vie‐ ną arba dvi dienas. Gatavi produktai, šalti patiekalai ir kt.
www.aeg.com dyti leidžiama tik įgaliotiems tech‐ nikams. 5.1 Reguliarus valymas Prietaisą būtina reguliariai valyti: • Vidinius paviršius ir priedus valykite šilto vandens ir neutralaus muilo tirpa‐ lu. • Reguliariai patikrinkite durelių tarpik‐ lius ir juos nuvalykite, kad jie būtų šva‐ rūs ir be jokių nešvarumų. • Nuplaukite ir gerai nusausinkite. Netraukite, nejudinkite ir nepa‐ žeiskite jokių korpuso viduje esančių vamzdelių ir (arba) kabe‐ lių.
LIETUVIŲ Oro filtras yra išeikvojamas prie‐ das, todėl jam garantija netaiko‐ ma. 33 Pakeitimo metu oro ventiliacijos atlenkiamąją dalį visada laikykite uždarytą. Su oro filtru reikia elgtis atsargiai, kad nesubraižytumėte jo pavir‐ šiaus. 5.3 Šaldytuvo atitirpdymas Įprasto prietaiso naudojimo metu, kai nustoja veikti variklio kompresorius, nuo šaldytuvo skyriaus garintuvo automatiš‐ kai pašalinamas šerkšnas.
www.aeg.com Problema Galima priežastis Sprendimas Prietaisas neveikia. Lemputė nešviečia. Prietaisas yra išjungtas. Įjunkite prietaisą. Maitinimo laido kištukas Tinkamai įkiškite kištuką į netinkamai įjungtas į elek‐ maitinimo tinklo lizdą. tros tinklo lizdą. Lemputė nešviečia. Kompresorius veikia be perstojo. Prietaisui netiekiamas maitinimas. Maitinimo tin‐ klo lizde nėra įtampos. Įjunkite į maitinimo tinklo lizdą kitą elektros prietaisą. Kreipkitės į kvalifikuotą elektriką.
LIETUVIŲ Problema Galima priežastis 35 Sprendimas Maisto produkto tempera‐ Prieš įdėdami maisto pro‐ tūra per aukšta. duktą, palaukite, kol jis at‐ vės iki kambario tempera‐ tūros. Vienu metu laikoma daug maisto produktų. Vienu metu laikykite ma‐ žiau maisto produktų. Temperatūra šaldytu‐ ve pernelyg aukšta. Prietaise nevyksta šalto oro cirkuliacija. Pasirūpinkite, kad prietaise vyktų šalto oro cirkuliacija. Temperatūra šaldiklio skyriuje pernelyg aukšta.
www.aeg.com 7. ĮRENGIMAS ĮSPĖJIMAS Norėdami užtikrinti savo saugu‐ mą ir prietaiso naudojimą pagal paskirtį prieš įrengdami prietaisą atidžiai perskaitykite skyrių Infor‐ maciją apie saugą. 7.1 Padėties parinkimas Klimato Aplinkos oro temperatūra klasė SN Nuo 10 °C iki 32 °C N Nuo 16 °C iki 32 °C ST Nuo 16 °C iki 38 °C T Nuo 16 °C iki 43 °C Prietaisą įrenkite tokioje vietoje, kurioje aplinkos temperatūra atitiktų klimato kla‐ sę, nurodytą prietaiso duomenų lentelė‐ je: 7.
LIETUVIŲ 37 7.4 Galinės poveržlės Prietaiso viduje rasite dvi poveržles, ku‐ rias reikia sumontuoti taip, kaip parodyta paveikslėlyje. Atlaisvinkite varžtus ir įdėkite poveržles po varžto galvutėmis, o tada varžtus vėl prisukite. 7.5 Durelių atidarymo krypties pakeitimas Pakeisti durelių atidarymo kryptį neįma‐ noma. 8. TRIUKŠMAS Įprastai naudojant prietaisą gali būti gir‐ dimi tam tikri garsai (kompresoriaus vei‐ kimo, šaldomosios medžiagos cirkuliavi‐ mo).
www.aeg.com HISSS! HISSS! BLUBB! BLUBB! BRRR! BRRR! CRACK! 9. TECHNINIAI DUOMENYS Prietaiso įrengimo angos matmenys Aukštis 1950 mm Plotis 695 mm Gylis 669 mm Kilimo laikas 20 val. Įtampa 230–240 V Dažnis 50 Hz Techninė informacija pateikta duomenų lentelėje, kuri yra prietaiso viduje, kairėje pusėje, ir energijos plokštelėje.
LIETUVIŲ 10. APLINKOSAUGA Atiduokite perdirbti medžiagas, pažymėtas šiuo ženklu . Išmeskite pakuotę į atitinkamą atliekų surinkimo konteinerį, kad ji būtų perdirbta. Padėkite saugoti aplinką bei žmonių sveikatą ir surinkti bei perdirbti elektros ir elektronikos prietaisų atliekas. Neišmeskite šiuo ženklu pažymėtų prietaisų kartu su kitomis buitinėmis atliekomis. Atiduokite šį gaminį į vietos atliekų surinkimo punktą arba susisiekite su vietnos savivaldybe dėl papildomos informacijos.
www.aeg.com SPIS TREŚCI 1. 2. 3. 4. 5. 6. 7. 8. 9. 10. WSKAZÓWKI DOTYCZĄCE BEZPIECZEŃSTWA . . . . . . . . . . . . . . . . . . . . . . . . . . . . . PANEL STEROWANIA . . . . . . . . . . . . . . . . . . . . . . . . . . . . . . . . . . . . . . . . . . . . . . . . . . CODZIENNA EKSPLOATACJA . . . . . . . . . . . . . . . . . . . . . . . . . . . . . . . . . . . . . . . . . . . . PRZYDATNE RADY I WSKAZÓWKI . . . . . . . . . . . . . . . . . . . . . . . . . . . . . . . . . . . . . . . .
POLSKI 1. 41 WSKAZÓWKI DOTYCZĄCE BEZPIECZEŃSTWA W celu zapewnienia bezpieczeństwa użytkownika i bezawaryjnej pracy urzą‐ dzenia przed instalacją i pierwszym uży‐ ciem należy uważnie przeczytać instruk‐ cję obsługi, zwracając szczególną uwa‐ gę na wskazówki oraz ostrzeżenia. Wszyscy użytkownicy urządzenia powin‐ ni poznać zasady jego bezpiecznej ob‐ sługi. Pozwoli to uniknąć niepotrzebnych pomyłek i wypadków.
www.aeg.com OSTRZEŻENIE! Aby można było uniknąć niebez‐ pieczeństwa, wymiany elemen‐ tów elektrycznych (przewód zasi‐ lający, wtyczka, sprężarka) może dokonać wyłącznie technik auto‐ ryzowanego serwisu lub osoba o odpowiednich kwalifikacjach. Nie wolno przedłużać przewodu zasilającego. 2. Należy upewnić się, że tylna ścianka urządzenia nie przygniotła ani nie uszkodziła wtyczki przewo‐ du zasilającego. Przygnieciona lub uszkodzona wtyczka może się przegrzewać i spowodować pożar. 3.
POLSKI • Zaleca się odczekanie co najmniej czterech godzin przed podłączeniem urządzenia, aby olej mógł spłynąć z powrotem do sprężarki. • Należy zapewnić odpowiednią wenty‐ lację ze wszystkich stron urządzenia. Nieodpowiednia wentylacja prowadzi do jego przegrzewania. Aby uzyskać wystarczającą wentylację, należy po‐ stępować zgodnie z wskazówkami do‐ tyczącymi instalacji.
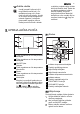
www.aeg.com 2.1 Wyświetlacz 2.3 Wyłączanie 1 10 9 2 3 4 8 7 6 5 1 Wskaźnik temperatury chłodziarki 2 Funkcja „Wakacje” 3 Wyłączenie chłodziarki 4 Wyłączenie zamrażarki 5 Wskaźnik temperatury zamrażarki 6 Wskaźnik alarmu 7 Funkcja „Chłodzenie napojów” Aby wyłączyć urządzenie, należy wyko‐ nać następujące czynności: 1. Nacisnąć przycisk ON/OFF urządze‐ nia i przytrzymać przez 5 sekund. 2. Wyświetlacz wyłączy się. 3.
POLSKI Ustawiona temperatura zostanie osiąg‐ nięta w ciągu 24 godzin. Po zaniku zasilania ustawiona temperatura będzie zachowana. 2.7 Funkcja „Blokada uruchomienia” Aby zablokować działanie przycisków przed przypadkowym użyciem, należy wybrać funkcję „Blokada uruchomienia”. Aby włączyć funkcję: 1. Nacisnąć kilkakrotnie przycisk Mode, aż pojawi się odpowiednia ikona. 2. Wskaźnik blokady uruchomienia za‐ cznie migać. 3. Nacisnąć przycisk OK, aby potwier‐ dzić wybór.
www.aeg.com Minutnik przez kilka sekund przed‐ stawia ustawioną wartość (30 mi‐ nut). 2. Nacisnąć przycisk regulacji minutni‐ ka, aby zmienić ustawienie w zakre‐ sie od 1 do 90 minut. 3. Nacisnąć przycisk OK, aby potwier‐ dzić. Zostanie pokazany wskaźnik Drinks Chill. Minutnik zacznie migać. Po zakończeniu odliczania wskaźnik Drinks Chill miga i emitowany jest alarm dźwiękowy: 1. Wyjąć napoje przechowywane w ko‐ morze zamrażarki. 2. Wyłączyć funkcję. Aby wyłączyć funkcję, należy: 1.
POLSKI 47 3. CODZIENNA EKSPLOATACJA 3.1 Czyszczenie wnętrza Aby usunąć zapach nowego urządzenia przed pierwszym uruchomieniem należy wymyć jego wnętrze i znajdujące się w nim akcesoria letnią wodą z łagodnym mydłem, a następnie dokładnie je osu‐ szyć. Jeśli na wyświetlaczu widoczne jest wskazanie „dEMo”, urządzenie działa w trybie demonstracyjnym: patrz rozdział „ROZWIĄZYWANIE PROBLEMÓW”.
www.aeg.com 3.5 Szuflada na warzywa z kontrolą wilgotności Szuflada nadaje się do przechowywania owoców i warzyw. Umieścić przegrodę znajdującą się wew‐ nątrz szuflady w innym położeniu, aby podzielić szufladę według potrzeb. Na spodzie szuflady znajduje się wkład‐ ka (jeśli została przewidziana) pozwala‐ jąca na oddzielenie warzyw i owoców od wilgoci mogącej się zbierać na dnie szu‐ flady. Aby wyczyścić szufladę należy wyjąć z niej wszystkie elementy.
POLSKI Proces zamrażania trwa 24 godziny: w tym czasie do zamrażarki nie należy wkładać kolejnej partii żywności. 3.8 Przechowywanie zamrożonej żywności Przy pierwszym uruchomieniu lub po pewnym okresie wyłączenia urządzenia, przed umieszczeniem produktów w ko‐ morze należy uruchomić urządzenie na co najmniej 2 godziny z wyższym usta‐ wieniem.
www.aeg.com 3.10 Rozmrażanie Głęboko zamrożoną żywność lub mro‐ żonki należy przed użyciem rozmrozić w komorze chłodziarki lub w temperaturze pokojowej, zależnie od czasu przezna‐ czonego na tę operację. Małe kawałki można gotować w stanie zamrożonym, od razu po wyjęciu z za‐ mrażarki. W takim przypadku gotowanie potrwa jednak dłużej. 4. PRZYDATNE RADY I WSKAZÓWKI 4.
POLSKI żonymi produktami, aby uniknąć wzrostu temperatury produktów za‐ mrożonych. • Produkty niskotłuszczowe przechowu‐ ją się lepiej i dłużej niż o wysokiej za‐ wartości tłuszczu. Sól powoduje skró‐ cenie okresu przechowywania żyw‐ ności. • Spożywanie sorbetu bezpośrednio po wyjęciu z komory zamrażarki może spowodować odmrożenia skóry. • Zaleca się umieszczanie daty zamro‐ żenia na każdym opakowaniu w celu kontrolowania długości okresu prze‐ chowywania.
www.aeg.com Po czyszczeniu ponownie podłączyć urządzenie do zasilania. 5.2 Wymiana filtra Taste Guard Filtr Taste Guard pomaga zmniejszyć powstawanie nieprzyjemnych zapachów w chłodziarce, ograniczając ryzyko prze‐ niknięcia niepożądanego zapachu do przechowywanych produktów. W celu zapewnienia optymalnej skutecz‐ ności działania filtr Taste Guard należy wymieniać raz w roku. Nowe filtry można nabyć w lokalnym punkcie sprzedaży.
POLSKI 53 5.3 Rozmrażanie chłodziarki Podczas normalnego użytkowania za każdym razem po wyłączeniu się silnika sprężarki następuje automatyczne usu‐ nięcie szronu z parownika komory chło‐ dziarki. Woda z rozpuszczonego szronu spływa rynienką do specjalnego pojem‐ nika znajdującego się z tyłu urządzenia nad sprężarką, skąd następnie odparo‐ wuje.
www.aeg.com Problem Prawdopodobna przyczy‐ na Urządzenie nie działa. Urządzenie jest wyłączo‐ Nie działa oświetlenie. ne. Rozwiązanie Włączyć urządzenie. Wtyczka przewodu zasila‐ Podłączyć prawidłowo jącego nie została prawid‐ wtyczkę do gniazda elek‐ łowo podłączona do trycznego. gniazda elektrycznego. Urządzenie nie jest zasi‐ lane. Brak napięcia w gnieździe elektrycznym. Podłączyć inne urządzenie elektryczne do tego same‐ go gniazdka. Skontaktować się z wy‐ kwalifikowanym elektry‐ kiem.
POLSKI Problem Prawdopodobna przyczy‐ na 55 Rozwiązanie Temperatura w urzą‐ Regulator temperatury nie Ustawić wyższą tempera‐ dzeniu jest zbyt niska. jest ustawiony prawidło‐ turę. wo. Temperatura w urzą‐ Regulator temperatury nie Ustawić niższą temperatu‐ dzeniu jest zbyt wyso‐ jest ustawiony prawidło‐ rę. ka. wo. Drzwi nie są prawidłowo zamknięte. Patrz „Zamykanie drzwi”. Temperatura produktów jest zbyt wysoka.
www.aeg.com Nacisnąć śrubokrętem na zaczep z tyłu klosza żarówki i równocześnie pociągnąć i obrócić klosz w kierunku wskazanym przez strzałkę. Wymienić żarówkę na żarówkę o tej samej mocy, przeznaczoną specjal‐ nie do urządzeń domowych. (Maksy‐ malną moc podano na kloszu żarów‐ ki). Przymocować klosz żarówki w pierwotnym położeniu. Włożyć wtyczkę przewodu zasilają‐ cego do gniazda. Otworzyć drzwi. Sprawdzić, czy oś‐ wietlenie się włącza. 1. 1 2. 2 3. 4. 5. 6.2 Zamykanie drzwi 1. 2. 3.
POLSKI 57 7.2 Miejsce instalacji 100 mm 15 mm 15 mm Urządzenie należy zainstalować z dala od źródeł ciepła, takich jak grzejniki, bojlery i nie wystawiać na bezpośrednie działanie promieni słonecznych itp. Należy zapewnić swobodny przepływ powietrza z tyłu obu‐ dowy. Jeśli urządzenie jest ustawione pod szafką wiszącą, odległość pomiędzy górną krawędzią obudowy a szafką powinna wy‐ nosić co najmniej 100 mm, co zapewni najlepszą wydajność urządzenia.
www.aeg.com 7.5 Zmiana kierunku otwierania drzwi Nie można zmienić kierunku otwierania drzwi. 8. HAŁAS/GŁOŚNA PRACA Podczas normalnej pracy urządzenia słychać odgłosy (sprężarka, obieg czyn‐ nika chłodniczego).
POLSKI BLUBB! BLUBB! CRACK! 59 CRACK! 9. DANE TECHNICZNE Wymiary wnęki Wysokość 1950 mm Szerokość 695 mm Głębokość 669 mm Czas utrzymywania tem‐ peratury bez zasilania 20 godz. Napięcie 230-240 V Częstotliwość Dane techniczne podane są na tabliczce znamionowej znajdującej się z lewej 50 Hz strony wewnątrz urządzenia oraz na ety‐ kiecie informującej o zużyciu energii. 10. OCHRONA ŚRODOWISKA Materiały oznaczone symbolem należy poddać utylizacji.
222346988-A-202012 www.aeg.