
User manual


6
www.aeg.com
ENGLISH
Thank you for choosing an AEG product. In order to ensure the best results, always use original AEG accessories and
spare parts. They have been designed especially for your product. This product is designed with the environment in
mind. All plastic parts are marked for recycling purposes.
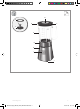
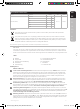
COMPONENTS
A. Jug
B. Spout
C. Lid with ller hole
D. Measuring cup
E. Rubber seal
F. Blade assembly, detachable
G. Locking collar
H. Motor housing
I. Control panel
J. Non-slip feet
Picture page 2-3
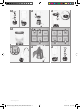
GETTING STARTED
1 Before using the blender for the rst time, wash all parts except for the motor housing. Assembling: Place the
blade rubber seal on top of the blade assembly (A). Then place the blade assembly with the rubber seal into the col-
lar (B). Carefully assemble the blades and collar into the jug. Tilt the collar slightly for easy access of knives into the
jug. Once in place, turn the collar counter-clockwise to lock in place (C ).
2 Place the blender on a at surface and then place the jug on top of the motor housing. The jug can be placed is
several dierent positions with handle on either sides, or in front. Put the ingredients in the jug.
(Do not exceed the maximum level as indicated on the jug.)
3 Close the lid (A) and insert the measuring cup in the ller hole and (B) lock into position. (You can use the measur-
ing cup to add ingredients while the blender is running. Close the ller hole immediately after, to avoid splashing.)
Caution! When processing hot liquids, see paragraph 4.
4 Processing hot liquids: We recommend to allow hot liquids to cool down (max 90 °C) before lling the jug. Fill the
jug only half full and start processing on low speed. The blender jug can become very warm – take care to protect
your hands and to ventilate steam out through the ller hole. Always replace the lid before use.
5 Start the blender:
Plug into mains. Press the On/O button
(A)
, the LED light will illuminate. Press the “Low”
(B)
or
“High”
(C)
button to select your desired processing speed, or choose one of 3 special functions. Light will indicate the
speed selected. To pause, press the selected speed button again.
Auto-O:
If the machine is not turned o manually, the Safety Auto-O function turns it o after
30
minutes.
6 Pulse Function: Press the “Pulse” button (A) when you need a short burst of power.
Smoothie Function: Press the “Smooth” button (B) to get ice crushed and your smoothie blended to the desired
consistency.
Crush Ice Function: Press the “Crush” button (C) to crush ice.
(For best results, work in small batches.)
CLEANING AND CARE
7 Quick cleaning:
Pour warm water into the jug, add a few drops of detergent. Mix water and detergent by pressing the
“PULSE” button. Finally, rinse the jug under running water.
8 Thorough cleaning:
Turn the blender o and unplug the power cord. Wipe the motor housing with a damp cloth.
Warning!
Never immerse the housing, plug, and cord in water or any other uid.
9 Remove the lid and jug.
Turn the collar clockwise to unlock. Then carefully remove the collar and knives by pulling the collar downwards. Lift
o the blade assembly and the rubber seal from the collar. Rinse the blade assembly in water and detergent.
Caution! Handle carefully, the blades are very sharp!
The lid, jug and measuring cup can be washed in the dish-
washer.
Enjoy your new AEG product!
SB7XXX_Pragati_Blender_AEG_NEW NO-FARSI.indd 6 2017-07-06 15:17:15