SCT71900S0 EN FRIDGE-FREEZER USER MANUAL
FOR PERFECT RESULTS Thank you for choosing this AEG product. We have created it to give you impeccable performance for many years, with innovative technologies that help make life simpler – features you might not find on ordinary appliances. Please spend a few minutes reading to get the very best from it. ACCESSORIES AND CONSUMABLES In the AEG webshop, you’ll find everything you need to keep all your AEG appliances looking spotless and working perfectly.
Contents 3 CONTENTS 4 6 9 10 13 14 15 17 18 25 27 Safety information Control panel First use Daily use Helpful hints and tips Care and cleaning What to do if… Technical data Installation Noises Environmental concerns The following symbols are used in this user manual: Important information concerning your personal safety and information on how to avoid damaging the appliance.
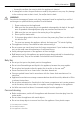
Safety information SAFETY INFORMATION In the interest of your safety and to ensure the correct use, before installing and first using the appliance, read this user manual carefully, including its hints and warnings. To avoid unnecessary mistakes and accidents, it is important to ensure that all people using the appliance are thoroughly familiar with its operation and safety features.
Safety information 5 – thoroughly ventilate the room in which the appliance is situated • It is dangerous to alter the specifications or modify this product in any way. Any damage to the cord may cause a short-circuit, fire and/or electric shock. WARNING! Any electrical component (power cord, plug, compressor) must be replaced by a certified service agent or qualified service personnel to avoid hazard. • • • • 1. Power cord must not be lengthened. 2.
Control panel • Regularly examine the drain in the refrigerator for defrosted water. If necessary, clean the drain. If the drain is blocked, water will collect in the bottom of the appliance. Installation For electrical connection carefully follow the instructions given in specific paragraphs. • Unpack the appliance and check if there are damages on it. Do not connect the appliance if it is damaged. Report possible damages immediately to the place you bought it. In that case retain packing.
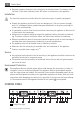
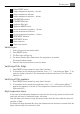
Control panel 2 3 4 5 6 7 8 9 10 11 12 13 14 15 16 7 Fridge ON/OFF switch Fridge temperature regulator, + button Fridge temperature indicator Fridge temperature regulator, - button DYNAMICAIR indicator DYNAMICAIR button Appliance Pilot light Appliance ON/OFF switch Freezer temperature regulator, + button Freezer temperature indicator Freezer temperature regulator, - button FROSTMATIC indicator FROSTMATIC button Alarm indicator Alarm reset button Switching on 1. 2. 3. 4.
Control panel Press the alarm reset button. The alarm indicator light goes out and at the same time the freezer temperature indicator show for about 5 seconds the warmest temperature reached in the freezer compartment. Temperature setting buttons The temperature is adjusted using the temperature setting buttons. These buttons are connected to the temperature indicator. • Each time one of the two buttons is pressed again the temperature is adjusted by 1°C.
First use 9 COOLMATIC function The COOLMATIC function is suitable for quick cooling of large quantities of goods in the refrigerator. To activate the function, do these steps: 1. Press the Fridge Temperature - button (several times if necessary) until the word “SC” appears in the display. A temperature of +2°C is automatically selected. To deactivate the function, do these steps: 1. Press the Fridge Temperature + button . The COOLMATIC function stops automatically after about 6 hours.
Daily use Do not use detergents or abrasive powders, as these will damage the finish. DAILY USE Freezing fresh food The freezer compartment is suitable for freezing fresh food and storing frozen and deepfrozen food for a long time. To freeze fresh food activate the FROSTMATIC function at least 24 hours before placing the food to be frozen in the freezer compartment. Place the fresh food to be frozen in the upper compartment.
Daily use 11 Ice-cube production This appliance is equipped with one or more trays for the production of ice-cubes. Fill these trays with water, then put them in the freezer compartment. Do not use metallic instruments to remove the trays from the freezer. Cold accumulators One or more cold accumulators are supplied in the freezer; these increase the length of time for which food will keep in the event of a power failure or breakdown.
Daily use 1. lift the shelf with the sliding box upwards and out of the holders in the door 2. remove the retaining bracket out of the guide under the shelf 3. Reverse the above operation to insert the sliding box at a different height. MAXIBOX drawer The drawer is suitable for storing fruit and vegetables. There is a separator inside the drawer that can be placed in different positions to allow for the subdivision best suited to personal needs.
Helpful hints and tips 13 HELPFUL HINTS AND TIPS Hints for energy saving • Do not open the door frequently or leave it open longer than absolutely necessary. • If the ambient temperature is high and the Temperature Regulator is set to low temperature and the appliance is fully loaded, the compressor may run continuously, causing frost or ice on the evaporator. If this happens, set the Temperature Regulator toward warmer settings to allow automatic defrosting and so a saving in electricity consumption.
Care and cleaning • water ices, if consumed immediately after removal from the freezer compartment, can possibly cause the skin to be freeze burnt; • it is advisable to show the freezing in date on each individual pack to enable you to keep tab of the storage time.
What to do if… 15 Defrosting of the refrigerator Frost is automatically eliminated from the evaporator of the refrigerator compartment every time the motor compressor stops, during normal use. The defrost water drains out through a trough into a special container at the back of the appliance, over the motor compressor, where it evaporates.
What to do if… There are some sounds during normal use (compressor, refrigerant circulation). Problem Possible cause Solution The appliance is noisy The appliance is not supported properly Check if the appliance stands stable (all the four feet should be on the floor) The appliance does not operate. The lamp does not operate. The appliance is switched off. Switch on the appliance. The mains plug is not connected to the mains socket correctly.
Technical data Problem Possible cause 17 Solution Temperature cannot be set . FROSTMATIC or COOLMATIC functions switched on. The temperature in the appliance is too low/high. The temperature regulator is not Set a higher/lower temperature. set correctly. Switch off FROSTMATIC or COOLMATIC manually, or wait to set the temperature until the function has reset automatically. Refer to "FROSTMATIC or COOLMATIC function".. The door is not closed correctly. Refer to "Closing the door".
Installation INSTALLATION WARNING! Read the "Safety Information" carefully for your safety and correct operation of the appliance before installing the appliance.
Installation 1 Green and Yellow: Earth 3 Brown: Live 5 Blue: Neutral 19 As the colours of the wires in the mains lead of this appliance may not correspond with the coloured markings identifying the terminals in your plug, proceed as follows: 1. Connect the wire coloured green and yellow to the terminal marked either with the letter “E“ or by the earth symbol or coloured green and yellow. 2. Connect the wire coloured blue to the terminal either marked with the letter “N“ or coloured black. 3.
Installation 3. Unscrew the pins (B) and spacers (C). 4. Remove the lower door. C B C 5. Loosen the lower pin. On the opposite side: 1. Install the lower pin. 2. Install the lower door. 3. Refit the pins (B) and the spacers (C) on the middle hinge on the opposite side. 4. Install the upper door. 5. Tighten the spacer and tighten the upper pin. Ventilation requirements The airflow behind the appliance must be sufficient. 50 mm min. 200 cm2 min.
Installation 1. If necessary cut the adhesive sealing strip and then apply it to the appliance as shown in figure. x x 2. Drill the hinge cover A, as shown in figure. Apply the covers A and A1 (in the accessories bag) in to the middle hinge. A 3. Install the appliance in the niche. Push the appliance in the direction of the arrow (1) until the upper gap cover stops against the kitchen furniture.
Installation 4. 5. Adjust the appliance in the niche. Make sure that the distance between the appliance and the cupboard frontedge is 44 mm. The lower hinge cover (in the accessories bag) makes sure that the distance between the appliance and the kitchen furniture is correct. Make sure that the clearance between the appliance and the cupboard is 4 mm. Open the door. Put the lower hinge cover in position. Attach the appliance to the niche with 4 screws. 4mm 44mm I I 6.
Installation 7. Attach the covers (C, D) to the lugs and the hinge holes. Install the vent grille (B). Attach the hinge covers (E) to the hinge. D C E E 8. B If the appliance must connect laterally to the kitchen furniture door: a) Slacken the screws in fixing brackets (H). b) Move the brackets (H). c) Retighten the screws. H 9.
Installation 10. Install the part (Ha) on the inner side of the kitchen furniture. ca. 50 mm 90° 21 mm 90° ca. 50 mm 21 mm 11. Push the part (Hc) on the part (Ha). Ha Hc 12. Open the appliance door and the kitchen furniture door at an angle of 90°. Insert the small square (Hb) into guide (Ha). Put together the appliance door and the furniture door and mark the holes.
Noises 13. Remove the brackets and mark a distance of 8 mm from the outer edge of the door where the nail must be fitted (K). 25 8 mm K Ha 14. Place the small square on the guide again and fix it with the screws supplied. Align the kitchen furniture door and the appliance door by adjusting the part Hb. Hb 15. Press the part (Hd) on the part (Hb). Do a final check to make sure that: • All screws are tightened. • The sealing strip is attached tightly to the cabinet.
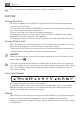
Noises SSS RRR ! HISSS! OK B! B LU B CLICK! BRRR! BLUBB! K! IC CL BRRR! CR AC K! CLICK! BRRR! BLUBB!
Environmental concerns HISSS! SSSRRR! CRACK! 27 HISSS! SSSRRR! CRACK! ENVIRONMENTAL CONCERNS The symbol on the product or on its packaging indicates that this product may not be treated as household waste. Instead it should be taken to the appropriate collection point for the recycling of electrical and electronic equipment.
www.aeg.