SKZ71800F0 EN FRIDGE USER MANUAL
FOR PERFECT RESULTS Thank you for choosing this AEG product. We have created it to give you impeccable performance for many years, with innovative technologies that help make life simpler – features you might not find on ordinary appliances. Please spend a few minutes reading to get the very best from it. ACCESSORIES AND CONSUMABLES In the AEG webshop, you’ll find everything you need to keep all your AEG appliances looking spotless and working perfectly.
Contents 3 CONTENTS 4 6 9 10 14 15 16 18 18 21 23 Safety information Control panel First use Daily use Helpful hints and tips Care and cleaning What to do if… Technical data Installation Noises Environmental concerns The following symbols are used in this user manual: Important information concerning your personal safety and information on how to avoid damaging the appliance.
Safety information SAFETY INFORMATION In the interest of your safety and to ensure the correct use, before installing and first using the appliance, read this user manual carefully, including its hints and warnings. To avoid unnecessary mistakes and accidents, it is important to ensure that all people using the appliance are thoroughly familiar with its operation and safety features.
Safety information 5 – thoroughly ventilate the room in which the appliance is situated • It is dangerous to alter the specifications or modify this product in any way. Any damage to the cord may cause a short-circuit, fire and/or electric shock. WARNING! Any electrical component (power cord, plug, compressor) must be replaced by a certified service agent or qualified service personnel to avoid hazard. • • • • 1. Power cord must not be lengthened. 2.
Control panel • Regularly examine the drain in the refrigerator for defrosted water. If necessary, clean the drain. If the drain is blocked, water will collect in the bottom of the appliance. Installation For electrical connection carefully follow the instructions given in specific paragraphs. • Unpack the appliance and check if there are damages on it. Do not connect the appliance if it is damaged. Report possible damages immediately to the place you bought it. In that case retain packing.
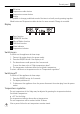
Control panel 7 3 OK button 4 Temperature colder button 5 Temperature warmer button 6 Display It is possible to change predefined sound of buttons to a loudly one by pressing together Mode button and Temperature colder button for some seconds. Change is reversible. Display 1 1 2 3 4 5 6 2 3 4 5 6 Timer function COOLMATIC function Minute Minder function Child Lock function Alarm indicator Temperature indicator Switching on To switch on the appliance do these steps: 1.
Control panel Minute Minder function The Minute Minder function is to be used to set an acoustic alarm at the preferred time, useful for example when a recipe requires to cool down a mixture for a certain lenght of time. To switch on the function: 1. Press the Mode button until the corresponding icon appears. The Minute Minder indicator flashes. The Timer shows the set value (30 minutes) for a few seconds. 2. Press the Timer regulator button to change the Timer set value from 1 to 90 minutes. 3.
First use 9 2. Press the OK button to confirm. The COOLMATIC indicator is shown. The COOLMATIC function shuts off automatically after approximately 6 hours. To switch off the function before its automatic end: 1. Press the Mode button until the COOLMATIC indicator flashes. 2. Press the OK button to confirm. 3. The COOLMATIC indicator goes off. The function switches off by selecting a different fridge set temperature. Door open alarm An acoustic alarm will sound if the door is left open for a few minutes.
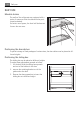
Daily use DAILY USE Movable shelves The walls of the refrigerator are equipped with a series of runners so that the shelves can be positioned as desired. For better use of space, the front half-shelves can lie over the rear ones. Positioning the door shelves To permit storage of food packages of various sizes, the door shelves can be placed at different heights. Positioning the sliding box The sliding box can be placed at different heights. To make these adjustments proceed as follow: 1.
Daily use 11 Carbon Air Filter Your appliance is equipped with a carbon filter CLEANAIR CONTROL behind a flap in the rear wall of the fridge compartment. The filter purifies the air from unwanted odours in the fridge and LONGFRESH compartment meaning that the storage quality will be further improved. C L E A N A I R C O N T R O L During the operation, always keep the air ventilation flap closed. LONGFRESH Compartment In the LONGFRESH 0°C compartment the temperature is controlled automatically.
Daily use Longfresh drawers The humidity is not adjustable. The wire shelves inside the drawers permit that air can circulate freely and consequently a better conservation of foods. The compartment has stops to prevent the drawers from falling out when fully extended. To remove the drawers (e.g. for cleaning purposes), pull them out as far as the stops, lift and remove. You can remove all drawers to store large quantities of foods.
Daily use Type of food Air humidity adjustment 13 Storage time Artichokes, cauliflower, chicory, iceberg lettuce, endive, lamb’s lettuce, lettuce, leeks, radicchio “humid” up to 21 days Broccoli, Chinese leaves, kale, cabbage, radishes, Savoy cabbage “humid” up to 14 days Peas, kohlrabi “humid” up to 10 days Spring onions, radishes, asparagus, spinach “humid” up to 7 days Fruit 1) Pears, dates (fresh), strawberries, peaches 1) “humid” up to 1 month Plums 1) rhubarb, gooseberries “humid”
Helpful hints and tips • The whole storage cycle time will depend on the preservation conditions made prior to the final storage in the fridge. • Food, fruit or vegetables should always be packed or wrapped up before storage. • Animal food always store packed and dry. • Food rich in proteins will go bad quicker. This means seafood will spoil before fish which in turn will spoil before meat.
Care and cleaning 15 CARE AND CLEANING CAUTION! Unplug the appliance before carrying out any maintenance operation. This appliance contains hydrocarbons in its cooling unit; maintenance and recharging must therefore only be carried out by authorized technicians. Periodic cleaning The equipment has to be cleaned regularly: • clean the inside and accessories with lukewarm water and some neutral soap. • regularly check the door seals and wipe clean to ensure they are clean and free from debris.
What to do if… • The air filter is placed behind the flap and can be reached by pulling the flap outward (1) • pull out of the slot the exhausted air filter. 1 2 • insert the new air filter in the slot (2) • close the flap. The air filter is a consumable accessory and as such is not covered by the guarantee. During the operation, always keep the air ventilation flap closed. The air filter should be handled carefully to prevent its surface from being scratched.
What to do if… Problem Possible cause 17 Solution The appliance is noisy The appliance is not supported properly Check if the appliance stands stable (all the four feet should be on the floor) The appliance does not operate. The lamp does not operate. The appliance is switched off. Switch on the appliance. The mains plug is not connected to the mains socket correctly. Connect the mains plug to the mains socket correctly. The appliance has no power. There is no voltage in the mains socket.
Technical data Problem Possible cause Many products are stored at the same time. The temperature in the refrigerator is too high. Solution Store less products at the same time. There is no cold air circulation in Make sure that there is cold air the appliance. circulation in the appliance. Replacing the lamp The appliance is equipped with a longlife LED interior light. Only service is allowed to replace the lighting device. Contact your Service Center Closing the door 1. Clean the door gaskets. 2.
Installation 19 Install this appliance at a location where the ambient temperature corresponds to the climate class indicated on the rating plate of the appliance: Climate class Ambient temperature SN +10°C to + 32°C N +16°C to + 32°C ST +16°C to + 38°C T +16°C to + 43°C Electrical Connection CAUTION! Any electrical work required to install this appliance should be carried out by a qualified electrician or competent person. WARNING! This appliance must be earthed.
Installation 1. Connect the wire coloured green and yellow to the terminal marked either with the letter “E“ or by the earth symbol or coloured green and yellow. 2. Connect the wire coloured blue to the terminal either marked with the letter “N“ or coloured black. 3. Connect the wire coloured brown to the terminal either marked with the “L“ or coloured red. 4. Check that no cut, or stray strands of wire is present and the cord clamp 4 is secure over the outer sheath. 5.
Noises On delivery the carbon filter is in a plastic bag to maintain it’s duration and characteristics. The filter should be placed behind the flap before the appliance is turned on. 1. Open the flap cover (1) 2. Remove the filter from the plastic bag 3. Insert the filter in the slot found in the back of the flap cover (2) 4. Close the flap cover 21 1 2 During operation, always keep the air ventilation flap closed. The filter should be handled carefully so fragments do not loosen from the surface.
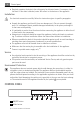
Noises BRRR! BLUBB! HISSS! SSSRRR! BRRR! BLUBB! HISSS! SSSRRR!
Environmental concerns CRACK! 23 CRACK! ENVIRONMENTAL CONCERNS The symbol on the product or on its packaging indicates that this product may not be treated as household waste. Instead it should be taken to the appropriate collection point for the recycling of electrical and electronic equipment.
www.aeg.