
Operation Manual


3
ENGLISH
ST 400, ST 440, STEP 420, STEP 450, SPE 70, SPE 80 A
Always disconnect the plug from the
socket before carrying out any work on the
machine.
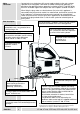
1. Slide the transparent cover downwards,
then the clamping screw is more
accessible.
2. Loosen the clamping screw about 2
revolutions by means of the hexagonal
allen key (fitted into the base plate).
3. Fit the saw blade into the groove of the support roller
and push it firmly into the plunger as far as it will go;
the lug of the saw blade must contact the end of the
plunger (see illustration).
4. Retighten the clamping screw.
5. Check that the saw blade is sitting firmly (wear
protective gloves!).
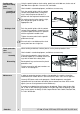
The base plate can be tilted or moved
backward or forward.
Setting an angle For angle cuts and
bevels.
Loosen the fixing screw, pull the base
plate out of the mounting, set it at the
required angle (15
o
, 30
o
, 45
o
), push it
back into the mounting and tighten the
fixing screw again. Angles other than 45
o
can be set by not pushing the base plate
back into the mounting.
The angle can be read off the scale.
For very exact angle cuts it is
recommended to make a test cut.
Moving the base plate
For plunge
cuts or cuts in corners.
Loosen the fixing screw, push the base plate to the rear and tighten the fixing
screw again. The base plate in this position is fixed at the 0
o
setting.
Moving back For cutting a hole with a short saw blade and sawing near the
edge.
Take the fixing screw out, push the base plate to the rear and screw the fixing
screw tightly into the rear hole.
In this position the base plate can also be off-set in longitudinal direction.
Intermittent use
Switching on: Press On-/off switch
Switching off: Release On-/off switch
Continuous use
Switching on: Press the On-/off switch and
then the locking button, after that release
on-off switch.
Switching off: Press the On-/off switch and
then release.
Inserting the
saw-blade
Adjusting the
base plate
On-/off switch
0
274315
0
B
A
B
A
1
2