TB7170NTW FR Notice d'utilisation EN User manual 2 28
www.aeg.com SOMMAIRE 1. 2. 3. 4. 5. 6. 7. 8. 9. 10. 11. 12. INSTRUCTIONS DE SÉCURITÉ . . . . . . . . . . . . . . . . . . . . . . . . . . . . . . . . . . . . . . . . . . . . . . . . . 3 DESCRIPTION DE L'APPAREIL . . . . . . . . . . . . . . . . . . . . . . . . . . . . . . . . . . . . . . . . . . . . . . . . . 6 ACCESSOIRES . . . . . . . . . . . . . . . . . . . . . . . . . . . . . . . . . . . . . . . . . . . . . . . . . . . . . . . . . . . . . . 7 BANDEAU DE COMMANDE . . . . . . . . . . . . . . . . . . .
FRANÇAIS 1. 3 INSTRUCTIONS DE SÉCURITÉ Avant d'installer et d'utiliser cet appareil, lisez soigneusement les instructions fournies. Le fabricant ne peut être tenu pour responsable des dommages et blessures liés à une mauvaise installation ou utilisation. Conservez toujours cette notice avec votre appareil pour vous y référer ultérieurement. 1.1 Sécurité des enfants et des personnes vulnérables AVERTISSEMENT Risque d'asphyxie, de blessure ou d'invalidité permanente.
www.aeg.com Branchement électrique AVERTISSEMENT Risque d'incendie ou d'électrocution. • L'appareil doit être relié à la terre. • Vérifiez que les données électriques figurant sur la plaque signalétique correspondent à celles de votre réseau. Si ce n'est pas le cas, contactez un électricien. • Utilisez toujours une prise de courant de sécurité correctement installée. • N'utilisez pas d'adaptateurs multiprises ni de rallonges. • Veillez à ne pas endommager la fiche secteur ni le câble d'alimentation.
FRANÇAIS 1.4 Entretien et nettoyage AVERTISSEMENT Risque de blessure corporelle ou de dommages matériels. • Avant toute opération d'entretien, éteignez l'appareil et débranchez la prise secteur. • Ne pulvérisez pas d'eau ni de vapeur pour nettoyer l'appareil. • Nettoyez l'appareil avec un chiffon doux humide. Utilisez uniquement des produits de lavage neutres. N'utilisez pas de produits abrasifs, de tampons à récurer, de solvants ou d'objets métalliques. 1.
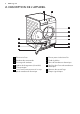
www.aeg.com 2.
FRANÇAIS 7 3. ACCESSOIRES 3.1 Kit de superposition Le tuyau doit être installé à une hauteur comprise entre 50 cm au minimum et 1 m au maximum du niveau du sol. Ce tuyau ne doit pas faire de boucle. Si nécessaire, réduisez la longueur du tuyau. Lisez attentivement la notice fournie avec l'accessoire. 3.3 Socle à tiroir Nom de l'accessoire : SKP11, STA8, STA9 Disponible auprès de votre magasin vendeur agréé. Le kit de superposition ne peut être utilisé qu'avec les lave-linge indiqués dans le livret.
www.aeg.com vendeur ou sur le site Internet que l'accessoire est compatible avec votre appareil. Grille de séchage pour laisser sécher le linge délicat en toute sécurité dans le sèche-linge : • chaussures de sport • laine • peluches • lingerie Lisez attentivement la notice fournie avec l'accessoire. 4.
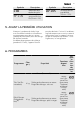
FRANÇAIS Symbole Description Symbole indication de la durée du cycle - sélection du programme Minuterie (10 min - 2 h) - 9 Description sélection du Départ différé (30 min - 20 h) 5. AVANT LA PREMIÈRE UTILISATION Nettoyez le tambour du sèche-linge avec un chiffon humide ou sélectionnez un programme court (par ex. un programme de 30 minutes) avec une charge de chiffons humides. Au début du programme de séchage (pendant 3 à 5 min), l'appareil fera un peu plus de bruit.
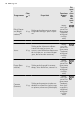
www.aeg.com Programmes Prêt à Repasser (Bügeltrocken) 2) Jeans Draps (Bettwäsche) Couette (Daunen) Charge 1) Propriétés Fonctions disponibles toutes sauf : Reverse Plus (Inversione Tamburo) et Minuterie (Zeitwahl) 8 kg Séchage de vêtements en coton. Degré de séchage : prêt à repasser. 8 kg toutes sauf : ReSéchage des vêtements déconverse Plus tractés tels que les jeans, les (Inversione sweats, avec différentes épaisseurs Tamburo) de tissu (par ex.
FRANÇAIS Programmes Minuterie (Zeitprogramm) Mix Extra Court (Mix Extra Kurz) Charge 1) Propriétés Fonctions disponibles 8 kg Séchage complet du linge pendant la durée de séchage sélectionnée par l'utilisateur. La durée doit être proportionnelle à la charge. Pour sécher un seul article ou de petites quantités de linge, nous vous recommandons d'utiliser des durées courtes.
www.aeg.com Programmes Vestes (Active Wear) Microfibres (Mikrofaser) Soie / Lingerie (Seide) Charge 1) 2 kg 2 kg 1 kg Propriétés Fonctions disponibles Séchage de vêtements de plein air, de travail, en velours, d'imperméables et de tissus perméables à l'air, de vestes à molleton ou doublure isolante amovible.
FRANÇAIS Programmes Laine (Wolle) Charge 1) 1 kg Propriétés Fonctions disponibles 13 Étiquette d'entretien des textiles Séchage de vêtements en laine. Les vêtements seront doux et confortables. Nous vous recommandons de sortir immédiatement les vêtements sitôt le programme terminé. Le cycle de séchage Laine de ce sèche-linge a été testé et approuvé par la Woolmark Company.
www.aeg.com 7. UTILISATION DE L'APPAREIL 7.1 Préparation du linge Séchez uniquement le linge adapté au séchage dans le sèche-linge. Veillez à ce que le linge soit adapté au séchage dans le sèche-linge. Vérifiez le symbole tissu sur les vêtements.
FRANÇAIS 7.5 Réglage d'un programme 15 7.7 La fonction Séchage + (Trocken +) Grâce à cette fonction le linge est plus sec. Il y a 3 sélections possibles : - la sélection par défaut qui est liée au programme. — la sélection pour un linge légèrement sec. — la sélection pour un linge plus sec. 7.8 La fonction Reverse Plus (Inversione Tamburo) Utilisez le sélecteur pour régler le programme. Le temps restant du programme apparaît sur l'écran.
www.aeg.com 7.12 Fonction Départ Différé (Zeitvorwahl) 7.14 Départ d'un programme Permet de retarder le départ du programme de séchage d'un minimum de 30 min jusqu'à un maximum de 20 heures. 1. Sélectionnez le programme et les fonctions de séchage. 2. Appuyez plusieurs fois sur la touche Départ Différé (Zeitvorwahl) jusqu'à ce que l'heure de départ différé requise apparaisse sur l'affichage (par si le programme doit exemple démarrer après 12 heures.) 3.
FRANÇAIS 17 8. CONSEILS 8.1 Conseils écologiques • N'utilisez pas d'assouplissant pour le lavage et le séchage. Le sèche-linge adoucit automatiquement le linge. • Utilisez l'eau de condensation comme de l'eau distillée, par ex. dans un fer à repasser à vapeur. Nettoyez si nécessaire l'eau de condensation (par ex. avec un filtre à café) pour enlever les petites peluches qui peuvent s'y trouver. • Maintenez toujours dégagées les fentes de circulation d'air au fond de l'appareil.
www.aeg.com 9. ENTRETIEN ET NETTOYAGE Le filtre recueille les peluches. Des peluches apparaissent lors du séchage des textiles dans le sèche-linge. 9.1 Nettoyage du filtre principal À la fin de chaque cycle, le voyant approprié (nettoyez le filtre principal) s'allume pour vous indiquer que le filtre principal doit être nettoyé. Pour nettoyer le filtre principal : 1 1. 2. Ouvrez le hublot. Retirez le filtre. 3. Ouvrez le filtre. 4. Nettoyez le filtre après vous être humecté la main.
FRANÇAIS 5. 19 Au besoin, nettoyez le filtre à l'eau tiède à l'aide d'une brosse. Refermez le filtre. Enlevez les peluches du logement du filtre. Un aspirateur peut être utilisé à cet effet. 7. Insérez le filtre dans son logement. 6. ATTENTION N'utilisez jamais votre sèche-linge sans le filtre principal ou avec un filtre endommagé ou obstrué. Nettoyez le filtre principal après chaque cycle de séchage. Un filtre obstrué augmente la durée du cycle et entraîne une consommation d'énergie plus élevée.
www.aeg.com AVERTISSEMENT Risque d'empoisonnement. L'eau de condensation est impropre à la consommation. L'eau de condensation récupérée peut être utilisée dans un fer à repasser à vapeur. Si nécessaire, filtrez l'eau de condensation (par ex. avec un filtre à café) pour en éliminer les résidus et les petites peluches. 9.3 Nettoyage des filtres du condenseur thermique Si le voyant (Nettoyez les filtres du condenseur thermique) est allumé, les filtres doivent être nettoyés.
FRANÇAIS 21 5. Soulevez le filtre principal. Tenez le filtre du condenseur thermique et sortez-le du compartiment inférieur. 6. Poussez sur le crochet pour ouvrir le filtre. 7. Nettoyez le filtre après vous être humecté la main. Au besoin, nettoyez le filtre à l'eau tiède à l'aide d'une brosse. Refermez le filtre.
www.aeg.com ATTENTION N'utilisez pas le sèche-linge quand les filtres du condenseur thermique sont obstrués par des peluches. Cela peut endommager le sèche-linge. Cela augmente par ailleurs la consommation d'énergie. N'utilisez pas d'objets pointus pour nettoyer le compartiment du condenseur thermique. N'utilisez pas le sèche-linge sans les filtres. 8. Nettoyez le petit filtre situé à la base. 9. Si nécessaire, une fois tous les 6 mois, retirez les peluches du compartiment du condenseur thermique.
FRANÇAIS ATTENTION N'utilisez pas de matières abrasives ou de laine d'acier pour nettoyer le tambour. 23 Nettoyez-les à l'aide d'un chiffon humide. Séchez les surfaces nettoyées avec un chiffon doux. 9.5 Nettoyage du bandeau de commande et du boîtier Utilisez un détergent savonneux neutre standard pour nettoyer le bandeau de commande et le boîtier. ATTENTION Ne nettoyez pas l'appareil à l'aide de produits de nettoyage pour meubles ou autres pouvant entraîner une corrosion. 10.
www.aeg.com Problème1) Le hublot ne ferme pas. Err (Erreur) s'affiche à l'écran. Cause probable Solution Le filtre n'est pas verrouillé en position. Mettez le filtre dans la bonne position. Le linge est coincé entre le hublot et le joint. Placez la charge correctement dans le tambour. Vous essayez de modifier le Éteignez puis rallumez le sèprogramme ou la fonction alors che-linge. Faites une nouvelle que le cycle a commencé. sélection.
FRANÇAIS 25 3) reportez-vous au chapitre ENTRETIEN ET NETTOYAGE 4) reportez-vous à la section DURETÉ DE L'EAU au chapitre CONSEILS 5) Uniquement pour les sèche-linge avec éclairage du tambour. 6) Remarque : au bout de 5 heures au maximum, le cycle de séchage se termine automatiquement (reportez-vous à la section Fin du cycle de séchage). 11.
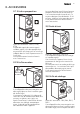
www.aeg.com 12. INSTALLATION 12.1 Déballage ATTENTION Avant de mettre l'appareil en service, il est impératif d'enlever tous les éléments de protection de transport. Pour retirer les cales en polystyrène : 1. Ouvrez le hublot. 2. Sortez le tuyau en plastique et les cales en polystyrène du tambour. 12.2 Installation sous un plan de travail L'appareil peut être installé de façon autonome ou sous un plan de travail de cuisine si un espace correct est disponible (voir schéma). 600 mm > 850 mm 600 mm 12.
FRANÇAIS Où aller avec les appareils usagés? Partout où des appareils neufs sont vendus, mais aussi dans un centre de collecte ou une entreprise de récupération officiels SENS. La liste des centres de collecte officiels SENS est disponible sous www.sens.ch.
www.aeg.com CONTENTS 1. 2. 3. 4. 5. 6. 7. 8. 9. 10. 11. 12. SAFETY INSTRUCTIONS . . . . . . . . . . . . . . . . . . . . . . . . . . . . . . . . . . . . . . . . . . . . . . . . . . . . . PRODUCT DESCRIPTION . . . . . . . . . . . . . . . . . . . . . . . . . . . . . . . . . . . . . . . . . . . . . . . . . . . . ACCESSORIES . . . . . . . . . . . . . . . . . . . . . . . . . . . . . . . . . . . . . . . . . . . . . . . . . . . . . . . . . . . . . CONTROL PANEL . . . . . . . . . . . . . . . . . . . . . . . . .
ENGLISH 1. 29 SAFETY INSTRUCTIONS Before the installation and use of the appliance, carefully read the supplied instructions. The manufacturer is not responsible if an incorrect installation and use causes injuries and damages. Always keep the instructions with the appliance for future reference. 1.1 Children and vulnerable people safety WARNING! Risk of suffocation, injury or permanent disability.
www.aeg.com • Do not use multi-plug adapters and extension cables. • Make sure not to cause damage to the mains plug and to the mains cable. Should the appliance power supply cable need to be replaced, this must be carried out by our Service Centre. • Connect the mains plug to the mains socket only at the end of the installation. Make sure that there is access to the mains plug after the installation. • Do not pull the mains cable to disconnect the appliance. Always pull the mains plug.
ENGLISH The type of light bulb or halogen lamp used for this appliance, is only for household appliances. Do not use it for house lighting. To replace the internal light, contact the Service. 31 • Remove the door catch to prevent children and pets to get closed in the appliance. Compressor WARNING! Risk of damage of the appliance. 1.6 Disposal • The compressor and its system in the tumble dryer is filled with the special agent which is free from fluoro-chlorohydrocarbons. This system must stay tight.
www.aeg.com 3. ACCESSORIES 3.1 Stacking kit in loop. Decrease the length of the hose if necessary. Read carefully the instructions supplied with the accessory. 3.3 Pedestal with the drawer Accessory name: SKP11, STA8, STA9 Available from your authorized vendor. Stacking kit can be used only with the washing machines specified in the leaflet. See the leaflet attached. Read carefully the instructions supplied with the accessory. 3.2 Draining kit Accessory name: PDSTP10.
ENGLISH Drying rack accessory let to dry safely in the tumble dryer: • sport shoes • wool 33 • soft toys • lingerie Read carefully the instructions supplied with the accessory. 4.
www.aeg.com Symbol Description delay start selection (30 min. 20h.) - 5. BEFORE FIRST USE Clean the tumble dryer drum with a moist cloth or set a short programme (e.g. 30 minutes time programme) with the load of moist cloths. At the beginning of drying cycle (3-5 min.) there could be a slightly higher sound level. It is because of start of the compressor that is normal for compressor powered appliances such: refrigerators, freezers . 6.
ENGLISH Programmes Jeans Bed Linen (Bettwäsche) Duvets (Daunen) Time (Zeitprogramm) Extra Quick Mixed (Mix Extra Kurz) Load Properties Available functions 8 kg To dry leisure clothing such as jeans, sweat-shirts of different material thicknesses (e.g. at the neck, cuffs and seams). all except: Reverse Plus (Inversione Tamburo) and Time Drying (Zeitwahl) 3 kg all except: Reverse Plus (InverTo dry bed linen such as: single sione and double sheet, pillowcase, bedTamburo) spread.
www.aeg.com Programmes Load 1) Properties Available functions Extra Dry (ExTo dry synthetic pieces of clothing. 3,5 kg tratrocken) Drying level: extra dry. all except Time Drying (Zeitwahl) Cupboard Dry (Schranktrocken) 2) To dry synthetic pieces of clothing. 3,5 kg Drying level: cupboard dry. all except Time Drying (Zeitwahl) Iron Dry (Bügeltrocken) To dry synthetic pieces of clothing. 3,5 kg Drying level: applicable to iron.
ENGLISH Programmes Silk/Lingerie (Seide) Wool (Wolle) Load 1) 1 kg 1 kg Properties To dry silk/lingerie with warm air and gentle movement. Available functions 37 Fabric mark all except: Reverse Plus (Inversione Tamburo) and Anticrease (Knitterschutz) and Time Drying (Zeitwahl) To dry the cloths made of wool . The cloths become soft and cosy. We recommend to remove the cloths immediately after the programme end.
www.aeg.com 7. USING THE APPLIANCE 7.1 Preparing the laundry Dry only the laundry applicable to dry in the tumble dryer. Make sure if the laundry is applicable to dry in the tumble dryer. Do the check of the fabric mark on the clothes.
ENGLISH The drying time you see is related to the load of 5 kg for cotton and jeans programmes. For the other programmes the drying time is related to the recommended loads. The drying time of the cotton and jeans programmes with the load more than 5 kg is longer. 7.6 Special functions Together with the programme you can set 1 or more special functions. To activate or deactivate the function push the applicable push button. 39 nutes. This function prevents laundry from creases.
www.aeg.com time until the symbol come into view on the display. To deactivate push again the above buttons until the symbol go out of view. You can activate the child lock function: • before you push the Start/Pause button - the appliance cannot start • after you push the Start/Pause button - all the push buttons and the programme dial are deactivated 7.14 Starting a programme the On/Off to activate the appliance and then set the programme again. 7.
ENGLISH – low conductivity <300 μS/ cm – moderate conductivity 300-600 μS/cm – high conductivity >600 μS/cm 3. Push the Start Pause button again and again until you set necessary level. 4. To memorise the setting push at the same time the Dry Plus (Trocken +) and the Anticrease (Knitterschutz) buttons. 8.3 Water container full — indication 41 the cycle or when the water container is full. When you use an external equipment to drain the container, the LED can be off.
www.aeg.com 1 3. Open the filter. 4. Use a moist hand to clean the filter. 5. If necessary clean the filter with warm water using a brush. Close the filter. 2 6. Remove fluff from the filter socket. For this a vacuum cleaner can be used. 7. Put the filter inside the filter socket. CAUTION! Do not operate the tumble dryer without the primary filter or with damaged or blocked filter. Clean the primary filter after each drying cycle.
ENGLISH gramme, drain the condensed water container and press the start button. 43 To drain the condensed water container automatically you can install draining accessory (see chapter: ACCESSORIES) To drain the condensed water container: 1. Pull the condensed water container and keep it in horizontal position. Move the plastic connection out and drain the condensed water container into a sink or equivalent receptacle. 3. Move plastic connection in and install water container. 2.
www.aeg.com 3. Turn the blockage to unlock the heat exchanger cover. 4. Lower the heat exchanger filters cover. 5. Lift the primary filter. Hold the heat exchanger filter and pull it out from the bottom compartment.
ENGLISH 45 6. Push the hook to open the filter. 7. Use a moist hand to clean the filter. If necessary clean the filter with warm water using a brush. Close the filter. 8.
www.aeg.com 9. CAUTION! Do not operate the tumble dryer when the heat exchanger filters are blocked with fluff. This could cause the damage to the tumble dryer. This also increases energy consumption. Do not use sharp objects to clean the heat exchanger compartment. Do not operate the tumble dryer without the filters. 9.4 Cleaning the drum WARNING! Disconnect the appliance before you clean it.
ENGLISH 47 10. TROUBLE SHOOTER AND SERVICE 10.1 Troubleshooting Problem1) Possible cause The tumble dryer is not connected to mains supply. Remedy Connect in at mains socket. Check fuse in fuse box (domestic installation). The loading door is opened. Close the loading door. The tumble The On/Off button was not Push the On/Off button. dryer does pushed. not operate. The Start/Pause button was not Push the Start/Pause button. pushed. Unsatisfactory drying results. The door does not close.
www.aeg.com Problem1) Possible cause Abnormally elapsing time on the display. The time to end is calculated on the basis of the volume and dampness of the laundry. The automatic procedure — this is not the appliance malfunction. Programme inactive. The water container is full. Drain the water container3) , push the Start/Pause button. Too small laundry volume. Do the selection of time programme. The time value must be related to the load.
ENGLISH adjustable height 850 mm (+ 15 mm - feet regulation) the appliance weight 52 kg maximum load volume 8 kg voltage 230 V frequency 50 Hz necessary fuse 4A total power 900 W energy efficiency class A+ energy consumption kWh/cycle 1) 2,24 kWh annual energy consumption2) 265 kWh left—on mode power absorption 0,44 W off mode power absorption 0,44 W type of use Domestic permitted ambient temperature + 5°C to + 35°C 49 1) 8 kg of cotton, centrifuged at 1000 rpm with reference t
www.aeg.com 600 mm 15mm > 850 mm 600 mm 12.2 Installation under a counter 12.3 The load door reversal The appliance can be installed as freestanding or below the kitchen counter with correct space (see picture). The load door can be installed by the user in the opposite side. It can help to easily put and remove the laundry or if there is a limit to install the appliance. (see separate leaflet). 13. ENVIRONMENT CONCERNS Recycle the materials with the symbol .
ENGLISH 51
136925601-A-372013 www.aeg.