VL 5529 Bedienungsanleitung/Garantie Gebruiksaanwijzing • Mode d’emploi • Instrucciones de servicio Manual de instruções • Istruzioni per l’uso • Instruction Manual Instrukcja obsługi/Gwarancja • Návod k použití • Használati utasítás Інструкція з експлуатації • Руководство по эксплуатации Tischventilator Tafelventilator • Ventilateur de table • Ventilador de mesa Ventoinha de mesa • Ventilatore da tavola • Table fan Wentylator stołowy • Stolní ventilátor • Asztali ventilátor Настільний вентилятор • Настоль
Inhalt Deutsch 2 English Inhalt Contents Übersicht der Einzelteile ......................................... Seite 3 Overview of the components .................................Page 3 Bedienungsanleitung ............................................... Seite 4 Instruction Manual ....................................................Page 23 Technische Daten....................................................... Seite 6 Technical Data .............................................................
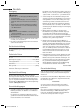
Übersicht der Einzelteile Overzicht van de onderdelen Description des différentes parties de l’appareil Indicación de los componentes Elementos do aparelho • Elenco dei pezzi Overview of the components Przegląd poszczególnych części Přehled jednotlivých součástí • Az alkatrészek áttekintése Деталі приладу • Обзор деталей прибора Abb./Fig. 1 05-VL 5529 AEG.indd 3 02.12.
Deutsch Allgemeine Sicherheitshinweise Lesen Sie vor Inbetriebnahme dieses Gerätes die Bedienungsanleitung sehr sorgfältig durch und bewahren Sie diese inkl. Garantieschein, Kassenbon und nach Möglichkeit den Karton mit Innenverpackung gut auf. Falls Sie das Gerät an Dritte weitergeben, geben Sie auch die Bedienungsanleitung mit. • Benutzen Sie das Gerät ausschließlich für den privaten und den dafür vorgesehenen Zweck. Dieses Gerät ist nicht für den gewerblichen Gebrauch bestimmt.
Deutsch HINWEIS: Am Gerät können sich noch Staub oder Produktionsreste befinden. Wir empfehlen Ihnen das Gehäuse kurz mit einem feuchten Tuch abzuwischen. Montageanleitung Das Gerät muss unbedingt vor Inbetriebnahme komplett montiert werden! Wenn Sie den Text lesen, empfiehlt es sich, dazu die Übersicht der Einzelteile (Abb. B) zu betrachten. 1. Setzen Sie das Schaltergehäuse (12) in den Standfuß (11). Befestigen Sie es auf der Unterseite mit der Kreuzschlitzschraube (Abb. A). 2.
Deutsch Reinigung WARNUNG: • Ziehen Sie vor der Reinigung und Wartung immer den Netzstecker. • Sollten Sie das Schutzgitter entfernen: Schalten Sie das Gerät immer aus und ziehen Sie den Netzstecker. • Das Gerät auf keinen Fall zum Reinigen in Wasser tauchen. Es könnte zu einem elektrischen Schlag oder Brand führen. ACHTUNG: • Benutzen Sie keine Drahtbürste oder andere scheuernde Gegenstände. • Benutzen Sie keine scharfen oder scheuernden Reinigungsmittel.
Deutsch 7 Alternativ können Sie uns den Servicefall per E-Mail hotline@etv.de oder per Fax 0 21 52 – 20 06 15 97 mitteilen. Bitte teilen Sie uns Ihren Namen, Vornamen, Straße, Hausnummer, PLZ und Wohnort, Telefon-Nummer, soweit vorhanden, Fax-Nummer und E-Mail-Adresse mit. Im weiteren benötigen wir die Typenbezeichnung des reklamierten Gerätes, eine kurze Fehlerbeschreibung, das Kaufdatum und den Händler, bei dem Sie das Neugerät erworben haben.
Nederlands Algemene veiligheidsinstructies Lees vóór de ingebruikname van dit apparaat de handleiding uiterst zorgvuldig door en bewaar deze goed, samen met het garantiebewijs, de kassabon en zo mogelijk de doos met de binnenverpakking. Geef ook de handleiding mee wanneer u de machine aan derden doorgeeft. • Gebruik het apparaat uitsluitend privé en uitsluitend voor de voorgeschreven toepassing. Dit apparaat is niet geschikt voor commercieel gebruik. Gebruik het apparaat niet buiten.
Nederlands Montageaanwijzingen U dient het apparaat vóór de ingebruikname eerst compleet te monteren! Wij adviseren u, bij het lezen van de tekst het overzicht van de onderdelen (afb. B) te bekijken. 1. Plaats de schakelaarbehuizing (12) op de standvoet (11). Bevestig de behuizing op de onderzijde met de kruiskopschroef (afb. A). 2. Plaats het achterste beschermrooster (7) overeenkomstig de uitsparingen. 3. 4. 5. 6. OPMERKING: let op dat de draaggreep naar boven wijst.
Nederlands Reiniging WAARSCHUWING: • trek vóór de reiniging van het apparaat altijd de steker uit de contactdoos. • wanneer u de veiligheidsbehuizing wilt verwijderen, schakelt u het apparaat uit en trekt u de netsteker uit de contactdoos. • dompel het apparaat voor de reiniging niet onder water. Dit zou tot een elektrische schok of brand kunnen leiden. Voor informatie over verzamelpunten voor uw apparaten kunt u contact opnemen met uw gemeente of gemeenteadministratie.
Français Conseils généraux de sécurité Lisez attentivement ce mode d’emploi avant de mettre l’appareil en marche pour la première fois. Conservez le mode d’emploi ainsi que le bon de garantie, votre ticket de caisse et si possible, le carton avec l’emballage se trouvant à l’intérieur. Si vous remettez l‘appareil à des tiers, veuillez-le remettre avec son mode d‘emploi. • N’utilisez cet appareil que pour un usage privé et pour les taches auxquelles il est destiné.
Français Déballage de l’appareil • Sortez l’appareil de son emballage. • Enlevez tout matériel d’emballage, comme les films plastique, le matériel de remplissage, les supports de câbles et le carton lui-même. • Vérifiez les éléments de la fourniture. REMARQUE: L’appareil peut présenter des particules de poussière ou de production résiduelles. Nous vous recommandons de brièvement essuyer l’appareil à l’aide d’un chiffon mouillé.
Français 13 Orientation de l’air / pivotement Vous disposez de deux possibilités : 1. L’appareil doit, au préalable, avoir été arrêté. Le bouton de réglage doit alors être sorti. Vous faîtes pivoter l’appareil doucement entre vos mains en saisissant le ventilateur sur le côté et en le tournant vers la gauche ou vers la droite jusqu’à ce qu’il se bloc. ATTENTION: ne forcez pas. 2. Vous optez pour le pivotement automatique, en appuyant sur le bouton de réglage.
Español Indicaciones generales de seguridad Antes de la puesta en servicio de este aparato lea detenidamente el manual de instrucciones y guarde éste bien incluido la garantía, el recibo de pago y si es posible también el cartón de embalaje con el embalaje interior. En caso de dejar el aparato a terceros, también entregue el manual de instrucciones. • Solamente utilice el aparato para el uso privado y para el fin previsto. Este aparato no está destinado para el uso profesional.
Español INDICACIÓN: En el aparato se pueden encontrar todavía restos de polvo o de producción. Recomendamos limpiar un poco la carcasa con un paño húmedo Instrucciones de montaje Antes de poner el aparato en marcha debe estar montado por completo! Recomendamos al leer el texto también mirar las indicaciones de los componentes (Imagen B). 1. Coloque la tapa de interruptor (12) en el pie (11). Ajústela en la parte inferior con un tornillo con ranura cruzada (Imagen A). 2.
Español 2. Usted elije el dispositivo giratorio automático presionando el botón de ajuste. El aparato gira por su cuenta en una zona de unos 90 grados. Esta función solamente está activada cuando tenga el ventilador conectado. Para apagar esta función tiene que tirar del botón de ajuste. Ayudará en evitar las potenciales consecuencias, a causa de una erronéa eliminación de desechos, para el medio ambiente y la salud humana.
Português Instruções gerais de segurança Antes de pôr este aparelho a funcionar, leia muito atentamente as instruções de emprego e guarde-as muito bem, juntamente com o talão de garantia, o talão de compra e, tanto quanto possível, a embalagem com os elementos interiores. Se puser o aparelho à disposição de terceiros, entregue-lhes também as Instruções de Utilização. • Utilize o aparelho exclusivamente para fins privados e para a finalidade para a qual o mesmo foi concebido.
Português INDICAÇÃO: Pode ainda encontrar pó ou restos de produção no aparelho. Aconselhamos de limpar rapidamente o invólucro com um pano húmido. Instruções de montagem Antes de se pôr o aparelho a funcionar, é absolutamente necessário proceder à sua montagem completa! Ao ler-se o texto, deverá consultar-se simultanea-mente a lista dos elementos do aparelho (Fig. B). 1. Coloque a caixa do interruptor (12) no pé de suporte (11). Fixe-a na parte de baixo com o parafuso de fenda em cruz (Fig. A). 2.
Português 2. Para se seleccionar o dispositivo automático de oscilação, basta premer o botão regulador. O aparelho oscilará automaticamente com um ângulo de cerca de 90 graus. Esta função só estará activada quando o aparelho se encontrar em funcionamento. Para desligar tal função, puxar o botão regulador para fora. 19 Desta forma, contribuirá para ajudar a evitar os potenciais efeitos perniciosos que um falso depósito de objectos usados terão, tanto no que diz respeito ao ambiente, como à saúde humana.
Italiano Norme di sicurezza generali Prima di mettere in funzione questo apparecchio, leggere molto attentamente le istruzioni per l’uso e conservarle con cura unitamente al certificato di garanzia, allo scontrino e, se possibile, alla scatola di cartone con la confezione interna. Se passate l‘apparecchio a terzi, consegnate anche le istruzioni per l‘uso. • Utilizzare l’apparecchio esclusivamente per scopi privati e conformemente al tipo di applicazione previsto.
Italiano NOTA: Sull‘apparecchio possono esserci ancora tracce di polvere o residui di produzione. Noi consigliamo di spolverare la custodia con un panno umido. Istruzioni per il montaggio L’apparecchio deve essere assolutamente montato in ogni sua parte prima di essere messo in funzione! Mentre si legge il testo è consigliabile osservare in aggiunta l’elenco dei pezzi (fig. B). 1. Inserire la scatola dell’inseritore (12) nel piede di appoggio (11).
Italiano Pulizia AVVISO: • Prima della pulizia staccare sempre la spina. • Qualora si tolga la griglia di protezione: spegnere sempre l‘apparecchio e staccare la spina. • In nessun caso immergere l‘apparecchio in acqua per la pulizia. Ne potrebbe conseguire un corto circuito o incendio. ATTENZIONE: • Non usare pagliette o altri oggetti abrasivi. • Per la pulizia non usare detersivi forti o abrasivi. • Pulire l’apparecchio dall‘esterno con un panno morbido e asciutto, senza aggiunta di detergenti.
English General Safety Instructions Read the operating instructions carefully before putting the appliance into operation and keep the instructions including the warranty, the receipt and, if possible, the box with the internal packing. If you give this device to other people, please also pass on the operating instructions. • The appliance is designed exclusively for private use and for the envisaged purpose. This appliance is not fit for commercial use. Do not use it outdoors.
English Assembly instructions The device must be completely assembled before use! While reading the text it is advisable to refer to the „Overview of the Components“ (Illustration B). 1. Insert the switch housing (12) into the stand (11). Attach it on the bottom with the crosshead screw (Illustration A). 2. Position the rear protection grid (7) in place in accordance with the recesses. 3. 4. 5. 6. NOTE: Please ensure that the carrying handle is facing upwards.
English 25 Cleaning WARNING: • Always remove the mains plug before cleaning the device. • If you need to remove the safety guard: Always switch the device off and remove the mains plug. • Under no circumstances should you immerse the device in water for cleaning purposes. Otherwise this might result in an electric shock or fire. CAUTION: • Do not use a wire brush or any abrasive items. • Do not use any acidic or abrasive detergents. • Clean the outside of the device with a dry cloth without any additives.
Język polski Ogólne wskazówki bezpieczeństwa Przed uruchomieniem urządzenia proszę bardzo dokładnie przeczytać instrukcję obsługi. Proszę zachować ją wraz z kartą gwarancyjną, paragonem i w miarę możliwości również kartonem z opakowaniem wewnętrznym. Przekazując urządzenie innej osobie, oddaj jej także instrukcję obsługi. • Proszę wykorzystywać urządzenie jedynie dla prywatnego celu, jaki został przewidziany dla urządzenia.
Język polski • Sprawdź kompletność zawartości opakowania. WSKAZÓWKA: na urządzeniu może znajdować się pył lub pozostałości poprodukcyjne. Radzimy przetrzeć obudowę wilgotną szmatką. Instrukcja montażu Przed pierwszym użyciem urządzenie musi być koniecznie zmontowane w całości! Zaleca się, aby po przeczytaniu tekstu przejrzeć poszczególne częśc (rys. B) urządzenia. 1. Wsuń osłonę przełączników (12) w stojak (11). Przykręć ją od spodu przy użyciu śruby krzyżowej (rys. A). 2.
Język polski Czyszczenie OSTRZEŻENIE: • Przed czyszczeniem zawsze wyciągaj wtyczkę z gniazda sieciowego. • Jeżeli chcesz zdjąć kosz ochronny: wyłączaj zawsze urządzenie i wyciągaj wtyczkę sieciową. • Urządzenia parze nie wolno do czyszczenia zanurzać w wodzie. Może to doprowadzić do porażenia elektrycznego lub pożaru. UWAGA: • Nie używaj szczotki drucianej ani innych podobnych przed-miotów. • Nie używaj ostrych lub ściernych środków czyszczących.
Česky Všeobecné bezpečnostní pokyny Před uvedením tohoto přístroje do provozu si velmi pozorně přečtěte návod k obsluze a tento návod spolu se záručním listem, pokladním blokem a podle možností i s obalem a vnitřním vybavením obalu dobře uschovejte. Pokud budete přístroj předávat třetím osobám, odevzdejte jim i tento návod k obsluze. • Používejte tento přístroj výlučně pro soukromou potřebu a pro stanovené účely. Tento přístroj není určen pro komerční použití. Nepoužívejte jej v otevřeném prostoru.
Česky UPOZORNĚNÍ: Na přístroji se mohou ještě nacházet prach či zbytky nečistot z výroby. Doporučujeme Vám, abyste plášť přístroje otřeli navlhčenou látkou. Návod k montáži Přístroj musí být před uvedením do provozu kompletně sestaven! oporučujeme vám brát při čtení textu v úvahu také přehled jednotlivých součástí (obr. B). 1. Vložte plášť vypínače (12) do podstavce (11). Upevněte ho na spodní straně pomocí křížového šroubu (obr. A). 2. Nasaďte zadní ochrannou mřížku (7) v souladu s drážkami. 3.
Česky 31 Čištění VÝSTRAHA: • Před čištěním vždy vytáhněte zástrčku. • Pokud byste měli odstranit ochrannou mřížku: vždy přístroj vypněte a vytáhněte zástrčku. • Pro čištění přístroje ho nenořte v žádném případě do vody. Mohlo by to vést k úrazu elektrickým proudem či požáru. POZOR: • Nepoužívejte drátěný kartáč ani jiné drhnoucí předměty. • Nepoužívejte žádné ostré či drhnoucí čisticí prostředky. • Přístroj otřete z vnějšku suchou látkou bez jakýchkoliv přísad.
Magyarul Általános biztonsági rendszabályok A készülék használatba vétele előtt gondosan olvassa végig a használati utasítást, és őrizze meg a garancialevéllel, a pénztári nyugtával és lehetőleg a csomagolókartonnal, ill. az abban lévő bélésanyaggal együtt! Amenynyiben a készüléket harmadik személynek adja tovább, a használati útmutatót is adja a készülékhez. • Kizárólag személyi célra használja a készüléket, és csupán arra, amire való! A készülék nem ipari jellegű használatra készült.
Magyarul TÁJÉKOZTATÁS: A készüléket még előfordulhat por vagy termékmaradvány. Azt javasoljuk, hogy a készüléket nedves ronggyal röviden törölje le. Szerelési útmutató Használatbavétel előtt a készüléket okvetlenül teljesen össze kell szerelni. Amikor ezt a szöveget olvassa, ajánlatos mindig hozzánéznie az alkatrészek áttekintését („B” ábra). 1. Helyezze a kapcsolóburkolatot (12) a talpba (11). Rögzítse az alján a csillagcsavarral („A” ábra). 2.
Magyarul Tisztítás FIGYELMEZTETÉS: • Tisztítás előtt mindig húzza ki a csatlakozót. • Ha eltávolítja a védőrácsot, mindig kapcsolja ki a készüléket és húzza ki a csatlakozót. • A készüléket semmiképpen ne merítse vízbe tisztítás közben. Ez elektromos áramütést vagy tüzet okozhat. VIGYÁZAT: • Ne használjon drótkefét vagy más súroló hatású tárgyat. • Ne használjon agresszív vagy súroló hatású tisztítószert. • A készüléket kívülről tisztítószer hozzáadása nélkül száraz ronggyal tisztítsa.
Українська Загальні вказівки щодо безпеки Перед прийняттям в експлуатацію цього приладу дуже уважно читайте інструкцію з експлуатації та зберігайте її разом з гарантійним талоном, касовим чеком та, по мірі можливості, з картонною коробкою і внутрішньою упаковкою. У разі, що прилад буде передано третім особам, слід передавати його разом з цією інструкцією з експлуатації. • • • • • • • Використайте прилад виключно в приватних цілях та за передбаченим призначенням.
Українська ВКАЗІВКА: На приладу можуть бути пил або виробничі залишки. Рекомендація витирати корпус зволоженою ганчіркою. Інструкція з монтажу Перед експлуатацією прилад необхідно повністю збирати! Рекомендація читати текст і ознайомитись із переліком деталей приладу (зобр. В). 1. Вставте корпус вимикача (12) на стояк (11). Закріпіть його на нижньому боці гвинтом з хрестоподібним шліцом (зобр. А). 2. Вставте задню запобіжну решітку (7) згідно пазам. 3. 4. 5. 6.
Українська 37 Очищення • • • ЗАСТЕРЕЖЕННЯ: Перед очищенням і технічним обслуговуванням завжди витягніть вилку з розетки. Коли Ви усуваєте запобіжну решітку: Завжди вимикайте прилад і витягніть вилку з розетки. В жодному разі не опускайте прилад для очищення в воду. Це може привезти до удару струмом або до пожежи. УВАГА: Не використовуйте дротяної щітки або інших абразивних предметів. • Не використовуйте гострих або абразивних засобів для очищення.
Русский Общие указания по технике безопасности Перед началом эксплуатации прибора внимательно прочитайте прилагаемую инструкцию по эксплуатации и сохраните ее в надежном месте, вместе с гарантийным талоном, кассовым чеком и, по возможности, картонной коробкой с упаковочным материалом. Если даете кому-либо попользоваться прибором, обязательно дайте впридачу данную инструкцию по эксплуатации. • • • • • • • Пользуйтесь прибором только частным образом и по назначению.
Русский Распаковка прибора • • Выньте прибор из упаковки. Удалите весь без исключения упаковочный материал, например, плёнку, заполняющий материал, держатель кабеля и картонную упаковку. Проверьте комплектность поставки. • ПРИМЕЧАНИЕ: Прибор может быть покрыт пылью или остатками производства. Мы рекомендуем Вам слегка протереть корпус влажной тряпкой. 39 Монтаж на стене (Рис. D) На нижней стороне корпуса выключателя имеются две насечки. Расстояние между насечками составляет 46 мм.
Русский 2. Выбрать автоматическую регулировку, для чего необходимо вдавить регулирующую кнопку. Прибор будет самостоятельно сканировать в секторе порядка 90 градусов. Этот режим возможен только при включенном вентиляторе. Для выключения этого режима, вытяните регулирующую кнопку наружу. Чистка • • • ПРЕДУПРЕЖДЕНИЕ: Перед чисткой всегда вынимайте штепсельную вилку. Если Вам нужно убрать защитную сетку: Всегда выключайте прибор и вынимайте сетевой штекерный разъём.
05-VL 5529 AEG.indd 41 02.12.
GARANTIE-KARTE Garantiebewijs • Carte de garantie Certificato di garanzia • Tarjeta de garantia Cartão de garantia • Guarantee card Karta gwarancyjna • Záruční list • Garancia lap Гарантійний талон • Гарантийная карточка Stünings Medien, Krefeld • 12/08 VL 5529 VL 5529 24 Monate Garantie gemäß Garantie-Erklärung • 24 maanden garantie overeenkomstig schriftelijke garantie • 24 mois de garantie conformément à la déclaration de garantie • 24 meses de garantie según la declaratión de garantía • 24 meses de g